
 |
 |
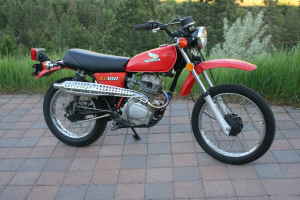
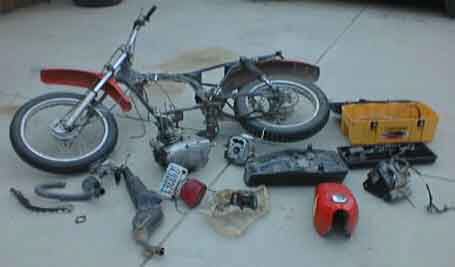
| '78 Honda XL100, 'after'? (file photo) | '77 Honda XL100, before |
My brother owned this bike, as did one of the neighbor kids. It eventually ended up with my cousin's son, who seemed to have gotten a bit confused as to just who should be responsible for putting oil in it along with the fuel. The results came to me as a literal basket case, for $100, needing a new piston, rings, and a cylinder boring. I'd wanted an inexpensive small knock-around dirt bike for awhile, for running around on our acreage. Nothing fast, or loud. Just a small easily-maneuvered bike. (Everybody seems to want quads, I guess they never learned to ride on two wheels. I didn't want to have to cut roads for the thing, the ability to thread through trees is a necessity.) My brother said that this is what I wanted, and that this particular bike had always been a 'one-kick wonder'. Sounds perfect, but can it be resurrected? In very good condition such a bike seems to be worth as much as $1000, though that seems high to me.
Pictures:
I guess I'll have to pay him. Next time I see him, probably.
Some surfage that may come in handy (slightly edited):
Carb Cleaning 101
By M. ShivelyThe elements of internal combustion engines are: correct fuel/air ratio, spark at right time, adequate cylinder compression.
There are many passageways and openings to check and clean. All are important in function and when obstructed or not working properly have subtle to radical effects on engine performance. Vacuum leaks and carburetor synchronization also affect performance and should be inspected and adjusted following the procedures below.
Warning: Remove all rubber parts before you begin. These parts usually include vacuum diaphragms, needle valves, O-rings, hoses, and other parts. Spray cleaners will damage these parts. Do not disassemble individual carbs from the carb bracket.
Air & Fuel Passageways: Trace and learn individual fuel and air circuits from beginning to end. Machines can only drill straight through the cast passageways. To change direction, another angled passageway must be drilled. The union is plugged with a brass or bronze bead. Inspect and clean each passageway with spray cleaner, brushes, pipe cleaners, etc., and compressed air. Remove any discoloration and debris. Look for spray cleaner to exit from one or more passageways.
Jet Cleaning: Inspect jets by holding to light and look through them. You should see an unobstructed round hole. Clean the jets with one or more of the following: jet cleaning wires, soak solutions, carb spray cleaners and compressed air. Re-inspect jets after cleaning and install when clear of obstructions. Some main jets have paper-like gaskets. Most have metal spacers between the jet and the emulsion tube. Some screw directly into a brass emulsion tube which is machined for a 7mm wrench at its float chamber exposed base.
Inlet Fuel Valve: Inspect the needle valve & spring. Press down the tiny metal rod that protrudes from the butt or float end of the needle valve. The spring should move freely and return the rod to its location. Check the needle valve's seat area for a groove or other wear. It should appear highly polished. Some needle valve seats are rubber and wear may not be visible. Inspect the needle valve jet seat. You can clean the jet seat with Q-tips and semi-chrome polish if necessary.
Carb Body Castings: Blow air through the atmospheric vent holes located on the dome of each float bowl chamber. Air should exit via hoses or brass nipples. Inspect the emulsion tubes and passageways (cast towers that jets thread into) for discoloration and debris. Clean interior emulsion towers with a soft bristle gun cleaning brush. Clean the venturis (main carb bore).
Needle Jets & Jet Needles: Clean the needle jets, jet needles, and passageway or tower that needle jet screws into. Clean the emulsion tube (pipe between needle jet and main jet) (Main Jet may screw into emulsion tube). Jet needles are part of the throttle slides. See below.
Throttle Slides: There are several types of throttle slides: Mechanical linkage, vacuum, diaphragm, and cable. Disassembling the jet needle from the slide is not always required for cleaning. If you have vacuum piston type throttle slides (large diameter solid metal slide), avoid cleaning the lubrication from sides and caps. If piston type check cap vents and passageways with air. Clean if necessary and re-lube. If you have rubber vacuum throttle diaphragms, inspect for dry-rot, defects, and tears by gently stretching rubber away from center. Do this until all areas around diaphragm have been inspected. Replace any defective part as described above. Clean carb body areas around diaphragm including air passageways and air jets. Diaphragms have a locator loop or tab fabricated into their sealing edge. Observe this locator upon reassembly. Avoid pinching the diaphragm when reinstalling caps.
Fuel Screws: Fuel screws have sharp tapered ends. Carefully turn one fuel screw in while counting the turns until it seats lightly. Warning: These screws are very easily damaged if over tightened into their seats. Record amount of "turns-in" and remove the fuel screw, spring, washer, and O-ring. The fuel screw is part of the enrichment (choke) circuit. Clean passageways as described above. When carbs are assembled, spray low PSI compressed air into diaphragm air vents located at intake side of carbs. Throttle slides should rise, then fall when air is removed. Lightly lube external moving linkages. Reinstall carbs and follow through with carburetor synchronization.
Throttle Cables: Lubricate cables periodically. If cables are disconnected from carbs or removed for replacement, etc... remember cable routing and ensure proper reinstallation routing. Avoid bread-tying, sharp bends, and pinching cables. Adjust cables so throttle grip has about 5mm of play or throttle slides or butterfly valves may not open completely (at full throttle).
Float Bowls: Inspect float bowls for sediment, gum or varnish, crystallization, and defects. Clean all pipes, tubes, passageways, and embedded jets with cleaners and compressed air. Remove and clean the drain screw and area. Inspect bowl gasket and replace if necessary. Clean and inspect overflow pipes and tubes, look for vertical cracks.
Floats: There are several types of float materials: plastic, brass, black composite, tin, and others. Handle floats carefully. Avoid bending, twisting, denting, or other means of mishandling. Most floats are adjustable by bending a small metal tab near the float axle end. Do not change the float adjuster tab unless tuning fuel service levels. Clean metal floats by soaking or spray cleaners, if necessary. Replace other type floats if cleaning is necessary. Clean the float axle or pin.
Synchronization: This is a fine adjustment performed usually and preferably with the carbs installed and the engine running. The unusual part is performed with gauged wire with the carbs on the work bench. Carburetor synchronizing balances venturi vacuum at the exhaust side of each carburetor, resulting with smooth idling and optimized performance at all throttle openings. Synchronization is checked using a set of gauges which are either air vacuum type or liquid mercury type. The gauges are connected to vacuum ports on the intake manifolds via nipple tubes or if sealed with screws, sync gauge adapters will be needed. With the engine running at temperature, and with a fan or other means of forced convection aimed onto the engine, the carbs fuel screws and idle are adjusted, then the synchronization is adjusted via adjustment screws on the carbs. A reserve fuel tank is recommended for convenience of accessing carbs during this procedure. See gauge instructions and repair manuals for detailed use of synchronization gauges.
Notes: While carbs are apart, record the jet sizes. Look for a very small number imprinted on the body of the jets. It should be the same number for all. If you have dial or vernier calipers, measure and record float heights. Perform measurements with floats just touching needle valves, though not depressing the needle valve rods. Replace fuel and vacuum hoses. Be sure to use fuel rated hose for fuel. Install or replace in-line fuel filters. This is a good time to remove and clean interior petcock fuel filters. Inspect carb manifolds for dry-rotting, inspect all clamps and air ducts. Inspect, clean, lube, and/or replace air filter(s).