The Tarn-X might not be the best idea. It is suggested that this approach actually dissolves the silver sulfide, rather than reducing it, which represents a loss of silver. Better might be galvanic reduction using aluminum foil wrapped around the tuba, in a solution of sodium carbonate (washing soda) electrolyte. (Electrolytic reduction using an external current source, described in Silver Conservation, seems like it might be perilous.) See also: Tarnish Experiment, some of which is quoted here:
When silver tarnishes, it combines with sulfur and forms silver sulfide. Silver sulfide is black. When a thin coating of silver sulfide forms on the surface of silver, it darkens the silver. The silver can be returned to its former luster by removing the silver sulfide coating from the surface.There are two ways to remove the coating of silver sulfide. One way is to remove the silver sulfide from the surface. The other is to reverse the chemical reaction and turn silver sulfide back into silver. In the first method, some silver is removed in the process of polishing. In the second, the silver remains in place. Polishes that contain an abrasive shine the silver by rubbing off the silver sulfide and some of the silver along with it. Another kind of tarnish remover dissolves the silver sulfide in a liquid. These polishes are used by dipping the silver into the liquid, or by rubbing the liquid on with a cloth and washing it off. These polishes also remove some of the silver.
The tarnish-removal method used in this experiment uses a chemical reaction to convert the silver sulfide back into silver. This does not remove any of the silver. Many metals in addition to silver form compounds with sulfur. Some of them have a greater affinity for sulfur than silver does. Aluminum is such a metal. In this experiment, the silver sulfide reacts with aluminum. In the reaction, sulfur atoms are transferred from silver to aluminum, freeing the silver metal and forming aluminum sulfide. Chemists represent this reaction with a chemical equation:
3 Ag2S + 2 Al → 6 Ag + Al2S3 Silver
SulfideAluminum Silver Aluminum
SulfideThe reaction between silver sulfide and aluminum takes place when the two are in contact while they are immersed in a baking soda solution. The reaction is faster when the solution is warm. The solution carries the sulfur from the silver to the aluminum. The aluminum sulfide may adhere to the aluminum foil, or it may form tiny, pale yellow flakes in the bottom of the pan. The silver and aluminum must be in contact with each other, because a small electric current flows between them during the reaction. This type of reaction, which involves an electric current, is called an electrochemical reaction. Reactions of this type are used in batteries to produce electricity.
this is also relevant:
I don't see any mystery here. The hydrogen gas is merely evolved through the reaction of aluminum and sodium carbonate. The hydrogen plays no part in the removal of the silver tarnish (i.e., silver(I) sulfide). Aluminum is a reducing agent, and thereby reduces silver sulfide to elemental silver while forming aluminum sulfide (which is yellow in color). The aluminum sulfide thus formed readily hydrolyzes to form aluminum hydroxide and hydrogen sulfide. So, we really have two gasses evolved: hydrogen and hydrogen sulfide, with the quantity of the former being greater than the latter. Aluminum in pure water would not work since the surface film of aluminum hydroxide readily stops further activity. Since hydroxyl ions from the sodium carbonate readily dissolve any aluminum hydroxide thus formed, a ready supply of aluminum ions for reduction purposes is assured. I have used this process, and found that cold water will work, but lukewarm is better. Boiling water will probably work even better, but the aluminum is used up too fast, and the smell is quite bad (probably from H2S or similar). See, I told you there was hydrogen sulfide! :-) Now you know why. I also find that a scum forms on the surface of the water after some time. Probably aluminum hydroxide, formed due to the reverse reaction with evolved hydrogen sulfide.— Larry Lippman @ Recognition Research Corp.
This suggests that perhaps I should just swaddle the tuba in aluminum foil and dunk it into a plastic garbage can full of hot water with washing soda dissolved in it. The hardest part of this would be making the water hot, and keeping it that way.
The de-denting charge was $163, about half what the guy figured his time was worth, but he wasn't altogether happy with how it came out and so gave me a cut rate. The shape of the bell is right, but there are a lot of rolled-out creases visible. Hey, I bet it'll be good enough! (The repair tech commented upon how heavy the sheet metal is, and how hard to manipulate.) The big dents in the main tubing section are much reduced. Not a perfect specimen but I didn't expect one. If the magnetic dent removal technique will work on such heavy sheet metal I'll have some of that done later.
I then wrapped a length of aluminum foil around the bottom bow and stood the horn in a big plastic tub with about 5 gallons of hot water and some washing soda as a test. We'll see if this galvanic method works or not. There was a lot of bubbling at first, which I believe is the sodium carbonate digging into the aluminum foil. After a couple of hours I pulled it out and had a look. There was no significant change in appearance, but when I rubbed with my thumb a lot of black started smearing around. I put it back in and left it overnight.
It didn't seem to make a huge difference, but on the theory that it couldn't hurt, and could only help reduce the required elbow grease, I swaddled the entire tuba body (sans bell) in aluminum foil and put it in the plastic trash can. I filled the can with water, including filling the tuba so it wouldn't float, and sprinkled in some washing soda. I then placed an immersion heater in there, protected from the horn and the plastic can by planks of scrap cement siding. After an hour or so the top (at least) of the water was warm, so that's working anyway. We'll see how it is tomorrow.
Yikes! I got home after work and went out to check it, and found the water near boiling! It was steaming and hissing. Two buckets of water were needed to replenish what had boiled off. I peeked under the aluminum foil that had been exposed and found a silvery look to the upper bow, along with blackened foil facing it. I think it's working, but I definitely need to control the temperature a little better. That broiler element I used for heating is too strong. (I normally use it to put a quick heat on the solvent tank, and I've never left it unattended before.) The bell won't fit in this trash can, nor will it (quite) fit in the plastic tub I used for the first experiment. I bet I can make it work, though, for most of the bell anyway. I left the horn in the can for a day and a half, at varying temperatures. I think an hour on, hour off cycle with the broiler element would keep a good temperature, but I never got around to rigging a timer to accomplish that.
Time to do the bell, or at least that part of it that I can dunk. I used the better parts of the used aluminum foil to wrap around the outside of the bell, then stuck it in the large plastic tub like a funnel. I heated the garbage can full of alkaline water with the broiler element, then ladled the warm water into the tub with a bucket until it started to overflow. I set up a radiant space heater to point at the side of the tub to try to keep it warm.
I got out the Tarn-X and the gloves and took a pass at the tuba's body. It started cleaning up, but this will be a long process! In addition to the tarnish there is a lot of finish damage, but I think this horn will become presentable in the end. Not beautiful, of course, but presentable.
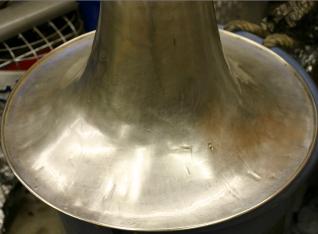
The bell's 24 hours in the tub of warm water accomplished more than I would have thought. I pulled it out and dried off the bulk of it, and wrapped a bit of the foil around the (untreated) rim and set it into the tub while I used Tarn-X on the treated and exposed part. After maybe ten minutes I had finished what I could reach and pulled it out of the tub, and was astonished to find that the newly-treated rim section looked just like the rest that had been in for 24 hours! I took a picture: here you can see the juncture, of the dipped and then Tarn-X'd body of the bell, the dipped-only rim section, and the unmolested rim section. (Note the 'waterline' on the body from the dipping.) It's hard to see in the photo that the Tarn-X did anything, but rest assured that it did. (If you look closely at the photo you can see that the Tarn-X removed the bulk of the mottling, and the yellow tinge.)
I then proceeded to dip and Tarn-X the remainder of the bell. Once it was all de-tarnished there were still a lot of splotches in the finish that weren't really coming out with the Tarn-X. I used a little bit of aluminum foil like 'sandpaper' to lightly rub on the splotches. They disappeared. I suspect further chemical interaction between the aluminum and the silver tarnish (facilitated by the Tarn-X residue), combined with a mild physical burnishing. Encouraged, I did the entire bell this way. You have to be careful not to press too hard or you put fine scratches into the finish. A light touch is all that is necessary. (I wouldn't do this on bright silver, but satin silver is more forgiving.) I took another picture afterwards: here is the bell after the de-tarnishing process. (Still to come is a session with the traditional silver polish.) It doesn't look too bad for a beat-up old bell! I rinsed it off and dried it, and set it aside.
I then moved on to the horn's body. Tedious! I put in an hour or so, in the manner of yesterday, and it's shinier. The finish on the horn body is badly damaged, it looks like acid splashes and spills from shoddy repair work. Far from done, but a good first session.
Time for another session, I wrapped the valve casing caps in aluminum foil, punched in some holes, put them in a little can and submerged them in water, threw in some washing soda, and put the can on the wood stove to heat. The galvanic action helped take off some corrosion, the remainder was removed by scrubbing with the rotten aluminum foil that remained after a day. They don't look great, but they look better than they did. There's a lot of bare brass on them, especially the bottom caps. I really need to get on this project more aggressively, time is beginning to run short.
Today I arranged to bring the horn body in Friday to get more dents taken out, using the magnetic tool.
Today I dropped the horn off at Burt's Music in Cd'A for magnetic dent removal. Denny showed me how it worked, and a few passes showed that it indeed would be able to fix at least some of the dents. (Though not, of course, the ones in the reinforced areas, of which there were a lot.) He made a passing mention to maybe renting me the tool to do it myself. I thought he was kidding, but now I wonder if he was serious? I want to think about that!
I picked up the horn today after two weeks; Denny was able to make it a lot better but it wasn't up to his usual standards. (The metal was too heavy and the pipes too small for best results.) He spent about 3 hours on it, but only charged me $20 since it didn't work out as well as he'd expected. Hey, it's much better and it wasn't too expensive. Works for me!