Log of the 190D's life with us.
Wednesday, August 11, 2004
Bought car. Acquisition story in car's main page.
Thursday, August 12, 2004
This morning, to preclude further damage to the upholstery, I removed
the seat and welded the two broken springs, then welded sheet-metal
splints around the breaks. I have had luck with this kind of repair
before. I glued (with fabric tear mender) a canvas patch behind the
hole in the seat cover, and glued cloth patches to both sides of the
seat pad. The seat feels very good now, some black vinyl patching
will take care of the rest. I even found $0.92 in change, to help
defray my expenses!
I don't know what to do with this car, the most likely choice is to
fix it and drive it for a bit, then sell it. But it could be good for
parts, the newer 2.5 diesel would make a better generator than the old
200D would, and some parts could be
useful. Like the air bag that ought to fit on my
convertible (which has a small tear along one side so you can see
bag material), and maybe its AC compressor. And I'm sure it could be
parted out to recover my money.
So, what's likely wrong with a transmission that intermittently has no
engagement at all, and makes no abnormal noises? My wife is
not happy that we have yet another car.
Much Time Passes...
Somewhere in here I glued together the shattered headlight assemblies,
collected a few spare parts like a used but intact taillight and a new
glow plug, a "190D" badge, the missing trunk trim, a replacement
outside temperature display, and a JVC KD-G200 stereo. I also
procured a manual-transmission parts car fragment ($600, in
Bellingham!) for repairing and converting the car to stick shift (for
better mileage and more power), and a used grille assembly ($50, same
source) to replace the mashed one.
Wednesday, February 8, 2006
With the Kohler genset more or less completed
it was finally time to begin on this car. I've cleared a spot inside
for the 450 SL, crosswise off the end of
the 250C and the Kohler genset, so it
doesn't get damp while I work on the 190D. (That took two days!) The
center bay is now open for the 190D, but first I have to put the new genset project inside. With any luck
tomorrow I'll be able to put the car inside where I can work on it.
This has been a long time coming! (Daniel was 2.5 years old
when I bought it, and now he's pushing 4.5.) My plan is to have this
car running again before the 450 SL needs to come back outside.
Thursday, February 9, 2006
In the morning I moved the new generator into
place, something that needed to be done before I filled the center bay
with this car. Then I pumped up the rear tires (both of which were
flat) using the portable air tank.
The car started with little more than a normal amount of cranking, not
bad for a very long sleep. I left it running in Neutral and used the
Mog to drag it backwards so that I could get a run down the little
hill into the garage. One of the rear wheels was frozen, and left a
furrow in the dirt. I jacked it up with a floor jack, and with enough
racking back and forth I eventually broke it loose, I imagine it was a
parking brake shoe.
I was hoping that the transmission had a front pump problem and that
by coasting down the little bump the rear pump would kick in enough to
cause it to move on its own. No such luck, I ran out of momentum just
as I got onto the pad. There was zero sign of self-propulsion. The
car is light enough, however, that I was able to push it the rest of
the way into place by hand. Once in place I opened it all up to air
out and put the battery charger onto it.
I spent some time refamiliarizing myself with the car. If I can make
it work I think we're going to enjoy this little car a lot, especially
if we can get 40+ MPG out of it. Not a lot of
room in the back seat, but I imagine Daniel won't mind. The trunk is
larger than an SL trunk, so it should be big enough.
Friday, February 10, 2006
I got the car up on jack stands. A setback was that the oil was low
in one of my two floor jacks (a cheap Chinese POS I've always pretty
much hated) so it wouldn't lift all the way, and the filling procedure
was not obvious. Anyway, I think I ruined it by taking apart
the wrong stuff. At least I had another CCPOS floor jack to use. The
other jack, though pretty much the same piece of junk, had enough of a
vague explanation of how to fill it with oil (printed on a fragile
sticker in bad English) that I found the correct fill plug. On both
of them it's a little rubber plug in a hole on top of the cylinder.
Once upon a time such a piece of equipment would have had "FILL->"
prominently molded into the casting or some such thing, and a screw-in
plug.
With the car up I found more rust than I'd thought was there. The
jack points are all messy, but only just the outside bits, the
structural parts seem to be fine on the ones I examined. Odd. One
was Bondo-d to death, I fear what may be found underneath there. The
passenger door bottom is very rusty too, but it hasn't progressed too
far. It may be possible to de-rust it and paint. The forward (of the
resonator) part of the exhaust pipe is very rusty, I may need to have
a new piece fabricated.
Saturday, February 11, 2006
It's really cold out there! One of these years I've got to
get that garage insulated. It's 20 °F outside and probably
the same inside. Anyway, I spent about an hour fooling with the CCPOS
floor jack and got it working again. (Though I hate it I'm in no
position to replace it with something better, and I'm going to need
both of them when it comes time to drop the tranny. I'd only ever
bought the second jack because it had a transmission cradle that I
also bought, but having two saves a lot of time over trundling a
single jack around.) Somehow during all my fooling around yesterday
the two differently-sized balls in the check valve assembly got
reversed, so of course it wouldn't work. I made a guess and swapped
them, and now it works again. So I filled it back up with ATF. (20
weight not the rated 10 weight, but it's what I had.) I used it to
lift the rear of the car the rest of the way up to the top of the jack
stands' extension, so I know it works again.
At that point I got cold enough that I gave it up and came back in. A
little later I went out and hitched up the car trailer, but I was
unable to get the Mog started before I ran out of time. Getting the
parts car out of the woods will have to wait 'til tomorrow.
Sunday, February 12, 2006
Still cold out! I put the car trailer on the truck and took it and the Mog
out to the woods. (Easier said than done, the Mog was hard to start,
as was the truck. I think the truck is going to need a new battery
very soon, as does perhaps the Mog, and the truck ran like crap the
entire time. Sheesh.) The Mog's crane lifted the parts car easily,
once I'd used a propane torch to thaw out the crane's control valves,
so I've obviously got some water in the oil. What a pain! Anyway,
ignoring those troubles, the moving of the parts car up to just
outside the garage bay that holds the 190D went fairly well. I'm
amazed how easily the Mog can just pick up a car and swing it around.
I've got to figure out a good way to lift the parts car up high for
working on, the 190D is consuming all the big jack stands and I only
have two little ones left. Right now it's still sitting on the
firewood rounds that supported it in the woods, just keeping it off
the dirt.
Of note is that the parts car seems to have unrusted and intact
rocker panels, I'm wondering if these are transplantable too?
Monday, February 13, 2006
I had three big leftover firewood rounds of squarish aspect (butt
'uglies' that I had yet been unable to split), and I jacked the parts
car up and put one under each rear wheel hub, and the last under the
engine crossmember and oil pan. It's now high enough in the air to
work under, and seems pretty stable. I'll slip the jacks under there
too before I go under, as a fail-safe. As I got it done it started to
snow so I moved on to some non-car-related work. (Sheet metal welding
for friends, in fact.)
Wednesday, February 15, 2006
Finally I begin. I removed the exhaust system, and found that the
front section (before the first muffler [of three]) is indeed rotted
through, about where the support over to the transmission used to be
(it's gone, too). I may be able to combine the two exhaust systems to
get one good one. If not, a repair at the muffler shop shouldn't cost
much at all. The problem area is just pipe. Next I removed the
driveline, that went well. I then unhooked most of the transmission
impedimenta, wires, mounts and such, and then drained it and the
torque converter. The fluid didn't look too bad, but there was a bit
of milkiness to it at the end. The six bolts holding the converter to
the flywheel and flex plate are out, as are all but two of the bell
housing bolts. The two hard-to-get-at bolts are all that remains
holding it in, or so I believe. Getting a wrench on the front crank
bolt was a pain, and in doing so I found that the radiator is quite
bent from the wreck. Doesn't seem to leak, though.
It looks like this car indeed had two belly pans at one time, both are
missing. It's got the two side shark-gill panels, all in all it looks
just like the SDL underneath, but smaller. I may be able to fabricate
something like I did for the SDL. There is little to no rust
underneath, excepting a piece of what looks like pipe underneath the
radiator that's rotted through and the stuff that's attacking the jack
points.
The car has a block heater, but no cord. Just a nice screw cap over
the connections. The donor car has a cord, so I'll be taking that.
The steering damper is totally shot, there's no resistance in it at
all.
...Later today I went back out and finished removing the transmission.
Harder than it looked, there were four bolts left, not two,
and I managed to break off the throttle cable attachment. The 2-foot
socket extensions and the swivel joint were, as before, instrumental
in getting all the bolts out. Also as before, my CCPOS transmission
jack is too tall, and the tranny was trapped beneath the car. But
with enough fooling around, and partial disassembly of the jack's
cradle, I was able to get it wrestled to the ground. Of interest is
that this is a used transmission: both it and the torque
converter have grease paint numbers scrawled on them. 990126. (A zip
code with an extra digit? 99012 is Fairfield WA, a pretty small place
to have anything to do with MB repair. Date code? January 26, 1999
is plausible.) Obviously it didn't hold up too well.
Thursday, February 16, 2006
Curiosity. Where would we be without it? Given that I have no
current plans for this transmission I decided to look at it a bit to
see what might have gone wrong. My brother (mechanic) and I both
thought: "front pump", given that there was no abnormal noise, and no
signs of motion. So I tried to pull the TC off to have a look. No
dice, it was stuck. I ended up rigging it up so that it was hanging
from the rafters by the TC mounting bolts and whaling away at the bell
housing with a rubber mallet. After a surprising number of whacks it
finally let loose and I could have a look. The pump drive ears on the
TC looked OK, but looking down into the neck of the transmission I
can't see anything that would mate with them. I'm guessing that the
drive ears (or ear, singular?) in the transmission end is sheared off.
I don't know if I'll dig further at this point.
It's 20 °F outside right now, I'm not sure that I really want
to go out and start liberating the transmission from the parts car.
Friday, February 17, 2006
I thought it was cold outside yesterday, today it's 4 °F!
I'm very sure that I don't want to go outside. So, more
inside work on the genset's metering system.
Thursday, February 23, 2006
It's warmed back up again, to above freezing. So today I went out to
the parts car and removed the exhaust system and the driveline, and
liberated the transmission with the exception of the two top bell
housing bolts. I'm going to try to read up on the procedure (it'll be
my first MB manual transmission removal) to make sure I don't forget
anything.
Reading what little I could find on transmission removal shows that
the only 'trick' is to rotate the transmission to the side 45°
before pulling it off. And to be careful doing so!
So I went back out and did it. The rotation trick doesn't seem to be
necessary for the 201 chassis. Oh well, so much for inference. With
the tranny out I took the power wire brush to it to remove a lot of
the caked-on crud and aluminum oxidation. It's interesting that the
transmission has a 124 part number on it.
I next removed the clutch and flywheel. This came off easily, and
there was a lot of caked gunk inside the flywheel. Friction material?
I was having so much fun that I went inside and removed the flex disc
and flywheel from the good car. No problem except that I stripped the
head on one of the 12-point stretch bolts. As every other such bolt
came out with fingers only once it was broken loose, and thus wouldn't
need a head to get the shank out, I took the grinder to it and removed
the head. Then I could pry off the flywheel and remove the bolt stub.
With fingers, of course. I have all the stretch bolts from the other
car to play with (they'll never be needed again), so I won't be short
any.
The friction material on the clutch disk measures about 3.2 mm in
thickness (per side). It also has about 1mm clearance to the rivets.
Someone has told me that the friction material starts out at
3.6–3.8 or 3.8–4.0 mm and the wear limit is 2 mm, so it
appears that there's plenty of life left. I will assume so, anyway.
Friday, February 24, 2006
Since I was under the car with the tranny out it was an excellent
time to remove the drain cover from the heater box, so I did and
cleaned out all the dirt.
I put the clutch flywheel on the car using the best-headed bolts from
both sets. I tapped the flywheel on using a copper hammer,
alternately tapping and snugging bolts to work it down into place. I
probably didn't get the full 90° stretch turn on the bolts, but I
was chinning myself from the wrench underneath at something over
45° so I'll call it good. (If it goes wrong I'll know who to
blame!)
I was a bit worried about moving the pilot bearing from the old
crankshaft to the new one, but I found the thing was a slip fit in the
old car, and just hooking a bolt head through the bearing and tugging
pulled it out. It looked, felt, and sounded good. The bearing tapped
into the new crankshaft easily using the copper hammer.
I had a bit of luck and found in my tool pile a clutch centering tool
that fits! (I don't think it's the one I bought for the Camaro, I seem to remember it was black and this
one is blue.) That certainly eased things. Given this tool I put the
clutch in too. I think my bad habit of buying odd tools that show up
at the thrift shop paid off this time.
After lunch I drained the oil out of the transmission. It was
blackish and smelled of gear oil, yet had a red tint to it in the
sunlight. It appears to me that somebody topped it off with gear oil
or something like that at some time. Bad news as gear oil attacks the
synchros. Anyway, I drained it and got quite a bit of brass shavings
in the pan. I poured in diesel oil, capped it, and worked the gears
and shafts and rolled it around bodily to sluice it out. More
shavings came out. I repeated this rinse, and got a more reasonably
clean drain. Then I put two quarts of ATF in it. I'll drain this and
replace it fairly soon once the car is running, that ought to just
about eliminate all the contamination. Somehow during all this I
managed to cross-thread the drain plug, but I was able to get it to
seal just the same. What a dummy! I was even trying to be
particularly careful not to do that.
The plastic vent cap was cracked, so I cleaned it off with brake
cleaner and compressed air and then Shoe-Gooed over the crack. One of
the rubber shifter bushings was split and had fallen out, so I cleaned
that all off too and glued it back in place. Sure I should have new
parts, but then I'd have to wait. This sort of repair ought to hold
plenty long enough.
Then I cleaned off the splined shaft and sluiced out the throwout
bearing, which felt a bit dirty. With that clean I worked grease back
into it and lubed up the sliding and other bearing surfaces. It then
worked very smoothly.
After all this I decided to go for it, and bench-pressed the
transmission back into place. Getting it to go all the way into place
was just as much joy as I'd remembered from the Camaro job but
eventually it slipped into place and I secured it with a bolt. The
secret seemed to be getting my knees under the tail of the
transmission while I fiddled with my hands at the front, jiggling and
wiggling until it slipped forward. I also had lifted the front of the
engine with the floor jack to get more clearance from the tunnel. For
some reason three of the bolts were short and didn't look like they'd
bite enough of the threads to hold well, so I replaced them with
longer ones from the parts car. I also moved the bell housing access
plug from the parts car to the good one, which was missing its plug.
The next step will be the pedal and shifter assemblies, because the
driveline can't go in until these are done.
Saturday, February 25, 2006
I went to take out the automatic shifter, and decided that I really
needed to read up on how to get the console out, so I went back in to
paw through the 201 Service Manual on CD. It's a mess, in that if you
have a Mac none of the existing indexing is usable, unlike
all the other CD's I've seen. At least all the data is still there as
PDF files, but the naming convention is pretty useless. So I proceded
to open each file in turn, all 103 of them, making a simple HTML index file as I went. With that built, it
was easy enough to find the appropriate section of the manual, and
future references will be greatly eased.
Like always, however, the data there is only vaguely helpful, in that
it was for a model that had a completely different HVAC system.
Still, using it was helpful enough that with a lot of fooling around I
was able to get the console off, both top and bottom pieces, and the
underdash areas exposed. It's a good thing I've got experience with
later 107 and 126 bodies, because the knee bolster business is
completely unmentioned in the manual. The thing that was most
irritating was the requirement to go under the car to loosen the
parking brake.
Exposed was a lot of installation butchery done by PO (or his
contractors) around the stereo area. Included were several broken off
plastic snaps which I shall try to repair. (Shoe Goo!) I also myself
managed to peel loose the wood pieces around the HVAC panels, though
they had been experiencing glue failure and were half off anyway.
More gluing! The fart saver switch also chose to fall apart rather
than unplug when its connector was pulled on, but I think I've got all
the pieces so it should be no big deal to repair.
Carpeting was glued down in places with what looked like aftermarket
Liquid Nails or something. (It was much too sloppily applied to be
stock.) I pulled it all up, because it has to come out in order to
free the console.
There were lots of cigarette ashes and butts down in the console area.
Nasty! I finally dug deep enough that I was able to remove the
automatic shifter, whereupon I decided to call it a day. The shifter
in the parts car is completely exposed already and should be nearly
trivial to swap into the car. The worst part will probably be the
wiring for the reverse lamps. I don't have the shift boot for the
manual shifter, and I'm not exactly sure how it's supposed to attach
to the console itself. I suspect I'm missing something. (The trim
bits of the donor car were long gone, as advertised.)
In general the engineering of the 201 body seems to be pretty good,
though it definitely has a 'cheaper' appearance and feel when compared
to the older cars I'm more familiar with. With equal experience the
201 would be quicker to work on, except for the stupid parking brake
business. (It was easy for me because the car was already jacked up
and the driveline was out.)
Sunday, February 26, 2006
I removed the manual shifter from the parts car and cleaned the knob
off in the laundry tub. Filthy! Then I lubed the guts of it with ATF
and installed it in the car. At the moment it doesn't shift very
nicely, 5/R is the troublesome one, but the transmission isn't bolted
into position so the linkages aren't in correct alignment nor is the
clutch hooked up yet. I'll withhold judgement until it's a lot closer
to done.
I had a look at the reverse switch wire, and it seems to be buried in
the harness more intimately than I'd like. I'll probably have to do a
cut-and-splice there. There's a switch on the clutch pedal, but I
don't know if it's a starter lockout or hooked into the cruise
control.
Monday, February 27, 2006
I removed the pedal assemblies from both cars. In an interesting
twist, the brake switch is different, and uses a different connector,
on the two cars. That promises to be extra fun! Since I was there I
disassembled the 'new' pedal assembly to clean and grease the pivots.
They're now very smooth. The clutch switch (for cruise control
disengagement) was frozen, so I disassembled, cleaned, and greased it.
This required grinding off the rivets and replacing them with long
2-56 screws. (I laid in a nice supply of these things
for just such contingencies.) The old-style Bakelite-bodied
switches are very easy to service this way.
Tuesday, February 28, 2006
I made an adapter cable for the brake switch business by cutting the
piece off the harness of the donor car and mating it to an instrument
cluster male connector from the donor that mates nicely with the newer
car's brake connector. This lets me avoid touching the newer car's
harness at all. The donor's yellow flying lead from the clutch switch
was substituted for the yellow lead from the original brake switch in
the terminal block that is underneath the footrest. (The
disengagement point for the cruise control.) According to the ETM,
there are quite a few changes over the years in this area and just
about every conceivable circuit variation was tried some time during
production, so what I've done ought to be valid enough.
I then mounted the pedal assembly into the car. The hardest part is
getting the clutch hose through the firewall to the brake reservoir.
(It is not yet hooked up because the nipple has to be cut off the
reservoir, and that is potentially quite messy. I don't think I want
to just swap reservoirs because the level sensor caps on the older one
are far gone, and different than the newer reservoir's.)
Then I hooked up the hydraulic line to the clutch, put on the
speedometer cable, and got all the ties for those things settled. The
current plan for dealing with the transmission wiring that used to go
through the hole where the clutch line now goes is to tuck it against
the hump. The reverse lamp switch line should be able to be plugged
into it with some fiddling. The starter lockout needs to be bypassed
there too.
While I was under the car I noticed that both tie rods have a bad ball
joint. The parts car has tie rods, though, so I may be able to do
some swapping around.
Next I went to straighten out the crossbrace, and found that I needed
to go to the parts car to get two more captive nuts for it. That was
more painful than it seemed like it ought to be. Installing them and
getting all the nuts positioned into the correct set of holes was much
easier.
I trial-fit the driveline, and all seems well. Before installing it I
want to try to clean and lube the center bearing. It's unclear to me
if I can get it out without damaging anything. The dirt shield for
these is press-fit, versus the circlip that I remember from older
cars. The rear halves of the drivelines are identical and both have
notchy U-joint bearings, though I don't think either are yet to the
point where they can be considered bad. Both center bearings are
getting a bit dirty sounding. One spins freer than the other, but
sounds a bit dry. Both rubber bearing mounts are intact and look
good. Both drivelines, being newer models, are factory match-marked
for balancing.
Wednesday, March 1, 2006
Bought a 240D for repair and resale, it
promises to really get in the way of this car for awhile. What's
worse, I have to work on it outside, all the garage bays are full,
mostly with stuff that either does not move, has to be
inside, or is sufficiently more valuable that it won't be displaced.
Tuesday, March 14, 2006
Stole the toe-tagged Becker Europa (which doesn't belong with this
car) to put in the 240D. It does
belong there.
...
Tuesday, April 4, 2006
Enough stalling, working on that 240D, it's
time to get back to this car. I removed the brake fluid reservoir,
making a bit of a mess in the process. (I dumped water all over to
rinse off the brake fluid.) I decided to use the donor car's
reservoir because it was a lot cleaner inside and already had the bump
cut off for the clutch hose. I sluiced out the donor with carburetor
cleaner to get what dirt there was out, rinsed it out with brake
fluid, and put it on, after checking that the low-fluid switches
worked with gravity. Then I filled it with clean brake fluid. Looks
as shiny as a new one! Next I bled the RF brake and the clutch
cylinder, using a hose to connect the two. (First I bled out all the
old brown fluid, then I hooked up the hose.) As always, this process
is messy as there's a lot of leaking and an occasional hose blow-off.
After this both the brake pedal and the clutch pedal felt good. I
still need to bleed the other three brakes.
Wednesday, April 5, 2006
Bled the other three brakes. Yuk, the stuff that came out looked a
lot like maple syrup. Brown. I had to take the rear wheels off to
access the brake bleeders, and the lug bolts came out hard, they were
corroding into place. While I had the LR wheel off I took a look at
its one lug hole that was buggered up (no bolt there). The threads
looked chewed, and a lug bolt wouldn't go in. So I took a tap to them
all to chase the threads out, and I did the one stripped one last. It
seemed to clean up fine, a lug bolt now will go in. Need to get a
bolt for it, of course. I sprayed lubricant on all the bolts before I
put them in this time.
Saturday, April 8, 2006
Went to the woods and liberated a lug bolt off of the 124 wagon
junker. Looks the same as what's on the car, so I installed it in the
now-repaired hole. Worked fine, and now the car has a full complement
of lug bolts.
Monday, April 10, 2006
Replaced the bad #2 glow plug. I'd bought the replacement a long time
ago, the old plug measured some 30+ ohms, versus the 0.6 ohms it ought
to. Fortunately for me #2 is one you can reach without taking off
the intake manifold, so it was fairly easy (a relative term!) to
replace. I almost blew it because I couldn't find my deep 12mm socket
and tried to make do with the regular one only half-engaged. After
rounding off the shoulder of the plug I looked harder, and eventually
found my set of deep metrics. That and a shot of PB and it came right
out.
With all five plugs measuring reasonably I turned on the key, to find
no glow plug light and a harsh buzzing from under the hood. Tracking
it down resulted in finding that the GP relay
(005 545 18 32) was buzzing. I double-checked the
wiring to it and its fuse, everything looked good. No buzzing if the
GP's were unplugged, and directly jumping the ignition terminal at the
relay resulted in the same symptoms. I grabbed a spare 5-cylinder GP
relay (Bosch, 002 545 06 32) from the parts pile, no
doubt from some 123, and plugged it in its place. It worked fine,
though still didn't light the dash light (which does work, I've gotten
it to come on sometimes). So I'm going to open up the relay and have
a look. The 123 relay is non-optimal because the mounting ears are on
the wrong side.
Inside the relay nothing looked obviously bad. I'll probably try a
resolder job on it, but first I have to strip the protective coating
off of the board. The current 'measuring' is somewhat elegantly done
by a reed switch. GP's #2–4 are fed through a single fat winding
of strap copper around the reed switch. GP #1 is fed through a narrower
counter-wound coil located inside the strap, it probably has three
turns (it's hard to see). If the GP's all draw equal current, the two
flux paths roughly cancel and the reed switch sees insignificant
magnetic flux and doesn't close. #5 is an obvious bag on the side,
and has its own reed switch with a 6-turn coil (in series with #5)
around it. One presumes that its switch is logically combined with
the other one to run the light.
The stripping and resoldering went fine and the relay no longer
buzzes. But the dash light still doesn't go on. Probing shows that
both reed switches activate, and I think the main one is not supposed
to if everything is OK. I opened the Bosch relay and found that it's
built somewhat differently. There's only a single reed switch, with
two countered assymetrical windings. #1, again, is pitted against the
other four. (If you ask me, it's a better design.)
The backwards housing can be corrected just by putting it back
together the other way around, so if I ever need to I can substitute
the 123 relay into the 201.
On the bench, the repaired relay seems to work properly. With the
reed switch from #5 jumpered 'on', the lamp output goes high for
awhile when power is applied, then goes out. If the starter terminal
is momentarily powered the relay shuts off when the starter terminal
is released. The relay seems to be fine, so I reinstalled it in the
car.
...Which only leaves the glow plugs themselves. Measuring resistance
is only a poor substitute on high-current items like these. I grabbed
a big Cherry microswitch and two alligator leads, and the clamp-on
ammeter. I measured the current draw of each of the glow plugs in
turn, and found that all but #1 started off at about 25 A and
dropped down to around 12 A as it heated up. #1, however,
started off at 40 A and dropped down to 25 A. As it's
drawing nearly 2× the current it should, the magnetic
circuit is imbalanced and the light should be off.
I'll have to order another glow plug for #1. But the car should start
anyway even if #1 is getting too hot!
Tuesday, April 11, 2006
Took apart the connector shell in the 201 donor car's taillight
assembly in order to liberate two male pins. Soldered their wires
together to make a jumper for the neutral safety switch, which is of
no use in the stickshift car. (It's a good place to tap in for a
starter kill of a security system, if I should ever want to add one.)
Guessed as to which pair of sockets in the cable that used to go to
the automatic tranny to put 'em in, and got it right in one. The car
started fine. However, it wouldn't shut off! The EDS idle system
shut down, but the engine kept idling at a reduced speed. No problem,
thinks I, and went under the hood to push the emergency stop lever.
Umm, what emergency stop lever? Couldn't find one, nor did
pushing on the throttle linkage do it. Fooled around for some time
before I pulled off the tube to the top of the shutoff actuator on the
injection pump and pushed on a length of vacuum hose, which I then
sucked on to stop the engine. Sheesh!
Anyway, before I tried to shut it down I shifted through all the gears
and looked underneath, and the tailshaft seemed to spin right in all
the gears. Looking good!
I found a picture in the service manual that showed where the STOP
lever should be. On my sample it's really buried down under the
manifold, bent at a funny angle, and missing the red STOP label. Not
something to find in an actual emergency! (Not even the minor one of
'the key doesn't work'.)
I liberated the reverse light switch plug and two more male pins from
the donor car's taillight and made a cable to plug into the other two
sockets in the cable that used to go to the automatic tranny.
It also works, though to get the linkages to work right again I had to
prop up the tail of the transmission into approximate position. I
really need to get the driveline in so I can put on the crossbrace to
bolt the rear of the transmission to.
Wednesday, April 12, 2006
I dug out my new on-sale Harbor Freight bearing puller (a flanged
bolt-on collar) and took the jaws off my large 3-jaw Harbor Freight
puller and put them on my largest (but too small) 2-jaw Harbor Freight
puller so that I could pull off the driveline center bearing. (Do I
sound like a commercial yet?) With it all put together it only took
the slightest of tugs to slip the bearing and its press-on collars off
of the splined shaft. A little scraping and prying with a small
screwdriver and I got the bearing seals out intact. Chunky dry grease
then fell out. Dry? Oh yes! As I mentioned back in March, the
rubber bearing mount is intact and looks good for reuse. The bearing,
though dry and starting to get a bit loose, seems fine. I sluiced it
out with solvent and greased it with wheel bearing grease, then put
the seals back on. It spins nicely now, feels like new. ('Sealed for
life' bearings? Sure, when the lubrication fails the bearing's life
is, ipso facto, over. If you can re-lube at the right time, however,
that life can be significantly extended.)
I slipped the bearing assembly back on the shaft, using the other
driveline as a reference to make sure I got it on right. No force was
needed. The press-in collar was tapped into place with the BFH and a
big screwdriver. I then cleaned and greased the splines and put the
two halves of the driveline together. (Obeying the factory
match-marks.) I slipped them into place under the car, and the length
looks good, I think this is going to work! I then stopped for
breakfast.
The driveline bolted in easily (and yes, I did grease the centering
sleeves), of note is that I had to use the longer bolts for the
transmission end that were in the donor car, the mounting assembly for
the automatic (with vibration damper) used shorter bolts that wouldn't
fit. I snugged the locking collar using two pipe wrenches and then
pulled the rubber spline boot over the nut. I then plugged the vacuum
line that used to go to the transmission (Duh!) with a framing nail
and started up the car. (I'd remove the line at the source, but it's
all buried under the intake manifold. Someday.) It shifted into each
gear easily, the speedometer reacted appropriately, and looking back
the wheels were moving as one would expect. The engine could be
stalled by applying the brakes while it was in gear (so the clutch
grips nicely), and it even shuts down normally with the key because
the vacuum leak was plugged. Back underneath I put on the tunnel heat
shield and policed the area a bit. I suppose I should work on the
exhaust system next, because it's the only thing under the rear of the
car that needs addressing. Everything else it needs can be done with
ramps at the front, so after the exhaust is back on I could perhaps
take it off the jack stands and take it for a little spin. I'll need
to move the parts car out of the way first, which is another
cranefest. I poured in a half gallon of diesel that I had lying
around so I won't run out of fuel. (The gauge is on empty, and was
when I got it. Who knows how little is left?) But first, lunch.
After lunch (and a nap) I laid the two exhaust systems next to each
other to verify that they had the same profile. Then I cut off the
holed front pipe of the target (3-muffler) system and cut off an
identical chunk of the donor system. I tack-welded it in place and
trial-fit it to the car. Yep, it was good. I pulled it back off and
welded the seam shut, then installed it in the car. I used anti-seize
on the four bolts (two at the header, and a U-bolt at the
transmission). The rear muffler hanger was missing one rubber donut,
which I supplied from my parts pile. Then I put away some more crap
and started the car. Much quieter! This thing is ready to take a
short drive, except that it's trapped in the garage.
Everything's always in the way of something else, so I first had to
pump up the tires on the Frankenheap so I
could move it. Then I fired up the Unimog and
used the crane to move the 190D parts car to where the Frankenheap had
been sitting. Getting it set securely back on its three firewood
chunks took some time. After that I could move the bad transmission
and other junk out of the way, then I lowered the car off of the jack
stands. Of course during the lowering somehow the hoist for the SL hardtop managed to hook the wind deflector for
the sunroof, which broke in half. Great. I'd planned on getting rid
of it someday, but for now it gets a big ol' chunk of lovely duct tape
on it. After pumping up the tires I took it for a little test drive.
The car basically hasn't moved in two years, and it worked fine and
seemed powerful enough, but there were some odd noises. Probably
mounts and exhaust leaks. I got it up to speed and man, does that
thing handle bad. I know it has two bad tie-rod ball joints
and a defunct steering dampener, but somehow I doubt that's the end of
the story. It wants to do all its own steering. The steering is
stiff, and very darty. This car had really been let go, and probably
was best suited to supplying parts for other cars. (That, of course,
is not what is going to happen!)
Still, a momentous day with some very serious progress. Long ways to
go, though. I think I'll call it quits for the day.
Thursday, April 13, 2006
Washed the console in the bathtub. Quite a bit of pop residue came
out of the padding on the underside. After drip-drying for awhile in
the bathtub I moved it in front of the fire. I wasn't feeling too
well, so that's all I did today.
Wednesday, April 19, 2006
Washed the console side carpets in the bathtub. They're filthy, and
took some scrubbing with shampoo to get the stale cigarette smell out
of them. They're drying outside. It's a fairly nice day, they should
be dry for tomorrow.
Friday, April 21, 2006
Installed the console. The delay has been long enough and things have
been moved about enough that figuring out how to put it back together,
and with which fasteners, was difficult. The rear ashtray was missing
a little rubber bumper, so I fabricated a new one with a hole punch
and some rubber sheeting. Two discs glued together worked out pretty
close to what ought to have been there.
Saturday, April 22, 2006
My wife brought home a jerry can of diesel so that I could put in
enough to ensure that we won't run out before it can be taken in for a
fill-up. (Whenever that should turn out to be.)
...
Wednesday, May 17, 2006
Moved the car down out of sight of my wife.
...
Sunday, June 11, 2006
Time to start working on it again! That wretched
Albatross and the putting in of next year's firewood have gotten
in the way long enough, and with fuel prices being what they are we
could really use this car. I pumped up the two rear tires (which have
slow leaks, perhaps due to disuse), put the rear of the car up on
ramps, and reconnected (and adjusted) the parking brake.
With that out of the way I examined the always-on low washer fluid
sender and found it to be defective, so I disconnected it until it can
be replaced. No sense burning out the dash bulb too! (The float is
not stuck, the sealed reed switch seems to have gotten too sensitive.)
Next I started looking at reassembling the console. The plastic clips
were broken off of the shifter's wood surround, so I glued them with
Shoe Goo and set it aside to dry. This panel lifts up from
the back, guys, not the front!
Pulling out the upper console piece it was time to confront the jammed
blower switch. I had bought a used replacement on eBay, but since the
broken one was held together nicely with screws I thought I'd have a
look inside first before just replacing it. There are three plastic
rockers inside driving spring-loaded electrical contacts, with a
spring-loaded roller wheel that travels along the rockers. The first
rocker had spun around on its post allowing the roller wheel to wedge
itself down into the gap next to the rocker. Careful examination
showed that the reason this happened was that a little plastic
protrusion on the rocker's axle post that mates with a travel-limiting
hole in the rocker had broken off, allowing for more rotation of the
rocker than was intended, and opening up a big gap for the roller to
drop into. This is a weak bit of design there, and the reason that #1
rocker is more susceptible to breaking off the pin is that there is
only the one rocker supporting the force from the roller, everywhere
else two rockers (and limit pins) share the load. To try to fix this
I used a small drill to drill through the shell right next to the axle
where the nub had broken off, then I glued a metal brad into that hole
to serve as a replacement nub, with a reinforcing wire wrapped around
the brad and bent around a corner and screwed into a handy hole. (I
left the brad long so that on the back side there was plenty of
protrusion for the glue [Shoe Goo of course!] to grip to lock it in
position.) I then set it aside to dry.
As it turns out, these units are not supposed to be easily
opened, they are normally heat-staked closed. Someone else had been
inside it and had drilled out the stakes and replaced them with small
wood screws and washers, so it's obvious it had been broken for some
time before. I suspect they missed seeing the little broken-off
plastic pip, it's a pretty subtle failure (though not in its effect).
If I can't repair it I always have the replacement I bought, but I
could re-sell that back on eBay if this repair works out. We shall
see!
It is interesting that there are two Bosch ice-cube relays inside this
switch assembly. (For the auto-Hi and auto-Low functions from the HVAC
controller.) They're welded in place, not socketed, I doubt
they'd be easily replaceable if they went bad.
Monday, June 12, 2006
Reassembled the blower switch. It works smoothly now. While trying
to put the upper console back together I got sidetracked on the
cracked plastic bezels, and am trying to get them out. They should
glue up fairly well, if I can just get them out. Similarly, I need to
get out the instrument cluster so I can go through it. I have a new
outdoor thermometer to install, and checking the bulbs and the lamp
dimmer rheostat is de rigeur. Sucker's stuck though!
The in-dash speakers are missing, but the parts car still had them. I
moved them to the car so I can at least have stock sound. The car was
also missing the speaker grille retaining screws, but the donor
supplied those as well. There are four shielded cables running to the
back of the car from the 'killer' stereo wiring job, I'll hook up two
of them to the rear channel output of the JVC stereo if/when I put
that in. I may go with the stock Becker hookup for now, I have one
that's a plausible fit for the car and the connector is still there in
the harness. I should be able to make the harness accept either the
Becker or the JVC, so if we ever sell the car I can easily put it
back to stock configuration.
...
Got out the instrument cluster, which was a PITA. The speedometer
cable came apart, I hope I can get that back together again. The trim
piece (around the center vents) that I was actually trying to get out
was also a big pain. It was not obvious that there was a fourth screw
hiding behind one of the switch holes. Also less than obvious was the
Allen screw to the center flap. I think I got it out without breaking
it any more, though it did get some bending stress put on it. Once it
was out it was obvious why the sunroof (and other) switches were
falling into the dash: two of the ledges that the switches normally
bottom out on were cracked off and lying loose inside the dash. I
should be able to glue them back in place, at least I still have the
pieces! Getting the rubber boot hooked back to the vent outlet will
also probably be a huge pain.
A lot of the wood trim had come unglued from where it belonged. I
think I can glue it all back in place with weatherstrip adhesive. The
piece around the ACC control panel comes loose by sliding two clip
releases that are not obvious when looking at them. I discovered
these clips by taking off the bottom panel of the ACC box. However,
once I had done this I found one burned solder joint, so there is
obviously a bit of work to do inside.
The strategy with all this trim junk is to use Shoe Goo for the
structural gluing where it doesn't show, super glue for the visible
cracks (if carefully done you can barely see it), and weatherstrip
(high-temperature contact) glue for the veneers. It's going to take
awhile.
The shifter surround is installed and all its switches put back. The
RR window doesn't roll down, but I'm not going to worry about it right
now. Also, the rear fader has been discombobulated, I may try putting
that back, I believe the parts car still has a socket.
Something I would like to do is put an unobtrusive auxiliary power
socket in the car somewhere, ideally it would be in the rear of the
console behind the rear ashtray, for use with travel coolers, etc.
However, I don't quite see how to do this cleanly.
Tuesday, June 13, 2006
After a time-out where I and my wife had gobs of fun de-quilling our
two dogs (the second time for one of them, stupid dog!) I started
gluing together the surround for the center vents. I used
cyanoacrylate glue (Hot Shot) with spray-on accelerator to glue the
bits in place, then I backed up the breaks with a bead of Shoe Goo
for strength and set it aside to dry.
I then (after getting rained out trying to collect some more firewood)
took apart the ACC unit. Unlike in earlier cars, the 'brain' is
inside the pushbutton array. (A bunch of LM2902 and LM2904 op-amps,
and power transistors.) This makes taking it apart a bit harder. The
usual requirement of prying out all the pushbuttons holds here too,
but the extra tricky step is to set the temperature wheel on one of
its detents (remember this setting!) and then pry out (with a
jackknife) the hexagonal-headed axle post from the side. This will
release the top board from the shell. This exposes the bottom board,
which is released with three plastic spring clips. With the PC boards
out of the shell I could examine everything, and determined that the
bad (burned) solder joint was the common terminal of the single relay.
I resoldered it (and it needed a lot of heat) and then tested
the connection with the ohmmeter. (The relay can be switched by hand,
and I could get continuity to both NC and NO terminals from the
connector pin that was wired to the common terminal. I then
reassembled the unit. (This is where remembering the wheel's correct
position comes into play.)
It should be noted that the wheel's detents are purely mechanical,
there are no switches involved. I believe this differs from the
earlier units' construction, and if true, indicates that the MIN/MAX
settings can't override a sick ACC brain.
Both lamps inside the unit were burnt out, and I only had one spare.
So I had to stop reassembling at this point. My wife was out on
errands, so I called her on the cell phone and had her stop off at
McParts to pick up some more. Which she did. Meanwhile I went out
and resumed my interrupted wood gathering.
When my light bulbs were delivered, I was done with the firewood. I
installed two new bulbs (so they start with maximum life expectancies)
and tested them, then reassembled the ACC panel. That was moderately
difficult, the plastic bits are tricky to get aligned while trying to
close the snaps. With it together the next step was to reglue the
wood face to its backing. I used contact cement and two big wooden
clamps. I painted both mating surfaces and put the pieces together
wet so that they could be repositioned. That went well, so I also did
the first gluing on the wood that goes around the blower switch. This
consumed my third (and final) wooden clamp, so I was therefore done
with the contact cement for the moment. These items were set aside to
dry.
Wednesday, June 14, 2006
The alignment of the wood to its metal backing is critical, and I was
off very slightly. This required some minor filing to make the wood
pieces fit where they were supposed to. With that done I installed
the panel on the ACC unit, it's now ready to reinstall in the car.
The panel for the blower switch was also ready to glue to the plastic
backing, but this first required cleaning off the old foam glue
residue and some more minor filing. (Dratted alignment!) I used
contact glue again, and put it in the clamps to dry. The minor
chipping at the edges of the acrylic (?) wood finish on various pieces
I treated with blobs of gap-filling cyanoacrylate glue. I figure this
treatment can hardly make it look worse, and might help.
The broken plastic center vent surround (and switch panel) I glued
yesterday was dry, so I used a sharp chisel and acetone to remove the
small amount of glue beading on the face. This left a tiny amount of
scuffing and discoloration on the switch panel, so I masked it off and
gave it a light dusting of black spray paint. Looks good! I also
trial-fit a spare switch into each of the holes to make sure the glue
hadn't beaded up to prevent a good fit there. No problems.
Wednesday, June 21, 2006
The Albatross is sold, there should be nothing
car-related in the way now. I installed the repaired vent surround,
it looks fairly decent. It actually went in much smoother than I
thought it might: once I'd removed the glove box liner the reattachment
of the rubber boot was nearly trivial. I also glued the crack in the
similar trim piece on the other side (where the rear dome switch is).
(Seems the guy liked trying to pry out switches from the front.) I
then started repairing the radio wiring, I'm trying to install plugs
for both the stock Becker and the aftermarket JVC I've got. I found
the clock fuse burnt out, so I first had to side-track to replace
that. Boy, is that fuse box cover badly designed! I got the power
wiring in place, and both radios power up OK.
To support both radios I have to rig it so the fader's in-circuit for
the Becker, but out for the JVC. I think I can reinstall the
front/rear fader, I have enough wiring harness from the parts car.
For the JVC I'll just unplug the fader itself and have it drive the
rear speakers directly. (If you forget to unplug the fader the JVC
will be bridging the front and rear channels, which would probably not
be good.) The rear speakers are totally shot, they'll need replacing.
Also, the wiring to them seems to be disrupted somewhere along the
line, there is no continuity. That promises to be extra fun!
The red speaker wiring (stock) is for the left speaker, not
the right. Odd, rechts/rot/right/red would make sense, but there you
go. Green is right.
Friday, June 23, 2006
Swapped the bad outside temperature display out of the instrument
cluster and put in the replacement. It powers up, as does its light.
(The light bulb in the bad one also works, and so can serve as a
spare.) The new unit has the speedometer connection, I think that can
be disregarded. While I was there I cleaned the cigarette ashes out
of the gauges, and tested the clock. It works.
This instrument cluster has one of the low-oil timer circuit boards on
it. (VDO [Vereinigung Deutscher Ordensobern] part number 645.138]
This board's job is to suppress the low-oil indicator lamp until the
sensor reports continuously for something like 60 seconds so that
sloshing in the oil pan doesn't panic the operator. Many report that
these little boards stop doing their job, resulting in a lot of false
low-oil indications. Nobody has been able to fix one, but not much is
known about their construction. I note that it has an electrolytic
capacitor on it, and these devices are known to fail with age. There
also is an 8-pin DIP IC on it, in this case marked with a "v 301"
legend and a date code. This is not an LM301 op-amp as the pinout
doesn't match up, nor is it any related part or a LM311 comparitor as
pin 4 (the negative power lead on these parts) is a no-connect on the
board. It's not a 555 timer part, the pinout doesn't match that
either, nor a 2907 or 3909 (other common jellybean parts that get used
in a lot of places). The board has four pins on it that connect to
the instrument cluster. I assume that these are power, ground, input,
and lamp output. They are labeled KL15, KL31, GEBER, and AUSG. (15
and 31 are the standard Bosch/Mercedes legends for power and ground,
and the board's circuitry bears this out. Geber is giver, or the
input, and Ausgang means output.) The remaining complement of
components are six resistors, and one each diode, transistor (C33725),
and non-electrolytic capacitor.
Saturday, June 24, 2006
Ran a new cable from the fader area of the console to the radio area,
for the JVC rear-speaker fader bypass. I wired this in and connected
up the fader wiring harness fragment I liberated from the parts car.
This was extremely tedious, since the wiring coloring of what was left
in the area doesn't make a lot of sense. I ended up using the meter
to verify correct continuity everywhere. One complication is
that the Left plug to the radio developed an open circuit during all
the mangling. I didn't have another one to replace it so I took a
close look at it and found that it is actually an insulation
displacement type of connector. The pin (and spade) pull right out of
the plastic shell, so the wire can be removed and shortened and
reinstalled. After this the radio worked correctly. (I did have one
Delco speaker clip-leaded into place in the rear, since the factory
rear speakers are blown out. This proved that I had the fader wired
right, and that the cabling to the rear was still intact.)
The radio sounded pretty good! Unfortunately I managed to break off
one of the shifter surround retaining ears I'd glued in place before, so it is
gluing up again. It's just about time to start actual reassembly of
the interior.
Sunday, June 25, 2006
Went to the lake today instead of working on the car. Did need to
move it out of the way of the convertible, however, and found that the
hydraulic clutch system seems to have an internal leak: the clutch
wanted to engage itself slowly while the pedal was down. Crap!
Searched the vintage National Semiconductor data books I have for
parts that might match what's in the low-oil delay circuit board. No
joy.
Monday, June 26, 2006
I powered up the low-oil board on the bench, and found that the IC on
it is not apparently an analog device. The RC network on it
(using the 0.047 µF capacitor) forms a 256 Hz
oscillator, the oscilloscope shows a prominent waveform on both
associated pins: one a rail-to-rail square wave and the other a
lower-voltage sawtooth waveform centered around the switching
threshhold. In other words, a typical on-chip RC oscillator. The
device appears to be a simple digital counter, probably about a
14-stage ripple counter as that gives you a 64 second timeout and
the light comes on about 16,800 clocks after it goes out. It has a
built-in RC oscillator, and requires a 2-second reset input (from the
oil sensor), and doesn't appear to be tease-able. (You need a steady
2-second grounding of the input in order to make the light go out.)
It also has a built-in voltage regulator, as the 47 µF
power supply capacitor (fed through a 1 kΩ
series resistor from +12 V) has about 5.5 V on it.
I can speculate that if the 0.047 µF capacitor (or the
traces or solder joints thereto) opened up the RC oscillator could
start running much faster than it ought to, perhaps resulting
in the device acting like there was no effective delay because the
clock frequency was much too high, assuming it still ran at all. That
would be one place to look on a dead one, and you certainly
would want to put a scope or frequency counter on the IC's pin 8
to see if you had the 256 Hz waveform, assuming you had such an
instrument. (Some DMM's will also measure AC frequency.)
[Yes. At a later date I procured a 'dead' board that had exactly this
problem. The oscillator runs at nearly 600 kHz, reducing the
delay to some 27 milliseconds instead of 60 seconds, effectively
eliminating it. Resoldering the capacitor (C2, 0.047 µF)
cured the problem.]
I can see that while an analog circuit could be designed to do the
same thing, this approach is in theory much more reliable. In
practice, however, not all silicon chips that were ever made exhibit
the long-term reliability that one would expect. (Certain expensive
and capable analog Tektronix oscilloscopes that are dying like flies
come to mind, for which there are no replacement chips.)
[In fact, the earliest low oil boards are analog, I now have
one in the parts pile. This digital board appears to be the
cost-reduced version.]
Another replacement thought would involve an 8-pin PIC
microcontroller. (And no, the pinout on the board does not match that
of the PIC either.) It ought not be too hard at all to write the
program, and the PIC is very cheap. I don't know that I'd want to go
there, however, as that's a fair amount of trouble to go through. I
think you can do an external slow RC oscillator, but I'm not sure you
can get away without an external voltage regulator. There are 12-volt
PIC's, but I don't believe they're available in the 8-pin jobs.
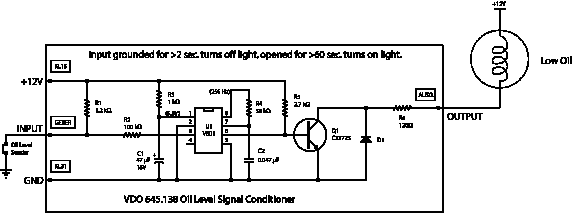 I made a schematic of the board, for future reference, in Illustrator, PostScript, PDF, and GIF
formats. C1 is the power supply filter. C2 and R4 are the RC time
constant for the oscillator. D1 is there to protect Q1, the lamp
driver, against inductive kickback from the incandescent lamp. U1
contains the power supply Zener diode, the oscillator, and the
counters.
I made a schematic of the board, for future reference, in Illustrator, PostScript, PDF, and GIF
formats. C1 is the power supply filter. C2 and R4 are the RC time
constant for the oscillator. D1 is there to protect Q1, the lamp
driver, against inductive kickback from the incandescent lamp. U1
contains the power supply Zener diode, the oscillator, and the
counters.
Tuesday, June 27, 2006
I'm done messing with my (good!) low-oil board, anything more and I
risk damaging it. Therefore I reassembled the instrument cluster for
replacement in the car.
Wednesday, June 28, 2006
I put the instrument cluster mostly back into the car, I still have
the (falling apart) speedometer cable to hook back up, that'll be a
pain. This cluster is much worse to install than any other
I've messed with. (Except for having to remove the steering wheel on
a 107.) There's just a whole lot of wires to hook to it, it's small,
and clearances are tight. While I was there I straightened out the
common problem of two #1 (if you believe the labels) lamps. I
re-labeled the correct #2 lampholder.
Next I fooled with the sinking clutch pedal, and was all depressed
until I started to smell brake fluid. Turns out the fitting nut on
the master cylinder was loose and leaking onto the car's floor.
I tightened it down, I expect that to cure the problem.
Then I installed a set of yard-sale Delco speakers (10 ohm) in the
back deck to replace the sun-rotted and blown out stock speakers.
They fit perfectly, and seem to work OK. Stock speakers are
apparently 4 ohms (the front ones are, and the rears look to be the
same part). The price was right, anyway! (They came in a nice Altec
Lansing box, and were obvious take-outs.)
Thursday, June 29, 2006
Playing around with the Becker, I noticed that the rear channel didn't
sound right. I pulled one of the speakers and noticed that I'd
managed to connect the terminals backwards, resulting in bass
cancellation. That was easily rectified, and it sounded a lot better
afterwards. I also found that the fader didn't seem quite right, and
when I measured it I found that one front channel would only go to
about 23 ohms versus the 40 ohms of all the others (when faded). This
channel was on the driver's side, which was annoying. I turned the
fader around to put this on the passenger side, which was more
pleasing. At least, to the driver.
The speedometer cable just doesn't fit. Perhaps it's too short for a
stickshift transmission? The donor car's cable was cut, so it's of no
use. I'm going to have to ramp the car to get under it in order to
disconnect the transmission end of the cable, making enough slack in
order to connect the head end. What a drag! TFM says you can do it
all from underneath the dashboard, we'll have to see.
The fuse box cover doesn't attach right, partly because one of its two
hinges is broken off. The parts car also had a broken off hinge, so
its cover was not a suitable replacement. What I did was to break off
the remaining hinge from the spare cover and glue it to the 'good'
cover, hopefully in more-or-less the right place! I used super glue
to tack it in place, checked the alignment once more, then potted the
(ill-fitting) hinge in Shoe Goo. The secret to getting the cover out
of the car appears to be to first remove the cover from the relay box
immediately forward of the fuse box. (Yes, I blew another fuse
working on the radio. And yes, this 'secret' seems to be in TFM.) I
set it aside to dry, tomorrow I should be able to see if I've fixed
it.
What a dummy! Since the dash switches are all in place I tried out
the sunroof switch. The wind deflecter only looks like it's
screwed to the sunroof panel. It's not. The sunroof works, but of
course it's as gummy as the Albatross's was,
and needs the same clean-and-lubricate treatment. Too bad the add-on
wind deflector was broken by accident earlier. I have a friend who
does a lot of plexiglas work, perhaps I can get him to help me glue it
back together.
Working slowly, I was able to reassemble the bulk of the center
console system. The Becker is in place, as is the ashtray. The dash
lamps all seem to work, but I'll have to test it at night to be sure.
The blower wants to run at near-full speed at all times (except when
off), I don't know what's up with that so I'm not going to push the
ACC panel in all the way. (It's a bitch to get back out.) I managed
to lose the two screws that hold the top of the center console, so I
can't put the vent grilles back yet.
The 201 is definitely not as nicely put together as the
earlier cars I've worked on. It has a cheap feel to it, that's for
sure.
Friday, June 30, 2006
Pulled the blower resistors and checked things out there. No problem,
it's being told to run at 3/4 speed whenever the ACC is on. I then
swapped in my other blower switch and it works normally. Obviously
something is wrong inside the one I worked on. So, I pulled the
blower switch apart and found that the support screw I'd driven into a
hole (to hold the wire that braces the pin I added to fix the pivot)
had wedged between two metal contacts and shorted them together. Duh!
I removed the screw, I'll have to rely on the glue to do the entire
job of attaching the reinforcing wire.
The blower squeaks a bit and sticks so that it won't start if it's set
on low. Needs a lube job obviously.
I reinstalled the repaired fuse box cover. That is one badly-designed
item I'll tell you that!
When the sunlight was just at the right angle I noticed a penny
sitting down in the defroster duct. What I've found that works fairly
well in these circumstances is to bend a piece of wire such that you
can just touch the offending item with it while not touching anything
else with the tip along the way. Then you put a drop of weatherstrip
cement on the end and go fishing. Leave the tip of the wire on the
item for a few seconds, then lift out the item. Worked great!
Search as I might, I just couldn't find the two black screws that hold
in the top of the console so I rounded up a couple from the junkbox
that would serve. Then I was able to put the rest of the console
together. I then tackled the glove box, which was missing a retaining
nut on one of the hinges, accounting for its loose floppy nature. The
parts car supplied this. (It is handy having one of those.)
It's starting to look like a car again!
Saturday, July 1, 2006
Per the manual I was able to get the instrument cluster back in place
by removing one end of the corrugated air vent hose under the dash.
It is very tight under there. I then took it for a little
test drive to check that the (unfortunately pulled-apart) speedometer
cable worked; it did. While driving I noticed that the heater seemed
to work OK, at least the vent controls seemed to work and the fan
behaved itself. The thing seemed to always want to heat, at least a
little. (Perhaps only after I turned the heat on the first time.)
There may be something wrong there. I can hear the aspirator working,
so that's not the problem. Perhaps the water shutoff valve is sticky?
The squeaky blower fan was next. I figured out, via TFM, how to
remove the air grille and the monowiper. The blower housing shell
then unclipped, as did the motor. The motor still seems to have some
brush life left, so I lubed the bearings, first with PB Blaster and
then with Mobil 1 15W50, and set it aside to 'soak'. The motor's
commutator looks good, so new brushes should be a possible repair
when/if the time comes. Next I taped a long piece of 1/2" hose to
the end of the shop vacuum and poked it down into all the crevices I
could find, sucking out the bits of leaves and dirt. This included
the exposed part of the air plenum behind the blower. Then I lubed
the blower once more and put it back, after testing it with a battery
charger (it still worked). Putting the cover back was less difficult
than I'd expected. When tested all speeds worked properly, even low.
Success!
With the firewall area all exposed I could see that the rubber vacuum
connector to the heater valve was split, which could definitely
explain its propensity to heat, so I replaced it. The valve moves
freely, and when shut by hand and then covering the vacuum port with
my thumb the valve will hold shut, so the diaphragm is not leaky.
Sunday, July 2, 2006
Putting the monowiper back was a real PITA. I finally figured out
that you need to slip a piece of cardboard under the rubber gasket to
the windshield to lift it up over the glass as you install it.
Fingers just won't do it.
The flimsy shield behind the battery got cracked when I removed it, so
I Shoe-Gooed it and set it aside to dry. I also covered some holes
that had been worn into it. I don't want water dripping onto the
electronics that are back there! Tomorrow it ought to be solid enough
to reinstall.
Getting all those trim bits back on the windshield area is an even
worse PITA. Not easy getting everything tucked into and over where it
goes, and then getting the aluminum cover strips to seat where they
belong. There was a missing bit of weatherstrip that went from the
windshield to the hood on the right side. I dug around in the parts
car and found a length of what looks like unused weatherstrip, though
old. It was the correct profile for the missing piece (as determined
by the other side's piece), but was too long and didn't have the rough
'S' shape to it that an installed piece has. I cut it to length and
installed it. (That parts car, though in severely depleted condition,
is still worth having around. I bet that with a lot of care and some
eBay time I could make back most of what it cost me just on the parts
it does still have.)
I found one of the missing console screws: it was down in the
defroster duct. I bet that's where the other one is too. I used a
magnet to fish it out of there. Memo to self: never put
screws up on the dashboard no matter how handy it is!
Monday, July 3, 2006
Installed the repaired behind-the-battery shield. It was a bit tricky
to get to stay in place, its molded shape is a bit off. A piece of
wood wedged behind the battery seems to have done the job, we'll see
how it holds up. The replaced rear hood seal seems to fit properly.
Then I moved to the interior and put back the driver's footwell stuff.
The difficult part there was cutting a new slot into the underdash
panel for the clutch pedal. That went fairly smoothly, however. I
modeled it after the brake pedal slot, first peeling back the sound
insulation and then using tin snips to cut out the piece of plastic.
Then I cut out a narrower strip of the sound insulation and glued it
back down, sans the black felt edge treatment of the brake slot.
(Nobody can see this stuff way under there anyway, especially with the
knee bolster.) The rest was just trying to remember how it all went
together, and finding the right fasteners. No real hitches, though it
was surprisingly hard to get the carpet back in place. Then I moved
to the passenger side which went much faster. The interior is now
reassembled.
Out shopping today I bought a new wiper blade. That's about the last
thing the car needs in order to be physically driveable, though there
is still a tremendous amount to do before I'd call it good enough.
The loose front end is probably the next thing that needs addressing.
After that I'll probably do the paperwork and start driving it around.
I did wash the car since I had the hose out to wash our road-tripper,
the SDL. It cleans up nice!
Thursday, July 13, 2006
I removed the wheel that has a not-too-slow leak in it, preparatory to
taking it in to be repaired. I inflated it again and looked it over
and didn't see anything, but when I put my ear by the tire I thought I
heard something. A little searching revealed a nail hole that was
blowing a little air. Well, that's a smoking gun!
Whatever glue I'd used before on the cracked headlight frames has
failed, yellowing badly, getting soft, and coming unstuck, and the
right fog light had gotten flooded. (I think it was 5-minute epoxy.)
I cleaned it off and began gluing it up again with Shoe Goo.
Friday, July 14, 2006
More Shoe Goo on the foglight lens. This will take awhile to build
back up. (Throughout the day I've been dabbing at it, slowly putting
the pieces back together and letting the glue set up before adding
the next piece.)
I put the rear brake drum on a jack stand and then jacked up the front
of the car to access the wonky tie rods. Turns out the 'bad' right
tie rod isn't itself bad per se, but was merely loose in the inboard
socket. Unfortunately I was unable to loosen or tighten the nut
because the 5mm Allen socket in it is stripped. I then removed the
idler arm pivot bolt so that I could try to remove the idler arm (with
tie rod) from the steering link. So far no good, it's stuck on the
steering link. Heat, banging, and a badly-applied puller have not
done the trick, I'm going to have to investigate getting the special
tools.
Out on errands, I dropped by the U-Pull to find they had a 1985 190E
(auto, complete with oily sludge in the coolant tank) (and a 1976
300D, auto), and liberated a spare passenger mirror glass, a
better-than-mine driver's door seal, a non-smashed AC condensor, a
spare cruise control amplifier, a door lock pump, and a windshield
washer tank sender. There was no blower switch knob, nor any seats
from which to get a hinge cover (the other items for this car I'm
after). (The 115 provided a quartz clock and a white-dot momentary
push-pull defroster knob.) I bought the 190E's rear ashtray assembly
for power socket experimentation, though it's blue and not black. I
also dropped by Harbor Freight and got a tie-rod puller and a pickle
fork, they were not too expensive. While I was at the yard I dropped
the tire off at Les Schwab to get the leak fixed.
(The 115 quartz clock seems to keep good time, though the hands are
misaligned. This is unfortunate, as there's no easy way to open these
to realign them.)
Saturday, July 15, 2006
I hate wrenching! The jaws of the new tie rod puller were
too wide, so I fired up the smoke wrench and bent them in some. That
got the thing on to the drag link, where I put some pressure on the
stuck joint. Then I beat the joint's socket between two BFH's until
it popped loose. That freed the idler arm and bad tie rod from the
car. I then used the torch to heat the stuck nut red hot a few times,
but I was unable to budge it. As the end was already ruined, I used
the torch to mostly cut off the nut, then used the grinder to liberate
the slaggy mess. The thing then just popped right out of the arm.
(The joint had always been loose, that was after all the whole problem
to begin with.) A bit of wire brushing and the idler arm looked good
again. Though it got hot during this operation I don't believe the
temperature ever approached that required to ruin the temper of the
arm, it's a pretty bulky bit of steel.
I then went over to the parts car and liberated the matching tie rod,
it came out no problem—a little pressure with the puller and a tap
or two and it popped right out. (While I was there I tested the
'spare' steering damper, it is only marginally better than the bad one
in the car. I think I'm going to go to the junkyard and see what the
one there is like.) The spare tie rod appears identical to the
original but was bent and its outboard end was shot, so swapping ends
was the right solution. I noted the orientation and counted the
exposed threads on the car's rod and counted turns as I removed it.
(22.5 in fact.) I then matched this with the 'new' end. That ought
to be good enough until I can get the car aligned. The refurbished
tie rod looks good, both joints are tight and the boots are good. Of
note is that the 'new' end has a paint splat on it, implying that it
was a used U-Pull part, and the 'old' rod had painted numbers on it,
indicating that it also was a junkyard part. Obviously tie rods are
wear items! At this point I broke for breakfast.
I went back to the U-Pull and liberated the steering shock from the
190E. It was good, nice and stiff, so I bought it. (It has a 124
part number, like so much of the 201.) I also picked up the plastic
knob from the 115's center vent, which works very well as a blower
control knob for the 190D. I picked up the 190E's clock/tach and the
four-gauge cluster with the Economy gauge, even though I don't need
them for anything. These might end up on eBay or something. This
gauge cluster also has a low-oil delay board, but this one uses a lot
of discrete components and a RCA CA239AE IC. (Hand-stuffed board,
much like early transistor radios with resistors on-end, etc. The
LM239 quad comparitor is a cross-reference for the IC. There are
three transistors and four electrolytic capacitors on it as well.
Resistors aplenty and probably diodes as well, but the glue potting
obscures details.) Obviously the digital circuit board was developed
as a lower-cost, and perhaps higher-functionality, replacement. I'm
told:
'85 was the first year for the low oil light. By '86 the circuit was
more complex and I believe there were several different versions.
Mercedes never made the circuit available as a part—if it failed
you had to replace the entire instrument cluster printed circuit board.
While lying under the 190E it became apparent that the under-engine
panel had been cut off rather than having its four screws removed.
Probably was done by the U-Pull yard, the cut was pretty clean. The
jerks, I could have used that panel! It probably took more time to
use the saw than a wrench would have taken. The bulk of the panel was
not anywhere in or around the car, it probably went into the dumpster.
Had it been there I could probably have repaired it easier than I'll
be able to fabricate a new one.
Finally I installed the 'new' steering shock and the right-side wheels
(which were off for access and tire repair). When I reinstalled the
wheels I wire-brushed the rust off of the bolts and rubbed paraffin
(candle wax) on them. I'd heard that that was a good anti-seize
treatment, we'll see. Of note is that the increased offset (ET49) of
the wheels on the 124 and 201 models seems to make wheel handling much
more difficult, they're more off balance and want to fall off the car
much easier than the ET25 wheels I'm familiar with from the earlier
cars. I think that the (always-missing) toolkit peg for wheel
installation is more important for these than before. Next up: the
left-side tie rod!
On the bench I powered up the spare clock, we'll see if it keeps time.
Sunday, July 16, 2006
From the worse news cancels bad news department: The bad steering
shock was not a handling problem, because the left-side ball joint is
so stiff that it took the place of it! It squeaks miserably and is
extremely stiff when I rotate the steering joint on that side, a fact
which was exposed once I'd taken off its bad tie rod. (I couldn't get
the tie rod off until I'd first used the torch to heat the puller
again and squeeze the jaws a bit closer together. That and the BFH on
the joint's socket resulted in fairly easy removal.) The bad outer
end on today's tie rod project was set back a bit as the proposed
replacement tie rod from the parts car also has the same bad joint.
And of course the inner-end joints are threaded the wrong way, so they
can't be used. However, the bent tie rod from the other side, which
supplied a good inner joint yesterday, also has a passable outer
joint. I am stymied, though, because I can't quite figure out how to
get the end out of the bent tie rod. (Were it not bent I'd just use
the whole rod, because I can easily get the other ends out. The jam
nut business puzzles me, and I don't want to damage anything flailing
around.) I asked the mailing list for help!
The spare clock's running fine. That makes it a saleable item, I guess.
Mailing list response on tie rod business:
For the tie rod, loosen the clamp nut (outer one), put the rod on an
anvil of some sort, and work it over with a 2# sledge, hitting on the
flats of the sleeve. This will crack loose the rust and let you
unscrew the end. Penetrating oil is good, too, but you must start the
rust or it will never turn.
OK, I guess that indicates that the funny double-nut is just a nut to
be loosened, and business as usual after that. I'll try pinning one
end in the parts car's steering knuckle as a vise before wrenching.
I think I've finished up the re-gluing of the nasty right-hand
headlight frame. I also washed out the worst of the swampy grunge
that had built up in it. With luck this will serve until a good set
of lights can be found economically.
Unfortunately while reassembling the headlight one of the bench
multimeters came crashing down onto the pathetic rats'-nest that is my
workbench and broke the needle off the 190E temperature gauge,
scratching the face in the process. While the needle can be glued
back on invisibly, the scratch will be a problem. There goes my $6!
(I put the meter stack back in a more secure fashion.)
Monday, July 17, 2006
I reinstalled the headlight, that went fairly well. I find that the
broken bottom mount is a small problem, but nothing insurmountable.
Wish I'd remembered this at the U-Pull, I could have liberated one
from there and they don't charge for such items.
The broken strap for the washer reservoir cap was easy to deal with, I
just cut a small length of narrow vinyl tubing (washer tubing from a
115) and slipped it over both broken ends. That tethers the cap
nicely.
I installed the 'new' washer fluid level sender I got at the U-Pull.
Nothing to it! It has made the dash light turn off as it should.
Vising the 'spare' tie rod in the parts car's steering knuckle, I was
able to break loose the end I'm interested in learning about (using a
crow-foot wrench for better grip than an open-end). It's a 19 mm LH
jam nut, jamming a flatted squeeze collar (looks like a nut, but it's
not) against the threaded and slotted (pinchable) body of the rod.
Easy to take apart in fact, if it's not too rusted. Now I'll move on
to the ones I'm interested in mix-n-matching. They've been soaked in
penetrant since yesterday.
...And they came off fairly easily, now that I knew where/how to apply
force. (Using the car as a vise really helps.) I counted the turns
to remove the end from the car's rod (19), and put back the 'new' end
to match. Again, this should be close enough until I can get the car
aligned. The boots on the tie rod were starting to crack and tear,
though the joints themselves were still clean and greasy. I used
acetone and Shoe Goo to patch the tears. I really ought to replace
the tie rod, but this job should do for a couple of years. I've got
more immediate problems to deal with before I go spending money I
don't have on the car. Moving on to the icky ball joint problem...
Ugh. I slid back the boot over the ball joint and it was absolutely
filled with dusty rust. I blew it out with air and then
sprayed in PB penetrant. I then worked the joint a bunch of times,
then sluiced it out with PB. I repeated a time or two and then blew
it out with air again. Then I used a grease gun with a needlenose
point (the same thing you do door hinges with) to fill the joint with
grease, and put the boot back. (That isn't all that easy due to the
retaining spring.) The joint works much easier now. There was a
small tear in the boot, so I'm going to clean and Shoe Goo it, though
that's probably pointless. Maybe after breakfast.
Yes, this joint should be replaced, but it isn't yet loose, and I
think the cleaning and lubrication will give it a new lease on life,
for at least the initial shakeout of the car. It will remain on the
to-do list. I just don't much care for heavy wrenching, such as a ball
joint replacement requires, nor do I have the special tools required.
I wield a mean soldering iron, but hand me heavy tools and watch me
hurt myself.
After breakfast I did Shoe Goo the ball joint seal tear and I put the
repaired tie rod back on. The steering now can be moved from the
jacked-up wheels like other cars, unlike before. While the car was up
in the air I removed the automatic transmission oil cooler lines, and
capped the radiator fittings with aluminum foil tied with wire to keep
the dirt out. (Just in case.) I also removed the remains of the
transmission shift-point linkage. The vacuum line to the transmission
was too difficult to ferret out from underneath the intake manifold,
so it's been left capped off and tucked away underneath. At some
convenient time in the future I will remove it permanently. I then
lowered the car and washed my (very greasy) hands.
Test drive time! It started right up, and there was no sign of the
former squirrelly handling. Handling seemed decent, and I even worked
up some speed on some corners. I don't know what 201's are supposed
to handle like, I'm told they handle particularly well, but I
certainly noticed nothing wrong with it. It seems to me that the
engine is not quite as torque-y as the one in the Frankenheap, but I'll need to research this
more. I had to fiddle with the hazard switch again to get the signals
working, but there's nothing new about that. It's just about
time to convert the car into a daily driver, and to do that I've got
to get the State involved, and the insurance company. And I probably
ought to take a stab at the air conditioner, since it is kind of hot
out now. Especially since my wife is the real fuel-burner these days,
and I don't want to subject her to too much inconvenience.
I just got offered a dead oil delay circuit board, so I hope to have
more information about that soon.
Tuesday, July 18, 2006
I stopped by Zoom's garage (at home semi-retired alignment guy), since
I had lost his phone number, and found that he's now fully retired.
But Jerry did refer me to Gary at Valley Auto Paint (now an alignment
shop), 535-9570.
I stopped by the licensing place, and found that even though the car
had not been licensed in awhile I could either pay now to get the car
renewed only until September, or wait 'til then and get the full year.
Either way I have to pay in September for a full year. However, she
also pointed out that in September I'll be required to have new plates
at an exorbitant $24 (new state law), but that if I get new plates now
they'll only be $7, and will be good for X years, whatever that
is. So I bought the license and the plates. $17 (nearly half) of the
three-month license fee was saved by buying plates now, let's hope the
rest can be made up in fuel savings before the end of September!
So I installed the new license plates, which required finding some
correct screws rather than the US ones that had been jammed into
there, but not fully so that the plate flapped. The right metric
screws (salvaged over time from the U-Pull) did the trick. Then I
installed the new wiper blade insert.
Feeling perky, I then put the AC gauges on. I had to disconnect the
mount for the suction pipe near the low-side fitting and shift the
pipe some, as otherwise there wasn't enough clearance at the fitting
to attach the service hose. That done, I found 10 psi of residual
pressure, so it's not like the system has a bad leak. I put the
vacuum pump on and sucked it down to zero, and corked it off. This
was at nearly 6 PM, so we'll see if it holds a vacuum for a few hours.
The condensor is nasty looking, but might still work good
enough. I have a spare, if/when needed.
...Two hours later (after 8 PM) it still has a full vacuum on it.
Looking good! I pressurized the system to 50 PSI, but neither
switch on the drier closed. One of them whichever is the low-pressure
cutoff, should have reacted. Not so good. (I looked it up, the unit
with terminals facing up is the pressure switch, it has blue wires.)
I swapped it with one off the parts car, and still no reaction. Could
they both be bad? Spec. says 2 Bar, which is about 30 PSI.
Wednesday, July 19, 2006
This morning it still has a full vacuum on it.
Looking very good! Unfortunately the pressure switch doesn't
seem to work, nor did the spare on the parts car.
Went to the U-Pull and got the 190E's auxiliary fan and its pressure
switch. Also picked up a headlight assembly, for merging with the one
that's missing a mounting ear. (Cut and glue?) Got the headlight
mount, too, the plastic one below the light, as one of mine is broken.
Funny thing, I ran into a guy at the U-Pull who was looking for parts
for his '79 280E, a fuel pump to be exact. (There weren't any.) He
wondered if I wanted to purchase his car, as it'd been sitting 'cause
his wife absolutely hated it and he largely drove something else. I
recommended that he fix it before selling it , if that was what he was
going to do, because you don't get squat for a broken car. (And he
said that was his position, tell his wife!) Or fix it if
you're keeping it, 'cause then you can drive it. Either way, fix it.
I told him to check okiebenz.com for a used fuel pump and the window
regulator he needs. We chatted cars for a bit, and I helped him get a
door handle to replace a broken one.
I powered up the fan on a battery charger and it worked fine.
However, the fan didn't install too easily because of the damage from
that past wreck. It did eventually go in, and it doesn't even
interfere with the condensor which is a bit of a surprise considering
the condensor's bent-ness. One complication was getting the fan
standoffs (which were also missing) in place: I dropped a sheet metal
screw down between condensor and radiator where it lodged point-in.
Each attempt to pry the two delicate items apart to look for or to try
to retrieve it wedged it in tighter. It didn't seem to penetrate,
however, and I was eventually able to fish it out with a magnet. I
had to pull the headlight to route the wire, and it seems to me I
should have gotten the headlight mount plastic top bits as well, mine
are really quite beat up. Sigh.
The pressure switch installed easily, and works properly. That, at
least, is a relief. Using compressed air I got the other two switches
responding, but I wouldn't use them except in an emergency. (Or at
all if it cost more than $7 to charge the AC system.)
The neighbor (who bought our spare 115) dropped by to pick up the
block heater I got for him at the U-Pull, and I reminded him that he
was already planning ahead for when his son started driving the 115,
and he'd been wondering if a 190D would fit him. So he sat in it. He
does fit, but barely. He allowed as though while it was a bit tight,
for 40+ MPG he'd get used to it! While there he
noted that it still had a Becker, and while I was regaling (read:
boring) him with its story he punched the ON button. And it came on!
Obviously a feature of the newer Beckers, where you can turn them on
even with the key off.
Thursday, July 20, 2006
The AC held pressure overnight, so I started it up. What a drag, the
auxiliary fan runs all the time and the compressor not at all. Time
to dive in! The drier's switches for compressor and fan both seem OK.
Off to the manuals, I guess. There are relays involved in both
functions, it's not as simple as the circuitry in earlier cars. Using
the ETM I tracked down the fan temperature sensor and unplugged it.
The fan stopped. Great, a bad sensor. I took a small hammer and
tapped on the sensor body with it reconnected and the fan shut off.
I've seen this before, sometimes it's enough just to do that, the
sensor is merely stuck and will behave itself in future. We'll see.
I used a jumper to short out both the engine temperature sensor and
the drier overtemperature switch. The former runs the auxiliary fan
at high speed, the latter, low. Good. The fan system seems to be OK
now, modulo that sticky sensor.
Nah, that sensor's no good. Its other contact turns off the AC
compressor, and it's stuck too. Unplugging it resulted in the
compressor running normally. Banging on the sensor did nothing to
relieve this problem. I have a spare sensor that I'd bought for
Jill's 560 SL, which had a stuck fan contact,
but that problem cleared itself up before I could install the new
sensor. It's been sitting on a shelf since, I'll probably put it in
this car. The full-throttle switch atop the intake manifold also
works to shut off the AC compressor, as it should.
While doing this testing I noticed a large fuel leak out of the
injector return line between #'s 2–3. That's new. I pulled it
off and replaced it with new line.
I started putting in a test charge of refrigerant. It fills slowly,
perhaps because it's not too warm out yet today, or perhaps because
there is a restriction in the low-side valving. (I've seen that
before.) But I was able to get a fair amount of test refrigerant in
there and I was starting to get reasonable pressures. Unfortunately
my vent temperatures never got very low, and I thought I even detected
some heat coming out the center vent. The sight glass showed plenty
of refrigerant flow. (Very foamy, as is normal for this refrigerant.)
So I pulled the access panels to the water valve and had a look. It's
not always shut off properly. I don't know if it's a control problem
or a vacuum leak problem, this will bear some looking into. I
manually pulled the valve shut, and then I could feel the vacuum
system kick in, but that never really changed anything at the vents.
The water pipe remained pretty hot. I wonder if the water valve
leaks? (I know it can take awhile to pull the heat out of the heater
core at summer temperatures.) Gotta dive into that too.
Only one of the horns works. Shoulda grabbed that horn bar at the
U-Pull! Maybe I'll go back to get the horns, and have a look for
water valves, etc. Must remember to grab the headlight mounting
plastic bits too.
So I went back to the U-Pull after breakfast and got the horn bar, the
heater water valve and auxiliary pump, and the trunk lock actuator (to
replace my spare that got used in the SDL), all
for $6.50, not bad. (The plastic fasteners for the headlights are a
no charge item. Also no charge for the Willie Nelson's Greatest
Hits CD I found in the back seat, complete with unbroken jewel
box. Washed the mud off of it and popped it into the player while I
worked on the car. Tres cool, I like Willie.) There was nothing left
of the 190E's cooling system, other than the oily coolant reservoir,
so no spare fan switch for me. I nosed about a bit and found that the
123 they have has a trailer hitch, or at least part of one. The trunk
was locked and unmolested, so I was unable to check it for toolkits,
or anything else interesting like the interior component of the
trailer hitch. When I came out there was a Slavic guy standing by
my Frankenheap, he asked me if I wanted
to sell it. Sorry, no!
Once back I resumed charging the AC. I also replaced two plastic
headlight mounts, and a missing bolt on the horn support. While I was
in the area I checked out the auxiliary coolant pump and found it
seized, though the one I bought at the U-Pull is not. I'll be able to
swap these if I want to, but for now I just unplugged the seized one.
(It's open-circuit, so it may have burned out after seizure.) After a
bunch of fooling with it, I was only getting vent temperatures of
about 65 °F, even with a water spray on the condensor. (The
spray did seriously lower the high-side pressures and temperatures,
but had at best moderate effect on the vent temperatures. Watching
the water evaporate off the condensor's coils I could see that the
front and back serpentine were about equally hot, so the smashing
didn't occlude the front pipe, and the tops of the serpentines were
hotter than the bottoms.) The high-side pressures and temperatures
were a bit on the high side, and the low-side pressure was perhaps a
bit low, though the temperature at the low-side fitting was not, and
it matched (more or less) that of the vent air. The auxiliary fan
came on periodically during this, if either the AC or engine
temperature got too high. (While working on the car I noticed that
the thermostatic 'shark gills' in the engine compartment had both
opened up due to the engine heat, so that's cool.) Adding more
propane really didn't result in any improvement in the AC situation,
so I stopped doing that. I decided to take a test drive, just to see
how it all worked together. Windows all open, no air recirculation.
After a few miles down the road things stabilized at a 59 °F
vent temperature, with about an 85 °F outside temperature
according to the instrument cluster's readout. (It might read a bit
low.) Engine temperatures climbed to a little over 100 °C,
not unusual for one of these with the AC on. (And especially as I
don't believe the main fan clutch is working. The auxiliary fan does
come on periodically, depending on how fast I was driving.) When I
turned off the AC, engine temperatures dropped to nominal, and the
vent temperature rose quickly to 95 °F. I think the heater
valve must be leaking a bit, if there's a 10 °F air
temperature rise through the venting system. Regardless, it looks
like the AC is accomplishing about a 35 °F delta, which is
not bad. Though 59 °F vent temperatures aren't that
impressive, it is just about according to spec (see the chart
on 83.11-035/3 of the 201 service
manual), so maybe I don't get to complain too much.
Because of the front end smashing this car experienced (or perhaps
not) I can't get the main fan off without removing the radiator,
there's simply no clearance between the fan and the radiator. That
will slow down anything I might do there. If I do have to remove the
radiator that will be the time to dig into the auxiliary heating pump
and the water shutoff valve. And why not then do a cooling system
flush and acid flush? And new coolant... At that point in time I
might as well consider replacing the condensor with the non-smashed
one I got at the U-Pull. I'm not sure if/when I will do this. It
also would be an excellent time to experiment with refilling the fan
clutch with silicone oil, but access is so poor that you would not
want to guess wrong about the amount of oil to put in. The U-Pull's
190E fan clutch was still there, but was missing the bimetallic strip
on the front, so it's not complete. Not worth the price to get it for
experimentation, as fan clutches are one of the things the U-Pull
charges a fair amount of money for. I should have one or two around
anyway, and I think I've probably got a good one off of the
SDL from when I stupidly replaced it due to bad
diagnosis, it'd be nice to put that to use.
The car drove well during this test drive, though I'm still pretty
sure that the engine is less torque-y than the 200D's. It might have a tiny bit of wander
in the steering, felt like possibly a toe-in problem. It certainly
wouldn't surprise me considering the state I found the front end in!
Gotta get it in for alignment soon.
Friday, July 21, 2006
I swapped in the intact grille that's been stored in the trunk nearly
forever. (I got it at the same time as the manny-tranny parts car,
though it was not from that car. $50, IIRC.) The egg-crate
plastic is not as new as what was there, nor is the metal as shiny,
but the metal is not bent and it has the star and trim pieces.
Someday if I get ambitious maybe I'll swap the plastic between the
two. I also replaced the dead low-side horn with the U-Pull horn.
Then I reinstalled the right-side headlight, the intact one. I
decided not to mess with the car's cooling system at this time.
I had to buzz down to the neighbor's to help move some furniture, and
it was hot out, I used the car's AC on the way. As the car's cooling
system wasn't hot the vent temperatures dropped quickly to about
57 °F, lower than yesterday. On the way back it never made
it down past about 65 °F, but the car was up to temperature.
This indicates to me that there is a fair amount of heater core
leakage flow.
I also had to make a Goodwill run, but this time it was outgoing
rather than incoming: makes for a nice change. I loaded the car up to
the gunwales and dashed off to town, windows closed and AC on, fan at
one notch off of maximum. Most of the trip was in third gear, and the
outdoor thermometer hovered around 100 °F. The engine
temperature stabilized at about 110 °C, and the vent
temperatures eventually stabilized at about 60 °F. On the
way home when ambient had dropped to about 96 °F and road
speeds were at their maximum (45 MPH or so) the
vent temperatures actually dropped to about 55 °F.
Tolerable, but nothing to write home about.
I'm more convinced that this engine has less low-end torque than
the Frankenheap. The heap's pretty
tolerable driving around the rural roads in fourth (direct) gear, but
not so the 190D: it gets a little bogged down at lower RPM's, so
keeping it in third helps a lot. Also, my usual rural 'California
stop' needs to be accompanied with first gear, not second, because the
lugging torque isn't there. Not a problem, but interesting
nonetheless.
I think I'll poll the mailing list about my fan options.
I don't think the main fan clutch is working right on my 190D
2.5, it's the silicone-filled kind. I have a few options to
pursue, all of which unfortunately require pulling the radiator
due perhaps to front-end damage that has pushed the radiator
to within 1/4" of the fan:
- Replace clutch, I might have a still-good one from our SDL.
(New-style, from plastic fan not the original.) Somewhere.
- Attempt to refill existing clutch with silicone oil. I have some,
though the viscosity is rumored to be a bit high.
- Swap in the electric-clutch fan from the 190D 2.2 parts car.
It's there, but not the sensor.
Opinions, all?
Voting Results:
| 1 - Replace: | 0 |
| 2 - Refill: | 0 |
| 3 - Redesign: | 1 |
Saturday, July 22, 2006
I used a coping saw to clean up the broken nubs on the left headlight
in the corner where the mount for the under-light trim strip used to
be, then to remove the matching piece from the donor headlight
assembly. I started gluing this to the headlight using my favorite:
Shoe Goo. It'll take awhile to finish this repair, as I can't put all
the necessary glue in place at once. I used cyanoacrylate glue and
accelerant to tack the piece in place, then started potting.
I also did exactly the same thing to the broken under-light trim
strip, cutting the necessary mounting tab off of the donor strip.
This is also gluing up, and will take a session or two more to finish
gluing.
I had a closer look at the electric fan clutch, and found that it
probably won't work for me. It's a little deeper, the fan itself is
definitely smaller, and the water pump appears to have a mount for the
clutch on it that isn't there on mine. So, it won't fit, won't cool,
and requires substantial disassembly to put it on. Nah! That still
leaves me with two viable (?) options.
...Another session of gluing. While sitting in front of the car I
noticed that the vertical piece of sheet metal between the headlight
and the radiator, where the air intake is, was bent towards the
radiator. This pinched off the air intake scoop, and one of the AC
pipes was rubbing on the metal and digging a groove in itself. I bent
this back towards its normal place with pliers, which relieved the
situation somewhat. Stupid wreck!
After the glue dried a bit I spray-painted the repaired area silver.
Not a real close match, but looks better painted than not. Now we
wait for significant drying. If I put it on too soon it'll fall
apart.
I needed to go off on errands, so I put the headlight back in. (But
not the trim, it needs to dry a bit more.) On the trip the AC (after
a puzzling start-up delay) worked well. On the way home it was
91 °F, and at speed on the back roads the vent temperatures
had dropped to 52 °F, the engine temperature was again about
110 °C.
In a fit of madness I sent my wife off on her errands in the
car, we'll see how it went when she gets back!
...Not a happy camper! The AC was spotty, she seems to have
forgotten that all cars with stickshifts are started in first
gear (only some heavier trucks may be started in second, when
unloaded, and she kept killing it when starting out), and she said it
couldn't get up to speed on the freeway. (Wonder what's up with that,
and why was she there anyway? I thought this was a local trip, I'd
never intended for her to go on the freeway yet. That was
for after the alignment.) And she couldn't find the
cupholder that was in the trunk, and she took our son when I was
expecting a solo trip, and she forgot her cell phone...
Not really an auspicious first trip for her.
Sunday, July 23, 2006
Took family to church in it. Still seems a bit gutless, but won't
know for awhile. AC worked fine. On the way home I smelled hot
vaporized diesel again, so I popped the hood. The remaining injector
return lines were now leaking, so I replaced them. They were hard as
rocks. (There was one earlier replacement using non-stock line that I
left, and the line over to the fuel filter was still flexible so I
left it alone too. But I did the other two injector-to-injector
lines, and the tail-end plug. I have very little injector line left
now.)
I checked the throttle travel of the pedal, and it looks good. Can't
blame anything on that!
On the trip home from the neighbors' (after dinner) I found that the
headlights were aimed a bit low, and the righthand light is aimed a
bit too far left. Will start to work on that next.
Monday, July 24, 2006
Yesterday my wife was grossed out by some mold she found on her
seatbelt, so this morning I washed it in bleachy water and rinsed it
out. There wasn't all that much.
Friday, July 28, 2006
Made an appointment for Tuesday at 9AM to get the car
aligned. (Gary at Valley Auto, 535-9570.) Estimated $65 for the job.
Used the Unimog's crane to put the parts car back in the
woods. Much easier said than done, but still much easier than any
other method of dealing with it. My wife should be pleased, she's
recently been complaining again about having to look at it.
Tuesday, August 1, 2006
While putting in the baby seat I (re-)noticed the missing black
plastic cover of the driver's-side rear seat belt track bolt. Put it
on the list too!
On the way to the alignment place the car, whose low-fuel light was
on, started sputtering. I pulled off the freeway and dumped in my
2-gallon can of diesel I'd brought along just in case. While turning
around in the parking lot it became apparent that the motor mounts are
indeed shot, as cornering resulted in huge changes in engine
vibration. Anyone know if '87 300TD mounts are a good substitute?
They look similar, and I have two down in the woods.
With great difficulty I found the alignment place, which is tucked
into an odd corner of town. They jacked up the car, and found that
both right-side wheels had unacceptable levels of play in them. The
front was caused by the steering idler, which had loosened up. The
rear was a totally shot bushing in the forward linkage. I will need
to fix these things, and reschedule. Drat! I wonder if these parts
are any good on the parts car?
On the freeway to the fuel stop the broken (but taped) wind deflector
nearly blew off. Made a hell of a racket flapping against the roof of
the car, nearly ruined my clothing. I spent the rest of the trip
holding it down with my hand through the sunroof, it made shifting
into fifth on the freeway rather interesting.
On the power front, it seemed fine to me. With the relatively low
torque and the bad motor mounts it's definitely preferable at the
moment to drive around town in third gear, at under 3000 RPM. In
the Frankenheap, under the same
circumstances, fourth gear works well. On the freeway it accelerated
just fine (for an economy car) in fifth gear. No neck snapping, but
it did go faster when you pushed down on the go pedal. At 'California
stops', where the heap will go on in second gear the 190D requires
first. I suspect, however, that as the car is sorted out it'll work
better and better, so we'll reserve final judgement for now.
The clock was wrong today, I wonder what's up with that? Will have to
keep an eye on it, it may need some work.
Wednesday, August 2, 2006
The clock was again wrong today, it obviously needs some attention.
Other stuff is much more important, however, so it'll probably be
awhile.
I jacked up the parts car (sadly back in the woods, which slowed the
procedure somewhat) and removed the rear suspension link that matches
the bad one on the car. It looked good. I then swapped it into place
in the car, which went very smoothly. The car had a clip-on plastic
splash shield on its link, which I moved to the good one. I then put
the bad link back into the parts car, it seemed like the best place to
store it and maybe it'll hold things together better. The right rear
wheel no longer has slop in it.
While I was under the car I loosened the parking brake about three
flats. Probably about two too many I found out when I lowered the
car. I'll get it dialed in perfectly one day. The left parking brake
cable sheath is broken, but the one on the parts car is still good.
Another someday.
On the test drive (errands) the car behaved well enough, but I can't
say that it handles any better. The ACC is certainly acting odd, the
whole first part of the trip it wanted to heat and not cool. Then it
settled down. The compressor control didn't necessarily want to run
on the snowflake setting, but the defrost setting forced it on. The
one inoperable rear window has been working fine since it
spontaneously began working, I guess I'll mark it as good until
further notice. I'm also hearing odd whirring noises, I may have a
marginal wheel bearing. Just gotta shake it out more!
Thursday, August 3, 2006
Vacuumed out under the rear seat before I reinstalled it from
yesterday's dog taxiing. Lotta crap under there.
Noted that the Klima relay is the same as that in the SDL, for which I
now have a supposedly-repaired spare. I installed the spare in the
car to try it next time I take it out.
Noticed that the car is also missing one of the seat belt mount covers
on the lower B pillar. Stupid PO's, that makes three missing black
plastic covers in the interior.
I jacked up the car's front and unhooked the steering idler arm.
Following the instructions in the service manual I was able to pull
the two slide bushings. Measuring them with a caliper, I found that
they were a couple of thousandths (of an inch) thinner in the middle
where they contacted the rubber slide bearings than at the end where
they didn't. Probably from wear rather than a design feature. Rather
than replace the bearing kit, which I did not have and didn't want to
spend $40 and some time getting, I decided to try an experiment. I
cut two inch-wide strips of 0.001" steel shim stock (which I had on
hand) sufficient to wrap almost entirely around the slide bushings,
greased them up, and slipped them into the bearings with the slide
bushings. It was a bit difficult to get it all together without
kinking or crimping the shims too much, but it eventually slid
together with the aid of the BFH. I had to use the big bolt to pull
it together far enough so that I could get the rubber dust seals to go
back into place over the slide bushings. The big bolt was also a bit
loose in the slide bushings, so I removed it and did a similar bit of
shimming there too. After this the idler arm was nice and tight once
it was put together and torqued down. Eventually it'll get a proper
bushing kit, but this ought to get it on the road and alignable right
away, and it ought to last for awhile. I then broke for lunch.
After lunch I went to the 87 300TD (124) parts car in the woods and
liberated its motor mounts. It was easy, since there was no motor on
them, but I did manage to lose one of the mounting bolts down into the
frame crossmember, and it would have been an extreme pain to retrieve.
Watch out for that! Fortunately I didn't need it, but I took extra
care when removing the mounts on the car. The procedure was to crack
loose the Allen bolt underneath, then lift the engine with a block of
wood under the pan, then remove the top bolt, then remove the bottom
Allen and finally lift out the old mount. The new mount went in by
putting the top bolt in so that it was still a bit loose while making
sure the locating finger was in the notch in the engine support arm.
Then I went underneath and tightened the Allen into place, then let
the engine down and tightened the top bolt. I repeated this for the
other side, except that it was complicated by the necessity of
removing the air cleaner cover first. Also while I was there one of
the two rear screws on the starter (the long spindly ones) had backed
out, so I tightened that back down. It was ironic, but the 'new'
mounts had 201 part numbers and the 'old' ones were 124! All in all
one of the easiest engine mount swaps I've ever done. Of note is that
there was no obvious sign of failure in either set of mounts, we'll
see on a test drive whether or not there is any difference.
Test drive. Transformation! The 'new' motor mounts are
infinitely better than what were in there, the buzzing
motor-on-rails noise is gone. We'll see if it holds up.
Unfortunately the 'repaired' Klima relay didn't work, so I put back
the original, since I need to use the car this afternoon. I'll take
another whack at it soon.
On the freeway the car is still quite darty, the alignment is
obviously off. But in general I think the steering feels tighter.
Friday, August 4, 2006
Put sick apparently-not-yet-repaired Klima on the bench. (Also
brought in the good one from the car.) Began tracing the schematic.
Measured the tachometer input on the car, the Fluke says it's about
1800 Hz at 3 V at idle. The Klima seems to react at about
800 Hz, as soon as that frequency is applied on the bench the
kickdown relay activates, allowing the kickdown switch to work. The
good Klima will activate the compressor clutch relay for a few seconds
when the input pin (10) is grounded, it then cuts it off because the
compressor tachometer input is not running. The bad one doesn't react
to the input pin. The COP processors seem to get about a 376 kHz
clock, they are running: there's plenty of wobbly signals on
their pins. The small COP425 gets a direct copy of the engine
tachometer signal, after being signal conditioned, so for there to be
any reaction I deduce that at least it is working. I got to probing
around, and I found that the transistor drive to the compressor
relay was getting a correct signal, so I measured the relay's
coil resistance. Around 500 ohms, which is approximately the
value of the resistor in parallel with the coil. The kickdown relay
has a 70 ohm coil. Freakish, the repaired electronics work fine,
but the relay itself is defective. You don't see that too often.
Maybe it got cooked? I removed it and then when I measured the
resistance it was indeed nearly an open circuit. Finding a
replacement relay may be difficult, my junkbox relays are all much
larger than that one.
It appears that the resoldering job was successful, but the patient
died anyway. Memo to self: before attempting a Klima resoldering
repair, check the relay coils. If dead, don't bother unless you've
got a replacement relay source lined up.
I swung by the U-Pull to see if the (destroyed by monkeys) ACC control
panel had the right kind of small relay in it (I know it has one that
looks similar), but unfortunately the car had already been sent to the
crusher. (Which fact was not recorded in the notebook out
front.) So I shopped around until I found a fairly small Japanese
relay, we'll see if it can be made to fit.
I cut the case off of the little relay, and most of the spade lugs. I
had to use the hacksaw to cut off half the base, but once I'd done
this, even though it was considerably larger than the original, I
could tuck the relay into the hole vacated by it. I think I can wire
it in place loosely, and then insulate it so it doesn't short out on
anything. It'll be a fiddly bit of work, though. Not particularly
cost-effective in terms of time!
Saturday, August 5, 2006
In the morning I finished repairing the Klima and tested it on the
bench. It seemed to work so I installed it for testing in the car. I
also cleaned up after the last U-Pull trip. Out on errands today the
repaired Klima seemed to work perfectly.
Decided to pick up the pace a little as I've got a road trip next
weekend I'd like to use the car for, so I took the cruise control
amplifier out in the evening. On the bench it did the usual spastic
dance, so I put paint stripper on to remove the solder-side varnish.
Then I scrubbed and dried the board, and resoldered it. On the bench
it seemed to work and wasn't sensitive to shock or flexing, so I
buttoned it back up for installation and testing tomorrow. Tedious,
but straightforward. Hands go a bit numb during one of these, though.
By popular demand I photographed the repaired low-oil board, and annotated it in
Photoshop per the schematic.
Sunday, August 6, 2006
I installed the repaired cruise control amplifier. Then I removed the
solar battery charger that I'd hard-wired in to the car, my wife had been
complaining about it sitting on her seat!
Next, I removed the Hirschmann 6000EL antenna. It looked OK inside,
and the belt was intact. Removing the motor connectors from the PCB I
could apply power direct to the motor and it ran. I removed the mast,
and found it to be intact, but dirty and sticky. I spent considerable
time sluicing it out with acetone, trying to free it up. It's
significantly better now, but I may not be done with this process.
The antenna's circuit board is built with three IC's: a CMOS 40106
Schmitt trigger hex inverter, a CMOS 4060 14-stage ripple counter, and
a 555 timer. There are four power transistors, and six signal
transistors as well, plus the usual crop of diodes, resistors, and
capacitors. There is one power resistor that is probably for motor
current sensing.
On the way to church the cruise performed properly. But on the way
back it would work, and then get into this neck-snapping throttle
yanking cycle. I suspect that its internal gain resistor(s) are wrong
for a stick shift, it was too regular (and intermittent) for it to be
still bad soldering, etc. Need to research this I guess.
I dug into my box of spare cruise amplifiers, and didn't find what I
needed. I have one manny-tranny vacuum box, but no slushbox models
with the same PCB layout, so inferring the differences from the vacuum
circuit is no good. And, of course, no manny-tranny servomotor boxes.
(If I had one, I'd just use it.)
I tried the antenna out, and it's completely dead. The paint stripper
I use for cruise amplifiers is methylene-chloride-free, and did not
even dent the RTV coating that's on the antenna board. I did some
searching, and it appears that methylene chloride itself will attack
RTV. Got to find some, I guess.
But as I don't have any methylene chloride, and whereas I
do have some other solvents, I thought I'd try some of the
others first. I placed the board in a glass dish and put a puddle of
Xylene in it just deep enough to cover the bottom of the board.
(Xylene can be used to thin RTV on application.) I then covered the
dish to retard evaporation. I let it sit for an hour and then
scrubbed it with a wire brush. The Xylene softened up the RTV enough
that a lot of it scrubbed off the board. Another two dips and scrubs
finished the job. Then I washed off the board with running water and
a scrub brush, and dried it.
Unfortunately resoldering had no effect on the board. What's worse,
it was difficult to do, since it is a tightly-packed double-sided
(at least) board.
So I started probing around with the 'scope. The 4060 counter gets a
665 Hz clock on it for several seconds after power-up. No doubt
this is part of the initial retraction logic (since the switch was
disconnected at that time). When the switch is (virtually) set to UP,
the counter again got a clock for a time. Also at this time the 555
timer pin 2 (trigger) voltage begins to sink, and after a few
seconds it fires. When the switch is set to DOWN the clock again runs
for a time. In other words the circuit appears to be reacting to
stimulus OK. The two big heat sinks are home to the motor's 'H'
drive, and each sink is common to the collectors of a complementary
NPN/PNP pair of BD437/438 power transistors, and to one of the two
motor pins. Two of the transistors have a small base voltage on them
which goes away when the motor is supposed to be running (at least in
one direction). None of the transistors is getting power, however,
and for an H drive the PNP transistors' emitters should be very
positive. The big resistor in the center of the board is intact, as
are the two mid-sized 39-ohm units. Because of the density of the
board, the encapsulation, the presence of the looming heat sinks, and
its multi-sidedness it is extremely difficult to trace out the
circuit. I wonder if I have a working antenna to compare with in the
parts box? Something is definitely wrong with the heavy drive power
supply on the board. I know that the board senses motor current draw
to stop running when the antenna mast hits its stops, no doubt this is
what is broken. More later, I hope.
Monday, August 7, 2006
I dug out another Hirschmann 6000EL. It doesn't work either, but at
least it tries. The circuit board seems cooked, and it sometimes
breaks out into oscillation, and the output of the H drive is
sometimes at an intermediate voltage. Bad power transistor(s)? Not
good. But at least the bridge is getting power, so I might be able to
use it to learn something. It does sorta try to work, at times. The
wires from the connector are charred where they touched the heat
sinks, and the heat sinks have oxidation on them. Not good signs! (I
sprayed penetrating oil on the spare antenna's mast and got it worked
loose. It ought to be a good spare, with a little more work.)
Ohming out the not-quite-so-bad (??? but heavily cooked) board
resulted in finding that the H bridge got power directly through
a diode yet the bad board did not, although the diode itself was OK.
Examining the bad board through a strong light (the cooked board is
currently nearly opaque), it appeared that a trace must have been
fried, because there sure didn't seem to be any other circuitry along
the way to where there was no longer any continuity. Jumping over the
suspected blown trace resulted in shorted power. There was a BZT03C18
Zener diode right there at the new jumper point between the
H bridge power terminal and ground, and it ohmed out nearly zero
in both directions. I removed the diode to find it indeed shorted,
and with it removed the antenna started to work. The diode's rated at
18 V 25 mA, and it appears to be just a spiking clamp, so I
ought to be able to substitute something. (Not that the part is all
that expensive, but waiting for it would be a pain.) I'm sure the
thing would run just fine without it, but I don't want to put it at
risk, that part's got to be there for a reason.
Digging around in the parts box I found a batch of 6.2V Zeners, so I
strung three of them in series to replace the dead one. That was
tedious, but ultimately successful. With the Zener string and the
jumper for the dead trace in place the antenna started working. Woo
hoo! Y'know, I'd heard somewhere that the circuit detected motor
stall current to shut off, in addition to a timeout, but I've really
seen no sign of such circuitry. Unless the one big power resistor is
hooked into the ground side of the bridge. Oh well...
I installed the antenna back in the car, and it works! Good, another
vital road trip item to check off.
I then pulled the instrument cluster, which I really hate doing on
this model, and pulled the clock out of it. Removing the two
100 µF 16 V capacitors, one measured 25 µF
and the other 8 µF. Not good, and no surprise the clock
wasn't working well. The drive current for the stepper motor goes
through these. I replaced these with junkbox items that tested good,
probably the last two I had, and reassembled the clock. It seemed to
work fine on the bench, so I put it all back together. Not fun.
While I was there I squirted some more M1 5W20 into the
speedometer cable, it seems a bit jittery at low speeds. (Not too
surprising considering that it has been damaged.)
Tuesday, August 8, 2006
Alignment day, again. Before I departed I jacked up the car's four
corners to check again for play, better here than there! I also put
back the original Klima, and put the repaired one into spares.
On the freeway the cruise control worked perfectly. Not much of a
stress test, however, as there are no hills. The too-high loop gain
of the existing (slushbox) amplifier may only be an issue in lower
gears, or under stressful circumstances.
At the shop they jacked it up and waggled all the wheels. While some
where a bit looser than they'd like, nothing was a show stopper. They
then hooked up the Hunter G111 to it and had at it.
They earned their money today, at least as far as elapsed time went.
I was there a little before 9AM, and didn't get out of
there until almost 11. The alignment itself went almost
2.5 hours.
Before:
Left Front
| Min. | Nominal | Max. | Actual
|
|---|
| –0.33° | 0.00° | 0.17° | 0.1°
| | 9.50° | 10.00° | 10.50° | 9.3°
| | 0.08° | 0.17° | 0.25° | 1.12°
| | | | 13.8°
| | | | 13.9°
| | | |
|
|
|
|
|---|
| Camber
| | Caster
| | Toe
| | SAI
| | Included Angle
| | Turning Angle
|
|
Right Front
| Actual | Min. | Nominal | Max.
|
|---|
| –0.4° | –0.33° | 0.00° | 0.17°
| | 8.0° | 9.50° | 10.00° | 10.50°
| | 0.10° | 0.08° | 0.17° | 0.25°
| | 13.8° | | |
| | 12.9° | | |
| | | | |
|
|
|
|
|---|
| Cross Camber
| | Cross Caster
| | Total Toe
| | Set Back
|
|
Front
| Actual | Min. | Nominal | Max.
|
|---|
| 0.5° | –0.33° | 0.00° | 0.33°
| | 1.3° | –0.50° | 0.00° | 0.50°
| | 1.22° | 0.17° | 0.33° | 0.50°
| | –0.06° | | |
|
|
Left Rear
| Min. | Nominal | Max. | Actual
|
|---|
| ... | ... | ... | –0.7°
| | 0.13° | 0.21° | 0.29° | –0.56°
|
|
|
Right Rear
| Actual | Min. | Nominal | Max.
|
|---|
| –0.2° | ... | ... | ...
| | –0.21° | 0.13° | 0.21° | 0.29°
|
|
|
|
Rear
| Actual | Min. | Nominal | Max.
|
|---|
| –0.76° | 0.25° | 0.42° | 0.59°
| | –0.18° | | |
|
|
After:
Left Front
| Min. | Nominal | Max. | Actual
|
|---|
| –0.33° | 0.00° | 0.17° | –0.3°
| | 9.50° | 10.00° | 10.50° | 9.6°
| | 0.08° | 0.17° | 0.25° | 0.14°
| | | | 14.0°
| | | | 13.8°
| | | |
|
|
|
|
|---|
| Camber
| | Caster
| | Toe
| | SAI
| | Included Angle
| | Turning Angle
|
|
Right Front
| Actual | Min. | Nominal | Max.
|
|---|
| –0.2° | –0.33° | 0.00° | 0.17°
| | 9.8° | 9.50° | 10.00° | 10.50°
| | 0.15° | 0.08° | 0.17° | 0.25°
| | 13.8° | | |
| | 13.6° | | |
| | | | |
|
|
|
|
|---|
| Cross Camber
| | Cross Caster
| | Total Toe
| | Set Back
|
|
Front
| Actual | Min. | Nominal | Max.
|
|---|
| –0.1° | –0.33° | 0.00° | 0.33°
| | –0.2° | –0.50° | 0.00° | 0.50°
| | 0.29° | 0.17° | 0.33° | 0.50°
| | –0.06° | | |
|
|
Left Rear
| Min. | Nominal | Max. | Actual
|
|---|
| ... | ... | ... | –0.7°
| | 0.13° | 0.21° | 0.29° | 0.16°
|
|
|
Right Rear
| Actual | Min. | Nominal | Max.
|
|---|
| –0.2° | ... | ... | ...
| | 0.16° | 0.13° | 0.21° | 0.29°
|
|
|
|
Rear
| Actual | Min. | Nominal | Max.
|
|---|
| 0.32° | 0.25° | 0.42° | 0.59°
| | –0.00° | | |
|
|
Unfortunately I don't think it handles all that well even now, I still
think it's darty on the freeway. It has to be better than it was,
however, especially as regards eating tires. They did use a spreader
bar when setting the final toe-in, I mentioned this to them and it was
also recommended by the machine itself.
I also noticed that I managed to not hook up the tachometer yesterday.
More fun!
I cleaned out the 115 cigar lighter socket I procured for potential
use in this car. It came apart nicely, it's a real pleasure to work
with things that aren't glued or crimped together permanently. One
idea I have is to set the thing in the base of the first aid kit box.
That'd be out of the way, yet accessible for things like cooler power
on road trips. It still would need power, but there's a nice fat
auxiliary power wire (currently disconnected) going back there from
the battery. Ideas:
- Wire it straight. Remember to unplug items if car will be parked
for more than a little while.
- Hook up a relay so power can be automatically/easily shut off.
Actuate relay by ... Ignition wire. (Not there yet, would have to
run one back, or move existing antenna wire off the radio to its
power terminal.)
- ... Radio antenna wire. Socket would unpower with the key, but
due to the Becker's ability to be turned back on with the key off
you could repower the accessory with the radio. Easy, especially
as the antenna wire is already right there with the power wire,
but would leave the radio on too. Could forget and drain the car
battery.
- ... Ignition wire in conjunction with timer. Specifically for
travel cooler use, would leave the cooler on for a reasonable yet
thought to be safe time after turning off the car. An hour?
That'd be nice, but a rear window defogger relay already exists
that has a 20-minute (or so) delay built in, and supposedly has
low-voltage automatic shutoff.
- ... Some switch-selectable combination of above, probably
switched versus timed versus always hot. Would be excellent for
both travel cooler and solar charger purposes, switch-selectable.
Wednesday, August 9, 2006
Looked at the power wiring to the trunk. Can resurrect a nice big
fused unswitched line and a mating ground, no problem. I have a
junkbox rear window defogger relay (107 820 00 10) and
its mating connector, which might serve. It has a nice mounting ear
on it already. Internally it's a simple analog circuit using a
1000 µF 16 V capacitor as a timing element. (It
rests at 12 V and once triggered begins to decay down to about
5 V whereupon the relay trips off.) The relay draws
42 µA of current when off, so it can be used in an
unswitched environment. It draws about 120 mA when on. I hooked
it up on the bench and wired a spare 12 V dashboard clock to it
to find out how long it really runs once triggered. The clock
registered about 17 minutes. There is plenty of room in the
relay shell to add more capacitance.
There are unused speaker wires running forwards from the trunk to the
driver's footwell area, I can perhaps use one to tap the (now unused)
kickdown switch input to get an "Engine Running" signal (from the
Klima), perhaps even better than "Ignition On" for the purpose of
gating heavy loads.
Time to rotate the tires to put the badly-worn one (from the previous
bad alignment, one presumes) on the back. No problem, except that I
finally noticed that the front and back tires are of different sizes!
The front (worn) tires are 195/60R15, and the back are 195/65R15. So
I rotated both sides to keep it symmetrical. I wonder which size is
the correct one?
I dug around in the junk box looking for capacitors. While I found
one or two that would fit in the shell and were of appropriate values,
they were too leaky to serve. The only non-leaky one I found was a
1000 µF 35 V unit that was 'new', and much too large
to fit in the shell. With it in circuit, the delay was about
30 minutes. I tried one of the more leaky ones in parallel too,
and got almost an hour's delay. I tested the relay and found that it
indeed will supply power indefinitely so long as the start control
lead is held high. (This will be hooked to the kickdown output of the
Klima.) I think that it just re-arms itself quickly when it times
out, as I don't see any way to maintain the charge on the timing
capacitor through the start terminal.
I removed the first-aid box and cut a rectangular hole in the side for
an old 114/115 rear dome light switch. I also drilled a hole in the
side for the lighter socket. Unfortunately I had a big chunk torn out
between the two holes when the 15/16" drill grabbed, so I had to glue
that back. These items are on the side rather than the bottom so that
water and crap won't get into them, and so that they don't hang down
into the trunk where they could get caught on things.
I found a male pin to match the kickdown switch connector and soldered
it onto one of the fore/aft wires, and plugged it into the correct pin
on the connector and taped it up. I checked with a meter, and that
pin is indeed hot only when the motor is actually running.
 The defogger relay circuit
uses two PNP transistors, five diodes, two capacitors (one big), seven
resistors, and one relay. I made a schematic of the relay, for future
reference, in Illustrator, PostScript, PDF, and GIF formats. In operation, Q1 is
'virtually' on all the time, which means the relay will actuate when
its positive coil lead is powered. Q1 is deenergized by the base
being dragged high, either by the Stop input going high or by the
action of Q2 when it times out. C1, the timing capacitor, is charged
through D2 when the relay is off. The voltage on C1 begins to decay
through R7 once the relay is energized, once it sags to a point that
turns Q2 on (a little below 5V, set by R3 & R4), Q2 drags the base
of Q1 high, turning off the relay. D1 holds the relay coil on during
the timed cycle, and also supplies power to the light in the dashboard
switch.
The defogger relay circuit
uses two PNP transistors, five diodes, two capacitors (one big), seven
resistors, and one relay. I made a schematic of the relay, for future
reference, in Illustrator, PostScript, PDF, and GIF formats. In operation, Q1 is
'virtually' on all the time, which means the relay will actuate when
its positive coil lead is powered. Q1 is deenergized by the base
being dragged high, either by the Stop input going high or by the
action of Q2 when it times out. C1, the timing capacitor, is charged
through D2 when the relay is off. The voltage on C1 begins to decay
through R7 once the relay is energized, once it sags to a point that
turns Q2 on (a little below 5V, set by R3 & R4), Q2 drags the base
of Q1 high, turning off the relay. D1 holds the relay coil on during
the timed cycle, and also supplies power to the light in the dashboard
switch.
I installed a not-too-leaky 2200 µF 25 V capacitor
(from the junk box) in parallel with the existing 1000 µF
16 V timing capacitor (C1) inside the relay. The time delay
worked out to be 40 minutes. I then reexamined the schematic of
the defroster relay, and discovered a problem. Because the relay
backdrives its own Start (E) input through a diode (D1) from its
output (87) in order to light the light in the switch, my original
plan to just short the output to +12 V via the 'Solar' switch for
the solar charging panel is no good: if you do that the relay
energizes, and stays that way. Unfortunately I have already cut the
hole for the switch, it's not particularly a standard size, and it's
only SPST. I need to do some more thinking. Can the relay be
modified internally to isolate its output terminal from the E input?
A series diode would do it, but it'd need to be a very hefty one, and
it would cause a voltage drop to the load.
With the relay assembled the time ran long. Really long. Three hours
in fact. Apart again it ran 40 minutes, I think the extra capacitor
is physically interfering with the internal relay armature. Going to
have to change something. I had a piece of gasket material in there
for insulation to keep the capacitor's terminals from bumping into the
(hot) frame of the relay. I'll try gluing the capacitor to something,
though normally I hate doing that.
Thursday, August 10, 2006
Glued capacitor into the relay. Sigh.
Road trip tomorrow, I've got to stop screwing around with this. I
assembled the power supply socket using the relay and the 'Solar'
switch, but for now you have to remember not to use the switch unless
you unplug the relay inside the trunk. (Otherwise the relay will be
on, burning 150 mA continuously. Not good when associated with a
feeble solar charger!) The Start (E) input needed an isolation diode
in the wiring harness to avoid back-driving the car's circuitry.
Testing shows that it works, though merely turning on the key glitches
the signals enough to kick-start the cooler. It won't, however, run
more than one cycle if the key is left on. Someday I may improve this
situation...
Then I cleaned out the trunk, pried the studs out of the spare tire
(which is 185/65R15, a third size!), washed it, and aired it up. I
found the wheel mounting aid under it, so that's good, but none of the
rest of the toolkit except the lug wrench. I pulled back into shape
the smashed spare tire mounting pillar, though the securing bolt and
flange are missing. I reassembled the under-dash area, and the air
intake cowl. That cowl cover is really nasty to get back
right. Crappy design, IMHO. I then glued up the cracks (and the
broken-off chunk) of the trunk floor panel. Shoe Goo! I installed a
trunk light bulb, it'd never had one before.
Friday, August 11, 2006
Shimmed the mounting bushing for the belt tensioner shock absorber.
It was rattling at idle because the rubber bushing is a bit tired.
Nothing a strip of pop can can't cure! The shock itself seems fine.
On the road, it's still darty. Something is not right. But
it's not horrible, so onwards! The cruise control works well, except
when coasting. Then it gets incredibly surgy, that bad loop gain
value or something. But still quite useful.
The car certainly seems to lack acceleration in higher gears, going up
passes it would drop to 55 MPH. Downshifting to
fourth didn't really help, and the speed loss while disengaged was
hard to make up. Otherwise it doesn't seem too bad. Kept speeds to
about 65 MPH, the car just wasn't happy a lot
faster than that, and I was interested in an economy run. AC was on
the whole time, though. You can definitely feel the
compressor when it kicks in.
The cooler timer was nice on the trip over. We made several stops
(nap and potty breaks) but the cooler was kept going for sufficient
time to help keep the food cool.
Saturday, August 12, 2006
Brother had a look at the car's engine before our beer run, he heard
the noise of the tensioner beating on its shock at idle. Noted that
the tensioner was cocked and in desperate need of replacement. I
concur, and I think I've got one or two on the parts cars.
Monday, August 14, 2006
Returning through Yakima we filled up, exactly 12 gallons for
509 miles. About 42.4 MPG. Not bad. Not
great, but not bad. I'm starting to notice the sput-sput-sput of an
exhaust leak, I'll have to check the manifold bolts.
Filled up at home again, 5.3 gallons for 227 miles,
42.8 MPG. This leg was slightly faster,
68 MPH or so. Car's too darty at higher speeds,
power is lower than I'd expect, and there's an out-of-balance tire or
something. At 75 MPH it's pretty unpleasant. The
car's not ready for prime time, IMHO. Brother thinks I should just
off it, but he has no patience for this kind of thing. In his world
if it's not a race car it's a pod, and not worth messing with. He
suggested I talk with the alignment place to see what they thought,
and perhaps get another check of its specs. If OK and no sign of
worn/wobbly bits, he suggested trying a frame shop to have them check
to see if the car was bent.
Tuesday, August 15, 2006
In an attempt to learn more about the surging cruise control, I opened
up all four of my spare servomotor amplifiers to get the tunable
resistor values out of them. I've also been sent values from a unit
that is purportedly (but not verifiably) from a stickshift car, and I
opened the one from the car itself.
Resistors listed in Left-to-right order, connector to Right
| Unit | Bd # | Bd # | # Res | Value | Car | PN | VDO PN | Date
|
|---|
| 1 | 993 | 12855 | 2 | 49,400 1% Tempco 2 | EPC 123? | 002 545 91 32 | 412 205/7/10 | 5.85
|
| | | | 51,100 1% | | (Programa refurb) | (29132) | 3(/4) 2002
|
| 2 | 735 | 12329 | 3 | 511,000 2% | EPC Euro? | 001 545 79 32 | 412 205/1/1 | 2.82
|
| | | | 46,400 2% |
|
| | | | 562,000 2% || 4X2,000 2% |
|
| 3 | 993 | 12X55 | 2 | 44,200 1% | '85 190E Automatic | 003 545 09 32 | 412 205/7/5 | 28/96
|
| | | | 39,300 1% |
|
| 4 | 993 | 12355 | 2 | 49,700 1% | EPC 560 SEL? | 003 545 07 32 | 412 205/7/4 | 10.84
|
| | | | 34,900 1% |
|
| 5 | X | 12329 | 3 | 511,000 2% | "For 123 Stickshift" | 002 545 32 32 | 412 205/1/6 | X
|
| | | | 53,600 2% | | (Cross 002 545 91 32)
|
| | | | 442,000 2% || 422,000 2% |
|
| 6 | 993 | 12355 | 2 | 42,200 1% | '86 190D Automatic | 003 545 86 32 | 412 205/7/7 | 23/85
|
| | | | 59,000 1% Tempco 2 |
|
What have I learned from all this? Not much.
Wednesday, August 16, 2006
Emptied out car from trip. Found that the torn bits of the trunk seal
had come off, but were still in the trunk. Glued them back with
weatherstrip cement.
Replaced failing belt tensioner with a good used one from the parts
car. What a PITA! I was able to do it without removing the fan or
radiator, but it took hours. Critical tools were little stubs of
Allen wrenches, 12mm and 6mm, and matching box- and open-end wrenches.
The main (rocking) bearing was beaten to death, there were ball divots
in the races. These bearings don't survive well, in my experience.
(Perhaps they should be stout sleeve or roller bearings rather than
ball bearings? I know that ball bearings don't hold up well in
rocking applications.) I ruined the tensioner's dust snap cap when
removing it, but fortunately the parts car had another one and I was
able to get it off intact. (Neither car had the cap for the idler
wheel, so I'll need to get one.) The parts car's tensioner bearing
felt very good. Both idler wheels were good, but both were getting
that dry bearing sound. I removed the dust seals and cleaned out the
original, as it was a little less worn, then packed it with wheel
bearing grease and replaced the seals. The parts car's idler wheel
retaining Allen bolt was siezed, and I ended up having to drill off
the head. Once that was done and the idler wheel was pried off over
the stump vise-grips removed the remainder easily.
Of note is that both tensioner shock absorbers were still tight, but
the bottom ring on the parts car's was cracked. So I reused the one
off the car. Its bottom rubber bushing was very loose, so I swapped
in the better one from the parts car, again with a strip of pop can
slipped into there to take up the slop. I shimmed (heavily) the other
shock and put it in the spare pile.
When the car was started there was still a hint of rattle at idle,
which was eliminated by putting my thumb on the top mount of the
shock. Though the bolt and the outside of the spacer were shimmed,
there was still play between the outside of the rubber and the shock's
mounting ring. I pulled the whole mount out and put a ring of bicycle
inner-tube rubber around the (hardened) rubber mount. When it all
went back together (difficultly, I might add) there was no more
rattling noise at idle. Much better! We'll see how it holds up, it
really should get new mounting rubber, but I don't know if that's
separately available. According to the EPC, assuming I used it right,
it is not.
The idler wheel is no longer canted, and runs true. That part of the
operation was a success at least. In retrospect there was no danger
of the tensioner breaking in any way that I could see, and it was also
a long way from spilling the belt. This could probably have run as it
was for some considerable time, but the noise was very annoying and
the hammering of the shock couldn't have been good for its health.
Thursday, August 17, 2006
Took the car on errands, and the nasty rattle does seem to be cured.
But the exhaust leak is still there, got to tackle that next. I
called the alignment place and described my problem to them. He said
it sounded like they needed a bit more toe-in and to bring it in
tomorrow at 10 AM.
Friday, August 18, 2006
Removed the cruise control actuator and the EGR valve so that I could
get to the exhaust manifold. (This also allowed me to remove the
now-useless mount for the automatic transmission cable.) None of the
manifold's retaining nuts were loose, nor was there any obvious
problem with the EGR assembly. While I was there I noted that a 27mm
3/4" socket fit perfectly into the EGR valve's fitting, so I used the
somewhat larger 32mm socket to trace a circle on some 16-gauge sheet
metal and cut it out with tin snips. I clamped the sheet metal circle
to the 27mm socket in the vise and used a small hammer to bend a lip
all the way around, using the socket as a mandrel. This made a
circular metal cap to go in place of the EGR valve, which clamped down
nicely over the manifold fitting. The intake pipe side also got a
similar plug, but using the 24mm socket as a mandrel. This wedged
tightly inside the intake pipe. It took longer to get the
clamp's bolt started than it did to make the plug. The vacuum fitting
on the firewall valving got plugged using a length of rubber and a
metal plug in the end. At some future point in time I'll remove the
intake crossover pipe altogether, but that won't happen until I take
apart the intake manifold side.
While everything was apart I used brake cleaner and a wire brush to
get off the worst of the grime. Starting the engine showed no exhaust
leaks at the EGR fitting or the exhaust manifold, but it became
apparent that the front muffler (resonator? First rat of three in the
snake's gullet anyway) is leaking badly. It'll have to come off for
me to have a look at it.
Took the car back to the alignment place. They noticed that there was
more play on the right-side tie rods, and that the toe-in on the right
had shifted over the nearly 900 miles since the alignment. It took
them three hours to dial it back in, a large part of this time was
because the alignment machine was just acting flakey. They even
swapped machines, and both acted the same. After much
fooling around, and some references to calling my car 'Christine', I
finally noticed that the other alignment machine was firing its laser
across the shop right at the one we were using! (They had a
burned-out laser component to show me, and it's not a tiny one.) We
put a big sheet of cardboard between the two cars and the problems all
went away. Obviously the two machines were interfering with each
other. This had never been a problem there before, but the particular
other car had a large toe-in value that was out of whack, causing the
laser to point across the shop and over to the other alignment bay.
That fiasco cost us at least two hours, they'd even gone so far as to
switch alignment machines and then it started acting flakey.
We'd fooled around with shop lighting, power outlets, etc. Anyway, he
dialed in more toe-in to make up for the looseness of the aging
suspension, something he's had plenty of experience with. We all
weren't sure what I owed them, so I offered them $20, he seemed happy
with that. Not much of a return on their three hour callback session,
but at least they did learn something about dueling alignment
machines.
After (again):
Left Front
| Min. | Nominal | Max. | Actual
|
|---|
| -0.33° | 0.00° | 0.17° | -0.2°
| | 9.50° | 10.00° | 10.50° | 10.1°
| | 0.08° | 0.17° | 0.25° | 0.18°
| | | | 14.2°
| | | | 14.0°
| | | |
|
|
|
|
|---|
| Camber
| | Caster
| | Toe
| | SAI
| | Included Angle
| | Turning Angle
|
|
Right Front
| Actual | Min. | Nominal | Max.
|
|---|
| -0.2° | -0.33° | 0.00° | 0.17°
| | 10.2° | 9.50° | 10.00° | 10.50°
| | 0.17° | 0.08° | 0.17° | 0.25°
| | 14.3° | | |
| | 14.1° | | |
| | | | |
|
|
|
|
|---|
| Cross Camber
| | Cross Caster
| | Total Toe
| | Set Back
|
|
Front
| Actual | Min. | Nominal | Max.
|
|---|
| 0.0° | -0.33° | 0.00° | 0.33°
| | -0.0° | -0.50° | 0.00° | 0.50°
| | 0.35° | 0.17° | 0.33° | 0.50°
| | -0.20° | | |
|
|
Left Rear
| Min. | Nominal | Max. | Actual
|
|---|
| ... | ... | ... | -0.5°
| | 0.13° | 0.21° | 0.29° | 0.11°
|
|
|
Right Rear
| Actual | Min. | Nominal | Max.
|
|---|
| -0.5° | ... | ... | ...
| | 0.34° | 0.13° | 0.21° | 0.29°
|
|
|
|
Rear
| Actual | Min. | Nominal | Max.
|
|---|
| 0.45° | 0.25° | 0.42° | 0.59°
| | -0.12° | | |
|
|
On the freeway the handling was much improved. While it's not
perfect, I think I can blame most of it on loose parts that really
should be replaced. (Someday!)
Anyway, only a few miles down the freeway I started losing power, and
when I hit the clutch it became apparent that brakes were sticking. I
got over to the side and limped to the next exit, and then (foolishly,
I guess) tried to limp slowly to my next stop at the bank. Right near
the end it started really bogging down. When I pulled in to
the lot the car could barely move and was smoking, and I even had to
blow out a small fire in the left rear brake area when I stopped.
Disaster! I tried to jack up the car to take off that wheel, and I
couldn't get two lug bolts out. They'd siezed up. I thought it was
the parking brake that had somehow gotten stuck on, because the handle
didn't feel the same anymore. I'd had some previous trouble with it
sticking on, but not recently.
While the car was up in the air there was a loud POP-whoooooosh
blowout sound and the car was enveloped in a big white cloud of
nasty-smelling smoke. At first I though a tire had blown, but in fact
the right rear brake line had melted and blown off the other side of
the car, spraying brake fluid all over extremely hot metal. Once the
car had done this, however, it rolled again. I determined that I
could take the car home at that point, the front and parking brakes
seemed to be OK. I theorize that the overlong alignment session with
the brake pedal applied took out the rear section of the master
cylinder somehow, because both rear brakes had been stuck on together.
Once pressure was released what was left of the rear calipers released
enough to let the car roll again.
Obviously I now have an undriveable mess on my hands, and will need at
least a master cylinder (or rebuild), two brake hoses, and two caliper
rebuild kits. I hope the heat didn't ruin the rear bearing seals or
the like. Crap. We'd just gotten the insurance turned on on this
car, but my wife called this afternoon and took it back off again, and
put on her brown convertible instead, the 450 SL.
I think the econo-box is going to be down for a little while, I'll
know more once I can take it apart.
There is some question as to whether the car had done this a bit
before, as my wife had reported that it couldn't get up to speed on
the freeway the first time she'd driven it, and I'd heard off and on
some odd brake-type noises, especially today. Obviously it hadn't
done it much, or we'd have had a brake heating episode like this
before now. Given the great mileage it had on the road trip it's
obvious that the brakes hadn't been dragging then. I think the three
hours standing on the brakes did it in somehow. (It shouldn't have,
obviously something was weak.) I'd actuated both the service and
parking brakes on the freeway today, but nothing helped.
Saturday, August 19, 2006
Jacked up the car. The siezed lug bolts on the left side did come
out, with difficulty, but the threads are not in great shape. We'll
see if they can be cleaned up or not. The caliper came out and the
hose came off it without incident. I sprayed PB around the brake drum
hub and put on my largest 2-jaw puller. (The bigger 3-jaw wouldn't fit
past the splash shield.) I removed the retaining screw, put some
tension on and then whacked the drum with the BFH. It popped right
off. I found nothing looking too bad in there, it seems like just the
brake rubber may have been all that was damaged. The parking brake
shoes still had some life left in them.
On the right side things proceeded much the same. Though there were
no lug bolt problems, the brake shoes were hung up inside the drum
somewhat. Enough pulling and yanking got them off anyway. The shoes
are cracked on that side, so something will probably need to be done
there.
The brake disc/drums and the calipers all have a reddish cast to them,
I suppose that's temperature-induced surface rust. I examined the
front-to-rear brake line, thinking that perhaps it had gotten damaged
yesterday on the lift, but there was no sign of trouble.
I went to the parts car and liberated its brake parts. Perhaps they
can be pressed into service? It looks like it's got a couple of
usable parking brake shoes, at least. Will have to disassemble the
calipers to see if they're OK.
Sunday, August 20, 2006
Removed rear hoses from car. A PB Blaster soak overnight and good
flare nut wrenches made it easy. Pulled the DBE master cylinder and
rear brake hoses from parts car, ditto. I then disassembled the DBE
master cylinder, both as a learning experience and to find out what
condition it was in. It seemed very good inside: the bores were
smooth, all the rubber was intact and 'live', etc. A little bit of
sludge but nothing very significant. I figured out how it worked,
especially the check valve for the rear circuit. Then I pulled the
master cylinder from the car, it's Girling but almost identical in
appearance and construction to the DBE. In fact, it looks like the
guts would swap, though somehow I doubt they actually would. It was
also in equally good shape inside, though there was a bit of flaking
sludge here and there, but that couldn't cause the problem.
I did find that the rear circuit check valve pin barely made
contact with the retaining/release pin that holds the plunger in.
(When the plunger comes out to the retaining pin stop, the release pin
of the valve should contact it first and lift the valve off the seat,
releasing the pressure.) Blowing through it while actuating it
resulted in less air flow than in the DBE. Looked like it may have
been defective all along, given how it works and in comparison to the
DBE. I filed the slot in the plunger deeper to expose more of the
valve's pin for release. Scary fun! Operating it then resulted in
air passage more like the DBE. I then cleaned it thoroughly
and put it back together, using brake fluid as an assembly lubricant.
If I need to I can swap in the DBE, though the repaired Girling looks
like it ought to work. Unfortunately I ran out of time to work on it
more today.
While under there I also noticed that the exhaust pipe is cracked
right where it enters the rear muffler, and there is a soot track.
More leaks in the exhaust system to weld up!
Monday, August 21, 2006
I removed the rubber dust seals from one of the calipers, but I was
unable to pull the pucks out of the caliper. There was enough
corrosion on the pucks to make them very stiff.
I then tried to make a puck-removal tool using my spare master
cylinder and some brake hose pieces. Too messy and unweildy, as it
turns out. (But I did find out that the inside of the brake hose
fittings is coarsly threaded, I was trying to flange together a
male-male hose out of my bad pieces of hose.) So I moved on to Plan
B. I'd bought a spare thrift-shop grease gun some time back. The
fitting on it has exactly the same threading as the brake calipers.
It was missing the T handle and the grease nipple fitting, but looked
like a high-quality unit, and is much the same as my old grease gun
that used to be my grandfather's. It's stamped "B-K Service Products
No. 4-817."
Anyway, I spent quite a bit of time cleaning the old grease out of it,
and disassembled it completely in order to do so. I found that the
sliding 3"×1/4" 'nut' from a Mercedes driveline center
bearing mount threaded nearly perfectly on to the end of the grease
plunger shaft (even though it was certainly a metric/US mismatch),
making a pretty serviceable T-handle for the plunger. With this
missing piece replaced the grease gun was ready for service. I
removed the plunger and end cap, leaving just the open grease tube. I
threaded the recalcitrant caliper on the end of the fitting and filled
the grease tube with water, keeping the open end up of course. With
the bleeder opened I pumped until water was coming out, then closed
the bleeder and pumped until one of the pucks popped out. (It's best
if you clamp the other one down so it doesn't move.) The tricky part
is getting the second puck out. I found a large metal fender washer
that fit over the bore in the caliper body, but wasn't so big as to
not seal against the puck's bore. I cut a length of bicycle inner
tube and stuffed the washer into it like an envelope, then put another
washer on top and clamped this sandwich to the bore, with the exposed
rubber against the bore's lip. This sealed the open bore, allowing
the other puck to be pumped out. I then blew compressed air through
the grease gun to dry it out, I don't want it to rust.
With the caliper bits in a bucket of water I first carefully pried out
the rubber sealing rings and then used a small piece of 600 grit
wet-and-dry sandpaper to clean off all the corrosion on the pucks and
inside the bores. (Work parallel to the sealing rings, not
perpendicularly. You don't want scratches [and there shouldn't be any
if you're as gentle as you should be] in a direction that will
encourage leaks.) The metal parts cleaned up very nicely, and the
rubber was still 'live' and undamaged. (As are the dust caps, I
cleaned off all the rubber in the water.) I used compressed air to
dry everything to prevent rust. I took particular care to blow out
the bleeder passage, then used the sealing washer to cap off the bore
that it empties into and blew into it again, thus drying the
between-bore passage. I'd say that the caliper refurbished very
nicely. A little brake fluid makes an excellent reassembly lubricant,
things went together smoothly.
The other caliper went exactly the same, though of course much faster
since all the tools and techniques were in place. After that I took
off one parking brake, as an experiment. I found some spring bits in
there, I think it is the mortal remains of the return spring (#31 in
the MB manual). I guess I'll need another one of those. Half the
friction material is gone off the shoes, those are shot too. We'll
see what the parts car has in the way of goodies for me.
Tuesday, August 22, 2006
I removed the broken parking brake cable from the car. That was
difficult because parts were rusted in place. Once I figured out how
it was supposed to come out, getting the good one out of the parts car
was pretty easy. You unhook the inboard end first, then you can
pull/push the cable through to the outside enough to open up the shoe
spreader enough to release the cable retaining pin. Then the whole
thing just pulls out of the brake backing plate once the retaining
bolt is removed. As I was down at the parts car I also liberated the
parking brake shoes from it, they all look to be in good usable
condition. They also had good return springs, so I should be in good
shape there. I will need to switch adjusters though, the parts car
has the old 8-toothed ones.
The 'good' parking brake cable had a crack in the sheath in the same
place the bad one was ruined, so I used brake cleaner to clean off the
area and potted it in Shoe Goo. That used up the last of my tube,
it's time to get more! I believe I have done all the disassembly at
the rear that I need to, reassembly should be the next steps. But
first, breakfast!
Next up was to clean up the buggered threads in the driver's side hub,
which is best done with all the brake guts out of there. My 12×1.5mm
tap did a nice job of cleaning up the threads. I re-threaded the two
holes that got messed up, and chased the threads in the other three
for good luck. Of the two bolts one was sufficiently damaged as to be
ruined. The other cleaned up with the die and while it's not perfect
it'll serve, at least until I can find a replacement. (I only had one
spare bolt on hand.)
I then reinstalled the parking brake cable, that went smoothly. I
greased everything (as recommended) lightly with Moly wheel bearing
grease. This included the shoe adjusters. The replacement brake
shoes slipped into place, and I didn't even have trouble getting the
four springs in place. I flipped the brake drum/disk over and placed
it on the hub. From there I could use a handheld grinder to take off
the lip of the drum where the shoes go. It looks a bit sloppy, but
there is no contact there (or there wouldn't be a lip) to worry about.
I also used the power wire brush to clean up the hub and the
drum/disk. With the drum/disk mounted correctly I then adjusted the
brake shoes outward until they made contact, then backed them off as
recommended.
While I did look at the parts car's drum/disks, and found their
unscored parking brake surfaces to be much superior, the pitting in
the main disk surfaces has gotten so bad that I think they can't be
used, at least without turning. So I'll attempt to reuse the ones
that got hot. If that doesn't work out I'll try something else.
Wednesday, August 23, 2006
Didn't have a lot of time this morning, but I did get the left parking
brake adjusted and the caliper reinstalled. I reused the old (heated)
brake pads because they actually didn't look too bad and they were
significantly better than the ones from the parts car. I also got the
right side parking brake shoes removed, greased the parking brake
mechanism on that side, and got the replacement shoes installed. The
old return spring was fatigued and about ready to break, so I used the
one from the parts car.
Thursday, August 24, 2006
Jill's birthday! I wonder if I can get this car off of the blocks and
out of her sight today as a present? That'd please her more than just
about anything else I could get her. The brake job ought to be
do-able, but what about the muffler welding? I'd better get busy!
I got the brake drum/disk wire brushed off, and ground off the parking
brake lip. I chased the lug threads with the tap, put the drum/disk
back on, and adjusted the parking brake shoes. I checked the parking
brake handle adjustment and it was good as it sat, no need for
adjustment there.
I then jacked up the front of the car too and removed the front
wheels. With my wife's help, as I was unable to make progress by
myself, I then bled the brakes. We used the pump-the-pedal technique,
and verbal feedback as to when to push and release, synchronized with
the wrenching. No worries using that technique, I'd already given the
master cylinder a clean bill of health. Once we'd finished, the pedal
was nice and solid.
I then dropped the exhaust system. There was a huge crack in
the top of the pipe right where it entered the front resonator. There
was also, as mentioned before, a long crack in the bottom of the pipe
right where it entered the rear muffler. Both cracks were in the
180° ballpark: fairly significant!
The MIG welder made short work of the cracks. The large crack got
bridged with some scrap sheet metal, bead served to repair the other.
The welding went smoothly, and the exhaust system reinstalled without
significant trouble. Time to test it out!
It worked! The test drive went well; the brakes performed normally,
the parking brake was better than ever, and the exhaust leaks were
gone. The total bill for the repair? Zero. Nothing was
purchased as part of this repair job, all parts and materials were
already on hand. I moved the car behind the house (along with all the
other vehicles) and cleaned up the mess. The old and leftover brake
parts are now back in a box in the trunk of the parts car. The
driveway area is completely empty, only the camper and the
boat are visible. (We just don't have alternative places for either
of these, or I'd have moved them too.)
Happy birthday, Jill.
Tuesday, August 29, 2006
Needed a car to take to a road-trip rendezvous, leaving it there until
the wee hours. This car, being secure(able) and somewhat ugly so it
probably wouldn't be messed with, was selected. It ran fine, and
handled decently on the freeway. Not much of a shakedown, but better
than nothing. (And no, nobody messed with the car.)
Wednesday, September 27, 2006
Care package from Clay (redghost, curator of Gump) in Seattle. Had
the 'new' headlights in it, and some plastic trim bits. $75 for all.
The headlights look pretty good. Not perfect, of course, they are
used and from a U-Pull after all, but infinitely better than what I've
got now. They're also the new style, and match the SDL's in
appearance. (9004 bulbs in a plastic shell with a replaceable glass
front, rather than the USDOT sealed beams.)
Saturday, September 30, 2006
Needed a car to take cross-State to pick up 1/2 beef at the family
butcher's. Hello, fuel economy! The car behaved fairly well, though
it is small and the lack of interior space is definitely
noticeable on a long trip like this. The tires are also obviously in
need of some attention, there was a pronounced shudder at speeds much
over about 65 MPH, feels like out-of-balance
tires, maybe exacerbated by weak shocks (struts). And, the AC didn't
work. I could feel the compressor kick in but then it cut out
immediately and wouldn't come back, probably the Klima doing its
thing. Will have to dig into that. So, not a perfect trip, but
adequate. The brakes were fine. Fuel mileage was about
36 MPG going over, there was a pretty noticeable
headwind. The car's still a bit twitchier than I would like, but it's
probably as good as it's going to get unless and until I do some
wholesale front suspension work.
I don't know why, but the radio antenna is again not working. Kind of
a bummer on a road trip, no antenna means no reception outside of the
city. Oh well, it's not like I really need tunes in order to drive
(unlike some people, one of whom I might be married to).
Saturday, October 1, 2006
Return trip pretty much the same as yesterday's. Fuel mileage was
about 42 MPG coming back. Starting to look like
42 is the magic number.
Thursday, October 5, 2006
Pretty cold morning, the rear window was all fogged up. Too bad the
rear defroster isn't working!
Saturday, October 7, 2006
Pulled out the antenna again. Seems to be getting signals from the
radio and switch, something must again be wrong inside. I opened it,
and after much fooling around came to the conclusion that the
protective diode in series with the power bridge, same manufacturer
and appearance as the dead Zener from before, was also flakey.
Flexing the board in the area would let it work sometimes. It
was not the solder joint; the diode had an internal crack or
something like that, it could have been stress-induced from when the
Zener shorted and blew the trace on the board. I paralleled a junkbox
diode with the flakey diode, but on the back side of the board, and
the antenna started working properly again. (Removing the old diode
would have been difficult due to the heat sinks on the board and the
general tightness of the layout.) So I reinstalled the antenna, but
left the trunk liner out just in case it flakes out again soon. The
antenna needs a new grommet anyway, this will ease access for that.
Sunday, October 8, 2006
Checked the fuse box. F6, the rear defroster fuse, was dimpled on one
end and not making good contact. Common, one usually replaces the
fuse in this case. I burnished the ends and turned it around since
the fuse was otherwise in good shape, then the dash switch light
started working. That fuse box lid is the worst piece of
crap design I've ever seen! It took me 15 minutes to get it back
into place. Even removing it is difficult. The secret to removing it
is, again, to first remove the relay box cover immediately in front of
it. The glued-on relay box cover hinge ear had started to come loose,
so I dribbled cyanoacrylate glue into it and hit it with accelerant.
That firmed it right up.
Started working on the design for the modified defogger timer relay
that runs the auxiliary (cooler) power plug. The existing circuit has
two problems: one, the switch for heating up the cigar plug
continuously (for the solar charger) triggers the relay, and two, the
timer runs a 40-minute cycle from when the timer was
(re-)started, not from when the ignition was turned off.
It's not a retriggerable timer, in other words. This means that the
cooler can run for up to 40 minutes when the key is turned off,
but it could be as little as seconds if it was about to time out when
the key was turned off. Fixing problem number two is easy, just move
a diode internally (D2 in my schematic). The other problem will take
some more thought. (There's a third minor problem in that the
auxiliary power glitches when the timer retriggers on the road every
40 minutes, but that will go away once the retriggering problem
is cured.)
Monday, October 9, 2006
Finished up the modified defogger relay (the Road Trip Relay) that runs
the cooler plug. This should correct all the faults of the original
installation.
...No, not quite done yet. The timer works well, except that
when engaged it clicks on for a half second, off for another half
second, then comes on for the remainder of the time. Apparently the
charging time of the timing capacitor is significant, and the new
circuit (which essentially lost D2) didn't charge the capacitor until
it was engaged, unlike the original circuit, which kept it charged in
readiness. I think I can add another diode to allow restoration of D2,
which should cure the double-start problem.
 This time for sure!
Modification (in addition to the large capacitor [C3] that was added
earlier) consisted of adding Q3, another general-purpose PNP
transistor (I used 2N3906), R8, 3900 ohms, and D6. The modifications
also required rewiring D1 by cutting two traces and adding a jumper.
The schematic of the modified relay, for future reference, is in Illustrator, PDF, and GIF formats. The original circuit
remains essentially the same, except that the relay coil is powered
during the timing cycle via the new Q3 instead of through D1 from the
output. D1 remains (but in a new role) in order to jump-start the
relay. D6 is added to keep the timing capacitor charged while the
Start input is energized, eliminating the retriggering problem.
This time for sure!
Modification (in addition to the large capacitor [C3] that was added
earlier) consisted of adding Q3, another general-purpose PNP
transistor (I used 2N3906), R8, 3900 ohms, and D6. The modifications
also required rewiring D1 by cutting two traces and adding a jumper.
The schematic of the modified relay, for future reference, is in Illustrator, PDF, and GIF formats. The original circuit
remains essentially the same, except that the relay coil is powered
during the timing cycle via the new Q3 instead of through D1 from the
output. D1 remains (but in a new role) in order to jump-start the
relay. D6 is added to keep the timing capacitor charged while the
Start input is energized, eliminating the retriggering problem.
If it were not for the Solar Charger switch, the relay modifications
would consist only of the addition of C8 and D6. (In which
case an external diode is needed to keep from back-powering the
ignition while the relay is timing out. With the full set of
modifications the external diode is no longer necessary, D1 in its
new role takes care of that problem. As the diode's already in the
car wiring, however, I'm going to just leave it there, it doesn't hurt
anything.)
...Coming home at night showed that I have again lost the rear window
defogger, plus the high beam indicator light, and the windshield
washer fluid level light. The SRS light also came on a few times.
Sigh. I did get a box of stuff from Rusty for the car,
especially my new glow plug, so that was nice. I wonder when I'll
get a chance to put any of it in?
Tuesday, October 10, 2006
Checked into the rear window defogger, and it appears that the lamp in
the switch has gone out, and that otherwise it is working properly.
As this lamp is an LED this is extremely rare failure, it may be
possible that the ground for that switch (used only for the lamp) is
bad. The high-beam lamp in the cluster also appears to be bad, as is
the washer fluid lamp. I think I need to schedule an instrument
cluster removal soon.
I installed the finished Road Trip Relay, which passed all its tests.
...I had a little time after work, so I pulled the instrument cluster
and the defogger switch. (What a pain.) The defogger switch has a
light bulb inside, not an LED! First time I've ever seen that on a
car this new. Of course the bulb was burned out, as was the one for
the windshield washer fluid level. I'll replace them, probably with
good used. (It's not like either one gets that much on-time.) The
high-beam indicator lamp, however, is OK. Something else is wrong
there it seems.
I then replaced the two burned-out bulbs. My parts box is full of
mostly burned-out bulbs as it turns out. (I just grab them at the
U-Pull when I see them.) But eventually I found two that worked. The
high-beam indicator was a little more involved. I disassembled the
cluster only to find that the PCB trace to the lamp had been worn
through by some of the plastic of the cluster, probably due to age and
vibration, perhaps in conjunction with a too-tight mounting screw. I
soldered a wire across the break. Then the bulb worked again, and I
reassembled the cluster. While I was there I numbered the big cluster
connector's pins on the back (which are labeled on the trace side)
with a Sharpie. I can install it again tomorrow, it's dark outside!
Wednesday, October 11, 2006
Installed the instrument cluster. A guy without a left hand probably
couldn't do this, because only my left hand can reach up behind the
dash (once the heating duct pipe is disconnected and its boot removed
from the area) to reach the retaining collar of the speedometer cable.
This is a real PITA job, one of the worst design features of the car.
Would have been an excellent car to use an electronic speedometer on.
...After work I (finally!) changed the oil. Who knows what kind of
nasty sludge it's had in it since who knows how long before I bought
it. It was long past time to do this, I have no excuse. Mea culpa!
I had my boy 'help'. He was actually able to fetch and carry the
gallon jugs of Delo from the carton in the garage, and to remove the
screw tops. (The peel-off seal was beyond him.)
Thrusday, October 12, 2006
Checked the glow plugs again. Cold resistance wasn't too definitive,
though #1 looked a little low. Hooking up the big ammeter was
definitive. All but #1 started in the mid to high 20's (amps) and
dropped to about 20 within a few seconds, #1 ran about 2× on current,
dropping to 40 A after a few seconds. Just like before, no change.
Good. Though it doesn't look like it, both #2 and #1 are
actually fairly easy to swap out from above. (I did #2 some time
ago.) A socket extension and a wobble joint, combined with a deep
12mm six-sided socket and the job was done. I'm really glad the 10mm
nuts that hold on the wires are captive on these cars. Transforms a
nasty job to something quite tractable; although you can see
them just fine, at best you can only brush the glow plugs with your
fingertips. With the plug swapped the dash light now comes on.
Excellent!
...After work I find another care package from Rusty. Motor mounts,
etc.
Friday, October 13, 2006
Tried to install the new antenna grommet. Wrong one! Rusteeeee!
Also, the rear defogger lamp is out again (though the defogger itself
is running). Crap, shoulda used a new bulb.
Also, the glow plug cycle seems to be running very long.
Too long, if you ask me. Even when the car is warm. Runs smoothly,
though.
Sunday, October 15, 2006
Replaced the motor and transmission mounts. Went fairly smoothly, the
only difficulty was that the exhaust hangar on the transmission then
ran into the transmission support crosspiece, so I had to relieve it a
bit with a grinder. (The new mount was a bit taller.) The engine now
feels like it's mounted on springs, and definitely sits up a bit
higher. I have hopes that it'll transform the car, just like every
other set of bad motor mounts I've replaced. (The old passenger-side
mount, in particular, was quite flat.)
While working on the car I checked, and it appears the AC compressor
is seized. (So, the Klima is doing what it should: protecting the
serpentine belt.) That's a big disappointment.
Driving it to church the car was much smoother than before. Still a
little more engine noise than I would have liked, but all the nasty
on-frame-rails noise is gone, and it started and stopped much
smoother.
Monday, October 16, 2006
Yep, sure is smoother. And the defogger light is back again. Stupid
light.
Wednesday, October 18, 2006
I slipped the shifter boot I bought from Rusty over the knob. It
isn't attached at the bottom at all, but it is an improvement
nonetheless. I may need to fabricate an attachment ring, probably out
of wood, for it to slip over at the bottom. That is, unless I somehow
come up with a proper stickshift surround.
Thursday, October 19, 2006
I replaced the broken rear taillight. The replacement was in much
better condition, though one of the reflector assembly's plastic
retaining snap clips was cracked so I bolstered it with Shoe Goo. My
fear that the metalwork back there was bent was unfounded, I couldn't
detect any significant deformation so the replacement should seal
well. I made sure to clean both the metal and the rubber seal before
reassembly.
Friday, October 20, 2006
Disassembled the 'new', slightly broken right headlamp assembly. Was
filthy inside, took some scrubbing in the sink to tidy it up. There
are a number of cracked pieces of plastic, nothing too serious, and
nothing that will show. Shoe Goo should make short work of them once
it's dry. There is one missing plastic bail (of three) that holds the
bezel on, I'll have to fabricate something there. Two of the three
screws that hold the headlamp itself in are missing, but they're
nothing special and should be easy to replace. The headlamp adjusters
were somewhat stuck, so I removed the lamp bucket and cleaned (had to
use some light sanding) the grunge off of the sliding surfaces. With
some lubrication this should work much better. (I may have to chase
the threads on the adjusters too.)
Saturday, October 21, 2006
Started gluing the cracked bits of the right headlamp. Began to
fabricate a new plastic bezel-retaining bail, and replaced a
broken-off locating post with a galvanized roofing nail (and Shoe Goo,
of course). Cleaned and lubricated the adjustment mechanisms.
I'm kind of torn about this whole headlight thing. The old lights,
while cracked and ugly, can have their USDOT sealed beams replaced
with Hella E-code inserts and thus be euro-ized in lighting pattern
and use (potentially larger) H4 bulbs. The new lights look great, but
I don't think I can get any kind of E-code housing for them, without
going to the expense of full Euro lamp assemblies, and they use those
wretched 9004 US bulbs. It does look like perhaps the bucket could be
adapted to use an E-code insert, but it's probably not a drop-in
proposition. I'll know more once I have both headlights out and can
compare them side-by-side.
Going out to dinner, I noticed that the glow plug light is again out.
Sigh.
Sunday, October 22, 2006
Final gluing on the right headlamp. Greased up the bucket slides and
reassembled the headlight. The new bail works well, and only needed
minor trimming. Once the glue on the mounting ear fully sets it ought
to be ready to deploy. On to the left side!
The left headlight assembly was in better shape. One broken (but not
missing) bezel locating pin, and a chunk out of the foglight
compartment where it contacts the seal. That will be a pain to
reproduce, but I should be able to come up with something.
I so prefer it when I can find the pieces to glue back! It
all cleaned off in the sink fairly well. I glued the locating pin
back, and will need to fabricate some little piece of plastic to fit
the coin-sized chunk out of the foglight compartment.
I checked the resistance of the glow plugs, and #5 was at 4 ohms. Not
good! Fortunate that I ended up with a full set of five new ones
more-or-less by accident, instead of the one I ordered. It doesn't
look like it, and took me some time to find out, but in fact
you can get your hand (and a wrench) around the back of the
engine onto #5, making it in fact the easiest of the glow
plugs to change out. These glow plugs are dropping like flies, I
dread losing #3 or #4, the two originals left, those look to be nasty.
With the plug changed out the light again comes on properly. (Though
the temperature-sensitive timer may be misbehaving, I'll need to dive
into that some time. It runs long if you ask me.)
Monday, October 23, 2006
Traced and cut out a chunk of plastic jar to fit the divot in the
right-hand fog light housing. Glued it in place. Yesterday's gluing
seems good, it shouldn't be long now before these lights are ready to
install.
...One last package from Rusty today: the antenna grommet. Tomorrow I
can put the trunk back together!
I also filed the repaired divot in the fog light housing and gave it
another coat of glue so it'll be ready to reassemble tomorrow.
Tuesday, October 24, 2006
Installed the antenna grommet. Dunking it in a cup of boiling water
beforehand is instrumental to making the installation easy. Once in,
I mopped the wet goo out of the bottom of the well and reinstalled the
trunk liner. Since it was icy out, I put the space heater in the car
to preheat it for my commute.
I also did the final filing on the left headlight bezel, and trimmed
the excess glue out of the right headlamp's repaired mounting tab
channel. Tomorrow, assembly of the left lamp. (I can't wait to get
these in. Last night the stinking headlights were very annoying, and
we nearly clipped a deer we couldn't see in time. My wife asked:
"Those are the HIGH beams?" The high beams are aimed low, nearly like
low beams, and the adjusters are broken. These new lights, besides
looking better, ought to at least be aimable.)
Wednesday, October 25, 2006
Cleaned and lubed the headlight adjustment mechanisms (the right
side). Next I reassembled the right-side lamp. Finally, I installed
the lights into the car. That went as well as could be expected,
except that I had to slit the sheath over the left-side wiring harness
to peel the ground wires out further as the new lights' plugs are
higher than the old, and doing this gave the plug more range of
motion. I then did a lamp check (OK), and did the first-order
headlight aiming. That is, about like before but a little higher.
The adjusters move easily, so dialing them in should be a smooth
process over the next few evenings.
The car looks a lot better. The left-side lamp assembly doesn't meet
with the grille very well, but it never did, and that's because of the
bent metal in that area. I did what adjustment I could via the
light's mounting screws, anything further will probably require actual
body work. (I did use the rubber mallet to correct the position of
the metal below the left-side turn signal, that was a bit displaced
and kept things from fitting well.)
The new-style fog lights definitely are brighter than the old, something
I expected given my experience with the SDL, which
has similar lights.
...At lunch I stopped by the U-Pull, and they had a 190E in. I
managed to get my missing plastic seat trim bits (outside hinge
covers, I got both though I only needed one; they were loose in the
car's trunk and I didn't know which was which), a spare right-hand
heated mirror glass, and the blower knob. The plastic is the wrong
color, but I'm sure it can be painted black. It's intact, that's the
important thing. I also got the missing seat belt hump attachment
bolt cover, it's already black. Due to lack of tools I had to break
it to remove it, but it should glue back together easily, and
invisibly. (Sadly, its AC compressor was also siezed. The one on my
parts car is not, but who knows what kind of shape it's in, it has
been open to the elements for years.)
...Coming home at night the lights were obviously extremely
cross-eyed. I'd set them this morning by eyeball, but because of the
bent radiator support the left-hand light needs to be aimed somewhat
'out'. The height was pretty good already, but I dialed that in a bit
too, the left was a touch high. I set the fogs to somewhat below the
low-beam level, we'll keep trying this out until it's perfect. What
I can say is that the lighting at night with these new lights
is clearly superior. (Though not, of course, any brighter. Thank
you, USDOT.)
Thursday, October 26, 2006
Cleaned (with TSP), dried, and put a first coat of paint (rattle-can
black) on the new seat hinge covers. Installed the new blower knob,
had to use a dab of rubber cement to get it to hold. (That stuff will
come loose when required, unlike more aggressive glues.)
...After work I did some more fine adjustments to the headlight aim,
based on my dark-driving impressions. I also put two more coats of
black paint on the seat hinge covers. I did the back sides too, so
light color won't show through any gaps or cracks where things fit
together. They look good, and should be dry for tomorrow.
Friday, October 27, 2006
Glued together the bolt covers I broke (to remove from the donor). A
couple of dabs of cyanoacrylate glue did the trick. Installed the
correct (of the two) plastic hinge covers on the driver's seat, and
the (missing) bolt cover for the driver's seat belt track. The latter
was tricky as it's missing the little retaining clip that actually
holds it in place. I used a little dab of glue and clamped it into
place. It should pry off of there fairly easily if/when I need to
remove it again.
...Another package from Rusty, a blower knob! Too bad I already have
one, I'll just keep this one in reserve.
The glued-on bolt cover is solidly attached. Even if it gets
destroyed during some future removal there will be no problem, because
I have (I believe) three spares. (One even has the retaining clip, a
fact I didn't notice until I'd installed the broken one using the glue
dot.)
Tuesday, October 31, 2006
Stopped at the U-Pull to raid that 190E again. I got a spare ACC
panel, somewhat disheveled, its mating connectors, a door lock
vacuum/pressure pump, also disheveled, its mating connectors, another
rear trunk lid trim piece (in case ours should break, it seems a bit
flimsy), and the big interior plastic rear wall cover piece that snaps
over the lip of the trunk well. Ours had all the retaining clips
broken off of it, so it was loose and rattly. I also got the antenna,
for a spare, and the two little headrest adjustment knobs. (Our SDL seems to lose these fairly often.) The final
acquisition was an under-seat relay panel, as a source for connector
pins, and the rear window defogger switch connector. With these I
intend to make a short extension cable with a tap for the garage door
opener. That will make installing a hidden opener in this car much
easier than my earlier versions where I opened the existing connector
to solder on two wires. (That is actually surprisingly difficult to
do.)
Wednesday, November 1, 2006
I installed the plastic trunk cover.
Thursday, November 2, 2006
The antenna (6000EL) from the U-Pull trip seems to work fine on the
bench. I'll lay it in as a good spare.
Saturday, November 4, 2006
Beastly rain tonight. I can see that the 'new' taillight is still
leaking pretty substantially into the trunk. I know it's the light,
'cause there's a wet slug trail down from it to the floor of the well!
Monday, November 13, 2006
A lot of water collecting in the trunk lid lip. Flip open the lid and
dump a slug of water onto your in-trunk items. Probably condensate
due to a wet trunk, there's no way for it to leak down from anywhere
else. I've got to address this...
Thursday, November 16, 2006
Noticing quite a lot of motor oil dripping off the motor now. Am
going to have to chase that down, it seems to be getting worse. The
level isn't low yet, but I had to throw some dirt under the car.
Friday, November 17, 2006
Now the brake light is flickering on. The forward compartment (rear
brakes?) is low. Wonder what's up with that? Time to schedule some
TLC for this car, I guess. I topped off the fluid at least.
Saturday, November 18, 2006
The oil drain plug didn't seem too tight, so I snugged it up. There's
a lot of oil drip on the bottom of the car, I didn't see where else it
could have been coming from, it certainly could have been the oil
drain drips blowing around. We'll see.
No obvious signs of leaking brake fluid, I didn't see anything inside
the footwell (from the clutch) either. Will have to search further.
I pulled the passenger door panel off, looking for a persistent
rattle. None of the attachment hooks are broken (yet). Didn't find
anything inside really, except a few chunks of flimsy black plastic.
(Some kind of shield(s).) It got dark before reassembly time. This
door's definitely a lot more cheaply assembled than earlier designs.
Progress, sigh.
Sunday, November 19, 2006
On the other hand, if you don't screw up and break off the
retaining hooks, they're a lot more stout than previous cars' snap
clips. And, it appears that once you know what you're doing it's
faster to open/close up these door panels. So, it's not all bad I
guess.
Anyway, I reassembled the passenger door and then decided to tackle
the driver's door, for which I had a replacement (used) check strap.
I got the door opened up (and fairly quickly too) and managed to get
the old check strap out. It had, as usual, blown-out one side of the
slider and a detent ball had escaped. A wreck, in other words. I
lubed up my replacement and put it in, only to find that it only had
one of the three mounting screw holes! WTF? It was not the
proper replacement, thank you eBay. So, I disassembled the
blown-apart one and the 'new' one and cleaned all the intact pieces in
the solvent tank. (This required hammers and vises, etc.) With the
parts clean I greased them up and assembled one good check strap out
of the parts. Essentially I took the blown-out metal cylinder (detent
cartridge) out of the original assembly and replaced it with that from
the 'new' one. Getting the spring-loaded balls back in place is not
an exercise for the faint-hearted. The secret is to 'twist' them back
in place in the track rather than to try to push the assembly in from
the open end. A bit of hammering with a hard wooden stick used as a
drift with the mess held in the vise made it snap into place. After
that it was reassembly as usual. One benefit of doing it this way is
that I kept the original door check strap, so the color still matched.
(The 'new' strap did not match.)
Finally I picked the rattly pieces of loose crap (detent balls, spring
bits, pieces of water shield and chunks of glue, etc.) out of the door
and reassembled it. It went quickly. The door 'grunches' a bit now,
but I expect this to smooth up with use. The ball track was a bit
rusty, but I've chipped out all the crud, sanded it, and lubed it.
It'll just take some breaking in. I hope.
Still a fair puddle of oil under the car when we used it today, I'm
probably not done there.
Monday, November 20, 2006
Tackled the (!) water leak into the trunk. The formerly-broken
taillight that I replaced earlier was leaking. I pulled it out and
had a look, and decided that maybe the metal was pushed in a
bit after all. I took a big rubber mallet and whacked at the area to
push it back out a bit, it did move. I also found a rust spot
starting along the very top under the light's seal, so I scraped it
off with a screwdriver and put some semi-matching paint on it. There
was a lot of painted-over Bondo or something like that, very thin, on
the seal area that was cracking, I scraped a bunch off. It looked
like it could leak, and I don't see why it was there to begin with.
With that done, and the paint dried a bit, I cleaned the gasket again
(dirt really builds up when they leak) and put it back, paying careful
attention to get it shoved well towards the centerline of the car so
that the outside wing wouldn't leak. Tightened down, a bucket of
water poured over the taillight didn't show any obvious leaks (unlike
before), so I'm hoping that it's at least better than it was. We'll
see.
Tuesday, November 21, 2006
I jacked up the front of the car to have another look for the oil
leak. It appears to be coming from above, probably the injection pump
area. I tightened the bolts on the lift pump, they weren't very
tight. I have no idea if that'll do anything, but they're about the
only things in the area to tighten. It was not the oil pan
bolts, nor the drain plug. I'm getting quite a coat of English
undercoating on the car right now! The oil level in the engine is
still good, it's amazing how much of a mess you can make without
affecting that.
The brake fluid level continues to drop, I topped it off again. No
obvious sign of leaks, but I haven't looked very hard yet.
The trunk has managed to get quite wet recently, so I dried it out
with a space heater and a fan. I hung the carpet in front of the fire
inside to dry.
The driver's door check is working well now. The front doors seem to
have lost their rattles, too. Good.
Wednesday, November 22, 2006
On my wife's road trip yesterday she complained that the passenger
seat would go back but not forwards, she ended up putting our boy in
the front 'cause she'd managed to eliminate his legroom in the rear.
So this morning I removed the seat. (I don't think it was any more
stuck than usual, she just wasn't persistent/forceful enough.) It has
the standard 5 10mm bolts, four on the seat feet and one holding in
the seat belt track. Pops right out then. I found some kind of
webbed brace, two mounting holes, under the seat, along with six
cents. Wonder what that brace is from? I didn't see anything
obviously missing on the seat bottom. Looks like something that may
have come from within the seat back, though it's not wide enough to
span the back's width, maybe I'll have a look later. Anyway, I got
all the plastic hinge cover bits off without breaking any and removed
the track mechanism from the bottom of the seat. (Unlike most earlier
seats I've experience with, the track assembly is held on with only
two Phillips screws, and four 13mm bolts. It's actually easier to
take apart, once you have the plastic covers off.) I put it in the
solvent tank to start loosening up, and then ran out of time. I did
get the height tracks to start moving. I'm thinking I ought to
liberate the pressure washer from its nest and blast this thing off,
it's so filthy.
There was only one of the two front seat mount covers, plastic, that
are so often missing. I've not seen one at the boneyard yet.
I checked, and the trunk is still leaking around that light. Crap. I
want to find some kind of goopy non-drying putty to seal this kind of
stuff. All I have is rope putty. It's a bit stiff, but I may have to
try to make it work.
Thursday, November 23, 2006
I got out the pressure washer and blasted off the seat track
mechanism. (That wasn't easy, everything like that has been
winterized, and the old fireplace inserts are in the way of getting
the washer out of the garage. I just ran it in place.) Then I blew
off and out the track with compressed air, and put it in the shop oven
at 200 °F to dry. Came out nicely, and the tracks all moved
fairly easily by hand. I then lubed the tracks with white lithium
grease and reassembled the seat.
While I was in the area I took the seat back panel off, there was
nothing inside to indicate that the mystery brace had come from this
seat. (My money's now on the driver's seat since its armrest feels
loosely mounted to me.) Since I was there I removed the cargo net
from the back and took the slack out of the dead shock cord. It
really needs a new cord, but I couldn't find the extra piece I know I
have. It comes apart easily enough that this will be no big deal to
do at some later time.
With the seat reassembled and reinstalled it works much
better than before, and the height adjustment now works. Mission
accomplished! And I found $0.31 during the job. What a deal. With
both adjusters working you can actually get decent legroom in the
front or the back, your choice.
I would have done the driver's seat today too, since I had all the
tools out, but turkey time is approaching and I have many other things
to do first. (Such as cook it!) So, reluctantly, I put everything away.
Wednesday, May 16, 2007
With the sale of the 450 SL, a spot opened
up in the garage. (I'd prefer to do invasive engine surgery inside
and protected from the wind.) I went to start it and found the
battery dead-dead-dead, in spite of the solar charger. Moreover, it
wouldn't even accept a charge. The date on it was '4' (1994
presumably), so I guess it didn't owe me anything. It was too small
anyway. My dad and I pushed the car into its slot instead.
Out at lunch I stopped by Les Schwab and bought a Group 49
battery. $97 out the door, and no core charge. That's in line with
other sources of that particular size (which Costco does not carry).
Let's hope I actually need it fairly soon!
Thursday, May 17, 2007
Put the new battery on a battery tender. For grins I put the battery
charger onto the dead car battery, and after an hour or so it started
taking a charge. Maybe it's not quite dead yet, but I bet it's
seriously hurt! We'll see.
...Tonight it was still taking charge, and was bubbling and hot.
Not good!
Friday, May 18, 2007
Hmm, battery died hard. That's kind of unusual. Got to looking at
what I had done to it 'recently', and the Road Trip Relay jumped out
at me. Now that I look at the (modified) circuit with fresh eyes I
can see a 1.5 mA leakage path to ground through the base of the
new transistor. Doh! I thought I had checked for things like this,
but I guess I'm not done yet.
Saturday, May 19, 2007
I did check for things like this, measuring the current draw
and everything, but my schematic was incorrect. (Quiescent current
draw measures 0.1 µA on my Fluke DMM, the smallest non-zero
amount that it can register.) I had the emitter of Q3, the new
transistor, drawn hooked to vehicle power rather than the relay output
where it was actually connected. (I have corrected the earlier
schematic.) As built there is no parasitic draw unless the
shorting switch for the solar charger is on! Which, unfortunately for
my poor battery, was the case. Worse yet, pushing voltage back into
the output results in triggering the relay, exactly the same problem
as the original circuit had when there was only a diode there. I
believe this is due to alpha (gain when C and E are reversed) being
non-zero (as it is), a mistake I have made before. I am not a very
good designer using basic transistors, that's for sure!
I need to think some more, it's starting to look like there's no easy
way to use the SPST shorting switch I already cut into the car's
first-aid compartment. If only it were a SPDT toggle!
...
A second contact set on the existing relay is what is needed, but it
doesn't have one. A second relay inside the timer's case would also
work perfectly, but there's no room. Hmm, I wonder if there's enough
stray magnetic field near the existing relay to operate a reed switch,
of which I have a few somewhere in my junk box? That would do the job,
and they are pretty small. Must experiment...
Sunday, May 20, 2007
 Found one of my old reed
switches. (I must have had them thirty years.) When held next to the
relay coil, axes aligned, it would operate with the relay. What's
more, it will fit within the timer's case in this orientation. Yes!
I glued it in place and revised the schematic. I then removed the
added Q3 circuitry and wired up the reed switch. The 'final' Mark III
relay works perfectly on the test bench. (To be fair, the Mark II
relay would be perfectly fine in an environment where power wasn't
pushed back into the output. Due to my problems with the
already-installed switch for the solar charger, that was not
possible.)
Found one of my old reed
switches. (I must have had them thirty years.) When held next to the
relay coil, axes aligned, it would operate with the relay. What's
more, it will fit within the timer's case in this orientation. Yes!
I glued it in place and revised the schematic. I then removed the
added Q3 circuitry and wired up the reed switch. The 'final' Mark III
relay works perfectly on the test bench. (To be fair, the Mark II
relay would be perfectly fine in an environment where power wasn't
pushed back into the output. Due to my problems with the
already-installed switch for the solar charger, that was not
possible.)
The schematic of the final (!) relay, for future reference, is in Illustrator, PostScript, PDF, and GIF formats. The original circuit
remains essentially the same, except that the relay coil is powered
during the key-off part of the timing cycle via the new reed switch
instead of through D1 from the output. (This eliminates triggering
the relay when the always-on switch [for the solar charger] is
engaged.) D1 remains (but in a new role) in order to jump-start the
relay. D6 is added to keep the timing capacitor charged while the
Start input is energized, eliminating the retriggering problem.
Monday, May 21, 2007
Installed the relay. It just slipped/snapped back into place. (I
always leave the shell bolted in place and just slip the guts out.)
The (bad) battery has been on charge overnight again, and had stopped
taking charge. It seems to have come back from the dead, but who
knows how long this will last or even how well it would work. I'll
defer putting the new battery in until the car's ready to be driven,
however.
Tuesday, May 29, 2007
The IP front seal came. Nothing holding me back except a complete
lack of time!
Thursday, June 7, 2007
Is it time? The IP front seal awaits. It's a rather involved job to
pull the injector pump. And there's the siezed AC compressor too...
Strategy:
- Jack up front of car, for general access.
- Remove radiator, condensor, and auxiliary fan.
(The justification is to improve access. Also, the cooling system
needs a flush so it has to be drained anyway, and as the AC
compressor is siezed the system needs to be opened up for a
shrapnel check. And, since the front end of the car was pushed
in, you can't pull the fan without first taking out the radiator.)
- Remove fan and belt.
(Improve access, also AC compressor has to come off.)
- Remove valve cover and intake manifold.
(Access to timing chain and IP.)
- Remove vacuum pump.
(Access to IP front.)
- Remove IP (per instructions).
- Remove AC compressor.
So, all stalling aside, I dove into the car. I managed to get #1, #2,
and half of #3 (the fan) done this morning. The radiator is really
bent in the middle, and quite the mess. I'm actually rather surprised
that it, A, didn't leak, and B, didn't overheat. There's a lot of
occlusion, from bent fins, dirt, and pinched off tubes where it has
been soldered. It probably should be replaced. (The condensor is in
condition nearly as bad, but I have a used replacement in the trunk.)
It was very difficult to get out, due to its deformation.
More disturbing, however, was the darkness of the coolant, and I can
see that the head is leaking oil on the exhaust manifold side. I
suspect that we probably have a head leak, I hope it's just the head
gasket. I may have to dive in and do that too. This car is really
turning into a heap-o-project.
...I checked, and a new radiator is $300. Head gasket set is $60.
Perhaps B, and no A?
Tuesday, June 12, 2007
I removed the belt. Not hard at this point! I found that the
alternator bearings are going bad, I'll need to take care of that
before reassembly. The belt tensioner, water pump, and power steering
pump appear to be fine. (The tensioner roller needs a dust cap.) The
AC compressor, as noted before, is siezed.
I removed the valve cover then rolled the engine, as specified, to
'-15°ATDC' on #1. With that extra '-' sign I'm not sure which
this is supposed to be: 15°ATDC or 15°BTDC. I will need to
find out! I assumed the '-' was spurious and set it to 15-A, but have
as yet done nothing that precludes rolling it around again to the
other position. I removed the intake manifold. (I'm not impressed
with the ease of service aspects of this engine, things are just
packed too tightly together for easy working.) The rubber blowby
manifold is hard, cracked, and ruined, I'll need to get a new one.
Same for the intake manifold gasket. The intake manifold collars (at
the air filter end) are nicely intact, but a bit loose from shrinkage.
I should get new ones if they're inexpensive enough, or fit bicycle
inner tube collars over the metal parts to fill the gaps. (Easy.)
The throttle linkage is a bit stiff, this will be an excellent
opportunity to clean and lubricate it. (I also need to fit the
throttle damper that manual transmission vehicles are supposed to get,
and that this one doesn't have. This car is very prone to a cyclic
lurching when you start out. I need to check to see if the parts car
still has this item or not.) I removed the vacuum pump and the chain
assembly basket. I removed the injector lines. At this point, modulo
the correct engine timing position, the scary stuff is slated to
start.
If I'm going to remove the head it actually looks quite doable at this
point, except that I don't recognize the conglomeration on the coolant
port at the back of the head where the heater core draws its flow, nor
do I see how it comes apart. Fuel preheater? I don't want to wreck
anything, and it has to come off in that event!
...One reply to my queries on the mailing list suggests that if it's
not obviously oily, dark coolant is just old and not to remove the
head unless it's obviously leaking, pressurizing the coolant, putting
floating oil slicks in the coolant, or losing coolant—the usual
suspects, in other words. And that the correct timing setting is
15-A, not 15-B. OK, that all sounds good to me!
Thursday, June 14, 2007
I found a sketch of the front of the engine showing that indeed the
desired timing position for disassembly is 15°ATDC, confirming
where I had already set it. I paint-marked the cam sprocket and
chain, the IP sprocket and chain, and the hub of the injection timer
where the mark on the shaft of the IP is. (That's a tough one,
they're far apart. I tried to line up the mark by eye. If I don't
wipe it off it should guarantee that I get the IP back in the same
phase it came out in.) Better safe than sorry! I removed the chain
tensioner and all five bolts holding in the injection pump. (Three on
the flange, the hub bolt, and one on the rear support bracket.) I
pulled off the fuel lines and vacuum hoses, then managed to yank the
thing out of there. It's a tight fit!
With it out the big O-ring flange seal was exposed. It was flattened,
though still somewhat flexible and not cracked. Not a smoking gun,
but it could well be responsible: the area under the flange was very
oily. Of note is that the O-ring seal looks nothing like the (much
smaller) seal I'd ordered from Rusty. I think he sent me the internal
shaft seal rather than the big flange seal. One can result in oil
leaks to the outside world, the other cannot. I will have to get the
right one.
There is a timing adjustment screw on the back of the timing vault
that mates with the IP's flange. That would be handy when making fine
timing adjustments.
I went to the parts car and found that it does have the throttle
damper on it. I'm not sure if it's supposed to be a sluggish
oil-filled thing, or more of an air-filled damper. I'll have to find
out, this one is definitely not full of oil. It was not clear where
the other end of the damper hooked on the parts car, there was nothing
obvious left in place. That could be fun.
While I was down there I noted that the heat exchanger at the heater
tap is sealed with a fat O-ring, and held in place with a spring clip.
(The parts car's was undone.) I also grabbed an alternator from out
of the back of the '87 TD, we'll see if it's the right one and if it
works. I also checked that the parts car's AC compressor is not
seized, so we'll be taking that at some point.
The IP for the manual transmission car also has a vacuum control valve
on the side of it, probably just for the EGR. I'll probably be
removing all this stuff anyway, it'll help reassembly and will
cut clutter in the car. (The EGR is already gone.)
I'm going to call a few Bosch diesel service places in town to see
what they'll charge to do a re-seal job on the pump. If it's
reasonable I may have that done. (There are a number of places it can
leak oil to the outside, and the delivery valve seals should probably
be refreshed while they're there.) I don't intend to have a full
calibration done as I know that's a not insignificant expense, and
the car was running well after all.
...After lunch I stopped by the local Bosch injection pump service
place. He said they'd be happy to look it over to give an estimate of
what they think it might need, but was unwilling to even guess a price
range beyond $75–$375. He also said that they are extraordinarily
reliable, and that they hadn't seen one in maybe two years.
(Their bread and butter is the Bosch VP44 rotary IP from the Cummins
24-valve motor. As I have a Dodge diesel truck, and know several
other people who also do, we chatted a bit about these. They see a
lot of the VP44's, about half due to low fuel pressure [bad pump or
clogged filter], and half due to electronics failures. [The latter
was news to me.] He said that their test stand for those was in use
all day every day. The Bosch P7100 used in my 12-valve engine [a pump
very like Mercedes' usual fare] is very robust, and while 'too large'
for that engine it had been used for emissions purposes, and was 1/3
the cost of the motor. He also said that many folks put auxiliary
fuel pumps on their 24-valve motors to try to prevent IP damage, but
that they run higher pressure than the 10-15psi it should have and end
up blowing the front seal out of the pump, filling the crankcase with
fuel. This is also Not Good. He confirmed that a fuel pressure gauge
on such trucks was a Very Good Thing. I also found this useful link
about the VP44.)
Friday, June 15, 2007
I cleaned the engine off some. Messy, and used up all my brake
cleaner, gotta get some more. (I wonder what the case price is?) I
also sprayed on a bunch of engine degreaser, but I'm not in a place
where I can use the hose for a rinse. That stuff makes everything all
slimy and drippy, unlike the brake cleaner. I may have to push the
car outside for cleaning at some point. Almost everything below the
head line is oily, greasy, and/or dirty, most of it quite caked on. I
can, however, visualize how leaking valve covers, chain tensioners,
power steering, and injection pumps could be responsible for it all,
so I'm not going to blame the head just yet!
I removed the dead AC compressor, and its mounting bracket. (The
latter for cleaning purposes.) I used more rubber stoppers on the
exposed lines to prevent the incursion of moisture and dirt. There
are no obvious signs of 'Black Death', but I haven't yet looked
closely for AC debris. The exposed O-rings are black, not green or
blue; I'll probably put in the green ones I got in an AC ring kit at
Harbor Freight when it was on sale. ($10 for 224 or so of mixed
sizes.)
I put the IP in a box for show and tell purposes.
...At lunch I took the pump to the shop. The woman manning the desk
couldn't tell me anything other that one of the guys would look at it.
(They were all out.) I also stopped and bought a case of brake
cleaner, $2 a can on sale rather than the usual $3.
...And an hour later my wife called and said they'd called and could
do nothing with it. So back I went, all the way downtown. (I was
attacked by a 'chicken' during the freeway trip, which was quite
startling. I'd rolled the windows down and the buffeting dislodged
the Chicken Wagon's mascot from the first aid box and it came
flying forward at my head, nest, plastic eggs, and all. The raffia
nest made quite a racket as it rattled forwards at me and then swirled
around in the back of the car. Good thing I don't have a weak heart!)
The pump guy said that they never saw those particular pumps and
suggested Coast Diesel in California, a place I'd even
heard of, though it may be under a different name now. I'm not going
to do that, as it was running well. But we chatted a bit about my
potential leaks. He rummaged in a box and found a big green O-ring
that looked like it would fit the flange. He gave me about four of
them, in fact, and said it was their standard seal. He also gave me a
few various sized small O-rings to try on the shutoff shaft seal. He
noted that it was quite loose, and that the whole pump would have to
come apart in order to properly fix that. The bushing is worn, but he
thought I might be able to jam the O-ring in to help stem the leak
somewhat, and pointed out that there was oil sign on the body that
indicated it was leaking from there pretty heavily. He warned against
letting that shaft push back into the case while the lever was off as
the pump would then have to come apart to get it back out. I have the
dead 4-cylinder pump in the woods I can play with to learn on. He
said that black sealer goop can be used in place of the official seals
for the flat plates. There was no charge for the O-rings and advice,
he just asked that I bring him some regular business when I could! I
appreciate the courtesy, and will of course throw what business I can
his way. (Everybody I know with the VP44 has already had
their pump replaced. But I suppose if it happened once it could
happen again.)
Saturday, June 16, 2007
More engine cleaning. Four cans of brake cleaner later I was woozy,
and decided I'd had enough for now. (The garage doors and windows
were all open, and it was a low-VOC non-chlorinated product, but
still...) Things are a lot cleaner nonetheless, though I'm not done.
Along the way I removed the alternator and its bracket, and placed
both brackets in the solvent tank after first giving them a good
scraping. My 'replacement' alternator is, of course, not at all the
right thing. I'm going to take the worn one apart to see if it looks
like I can replace the bearings myself, and to see if it's worth doing
at all. Nothing I would do should ruin any core value it has.
After breakfast I tackled the alternator. I used a pipe wrench with
its jaws padded with old inner tube, and a screwdriver stuck
in the vanes of the fan. With both of those in place I was able to
loosen the nut. (Either alone would not do the trick.) The body just
knocked apart once the screws were removed. The brushes, btw, were
definitely in need of replacement. The slip rings are grooved, but
I hope not unusably far. Getting the bearings off the shaft was a
frustrating exercise. Eventually I got a bearing separator and a
large three-jaw puller to do the job. I'll look into replacements for
these worn parts, it ought to be significantly cheaper than a
rebuilt alternator. We'll see.
Advice via the Internet:
Jimbo, the typical leak points for those pumps are the bottom-plate seal,
the fuel shutoff arm seal and the black rack position sensor next to the
ALDA/ADA on the top-plate.
The bottom-plate seal can be replaced with the large oil filter o-ring from
an OM617--at least on the OM603 pumps. I believe the fuel shutoff o-ring
can be replaced with the small o-ring from an OM617 oil filter center post.
I don't know if you can fix the rack position sensor o-ring, without
disassembling the pump--I'd just loosen the top nut, then clean it with
starting fluid or brake cleaner, and lay a bead of gasket sealer, then
re-tighten the nut.
I've messed around with these pumps a fair amount, and I can't see any
reason to send them off for re-sealing.
And:
The most common source of oil on the right hand side of OM60x engines
(above the alternator) is the head gasket at the front right side. Six
of my 7 60x engines suffered to greater or lesser degree. There is NO
official fix other than to replace the head gasket (because of the
torque to yield specs) but in one case I did tighten the far front
right head bolt and the fast ooze diminished to a very slow ooze.
Hosing the engine down about once a month kept thongs under control. Oil
consumption was NEVER any problem (these engines used a qt in 4-7kmi).
Monday, June 18, 2007
I boxed up the worn alternator parts, I'll shop them around looking
for replacements today if I can. I scrubbed the AC and alternator
mounting brackets which had been soaking in the solvent tank; this is
messy, smelly, and basically not much fun. I removed the throttle
linkage and scrubbed it off in the solvent tank as well. I removed
the air filter housing and EGR pipe (for cleaning), and then washed
off the oil and air filter housings with brake cleaner. (I used up
another can and a half.)
I think I've nearly reached the turnaround point, reassembly should
begin soon.
...At lunch I hit the local bearing supply house. No joy, the front
bearing is apparently an odd size. They could order it, but it would
run to about $30 or so for that one alone. At their new competitor's
next door, much the same story. On a gamble I swung by an old-line
electrical repair shop, Spokane Auto Electric &
Repair, and they had the bearings in stock, along with the
regulator/brush pack. Altogether it was $65, with turning the slip
rings thrown in for free. Fast, too. They did it while I waited at
the counter.
While I could perhaps have shopped the job down to about $25–30
(the small bearing was available and cheaper at the bearing house, and
solder-in brushes alone should have been cheap, assuming I could find
some), it would have taken much more time. These savings (about $100)
are sufficient, assuming I can put it back together so that it works
again and lasts.
Since I was downtown I swung by Dick's for a burger and malt, and
stopped at Goodwill where I found another Sony car-ready CD player,
the same model as I have in the Frankenheap, a model that is a perfect mix
of features except that it refuses to play CD-R's. (We'll just carry
two in the car: the Sony that remembers where it is and has anti-skip,
and the newer one.) I find, however, that it exhibits quite a lot of
motor noise in this installation, but otherwise works well.
Tuesday, June 19, 2007
Alternator reassembly time. I finished cleaning off the case,
straightened the bent (by the puller) bearing retainer plate on the
anvil, re-tapped the retainer's holes, and gently hammered the
bearings onto the shaft. I used a long socket to drive the bearings
onto the shaft. This was aided by putting the bearings into the shop
oven at 200 °F, and the rotor into the freezer. I did a
similar heat/cold thing to ease putting the front housing onto the
outside of the bearing on the rotor. The rear bearing was no problem
at all, it just slipped in to the rear housing. I put the mounting
bracket back on the car, and when I went to install the alternator I
found that I had clocked the rear housing 180° out of phase. So
much for my calibrated eyeball! It was easy to take it back off,
remove the screws, and rotate the back into the correct position.
Reinstallation was unremarkable after that. The alternator, at least,
is now finished.
Wednesday, June 20, 2007
Time to look at that injector pump. I washed it off some with brake
cleaner and then removed the vacuum shutoff device. It had been
poorly mounted (it was probably a replacement, and access to the IP is
quite difficult unless you remove the intake manifold), one of the
bolts was cross-threaded and only a little way into its hole. In
effect it wasn't doing anything except keep out dirt. Beneath the
shutoff was a nice big hole into which one could see much of the IP's
guts. I had been warned against losing the shutoff shaft inside once
I removed the lever, but it was obvious from this access point that
there was nothing to fear on that score. I removed the lever, pushed
the shaft in, and removed the shaft from the inside. It looked good,
as did the bushing it rode in. The O-ring shaft seal was still quite
pliable. What I did find was that the E-clip retainer that
pinned a washer against the O-ring, keeping it locked in its socket in
the bushing, was missing! The washer had shifted and the O-ring had
popped out of its socket, and was not sealing at all.
That would do it. I got out my Harbor Freight E-clip assortment, and
found one that would work. I reassembled everything properly, and
snapped on the new E-clip. When I put the shutoff device back I
noticed that there was no seal on it, though the IP case looked like
it had a socket for a big O-ring. Theorizing that it couldn't hurt, I
got out my Harbor Freight O-ring kit and found one that fit OK. I
installed the shutoff device, with both bolts installed correctly.
The O-ring ought to help keep out dirt as well as prevent oil splash
from migrating out.
It is well known that if you install the shutoff wrong you can get a
runaway engine, but it is actually quite easy to install correctly, at
least if you have good access to the IP. It has a pin sticking out
the bottom of its shaft that hooks into a fork in the internal shutoff
lever. It is also easy to test: push the shutoff lever down, cover
the vacuum hole with your thumb, then release the lever. It should
hold in place, and then snap up when you remove your thumb. It should
resist if you try to lift the lever without releasing the vacuum.
That took care of the obvious problems. Because it will never get
easier than this I decided to look at the other seals too. I removed
the vacuum control valve and its dust seal, I won't be putting it back
as there's nothing for it to drive in this car anymore. The throttle
shaft seals are not O-rings and didn't look like they had been
leaking. I decided to leave them alone. I then removed the side
plate, which covers the fuel rack. Its gasket was thick rubber, but
very hard. I decided to make another one, so I got out my scrap inner
tube and cut out a gasket using tin snips and some hole punches. Once
I had the gasket formed I cut/scraped off the old gasket (which was
not easy) and reinstalled the plate using the new gasket. The screws
can't be tightened too much or the gasket squeezes out the side.
We'll see if this works! Access to this plate, at least, should be
possible later if necessary.
I then removed the fuel pump, cleaned its thin paper gasket and seats,
and then reinstalled it using some shellac gasket sealer. At this
point I had run out of time, I will have to deal with the bottom and
rear access plates later.
Thursday, June 21, 2007
More injector pump sealing. I pulled the rear plate and made a new
paper gasket for it. Then I pulled out the idle regulator and found
that its O-ring looked good, especially since I didn't have another
one! (The HF O-ring kit doesn't go that big.) I don't think it would
be too hard to replace on the car if I had to. I did dump all the oil
out of it, I don't think it's supposed to fill up like it was.
(Sitting it on its back will do that.) Finally I tipped the IP up on
its nose and removed the bottom plate that covers the cam. It has a
weird tapered wedge ring type of seal, and it was starting to look a
little tired. I believe Casey said that on the 603 motors the big oil
filter O-ring is a decent substitute. OK, but the 602, with one less
cylinder, requires a smaller seal. I took one of the big O-rings and
cut out about an inch with a razor blade, using a bias cut. I then
glued the ends together with cyanoacrylate glue. (I have heard about
this technique before, but this is the first time I have used it so
far as I can remember.) The 'new and improved' O-ring fit into place
over the 'bump' in the cover, I put the glue joint next to a mounting
screw so that it would get a good tight pinch. I eased the cover into
place and tightened down the screws. The cover tightened down all the
way, the O-ring should have gotten well wedged into its tapered seat.
We shall see if this works! I saved the old seal just in case, though
if this leaks I think I should just try to purchase a new seal. I
finished up just as I ran out of time. It's almost time to start
putting this pig back together!
I thought I should record the pump's information plate info for
future (parts-ordering?) reference, so here it is:
PES 5M 55C 320 RS 159
(011) 642 90 362
0 400 075 976
(M) 602 070 04 01 ER 0011
Bosch
The parentheses represent circles, the (M) is the mercedes logo.
Friday, June 22, 2007
I changed out glow plugs #3 and #4, the two originals left, as those
are very hard to reach normally but they're completely exposed right
now. I'll save the old ones as emergency spares, since they're still
good.
I reinstalled the AC compressor bracket, there's a little plastic
shield (tool-catcher?) over the compressor bracket that I can't seem
to get back into place. Maybe it'll become more obvious when the IP
goes in. I did some more cleaning, and used up a couple of cans on
the fuel filter and power steering pump area. The low-pressure power
steering hose looked 'wet', so I took it off. (Messy!) I'll get a
new piece at the hose shop. It was a short morning, so that was about
it.
...New hose was $2 at the hose shop. US 3/8", not metric, not
fabric-covered. We'll see.
Saturday, June 23, 2007
I flushed out the power steering, its fluid was all brown and nasty.
I put the old hose on the steering box and guided it to the oil drain
pan and then corked off the open return line on the reservoir. I
poured in some ATF and then spun the pulley by hand. (It needs to be
a quick snap of the wrist to induce pumping.) That forced the dirty
fluid out from the steering box, without recycling it back into the
pump. When it ran clean I ran the steering from side to side and
repeated the flush until clean procedure. Once I was satisfied that
all the gunk was out I installed the hoses correctly and filled the
reservoir with ATF. This entire procedure used one quart. Hand
spinning again bled most of the air out of the system. The new hose
fit well even though it wasn't a metric size, I don't anticipate any
problems.
I then greased the throttle linkage pins, roller, and ball sockets
with Lubriplate and installed it. It works a lot smoother than it did
when it came off. One of the bolts was now too long due to the removal
of a support bracket for the EGR's crossover tube, so I used a large
nut and a washer as a spacer. (I couldn't find a shorter bolt.)
With that done I then reinstalled the injection pump, at least
partially. I'm using the new green O-ring the IP shop gave me for a
mounting flange seal. It seems fractionally thinner in cross-section
than what came out, yet it's what the shop uses for sealing Bosch
pumps. I guess we'll see if it seals, it looks like it will be able
to. I will not be happy if I have to pull this all back apart again
to change the seal, but at least I won't be scared of the job now, and
it should go fairly quickly. The IP's shaft had self-rotated such
that its shaft marker no longer lined up with the paint mark I'd made
on the timer. I had to fabricate a locking pin for the IP as I didn't
have the official tool. (It turns out that the official reference
position is not a stable one.) I took an old driveline flex disk bolt
which was about the right diameter to fit down into the hole and used
the cutoff saw to slot the end of the bolt. This was a close-enough
fit to the bump on the governor. The bump had a little play in the
slot and the bolt had a little play in the governor housing. Nothing
was holding this bolt in except that it was wedged against the side of
the hole in the housing by the bump itself trying to rotate out of
position. The bolt's tightly-fitting mating washer nestles just
inside the threaded opening, which helps to cut the play down even
further. While far from a precision tool this kludge was sufficient
to get the timing marks aligned again. Oh, and I didn't have an
official IP rotation tool, I just used padded vise grips. (Later I
remembered that I had a spare timer in a box, that would have worked
very well. In fact, I'm told that the official tool is just
the center piece of a timer. I should have used the timer, the vise
grips bit through the pad and put a nick or two in the shaft that I
had to file off so that the timer fit on smoothly. That's a sliding
surface in operation, it has to be a good fit.) It is interesting to
note that with everything done more-or-less officially the marks would
not have lined up, they were one spline off in the advance direction.
(The slop in the homemade locking pin actually improved the
situation!) I had to rotate the cam slightly to give the upper chain
length enough slack to allow the timer to rotate clockwise enough to
let it go onto the shaft in the original position. (There was more
than enough slack in the bottom length of chain to allow the necessary
timer rotation, perhaps too much. Initially I'd tried barring over
the engine a fraction to rotate the timer, but that was a mistake due
to the loosened chain tensioner. That mistake is why I now need to
check the cam timing. I rotated the crank backwards to its correct
position before tightening the chain, but I can't assume that it
didn't jump a tooth.) I'm guessing that a 'normal' installation still
requires a final dialing-in of the timing by using the adjustment
screw (the one that rotates the IP's flange). This based on the
(perhaps unjustified) assumption that the original timing was
'perfect'. My plan was to put it back exactly as it came off, since
there was apparently nothing wrong with the timing originally. I
believe I have done so.
The IP is not yet secured, but it is in place. I installed the timer
retaining bolt finger-tight, and put the chain tensioner in so that I
can rotate the engine and check that all the timing is still correct.
I know that the cam-to-IP timing is unchanged, there was no
way for that length of chain to jump a tooth, and both sprockets and
chains there were paint-marked anyway. I just need to check that the
crankshaft to cam timing is still correct and then we're good to go.
Sunday, June 24, 2007
I installed the IP mounting bolts, then rotated the engine slowly to
check the timing. It's correct, and measures about 4° of chain
stretch. I managed to get that mystery plastic shield wedged into
there under the IP, I had to remove the AC bracket again first. It's
not as secure as it was originally, but it'll do. Stupid entropy.
I then hooked up the fuel system. There was a slow fuel drip at the
fuel thermostat that had begun recently, I wasn't sure whether it was
the feed hose or the thermostat itself. I removed the primary filter
and the feed hose, unmounted the thermostat, and removed the snap
clip. I took the guts apart and cleaned it, and had a look at its
seal. The seal didn't look bad, but it wasn't an O-ring so rather
than replace it I just put it back together again. I did replace the
feed hose, and the primary filter. The filter was black, and had been
installed backwards. I verified the operation of the check valve in
the fuel return side of the IP, it works fine.
The real fun came in priming the fuel system. Rather than kill the
battery (either one) cranking I just used the old fuel hose to tie to
the spare grease gun I use for disassembling brake calipers. I used
it to pump about a tube's worth of diesel through the system. I left
the return line cracked open at first, once fuel started coming out
with the air I closed it off and kept pumping. There was definitely
fuel and no air coming out the return banjo fitting when I cracked it
at the end. This should dramatically reduce the cranking required for
starting the first time. In spite of its propensity to leak, and the
lack of need due to the supposed self-priming abilities of this fuel
system, the old-style primer pump would have been a welcome component.
I then buttoned up the fuel system and hosed off all the spills and
splashes with my (next to last!) can of brake cleaner. When that
dries I'll be able to see if there is still a leak at the thermostat.
Monday, June 25, 2007
The fuel feed system is dry, I guess the leak is fixed. That's good.
I cleaned off the vacuum pump in the solvent tank, that took a lot of
scrubbing! (It's a lot cheaper than using brake cleaner, which is for
the things that can't make it to the tank, though a bit slower.) I
did use brake cleaner to sluice off the solvent at the end, but that
doesn't take much. I squirted a bit of oil into the bearings, then
installed the vacuum pump, I reused its (paper) gasket. (Original
pump? It's the old style with the crimped-on cover, but it's in
perfect shape.) It's much easier to put the pump on if you rotate the
engine to a low point in the pump's cam cycle. I did reinstall the
chain assembly basket. I know the instructions say to take it out,
but if I do that it'll get lost. It made it this far without problem,
I can't see pulling it out now.
That was so much fun I then vacuumed off the injector area and used
brake cleaner to clean off the worst of the gunk. I vacuumed out the
intake ports, and used fingers and rags to try to get off the worst of
the caked-on EGR slime. That was messy.
I then used a screwdriver to wedge the throttle on all the way and
cranked the engine. I got little fuel fountains out of all (I think)
of the injector ports on the IP. I'd wanted to do that to make sure
it was primed, and to make sure to blow out any junk that might have
gotten down in there. I used brake cleaner to hose out the injectors
themselves.
The valve cover and its gasket then made the trip to the solvent tank.
The gasket, once cleaned with a scrub brush, seemed very good and was
still quite pliable. I installed the valve cover using the old
gasket. Another quick round of brake cleaner followed to clean off
the solvent, etc. I'm down to my last can of the case, and am trying
to conserve.
The engine's starting to look pretty good! I laid rags over the
intake ports and the injection pump to keep out dust, it may be some
time before I get another chance to work on this. I think it's just
about time to make a parts order, I need an intake manifold gasket,
the rubber blowby manifold parts, the injection line clips and
bumpers, and two brake reservoir grommets.
Tuesday, October 23, 2007
I finally ordered some parts! My wife's been clamoring to get this
thing moving again.
Friday, October 26, 2007
Some of the car's parts were delivered today. Manifold gasket and
injection line clips, looks like.
Thursday, November 1, 2007
More parts, this time the rubber blowby fittings and the throttle
damper. Are we done yet?
Thursday, December 20, 2007
I took a look at the jammed Nippondenso AC compressor, and removed the
clutch retaining nut. I tried measuring the threads inside the clutch
that the removal tool uses, I think it might be M23×1.5, or
M24×1.5 or so. Nothing close to US pipe threads or the like,
which would have made tool fabrication a breeze. I found a chart
online that indicated that the measured ID of the AC compressor hub
would be appropriate for M24×1.5 threads. Online sources for
threaded pipe or bolts looked slim, so I ended up ordering a
Nippondenso clutch removal tool for just over $20. We've got five
cars with this compressor, and we'll probably be keeping all of them
for some time. Having a tool seems warranted.
...Later today I got e-mail telling me the clutch removal tool is out
of stock, and won't be in for some considerable time. Other sources I
found were all too expensive. Back to the drawing board! [The
Autozone #27006 looks like it might work too, but I didn't know about
it at this time.]
Monday, January 21, 2008
I swung by the U-Pull again, they had in a fresh 1993 300E. Awfully
new for that place, then I found out why: Cabin fire. What a mess!
It didn't appear to have the EHA valve for my 560
SL I was hoping for, but I did nab the Nippondenso AC compressor
and its hoses (including the fuel heat exchanger) for $20. That's
going to be a much better unit than the one residing in the parts car
in the woods.
Friday, January 25, 2008
Looks like the drain plug from the bad differential that came out of
the Albatross has a M24×1.5 thread! I
should be able to drill out the center and weld on a piece of pipe to
make a puller. (I'll be able to test the fit once I drill the hole so
the threaded end of the clutch retaining shaft can protrude through
it. I can use the differential body itself to hold the plug while I
drill and weld. Handy that I hadn't yet put it back into Smelly to
hold the rear suspension up!)
Oddly, the replacement Nippondenso AC compressor I got Monday doesn't
have the same sort of clutch removal threads. The original clutch
has better-sounding idler bearings, so I'm hoping to re-use it on
the new compressor.
Sunday, February 3, 2008
The drain plug from a differential does fit the Nippondenso
AC compressor clutch! I drilled out the center of the buggered drain
plug a little bit bigger than the screw on the compressor, then found
a large heavy nut to use as a spacer and welded it to the plug. (I
used the dead differential as a vise to hold the plug during the
drilling and initial tack welding. That held it nice and still, and
protected the all-important M24×1.5 threads.) This assembly
screwed easily into the AC compressor's hub. I then dug up a long
M10×1.5 machine screw that had a mating nut, the screw's
diameter was slightly larger than the screw on the compressor. I
ground the threads off the nose of the machine screw so that it would
go down in the hole in the hub. As the screw's nut was too small to
weld directly to the big spacer nut I then welded a big washer to the
other side of the big nut, then welded the machine screw's nut to this
washer. Voila, instant tool! I screwed the tool into the hub and
applied a wrench to the machine screw. The end of the hub just walked
right off, exposing a snap ring that holds more of the clutch on.
Here's a bad ASCII drawing of the rough layout of the tool:
 M24×1.5        Washer
 Drain plug     |        Machine screw
 |                       | M10×1.5
 |   +=========||        |
     |WWWWWWWWW||        |
MMMM/|         ||=+      |
||===+         ||MM                     =+
       wwwwwWWWWWWWWWWWWWWWWWWWWWWWWWWWW=|
       mmmmmMMMMMMMMMMMMMMMMMMMMMMMMMMMM=|
||===+         ||WW                     =+
WWWW\|         ||=+
     |MMMMMMMMM||
     +=========||
                  |
        |         | M10×1.5
        Big nut   Small nut
This stupid tool took forever to come up with, mostly wasted time on
my part. I could/should have just ordered one in the beginning I
suppose, it would have been quicker, but it is quite satisfying to
have made it myself entirely out of junkyard MB parts. (Well, the big
nut's pedigree is unknown, but certainly wasn't critical.) And now I
have the tool for any other Nippondenso compressor (of which we have
several) that might need servicing.
Onwards!
Monday, February 11, 2008
I pulled the AC compressor apart. Nine bolts, two big snap rings, and
some hammering required. It was completely dry inside, and stuck, but
not really siezed nor were the cylinder bores or pistons particularly
scored, at least from my cursory look. The swash plate didn't look
bad either. Tiny bits of rust were starting on the roller bearings,
but nothing deadly. None of the reed valves looked broken. Could it
be restorable? Might be fun to try. [I later found a nice slide show
of a teardown.
http://mbw126.com/compressor.aspx]
Wednesday, February 13, 2008
I got the solvent tank cleaned off enough to be able to use it to
start to clean the compressor. As the only clear flat-topped table
type of item in the area, it usually collects more crap than a toilet!
I put the two cylinder housings in to soak.
Friday, February 15, 2008
I cleaned all the (Nippondenso) compressor parts in the solvent tank.
That was tedious, and cold! (I didn't plug in the tank heater,
probably I should have.) Everything cleaned up well. I saw no
scoring of the cylinders or pistons. The swash plate had marks where
the piston glide buttons had sat, perhaps corrosion was setting up?
It came off with a bit of worn 600-grit wet-and-dry sandpaper. That
revealed that there was only one small score arc in one face of the
swash plate, which I burnished down. I think it will be OK.
Everything cleaned up pretty well, in fact. The thrust bearings roll
smoothly.
There was some black smudge on a lot of places such as the piston and
valve faces, but it rubbed off. 'Black death'? Didn't seem too
deadly to me, it could have just been decomposed oil residue. Looks
to me like the compressor siezed up quickly enough that it didn't
damage itself. The car's belt-saver circuit may have helped. At the
moment I see no reason not to reassemble and use this compressor. I
should have a new seal kit for it, but I don't. Next time!
I'll reassemble the compressor body first before cleaning the exterior
clutch parts.
Sunday, February 17, 2008
I reassembled the AC compressor. That was tedious. I used M1 as an
assembly lube, and just started the pistons into their bores one at a
time. All five have to be on the swash plate before you begin,
however. That's a bit fun, clutching a handful of pistons around a
swash plate while you guide things into their bores. Oh, and don't
lose any bearing pieces or let the glide buttons on the pistons slip
out of place. Took more than a few tries. The worst part is that the
pistons wanted to bind rather than slip into place, tolerances are
very tight.
The front and back body halves are nearly identical, but not quite. I
eventually figured out which was which by sticking them together and
seeing how the thing mounted to the adapter plate on the car. It'll
only go on one way, which identified the front body half.
I re-used all the seals, bad me. Honestly I don't know if this
compressor is going to be any good at all, so I was unwilling to spend
money on it just to have it blow up soon. I can deal with slow leaks,
the test refrigerant I use is inexpensive. If warranted, I'll
consider re-sealing it later.
All back together it looks pretty good, nice and clean. The clutch
bearing is very good, and the clutch engaged when I put a battery
charger on it. The compressor turns over easily now, no more siezure.
Next up will be installing it in the car.
.. I talked to my brother, and he said my black smudge was probably
the infamous Black Death. It didn't seem deathly enough to me, but
what do I know? He suggested picking up an in-line filter at NAPA.
Monday, February 18, 2008
I installed the AC compressor on the car. I then cleaned the fuzzy
gunk off the thermostatic clutch and fan using the solvent tank, and
then installed the fan, belt, and tensioner spring.
Moving beyond this job (finally), I then contemplated the vacuum
plumbing. I'm wondering whether or not I do need to keep the VCV
(vacuum control valve) on the IP. (It's removed right now, but it'll
go back on easily at this stage of disassembly.) I will have to keep
it if it's involved with the intake runner flap on the air box. I
have to trace the piping to see what goes where. I don't need
anything associated with the automatic transmission or EGR valve,
which I thought was all that the VCV was driving, but I could have
been wrong.
Tuesday, February 19, 2008
Some delving into the factory service manual shows that the valve on
the air box is not a resonance valve (for increased performance), but
rather a means to selectively increase manifold vacuum so that it can
suck through the EGR valve easier. In other words, completely
unnecessary for non-EGR vehicles, such as the 1984 non-California
cars. Looking at the engine vacuum diagrams it looks like all of the
plumbing and valves can go away (as the idle control mechanism on this
particular engine is electrical, not vacuum-driven as in 1984).
I wonder if this vacuum-increasing valve would have any significant
impact on engine braking? Might be interesting to activate it while
decelerating down a hill to see if it has any material effect. If so,
it might be kind of nice to rig it so that it operated when the engine
was at idle throttle but increased RPM's. It might be possible to use
the existing EGR valve's control unit to do the RPM sensing (it's
normally active from about 1200-3000 RPM) and cobble its output
through the existing throttle microswitch assembly. That's a project
for later.
Thursday, February 21, 2008
The vacuum plumbing for the EGR system has been removed, including two
electrical vacuum valves and a vacuum amplifier. A third valve was
disconnected though it's still on the air box, it goes to the
vacuum-increasing butterfly valve that might get a new role someday.
I still need to cap off the vacuum source line that went to the
transmission VCV. I also got the air box cleaned and mounted. (Part
of the fun is trying to remember how it all went back together, and
finding all the parts.) The intake manifold is now soaking in the
solvent tank.
Friday, February 22, 2008
I cleaned the intake manifold in the solvent tank. Messy! This time
I did plug in the tank heater for a bit, that made it a much more
pleasant job and perhaps even aided the process. I then did the
injector lines, and blew them out with brake cleaner. I put them on
the car, finger-tight, so as to keep out dust and dirt. The intake
manifold snakes into place past the injector lines, now I have to
start figuring out what else needs to go on first (or be worked on)
before I actually install the manifold. Things get a whole lot less
accessible once it's in place, and I don't want to risk ruining the
gasket by having to take it off again once I put it on. The big
question mark right now is how to mount the throttle damper. (The car
never had one before because it had an automatic transmission, but now
with the manual transmission it obviously needs a damper to tame the
bucking.)
I pulled the cover from behind the battery (so that I could soak the
battery tray's retaining nuts with PB Blaster before removing it for
de-rusting and painting) and found the beginnings of a mouse nest.
Damned rodents! I hope the poison and/or cats got them. I soaked the
nuts, perhaps tomorrow I'll remove the tray.
...This evening I held my nose and jumped into the WIS and EPC that I
have installed on Virtual PC on my Mac G3. (233 MHz, not the
fastest thing out there, but it was free and has been working well for
me for years.) What nasty programs they are! I did find a nice
sketch of the throttle damper in the WIS, from Job 30-310. There were
also some linkage sketches in the EPC. I took some screen shots (no
print path on my installation) to look at later.
Saturday, February 23, 2008
I assembled yesterday's screen shots into a throttle damper page for easy reference.
(Tedious, it required extracting information from a series of screen
shots.) Then I studied it for a bit.
I then went to the parts car in the woods and liberated its simpler
throttle pivot (at the rear of the engine), I will substitute it for
the more complex automatic-transmission version the car currently has.
(I'm not sure if there's a real need to do this, but it should be easy
enough to do.) There was no trace of anything the throttle damper's
top ball mount connected to. Of course, the intake manifold is gone,
and that's probably what it hooked to. (I also note that the donor
car threw a rod: cylinder #1 has a big hole punched in the side, and
there's no piston in sight. Souvenir? )
Sunday, February 24, 2008
I tackled the EPC again, and this time noticed something I didn't see
before: a ball stud screwed directly (?) into the intake manifold. I
took a screen shot and merged it into the throttle damper page. Then I went out
into the garage. Yes! Once I knew what to look for I found a
threaded boss on the intake manifold that's in just the right place to
anchor the other end of the damper. You get tunnel vision sometimes
and don't see what's right there. I was so sure there was a bracket
of some sort...
Anyway, I pulled off the original throttle bell crank assembly and
replaced it with the simpler manual transmission version from the
donor car. The original one has a threaded ball stud that I can
steal, but unfortunately it's got smaller threads than what is
required. Unless I can find another threaded ball around here
somewhere I'll probably just weld it onto the end of a suitable bolt
and call it good.
Wednesday, February 27, 2008
I found a piece of scrap throttle linkage from a 617 that had some
ball studs on it, so I cut one off and welded it to the head of a
suitable 10mm bolt. It's now screwed into the intake manifold. It's
a bit crooked, and the rough 12mm hex I ground into the weld is rather
crude, but it will work.
Thursday, February 28, 2008
I painted the welded ball stud with silver paint to keep it from
rusting. I put on the damper, and found that the throttle return
spring is not strong enough to return the throttle with it in place.
So I'll need to get a stronger spring, perhaps today at the hardware
store. I removed the battery tray and put it in the derusting bucket,
which needed more water after the winter's evaporation. It'll
probably take four treatments to do all of it as it doesn't fit fully
into the bucket. The thing is not rusted enough to need repairs or
replacement, just a de-rusting and some paint. I found the battery
retaining clamp underneath it. I will need new nuts, the old ones are
pretty rusty. The studs into the car seem fine. There is no sign of
rust getting into the sheet metal that's under the tray.
...In the evening I turned the battery tray over in the bucket.
Friday, February 29, 2008
This morning I turned the battery tray around in the derusting bucket.
I bought a stronger throttle spring today and installed it. It's able
to overcome the stiffness of the new throttle damper. If it should
turn out to be too weak I can put it down the middle of the original
spring and use them both together. I installed the intake manifold.
Much fun trying to figure out where things go. When I tried to
install the blowby hosing I found that I was short a piece, so I had
to re-use the 'Y' connection segment, at least until I can get another
one ordered. Part number 601 016 04 81, there's also a
v13 molded into it. The old one is split at each opening so I had to
duct-tape it sealed. That's lovely.
The installation of the vibration dampening brackets for the injector
lines took the most time. Getting those plastic clips on was not
easy, and I had to take apart the throttle linkage in order to get
everything assembled. I have extra plastic clips left over, too. The
rubber bumpers themselves were NLA, but the old ones were still 'live'
enough to work. The throttle linkage now works properly, and feels
damped due to the hydraulic cylinder. It returns to the idle position
properly.
I removed the extraneous vacuum plumbing, replacing a three-way
splitter with a two-way from the EGR system. One vacuum feed line
goes directly to the intake butterfly actuator, the other (through a
restricting orifice) goes to the car's interior. Things are pretty
neat and tidy under the hood now, without all the extraneous vacuum
plumbing. The EGR relay module is nicely accessible behind the
battery, it should be easy to remove and operate on if my throttle
butterfly engine braking idea ever pans out.
I then vacuumed out the battery tray area, and chased the threads on
the studs. I re-tapped the nuts too, and put the rusty ones into the
bucket with the tray itself. I'll probably re-use them, mostly
because I don't have any spares in that style.
The car is pretty much ready to start, sans cooling system. I want to
do a final bleed on the injectors (the lines to which are only
finger-tight) and see if it'll start before I put in the cooling
system. If there's a problem I'd need to take it back out again
anyway, so no sense potentially wasting work. It's also still too
cold to be safe using only water for coolant, and I don't want to risk
wasting my Zerex G-05 until I'm sure the car will run. Tomorrow?
It's been down for more than nine months, but I can smell completion
on the wind! Jill's going out of town this weekend, it'd
be really nice if I could pick her up Monday in this car and
again send the Chicken Wagon into retirement,
a car whose faults she does not much appreciate.
...In the evening I turned the battery tray over again in the
derusting bucket. (Last turn?) The rusty nuts are also cleaning up.
While I was out there I fished the vacuum vent line (black) out from
behind the IP and hooked it to the vacuum valve that runs the air
cleaner butterfly valve, some of the surplus EGR vacuum piping was
very handy to make it reach. If it (the butterfly) did get
used the vent is appropriate, and I also don't want any loose hoses
left when I'm done with this job.
Saturday, March 1, 2008
I pulled the battery tray out of the derusting bucket and wire-brushed
it off. I had to use the Dremel for the crevices. All the rust came
off great, the chunks were gone and there was a nice coat of black
oxide in many places. I washed it (using washing soda) in the sink
and then blew it dry. I put it in the shop oven to finish drying, and
to warm up. I put the primer can in there too, and after a few
minutes I then primed the battery tray. That dried quickly, so I then
put on a coat of black. That took quite a bit longer to dry in the
oven, but after an hour or two I put on the second coat. I also
wire-brushed the tops of the studs in the car and greased them.
...In the evening I pulled the tray out of the oven. It was still a
bit tacky, but I was tired of waiting. I installed the tray, with a
bit of grease on the bearing surfaces of the nuts. I then painted the
two nut/stud sets that hold the tray down. (The third set is for the
battery clamp.) I put back the plastic electronics cover, reclaimed
the old battery from the generator, and put it
back in the car. (I'm not going to wear out the new battery on the
initial crank-fest.) I pulled the control plug off of the glow plug
relay and stuck a bare 10ga solid wire loop between pins 1 and 2, the
ignition and start terminals in the plug. (Violet [start] and
Black/Red [ignition], I'm not sure which is which.) I got out my old
manual cranking switch (automotive tool bought at Sears quite some
time ago) and clipped it to the loop and to the fuse stud in the GP
relay. I then pulled the vacuum shutoff line off of the IP, and put
the battery charger on. I made sure the car was in neutral.
Crank! I hit the switch and let it crank a lot. A lot! I
was starting to despair when I noticed that #5 injector was wet. I
let the car rest (and the battery charge) for awhile, and hit it
again. After a bunch more cranking #4 got wet. The battery is
definitely exhibiting signs that it doesn't appreciate this treatment.
At this rate I may end up killing it entirely, which is no great loss
except then I have to purchase another battery for the generator.
(And at that point I really should get two, as it's a 24 V
system.) I let it rest (and charge) for 20 minutes while I
brought this record up to date.
Another cranking session didn't last long before the battery started
to flag. However, just at the end #3 started to get wet so it does
look like I'm on the right track. 20 minutes is not enough
recovery time, I'm going to have to wait more like an hour before the
next session.
...I gave it about 3 hours and went out for another cranking session
just before bed. I didn't take the battery down as far as before and
I got #2 wet, and #1 was just starting to show fuel. Tomorrow I shall
try starting it.
Sunday, March 2, 2008
D(iesel)-Day! I decided to make it easier on the battery and use
jumper cables to parallel the other battery from the
generator, thus sharing the load. I should have done that yesterday.
Anyway, I cranked some more to make sure all five injectors were
getting a good supply of fuel, then I tightened the nuts down and
washed off the injectors with brake cleaner. I put back the vacuum
shutoff line and restored the glow plug wiring, removing my hand
cranking switch. I got in the car, glowed it for awhile (there may be
a problem with the timer, it seemed to really want to run a long time
and I didn't wait for the light to go out), and cranked. With only a
few seconds of cranking it started firing, and then caught. It ran
roughly for a few more seconds then smoothed out to where I could rev
it up a bit. Success! I shut it off then, as there is no cooling
system on the car. The key shutoff worked, that's another worry
gone.
With that done I pulled the brake reservoir tank off the car and
replaced the two grommets with the new ones. I put back the tank and
filled it with fresh brake fluid, then I dumped a lot of the derusting
bucket's nasty water all over the area to wash the spilled brake fluid
off the car. Messy.
Next, the cooling system. I pulled out the radiator and found that
the radiator fairies had done nothing to clean it or straighten the
fins while it was put away. I guess I have to do it. It
was filthy, the AC system had dumped some oil on it and there
was oily caked-on dirt blocking a lot of the fins, as well as a lot of
bent fins from the supposed wreck. (The radiator is seriously
deformed, enough to push it into the fan clutch which has left
circular tracks of flattened fins on the inside.) I spent some time
straightening fins to improve airflow, then I took the thing to the
laundry tub for a wash. I used laundry detergent and a bristle brush,
I seem to have improved it quite a bit. I'd really like to hose it
off outside, but it's too cold. I don't want to have to deploy a
garden hose and then try to re-winterize it. I could look through the
radiator towards a window and see a lot more light than before. Maybe
I'll call it good enough, it's a lot better than it was and as I
really should get a new radiator anyway I hate to spend a lot of time
on it.
I cracked the drain on the laundry tub so that the dirt would settle
in the tub rather than go into the septic system. When I later looked
into the drained tub there was 1/8" of oily black fuzz coating the
bottom. Gack! I mopped it out with paper towels and threw away the
evidence, then washed the tub clean.
I then slipped the radiator back into place in the car (having first
hung the shroud over the fan) and broke for breakfast.
Diving back in I put the front of the car back together. It was
apparent after a few attempts that the proper order is from front to
back, with the radiator going in last. I put in the horn support,
then the auxiliary fan, then the AC condensor, and finally the
radiator. (I had to take time out to weld a broken bracket back on
the condensor, and to do a fair amount of fin-straightening.) I
flushed out the cooling system with a bucket or two of water,
displacing a fair amount of green, then filled it with water. I
back-filled through the upper radiator hose so that the head would be
full. Then I buttoned up the cooling system and filled the reservoir.
(All this took quite a bit of time.) Then I started it.
Heartbreak. The engine runs OK, but idles rough and blows a lot of
white smoke. Could the timing be off? Clogged injectors? I revved
it a fair amount, and though it sounds OK at speed it's blowing too
much stinky white smoke to suit me. It never did stop, though it did
settle down some, even with the engine starting to come up to
temperature. To add insult to injury, most of the injectors were
bubbling around their seats. And, the brake fluid is dropping in the
reservoir, I think the clutch feed hose is shot. It also sounds like
there is an exhaust leak somewhere under the car.
Anyway, in the evening I put the air filter back on, cleaned out
access to the car, and took it for a test drive. It seemed to have
about as much power as before, maybe a touch less, but even fully
warmed up it smoked (white, stinky) a lot at low RPM's. Idle was
still very rough, and the car tended to die at stops. I wonder if the
timing being off a notch or two can be responsible for this? I tried
loosening each injector fuel line in turn, and it seemed that the idle
would actually stabilize for a bit then return to its usual awful
state. I couldn't pinpoint any one injector acting differently than
the others, so I guess this is another clue pointing towards something
global like timing. Interestingly, the smoke was much reduced right
after the cold start, but increased quickly.
I did notice that the car's drivetrain has a lot of 'springiness' in
it, the car can bounce back and forth a bit against it if you're too
rough with the throttle or clutch, but the new throttle arrangement
has completely cut out the engine feedback portion that kept it going
and turned into an irritating neck-snapping behavior. So that's a bit
of success, at least.
No way I'm going to be picking Jill up in this tomorrow, too bad.
So much for my surprise. I guess she'll have to continue to drive
the Chicken Wagon, a car she is not enjoying
at all.
From the mailing list:
In the past having had an IP set with wrong timing, can't remember if
too far before or after, I can say it nicely produces large volumes of
white smoke. The tech in question was confused between what to do
with a 603 versus 617 and I think, doesn't the timing notice on the
front rail give two values depending on how you measure?
A little surfing indicates that increased white smoke at low RPM is an
indication of retarded timing. Guess I'm going to have to learn how
to do the drip test.
Monday, March 3, 2008
I did a little surfing, and found a reference to a very
interesting way of setting the timing, known as the "millivolt
method." That is, with engine idling measure the average voltage on
the glow plugs and adjust the IP's timing from retarded towards
advanced until it peaks. (Or plateaus might be a better term.)
Millivolts? Just my kind of animal! This appears to be measuring the
voltage on the plugs with them acting as thermocouples, there is some
mention that a filtering RC network might be required to average out
the readings enough to use.
No time to pursue it today, however. The word from the mailing list
is that even one tooth off on the shaft spline will give me my
symptoms. Great.
Tuesday, March 4, 2008
I removed the radiator, which was filled (again) with rather
dirty-looking coolant. I guess it's getting its flush after all. I'll
be sure to do this a few times until it runs clear. (Though dark like
oil, there's no oily film. I think it's just ancient grungy coolant.
I'm glad I didn't put in the G-05 yet.) I removed the fan to allow
easy access to the front crank bolt. I then removed the air box,
which exposes the side of the IP. I pulled the IP's timing (RIV) plug
cover and then rolled the engine over to 15° ATDC, then
probed in the hole with a framing nail for the timing ear. Not there!
I rolled the engine a bit more until the ear swung into position, and
measured (roughly) the timing at about 25° ATDC. Hello
retarded timing! Obviously this thing jumped time during reassembly,
and it's sure not running right. I guess I get to pull the IP back
off and try again. Next time I'll check the timing better before
reassembling everything. Even without using the official timing tools
I think I can get the pump set to 15° ATDC just by equalizing
the angles the framing nail makes when wedged against the sides of the
access bore and the timing ear inside the pump. I bet I get awfully
close! (And I'll try to err on the side of advanced, 'cause I hear
a touch of advancement is usually preferable for drivability and
mileage reasons.)
Wednesday, March 5, 2008
Not much time this morning, but I did look for my ersatz IP locking
tool, which I seem to have misplaced. No matter, I'd like to make a
better one. I found a shouldered nut that tucks nicely into the screw
hole in the IP, with almost no play, and a large bolt that does the
same down into the bore. I'll cut the threads off the bolt and then
drill out the nut to take the bolt shank snugly, then I'll cut a slot
into the end of the shank. Should make for a much tighter tolerance
lock than before.
An old net posting by Dave Meimann:
Definitely check the EGR! About the lock pin, the part number is
601 589 05 21 00. Dealer cost is ~$21, plus
whatever markup they feel like gouging you with. Rusty should be able
to get it for under $30 if you can't find it elsewhere at a decent
price (will take 7–10 days, special order). Here are some notes
from emails I sent to other people regarding the tool:
The lock pin was not intended to be used to set the timing. MB has a
static RIV tester ("A-B" light box) which is designed for that
purpose, as explained in the service manual. It is a nifty tool but
most folks won't want to pony up the ~$250 to own it. The IP lock
pin, which is a mere $25–$30, can be used in place of that. It
takes longer to set the timing but it does work, although the
procedure is NOT in the manual. Basically you creep the crank up to
15 ATDC while trying to feel when the lock engages. When it
does, read the number off the crank. If it's not where you want it,
rotate the pump to adjust and repeat at least twice to confirm the new
setting. I have found that setting to the advanced side of spec (to
14 instead of 15 ATDC) provides a small but repeatable increase
in MPG (on 60x engines anyway).
Warning: DO NOT rotate the crank... OR adjust the pump by rotating
it... while the lock pin is in place! You WILL break something
expensive. (The IP!) Remove the lock before turning ANYTHING.
For OM617 engines, it's a real pain to adjust the pump... there is no
adjusting mechanism (turnbuckle) to rotate it like on the OM60x. You'll
need to loosen all 4 mounting bolts (3 front, 1 rear), all 5 injector
lines, and muscle it one way or the other. Note: When you remove the RIV
plug on the side of the IP, roughly above the left engine shock, it will
dump a pint of oil out! One last tip: Use the power steering pulley for
large engine rotations, and the alternator pulley for small ones—the
p/s would jump forward in 1–2 degree increments no matter how careful
I was, but the alternator worked great. (On an OM60x, pull the fan clutch
and rotate from the crank bolt.)
Thursday, March 6, 2008
I got the bolt cut off, its diameter is a bit small. I cut and
wrapped a sheet metal shim collar around it, now it fits very snugly
down into the IP. (Squeeze and put the collar in the hole first, then
force the bolt into it.) I'm not sure I'll need the nut at all, we'll
see. I cut a slot in the end of the bolt shank, it ended up a bit big
and not perfectly centered but I think it will work good enough. A
milling machine would sure come in handy sometimes!
I'll check at the hardware store to see if I can find a bolt with a
little bit bigger shank. A 27/64" drill shank fits the bore very
well, it's about 10.7 mm in diameter. I'd prefer the lesser
angular error I'd get with the right sized bolt and the nut drilled to
match.
...In fact, a 7/16" bolt has an 11 mm diameter shank. I bought a
3" long sample of one today, 70¢, and what I found was that it
was an even better fit than the 27/64" drill bit. I cut off the inch
or so of threads and cut/filed a notch into the end of the remaining
smooth shank. It fits nearly perfectly into the IP's timing bore, and
doesn't need the nut slip collar that I was going to make. Even
better. I made the notch a bit small to start with, then filed it
open incrementally until it dropped snugly over the tab on the IP's
camshaft. Let the timing begin!
Friday, March 7, 2008
I removed the vacuum pump, chain tensioner, intake manifold, and
injector lines. I also removed the lift pump from the injection pump,
saving some fuel spillage and affording a later opportunity to
re-prime the system with it. I then turned the engine over to the
lock position, 15° ATDC, and removed the tensioner and
injection pump. (Back to square one!) I used a spare injection timer
as a handle to rotate the IP into its lock position, which
was much easier and safer than using padded vise grips like
last time, and used the pin I made yesterday to lock it in place. I
inserted the IP into the engine and loosely bolted it in place. I
then put the tensioner back and turned the engine over twice and
checked the timing, it's pretty close. Unfortunately I was running
late so I wasn't able to check it additional times to make absolutely
sure it's in the right place. (And then, of course, comes putting it
all back together.)
Saturday, March 8, 2008
I ended up making a mistake and tried to loosen the IP hub bolt while
the chain tensioner was loosened, which caused the chain to shift a
bit which in turn prevented the tensioner from being reinserted. I
took off the valve cover so that I could better see what I was doing,
and got it put right again. I then checked to see that the cam timing
was still OK (still about 4–6° of stretch, it's a little hard
to be exactly sure), and removed and re-timed the IP. With the fasteners
all secure again I checked the 'final' numbers, and came up with about
14° ATDC for the IP. The slot in the locking pin is a bit
wide, I can get it to drop in over about a 2° span, but 14° is
about the center of the range and is just about where I want it
(slightly advanced from specification). I guess we'll see. In any
event the IP is now in the center of its adjustable range using the
shifting screw, so minor changes can be made without taking the engine
half apart, should that be necessary.
I then re-reassembled the engine. It all went fairly smoothly, except
that my Sears ratchet wrench finally gave up. (While trying to fix it
to keep the release button from falling out I managed to lose
something, I guess I'll check out that lifetime warrantee. If I hate
the proposed replacement I'll pass on the swap, though.) I re-primed
the fuel system by mashing the lift pump's plunger repeatedly against
the side of the IP before I bolted it back on. That saves a bunch of
time and wear and tear on the starting system. I then cranked the
engine, as before, until all the injector lines were wet. Then I
started the engine. It started easily and this time without all the
stinky white smoke. After only a few seconds of rough running it ran
and revved smoothly. Cool. I then buttoned up the cooling system and
filled it with water. (Incremental flush.)
We took a test drive to meet my wife. It ran well, no smoke, about as
much power as I recall from before. I think we'll call it good for
now. The coolant is again dirty-looking, but less opaque than last
time. I'm going to have to do the water drain/fill thing a few more
times in order to get it all cleaned out. Then I'll put real coolant
in.
Sunday, March 9, 2008
I drained the coolant again and re-filled it with water. I then
removed the crap battery, returning it to the generator, and put in the new Group 49
battery I'd bought last year. (It's been on a tender this entire
time.) I bolted it down using the hold-down plate I found under the
tray. Then I set the car's clock, and cleaned up some of the tools
that have gotten scattered everywhere.
After church I went to Sears, and they had a refurbished warrantee
replacement ratchet wrench that was acceptable. (Some of their new
ones were naaas-tee!)
In the evening I again took the car out, and it behaved itself well.
I still believe that the Frankenheap has
a better engine/transmission combination for around-town driving. It
feels more torquey and powerful, in general. You really can't drive
this car in fourth gear around town, whereas in the heap it's just
fine. (And you can't lug it at all, you do need to downshift at
times. It definitely feels 'lightweight' and not overpowered at all,
much like other econoboxes I've driven.) But this car cruises on the
highway more comfortably, and does get up speed faster. You just have
to wind it out more. In general the drivetrain in this car feels much
lighter and less solid than the heap's. It still feels underpowered
for its fifth gear, I often find myself losing speed on the freeway
unless I set the cruise control or stay in fourth gear. It may be
that it indeed needs the (shorter?) rear end from the donor car, but
if we do go that way the speedometer will need addressing.
I (re-?)note a short list of as-we-get-to-its:
- Driver's door switch doesn't run courtesy light. (Does run
buzzer, passenger door switch works. Warning module diode problem?)
- Clunk in front end. Front end still doesn't feel as good as, say,
the Frankenheap.
- Gummy sunroof. Switch also?
- Flasher switch dirty.
- Jill insists on a CD player, not the Becker.
Now where's that JVC I wired it for...?
- Left-side door checks are crunchy.
- Fader light is out. (Is it even lit? Perhaps not.)
- Tires.
- AC discharged.
When I got home I put it up on the ramps again and drained the
coolant. Getting better! The left headlight seemed a bit low,
so I cranked it up a bit.
Monday, March 10, 2008
More water. The water I took out is still pretty gray. Will this
never end? I also picked up tools and such, and started emptying the
trunk. Now, where is that JVC CD player? It seems to be
missing in action. I found the wiring kit in the trunk...
At lunch my wife picked up the license tabs, so we're good there now.
This evening I adjusted the left headlight some more, out and up. I
think the headlight alignment is good now.
Tuesday, March 11, 2008
More flush water. Not done yet. I figure I'm done when I can at
least see to the bottom of the drain bucket! I pulled the reservoir
when I found that there was goopy stuff in it. Sealant? I did my
best to wash it out, but it's a multi-chambered affair and resists
such things. Still, a lot better than before. I also pulled the
(original!) lower radiator hose and washed it out, as it had some goop
in it too. The rubber's actually in good shape, so no worries there.
I pulled out a bit of rubber mold flashing from the inside where the
small part of the Y hose joins the larger, I didn't want that breaking
loose in a few years and clogging the works.
Wednesday, March 12, 2008
The final flush! The drained water looked passably good this time, so
I poured in a gallon of Zerex G-05 and topped it off with water.
It's about time.
I also cleaned out the trunk of its miscellaneous spare bits and put
them into a dedicated box, preparatory to passing this car on to Jill.
I got inspired and looked in one of the dusty boxes near the car and
found the JVC CD player! So I'll next be able to tackle the
minor in-cabin electrical tasks.
After work I pulled the floor and underdash panels and carpet, and
liberated the warning module. (Which is behind the side panel.) I
found quite a bit of corrosion on Pins 1, 3, & 5. I also
pulled the Becker out. I cleaned up the corrosion and checked the
diode, all was well. When I put it back together things worked again,
though there is also an intermittent problem with the selector switch
up in the light. (That's common to both doors.)
There is a brake fluid leak from the clutch feed hose. Gotta fix
that!
Thursday, March 13, 2008
I glued the broken grille panel (the tow-hook cover). I cleaned the
mating surfaces with alcohol, used a heat gun to bend things back so
they'd stay in alignment on their own, bridged the three breaks with
Shoe Goo on the back side, and set it aside to dry.
I got the JVC plugged in, but the front speakers don't seem to work.
I ran out of time to chase that.
After I dropped Daniel off at school I plugged the rear fader back in,
which restored the front speakers to operation. I need to figure out
what's up with that, the fader is supposed to be unplugged when
there's a four-channel (fronts + rears) stereo in place.
After work I placed additional reinforcing beads of glue across the
backs of the glued gaps in the tow-hook cover. That should strengthen
it up.
Friday, March 14, 2008
I replaced the glued tow-hook cover, it looks good. I then pulled out
the shifter surround and refreshed my memory, there are two Becker
plugs for the rear speakers I'd put in there to be disconnected when
the JVC is in place. So I did that. Since I was there I popped the
bottom off of the flasher switch, which was gross inside. I
wire-brushed the contacts and put a little grease on them before
reassembly, then it worked well. That took only about ten minutes.
I got out some modeling clay and made a little dam around the worst
rust spot on the hood and filled it with water and put in a pinch of
washing soda. I pressed a loop of wire into the clay so that it was
underwater and hooked the battery charger to it and the grille.
(Positive to the sacrificial wire!!!!) The rust just boiled off of
there, in the half hour I spent on the above items the rust was gone,
reduced to blackened (a benign form of iron oxide) pitting and shiny
metal. I then removed the paraphernalia, dried the area, and put on a
little bit of primer to protect the exposed metal. It's a start!
There are two other rust patches and a lot of failed clear-coat to
address. Somewhere around here I have a can of paint that should be
pretty close in color that I'd like to try.
Saturday, March 15, 2008
Yesterday I broke off one of the retaining ears of the fader's
connector, which was causing it some difficulty in staying connected.
This morning I glued the ear back on using cyanoacrylate glue to tack
it in place, and Shoe Goo for the actual repair.
I managed to get the instrument cluster out again, it was very
difficult. I had to pull with pliers while pushing on the back. Once
it was out I could push out the defogger switch, for the opener
operation. I cut a length of surplus zip wire, and soldered it to the
A and ground terminals of the switch connector, and ran it down to the
open console area below the radio. I then soldered up a power source
for the opener using parts from the junk box: a 6.2 V Zener
diode, a string of four regular diodes to add a few volts to get up to
around 9 V, a 100 Ω series resistor,
and the connector panel from a dead 9 V battery. I liberated the
opener from the SDL and put it in the car. It
worked. I then put the dash and console back together. I left the
shifter surround out since the glue on the connector is still drying.
The bottom cover panel and the carpet are still out and will remain so
until the clutch leak can be taken care of.
I then swapped the cars, so that this car is now in the main garage
slot for Jill to drive, and the SDL is in the operating theater. Just
about ready!
In the evening the glue was dry enough to put the shifter surround
back. I was going to replace the window switch rocker as the old one
was burned with a cigarette and the painted legend was worn off, but
all my replacements were for the right side. (Stupid window shapes
lean in opposite directions.) I used a Sharpie to draw back the
black. That will serve until I can find a proper replacement.
Monday, March 17, 2008
1" of snow today! Roads look clear, though. I went out and had a
close look at the clutch cylinder and, sadly, it's leaking from the
top. New cylinder time! (Rebuild [seal] kits are no longer
available.) Finally armed with all the information I placed my parts
order with Rusty's crew. $216
and change.
Tuesday, March 18, 2008
Jill says the car is fine, but she would like me to look into moving
the cupholder from its current perch on the glovebox door to perhaps
the passenger side of the hump like we have in the SDL. OK, I will at some point.
Wednesday, March 19, 2008
The first part came today, a door check. Fronts and rears are
supposedly different (rears being more expensive); this one is part
number 126 720 05 16, which the EPC says is for the
front. OK, so now I know where to put it.
Thursday, March 20, 2008
I installed the door check in the driver's door, it went easily except
for the actual threading in and out of the checks themselves. The
opening is too tight to get your hand all the way into. I had to work
via fingertips from both sides. The door works smoothly now.
Since I was in the area I also used some spray teflon lube on all the
door handles. The two front doors can be sprayed through holes in the
door that are covered with plastic caps. The two rears I was forced
to spray where it came out through the handle surround. They used to
stick a bit when out, they work much easier now.
I then examined the cupholder situation. I found another one of our
favorite cupholders (a springy plastic skeleton that has centering
fingers, intended to hook over a door edge or the like) and drilled a
hole for a screw in the top part. I used the heat gun to bend the
joint to a more acute angle, matching that of the dash below the glove
box. I then removed one of the under-dash panel screws and affixed
the cupholder there. It's in more-or-less the place she asked for,
but of course in this smaller car it's much more in the way of any
passenger. We'll see how it works out, I left the one hanging from
the glovebox to give her a choice.
Here is some bad ASCII art (is there any other
kind?) showing the cupholder's hook detail:
            /\ <= More acute bend, 45°?
           /  \
          /    \/  <= Screw holding on below-dash panel.
         /     /\
        /     \  \              __ N (Up)
       /          > <=90°        /|
      /          /              /
     /          /              /
    /
   /
...
^--Actual cupholder continues on down from here.
Note that the left-hand line should appear vertical, as the equally-bad
compass arrow attempts to show. Tip your head, if it helps.
The geometry of the smaller trunk means that much of the trunk is
actually in shadow when opened in the dark, more so than any of the
other cars. I threaded an iron wire through the trunk hinge arm and
used it to pull an additional zip wire through the hinge. I then dug
up a spare 5 W courtesy light. (I had to scrub it clean, it was
filthy.) I think I can wire it so that it comes on with the existing
lamp and then affix it to the ceiling of the trunk compartment under
the hat rack (package shelf), filling in the lighting pattern.
However, I ran out of time to finish today.
...The rest of the parts (except the clutch hose) came today. Jill
reported that the car only got 33 MPG when she
filled it up today. That's low, but it's the next tank that
I think will be more telling. (Even so that's
10 MPG better than what she was driving
[Chicken Wagon].)
I had another look at the cleaned-up courtesy light, and it's just too
nice to hack on. However, I knew that there was a really banged-up
one (all glued together and even so missing chunks) in one of the rear
doors of the SDL, so I traded for it! Its
inability to snap into place will be of no consequence in its new
home. I then glued (Shoe Goo, naturally) a metal tab on the side of
the ratty one to serve as a mounting ear. I'll drill a mounting hole
in it after it dries.
Friday, March 21, 2008
I woke up to another inch of snow on the ground. Was I perhaps a bit
hasty in pulling the plug on the snow cars? Nah, it'll melt!
I drilled a hole in the light's new mounting ear and bent it at a
90° angle, threaded an 8mm self-tapping screw into it, and then
drilled a hole in a suitable place in the trunk ceiling (under the hat
rack). I then mounted the light there, it's nicely nestled into a
recess so that it is somewhat protected. I then put spade lugs on the
wire and attached it, using duct tape to keep it from hanging down in
the middle. The trunk swings open and shut without stressing the
wire, and none of the newly-installed parts show at all. Up above I
threaded the other end of the wire along the existing wire's path, and
attached it to the existing trunk light fixture. There is room for a
spade lug on the positive end of the lamp's spring clip, the negative
end's existing uninsulated spade lug just got many wraps of bare wire
around it.
...And it works! Unfortunately it was a bit dimmer than I'd hoped, at
first I thought it wasn't working. But it actually does
throw light under there, so it's much better than nothing. Probably a
10 W bulb fixture would have been better, but that's not what I
have extras of.
I then took an 8" square of aluminum foil and covered the less-shiny
side with spray glue, and lined the recess above and around the lamp
with it. That makes a noticeable difference, enough that I don't
think any further work is called for. It's a pretty ratty looking
reflector, but the only way you can see it is while lying on your back
inside the trunk!
Next up, the box-o-parts. I popped the hood and pried out the
remaining dead rubber from the blowby system and removed the duct
tape. I then installed the two new pieces. Easy-squeezy. Writing
this about the radiator cap replacement operation took longer than
actually doing it. The new cap is a 140°, the old was a 120°.
Coolant, washer, oil, and brake fluid levels were all acceptible.
Down went the hood again.
The first (left) rear door check replacement was easier than the
front, largely because you can reach into the door. The worst part
was getting all the screw holes lined up, I think the body of the
strap runs into the wiring in the door which tends to push it out of
place. I found that the moisture barrier was missing, so I had to
fabricate a new one from a water softener bag. (I sure wish I could
remember where I put the roll of clear plastic that I bought for that
purpose.) These new check straps have nice protective plastic sheaths
to keep out water and dust, they should last longer than the
originals. Oddly, the rear straps were delivered with the straps
fully retracted. You can't install them unless they're out at least
one notch, but pulling them out by hand is quite difficult. I got
them wedged into a hole in the garden tractor and put a screwdriver
through the strap's eye. Then I could plant a foot against the
tractor and yank hard to get them to come out.
The vinyl was peeling back from a couple of places along the top of
the door skin, so I got out some spring clamps and Shoe Goo, and glued
it back in place. I used strips of wood to evenly spread the clamping
force. Due to the missing vapor barrier the bottom of the panel was
wet and turning to mush in spots, and the glued-on retaining hooks
were coming undone. I glued those back on as well. (Emptying another
tube of Goo in the process. Two days ago I found a tube of Plumber's
Goo [same product line, and likely the same product] at the discount
store, so I bought it for $2. Can never have too much of that stuff,
especially at less than half price!) Door reassembly will have to
wait until the glue is dry.
At 10:00 it was still snowing heavily and there were maybe 3"
accumulated. It looks like perhaps Spring is not quite here yet.
Anyway, I then pulled the other rear door skin. Big surprise: no
vapor barrier. Though decomposition was less advanced several of its
hooks were also coming loose, so I glued them and set that panel aside
too. Replacing that check strap went much easier, I guess experience
helps. That door didn't open as far as it should and it turns out the
reason was that one of the balls had blown out of the check strap's
slider and gotten wedged against the stop. Time for replacement,
indeed! The retaining clip for the pin was missing, I replaced it
with one from the junkbox. I then cut up another salt bag and glued
and trimmed it in place. Now we wait. Once the glues have all dried
I can put the car back together.
Weird weather, all day it's been a full-court press from Winter, with
blizzardy gusts and a snow accumulation of more than 4", but in the
afternoon the sun came out and it warmed up, taking the snow down to
maybe an inch, with clear roads and sidewalks. Freakish. It would
have been kind of interesting to get this weather on Sunday (Easter),
we could have taken some pictures. I was joking with Jill, suggesting
that we should hunt eggs today 'cause it'd be real easy to hide them:
stand at the front door and throw them out into the yard. Wait ten
minutes for the snow to cover the holes and send Daniel out looking.
There was a notable lack of interest from both parties.
Saturday, March 22, 2008
I reinstalled the door panels. They don't fit great anymore, what
with their water-induced deformation and such, and they're covered
with cigarette burns, but they're much better than nothing.
Wednesday, March 26, 2008
The clutch feed hose came today. Very strange looking: the original
is the usual cloth-wrapped rubber, but this is a corrugated plastic
thing with rubber-gasketed socket ends. Is it the right item? Let's
hope so!
Thursday, March 27, 2008
Jill complains that the cupholder tilts too much under weight, and
that the clock in the car is off an hour. OK, honey,
I'll do it...
Turns out the clock she was complaining about is the one in the CD
player, so I set it. (It's not that hard, but it's definitely a more
cryptic procedure than the dash clock, which is what I'd thought she
was talking about. It wouldn't kill her to be more specific when
making such complaints.)
I cut a chunk of styrofoam and wedged it behind the cupholder support
to push it out more. The hitherto unused extra part of the original
hook holds it in place, keeping it from dropping onto the floor.
(See above.) Maybe that'll do it.
Tuesday, April 29, 2008
I'm told that the Harbor Freight ball joint tool can be used to do
this car. One has to make a (crappy) adapter for removal, heavy pipe
will do, but that it will do the insertion as it comes. Interesting.
Saturday, May 3, 2008
I primed and painted (black) the piece of styrofoam wedged into the
cupholder mount. Looks somewhat better! Unfortunately the paint
slowly attacked the styrofoam and it shriveled up as it dried. Oops!
I cut a piece of scrap 2×4 to shape with the bandsaw to take its
place and painted it. When dry I put it in place. Hard to see, which
is what I wanted, and it looks like it'll work too.
Thursday, May 8, 2008
Coming home from a function at night I noticed that the right low-beam
is out. Out of washer fluid, too. And, the car still
doesn't handle right. And the gearing just seems wrong. And it needs
new tires... (I hate to do the latter while the alignment is still
suspect.) Jill says she never liked the styrofoam plug in the
cupholder, said it was too 'squishy'. At least that's taken
care of.
Friday, May 9, 2008
I put in a new headlight bulb, we had a spare on the shelf. (Will
probably need to replace that, it was the last one.) I also found
during the walkaround that both rear side marker lights were out, so I
replaced those too. (From the salvaged bulb box. I had to wire-brush
off the corrosion and resolder one wire.) I refilled the washer
fluid. I topped off the coolant and the brake fluid, both of which
looked a bit low. The oil, at least, was fine.
Tuesday, May 13, 2008
I noticed that the U-pull had gotten in a 190E that theoretically has
the same EHA valve that my SL needs, so I ran down
there to get it. Skunked! But I did get a good fuse box
cover that doesn't have a broken-off hinge. I don't think they even
charged me for it.
Wednesday, May 14, 2008
I installed the new fuse box cover in the car. With great difficulty.
What a wretched design! No wonder the old one got broken. I also put
away the other booty from yesterday's procurement trip.
Tuesday, May 27, 2008
The wooden block in the cupholder mount keeps falling out, so I put a
retaining screw in. Jill also reports that the RR door sometimes
refuses to latch and stay shut, but so far I've never been able to
reproduce it.
After work I stopped by Harbor Freight and bought their ball joint
press kit. I'm told that it will work for this car, with some
fiddling. We'll see, it was about $80 for the two co-kits, on sale.
(I'm not sure I'll need the adapter kit for this, but it is
needed to do the joints on the Dodge.)
Friday, May 30, 2008
I prepped the car for Jill's road trip to her Mom's retirement party.
That was mostly just checking the air on all five tires (all needed a
little bit) and checking the fluids. (A little WW fluid was it.)
Swept out some of the crap, too, and put back the driver's seat hinge
cover which had popped out of its socket.
Saturday, May 31, 2008
Jill returned this evening to report that she really missed having AC
in part of the trip, that the cruise control surges at times, that the
spacer block still falls out of the cupholder, and that the car's best
mileage was only 39 MPG. That's down
3 MPG from before, I guess I should try tinkering
with the injection pump timing. The cupholder needs a second screw.
The cruise control amplifier was built for an automatic tranny, its
response curve is wrong for the manual. And I should probably go out
and charge the AC. I'll need to put in compressor oil, too.
Monday, June 2, 2008
I put a second screw in the cupholder's spacer block. That was easy
enough. I then got out the R12 refrigerant oil, and went looking for
my graduated cylinder (for measuring). Couldn't find it, Jill's
caused all the photography gear to be removed from where it used to
live. However, one of her kitchen measuring cups was stamped in both
ml and oz, so I nabbed it. I hit the books and determined that the AC
compressor requires a full charge of 120 ml, with an additional
10 ml for empty hoses. So I poured in something between 125 and
150 ml, erring on the high side, then carefully poured that into
the open end of the large refrigerant hose (up by the low-side
fitting). I wiped out the cup with my finger and used that to
lubricate the fitting's O-ring and threads, then put it back together.
Next I got out the gauge set and the deep vacuum pump. I was unable
to put on the low-side fitting, the pipe has apparently been twisted
at some time pointing the fitting toward the fender. So I got my 27mm
wrench and twisted it (carefully!) back enough that I could put on the
gauge's hose. With both fittings on I then turned on the vacuum and
let it suck for about half an hour. While that was going I washed the
cup out with soap and hot water and wiped it out well, then slotted it
for the dishwasher.
Vacuum fully applied I turned off the pump, and closed up the system.
I made sure the Schrader valve stems were snug, the high-side one was
a little loose. I don't have time to do more this morning, nor is it
a particularly good time to put a charge in, given the nature of the
charging process with the test refrigerant. We'll see if it holds a
vacuum 'til tomorrow.
Thursday, June 5, 2008
Circumstances conspired against getting back to this car until this
morning. I was a bit worried at what I'd find regarding residual
vacuum. The gauge set had been closed all this time, and had itself
leaked down to about 23" of vacuum. When I hooked it back up it
sucked right back down to the bottom peg, so the car's held vacuum for
three full days! This bodes very well for the integrity of the
system. I put the vacuum pump on again to suck on any moisture for
another hour, all the time I had before Jill took off again.
...I stopped by NAPA today to enquire about inline filters for the AC
system. They have several in the book, but nothing that looks like
it'd fit easily in the suction side, where it would be optimal. But
they have some liquid-state filters with fittings that just might be
of some use in the hot side, probably after the receiver. I'll have
to take a close look. The guy just tore a couple of pages out of
their book to hand to me, said they have lots of those books around.
Beats copying down the information by hand!
Friday, June 6, 2008
I went out and measured the AC lines. I also put the pump on again,
with a heat lamp on the receiver/drier. It looks like none of the
sizes in the book correspond with what's out there. Of course. I
went down to the parts car and grabbed its loose receiver/drier, the
one with hoses hanging off of it. I'll just take that to the store to
see if anything fits.
...After I picked up Daniel from school I stopped off at NAPA, and we
determined that they didn't really have anything that wouldn't require
heroic effort to install. So I guess we'll make do without. Onwards!
Thursday, June 12, 2008
Jill pointed out that the low-oil light has been coming on
intermittently, so I checked and found that the car is long past due
for an oil change. (Though not particularly low on the dipstick.) So
I changed it this morning. Uneventful, and I have plenty of filters
for this car so it got changed too. (It wasn't, last time.) The oil
sucker worked well, as usual.
Since I was there I put the AC vaccum back on. It had still held a
good vacuum since the last session, I'm confident that the system is
intact enough to hold a charge well. It's just been so
freakin' cold that it's hardly worth trying to charge it.
Saturday, June 14, 2008
It was finally time to charge the AC, especially as Jill has a road
trip tomorrow. It was 70 °F outside, marginal but as good as
I'm going to get, and I was able to vacuum the system for another hour
or so before the charging began. I put in my last can of secret sauce
only to find that I didn't have any more hamburger gas. Even my (old)
refillable cylinder was running on empty, so I had to find the filler
fitting and get out our one remaining non-OPD BBQ tank to refill it.
With that taken care of I started adding the propane. I wasn't having
a great deal of luck, but I kept adding gas. Even after it seemed
like it should have been fully charged I could only get vent
temperatures of 65 °F at first. Eventually I got it down to
55 °F. Frustrated, I finally went for drive with the gauges
and fill bottle hooked up (the gauges were lying on a bunched up towel
on the hood so that I could see them, the gauge's hook was hanging
onto the back lip of the hood to keep the whole shebang in place, the
bottle was in my lap), and I kept adding dollops of gas. Eventually
it got to 48 °F and the compressor started cycling, which is
game-over time for filling. (But probably OK given the moderate
outdoor temperatures.) With the gear removed on the final test drive
I actually hit 42 °F, which is probably about as good as I'm
going to get. I did find that the exact location of the thermometer
in the vents mattered a lot, the initial high readings were
accompanied with a "Huh, it feels cooler than that" reaction that was
eventually justified by moving the instrument to a better spot in the
vent grille. Throughout this the refurbished compressor operated
smoothly, let's hope it is OK.
Sunday, June 15, 2008
I washed the car and pumped up the tires. The poor thing has really
got some paint/rust issues. I rigged one of the small Weston dial
thermometers so that it could wedge into the vent grille and not roll
around. Perhaps I'll get some reports on the AC's performance. I
plugged Daniel's portable DVD player into the added rear lighter
socket, the one powered by the Road Trip Relay.
...And she's off! A couple of hours later she calls from the side of
the freeway. Tire failure, apparently fairly dramatic. Yes, honey,
you've got a spare and theoretically you can just change it and go on.
Well, we'll see! She says it's been maybe 20 years since she's
changed a tire. I guess getting new tires is not going to wait until
I get that ball joint changed!
...She called again, from the road this time, and says it all went
pretty well. She used the locator pin to get the new wheel back on,
and a helpful gentleman who had stopped right at the end made sure the
bolts were well torqued. She'd had Daniel helping, which is good.
...She called again, from a place with a compressed air, asking about
the desired pressure. She'd decided to stop and check the spare-that-was,
something I had neglected to do this morning. (I'll try to do better
in future.)
...She called again, and confessed to having left the jack hole plug
on the side of the road. I assured her that it wasn't going to be a
problem. She was nearly to her destination. The AC was working well,
she reported 45 °F vent temperatures.
Tuesday, July 29, 2008
I noticed yesterday that the reverse lights were not working. I
checked the fuse and it was OK, as was a bulb. I then pulled the
shifter surround out and checked the switch. No good. I removed the
switch and drilled out the four long rivets holding it together. The
contacts inside were very dirty, I cleaned them and reassembled the
switch body with screws (for the two holes where they would fit) and
bent-over wire (for the two holes where screws wouldn't fit). Tacky,
but it works again.
Thursday, August 7, 2008
Jill reports that the AC is still very intermittent. Sometimes it
blows cold air, sometimes hot. She believes the compressor to be not
running when it's hot, as she can feel the engine load when it's on.
She also reports that she got rear-ended today in the Wal-mart parking
lot. Fairly minor, but it did crease the driver's rear quarter panel
above and below the light, and shatter the light assembly. Great.
Friday, August 8, 2008
Jill got a body-shop estimate of $500 plus the light. This was at
the body shop associated with the paintless dent place, the same one
that worked on the SDL when the deer T-boned it.
Monday, August 11, 2008
I put back the original broken taillight assembly. Good thing I'd
kept it. It may be broken, but it's not as broken as the one I just
removed!
I drove the car today, and Jill's complaint of the AC not wanting to
start is accurate. But what I found is that if you use the AC's ON
button (the little defroster grid) rather than the AUTO button (the
little snowflake) you can force it on at will. Jill says she tried
every button but that one, thinking it to be like the main defroster
button. If you ask me, that column of buttons should have been
labeled AC ON, AC AUTO, and AC OFF. Stupid icons.
Saturday, August 30, 2008
It's time to tackle that bad ball joint. Jill's 560
SL is ready for the road again, so I can take this car out of
service. I jacked up the car under the wishbone (so I don't need to
compress the spring) and removed the wheel. Then I lost interest...
Tuesday, September 2, 2008
I got several of the steering knuckle bolts broken loose and removed.
The caliper is loose, but captured by the ridges on the brake disc.
The strut is disconnected, and can be moved up and down by one hand.
Seems a bit easy to move, but is damped nonetheless. I ran out of
time to proceed further, as it's Daniel's first day of school and I'm
now on short rations for project time.
...According to the collected wisdom of the mailing list:
They [struts] are gas charged, and if yours is actually moving easily
(as opposed to the rod moving in the now-loose mount!) it's bad.
Should be nearly at full extension as the car is sitting, usually
requires only a small amount of compression to put the bolts into the
steering knuckle. If you can move the shaft up and down easily and it
doesn't push back up firmly, it's dead.
There's a test procedure in Section 32 of the factory manual, I
suppose I could actually follow it to see just what kind of shape the
strut is in. The strut's half-removed already anyway.
Wednesday, September 3, 2008
I used the grinder to remove the ridges on the outer rim of the brake
disc. That allowed the caliper to slide off, then I hung it off to
the side with a piece of wire tied to the spring. I was then able to
hammer loose the nut holding the steering knuckle to the axle ball
joint. That was tough, and the theoretically free bolt was just about
as tough to break loose from the knuckle body. This promises to be
fun, but I was again out of time.
Thursday, September 4, 2008
More pounding. I got the bolt out easily enough using a punch, but of
course the knuckle was still solidly stuck to the ball joint. The
book says to use a 'spreader' on the goop-filled slot, which I assume
means the point of a chisel. Okey-dokey, I've got one of those. The
strut was in the way so I removed it, it's obvious that it's no longer
got the resistance it should. (I'll measure it according to the book
later.) Its boot is shot, too. Using a jack stand I was able to
support the tie rod ball joint enough that hammering on the wrench on
the steering arm's long bolt finally broke it loose. (Without the
jack stand things were too springy for hammering to work.) It came
out hard, but once it was out far enough some penetrant finally got in
there and it came out fairly easily the rest of the way. With the
steering arm off the steering knuckle was finally completely free and
unencumbered and pivoting easily on the ball joint. It could be
turned enough on the ball joint that the chisel could then reach the
sealed slot, the sealant feels like some sort of bituminous goop.
Perhaps Shoe Goo will do as a replacement? Something tougher than
RTV, that's for sure. Anyway, I hammered the chisel into the slot in
the steering knuckle and was finally able to lift it off of the ball
joint (the hub and rotor were both still attached to it). I then
removed the ball joint's boot and retaining spring, exposing its guts.
Gunky, but not as bad as I'd feared. I don't think it was ready to
fail just yet. (Good.) I used the wire brush to clean off the area,
then got out the Harbor Freight ball joint kits. Looking at it, it's
not obvious what to do, exactly. Their instructions, as usual, stink.
Well, I've got time to think about it since it was again time to clean
up.
...Suggestions from the mailing list:
You will need some sort of an adapter to push the old ball joint out
(a short bit of pipe, sawn off straight across will work) as none of
the sleeves supplied with the tool will fit inside the hole.
One of them will fit going back in.
What you want to do is put a large sleeve and the "cap" fitting
underneath (to push the old ball joint into) and then your custom
sleeve and the other "cap" on top. Turn the screw to force the old
joint out. Usually stuck, you may need a bit of tapping with a hammer
to get it to start moving.
Once it's out, find the sleeve that will fit around the hole and use
the sleeve that fits the flange on the bottom of the ball joint, with
appropriate caps, to push the new one in. If I remember correctly
you can just flip the "cap" over and it will push on the flange, but
check. There will be one or two notches in the new joint depending on
manufacturer—one of these notches must point to the other side
(toward the centerline—check the one in there before you push it
out). The joint is directional—more movement one way than the
other across the top. If you don't get it in right it won't last
long.
Be sure it starts square—again, a hammer may be necessary to keep
it moving in straight. My tool is bent from removing and installing a
ball joint in my brother's W126, which put it in a bind; you may have
less difficulty.
Friday, September 5, 2008
I checked the orientation of the old ball joint and it had a mark and
it was in the right place. I then trial-fit the ball joint remover;
though indeed nothing in the kit fit correctly the 32mm socket from
the 3/4" Harbor Freight socket set fit fairly well. It was about
the right length and its outer diameter was right, but the flats
inside kept it from dropping over the ball retaining shoulder. I
tightened and hammered the bejeezus out of it anyway, but no joy. I
heated the wishbone's socket a lot also. I could see that the spine
of the big C clamp was bowing, so after I gave up I pulled it all
apart and had a close look. The socket had actually flattened the
shoulder over the ball joint, which was now very tight instead of
loose like before. The ball joint seems like it might have scooted
out of its seat in the wishbone microscopically, but at this rate I'll
break something before it comes out. I need to find a better-fitting
piece of pipe so that I'm applying force to exactly the right place.
I'd also like to find a big piece of pipe to notch so that it fits the
bottom better, that'd keep things more in alignment.
The C clamp of the HF ball joint kit is now permanently deformed,
though not enough (I hope) to prevent its further use! The real press
is supported on both sides, call it an O clamp, and that sure
seems to be something that would be useful here.
...At lunch I bought a variety of plumbing and electrical pipes and
fittings, $32. I'll use what works out and probably return the rest.
That's the plan, anyway.
Monday, September 8, 2008
I dug into my newly-purchased bag of goodies and found that the best
choices were the 1-1/2" and 2" galvanized pipe sections. I cut a
length of 1-1/2" sufficient to extend from the ridge of the ball joint
to above the post, approximately the same length as the 32mm socket,
about 48mm long, and set it over the ball joint. Too big in diameter,
but not by much. I slit down its side with the cutoff saw and
hammered the gap shut using the the V-block face of one of the jack
stands as an anvil. Still too big, so I cut the slit open again and
repeated the exercise. There, it was just about perfect, about 45mm
in diameter. I welded up the slot and ground the bead off down where
the end needed to go through the wishbone socket. I then cut off a
short section of the 2" pipe, it was about perfect as-is. (28mm long
and 60mm in diameter.) I put the 2" on the bottom for the ball joint
to drop into and applied the big Harbor Freight C clamp. Once I
got it all aligned and got a bit of pressure on it I sprayed some PB
Blaster into the gap and then hit the wishbone socket with the propane
torch. Once the penetrant started boiling in the gap I then applied
the wrench in earnest, and the ball joint just pushed right out. And
I was out of time, again.
...At lunch I returned the unused fittings and got back $24, so the
net tool cost was about $8.
Tuesday, September 9, 2008
I trial-fit the new ball joint and got it lined up. While the two
pipe sections from the original kit worked well for size, they were
together too long to fit into the clamp with the wishbone and the
joint! I found, though, that I didn't need a pipe section on the
bottom (push side) at all; the stepped adapter flange actually itself
fit the ball joint well enough, contacting the heavy outer ring of the
joint without putting any pressure on the ball's cap. I assembled the
stack in alignment and snugged it, hit the wishbone socket with the
propane torch for a bit, then cranked on the clamp. The joint just
walked right into the socket, no problem.
Cool. I then spray-painted the area with primer and black paint,
since I had scuffed it up pretty well with the wire brush. I also
cleaned, primed, and painted the back of the steering knuckle.
I never did need the auxiliary kit for the ball joint press. Oh well,
it's supposedly useful for the Dodge.
Wednesday, September 10, 2008
I measured the resistance of the shock absorber (strut) according to
the book. (Push rod in 84mm while on spring scale noting 'weight'
while holding it at this extension. Should read 280+/–30 N
when new, 170 N minimum. Also note 'weight' required to push rod
in 50mm at a 100mm/minute rate, should be 320 N or 450 N
depending on model. The equivalent pull value should be 740 N or
1150 N.)
Well, it failed, big surprise. I measured about 12# either way I
conducted the push test. At
1 Newton = 0.225 pounds force that's 53 N! A
far cry from even 170 N, much less the optimal value. The pull
resistance was more, as it should be, but the push value is so low
that it's not worth the effort of measuring the pull value. It's
certainly not right. Time to order new.
Thursday, September 11, 2008
I managed to blow my chance yesterday, so first thing today I ordered
parts from Rusty. About $280
for both sides' struts (V36-0362), bellows
(129 323 01 92) and bump stops
(124 323 07 44). (The total invoice was $407.26, but I
also ordered other things.)
Monday, September 22, 2008
No sign of parts so I pinged Rusty. He apologized, and said it seems
that he forgot to ship it!
Friday, September 26, 2008
A big box showed up today!
Monday, September 29, 2008
I opened the big box, all the goodies were there so it's time to
start. The force required to compress the new strut is dramatically
more than that required for the old dead one I took out. No real
surprise there. The threads in the steering knuckle were pretty rusty
so I chased them with a tap. I painted the ball joint's post with
anti-sieze compound and installed the knuckle and its (new) retaining
bolt. I placed the new strut and loosely put the steering arm back
together. (Oddly, the Allen socket in the end of the new strut is a
different size than the original's.) I attached the new shock bellows
to the upper mount, it kind of clips over two ears on the upper shock
mount. But then, sadly, I was out of time. Still, it's progress!
Tuesday, September 30, 2008
I used Shoe Goo to fill the gap where the steering knuckle closes
around the ball joint's post. I then put the rest of the wheel
assembly together, using the new bolts that came with the strut but
reusing the rest. I put blue lock-tite on the main steering arm
retaining bolt as it was the only one that wasn't new and didn't have
any of its original thread-locker left.
I had some extra time this morning so I put the strut in on the other
side too. Just the strut only is actually a pretty easy proposition.
The bellows on the right side was in better shape, but the shock
wasn't. I noticed that the new struts didn't come with the little
clip that holds the brake wear sensor wire in place, then I noticed
that these clips were actually removable. Oh. So I removed it from
the old strut and moved it to the new. Then I had to go over to the
other side and do that one too. At least it can be done with the
strut on the car. I wire-brushed and waxed all the lug bolt threads,
they were getting pretty rusty.
With that done I then installed the new windshield washer pump seal.
It still leaked down there, so I cut off the enlarged end of the hose
coming off the pump. A little heat with the heat gun made the hose go
onto the barb easily. I think that will do it. I then put away all
the tools and cleaned up.
Ready to drive!
...No, it's not. I was going to drive it today, but it would only
crank, not start. Probably a glow plug problem of some sort, though
the light was working. I put it on charge and took Ethelred instead.
Wednesday, October 1, 2008
I checked the glow plugs. No, they were good. The car drew more than
60 A glowing, around 300 A cranking. Still no start. I
then pulled the vacuum shutoff hose from the top of the IP and the car
would then puke a bit as I cranked. With more cranking and some
throttle it started running just fine. I killed it with the clutch
and hooked the shutoff hose back up. It worked fine after that.
Coincidence? Perhaps. The fuel system may have leaked down (though
it should not) over this long hiatus and it just took that long for
the air to get purged out. Or, perhaps the key's shutoff valve was
sticky. I'll keep an eye on it.
The washer tank was low, but dry and no longer leaking, so I refilled
it.
The drive to work showed that the windshield washer level sender is
stuck on 'empty' again. However, the car handled well and the
thumping from the front end is gone. The rear shocks might need
attention too, I'm not sure.
Monday, October 6, 2008
I drove the car to band tonight, and I must say that with the new
front-end parts the car's handling is much improved. There's
a clunking in the rear over bumps and I thought that a couple of
potholes felt like they broke the back end loose from the pavement, I
wonder if the rear shocks need replacing too? Who knows, I might even
start actually liking to drive this car.
When we got this car the handling was truly vile, you might even say
dangerous. But up front new (well, better) tie rod ends, idler arm
bearing shims, steering damper, new front struts and a new ball joint,
and in back a replacement drag link, plus a four-wheel alignment and
new correct-sized tires and now it's handling pretty well. Amazing
what kind of difference throwing a bunch of money at a problem can
make. (Not amazing at all, actually.)
Wednesday, October 8, 2008
Topped off the power steering fluid. (It wasn't really low.)
Wednesday, October 15, 2008
I had a peek under the hood, and there is sign of fuel seepage at the
main fuel filter and the injection pump. Will need to go around
tightening the fittings, then see.
Thursday, October 16, 2008
I bounced the rear of the car up and down, the shocks back there are
definitely shot too. Rusty's got them on sale right now, $46.89 each.
I ordered two.
The spare tire is not tied down, I need to figure out what's missing
so that I can cure that source of noise on bumps. From the net:
The spare tyre hold down looks like a shallow bucket with a large
plastic screw thread sticking out the bottom. 201 890 00 07, not
sure of the year of yours, but 85 1900E, 87 190DT's are all the same.
Just like the SDL then. I'll have to look at
that.
Friday, October 17, 2008
Hmm, conflicting advice:
It doesn't have the bucket, it should have the long screw thing that
sticks down in one of the lug holes and screws in the bottom of the
spare tire well.
So, lug or center hole? A mystery.
Today I cashed the check from the rear-ending: $733.59, it may be that
we don't bother to fix the car. (The rust, you see. Hardly worth it.)
Tuesday, October 21, 2008
I opened the box that came yesterday, and found the rear shocks. Now
I need to schedule some time to do this.
Thursday, October 23, 2008
There's so much to do that I'm starting to fall into analysis paralysis.
Do something, fool! (Of course, I have almost no time left
this morning.) I did use brake cleaner to spray off the fuel system
fittings, then I loosened and tightened them all, including the nut on
the #1 line on the injection pump. (The one I was most suspicious
of.)
Friday, October 24, 2008
Looked at the injection pump. I won't say it's perfectly dry, but
it's not wet and dripping and reeking of hot raw fuel anymore.
I then jacked up the LF corner. The car's been making a heavy
clicking recently, and I wanted to check for loose work. Nothing
loose that I could find, but I did get the heavy clicking while
jacking it up. I couldn't reproduce it, however. I did remove and
replace the steering box bolts, and I checked the tightness of the
bolts I'd done for the ball joint. Nothing. I don't think it's the
steering linkage itself, so that leaves the bushings on the control
arm. Lovely. Regardless, I don't think there's any impending death,
so I can drive it until it worsens enough to pinpoint.
Saturday, October 25, 2008
No time like the present. I jacked up the rear of the car and put it
on ramps. I removed the plastic cover (two 10 mm sheet-metal
screws) and the 17 mm bolt that holds in the shock. Up top I
peeled back the trunk lining and removed the two 17 mm nuts, the
big washer, and the rubber bushing. Getting the old shock out wasn't
too hard because it was so dead. I also extended the suspension using
the jack. The hardest part was getting the new shock in. I made a
twine lasso and compressed the shock, then I could put it in place and
cut the twine. It then extended into position. Securing the hardware
was trivial at this point. It took about an hour to do the first
side, then I broke for breakfast.
The second side went exactly the same, in about 45 minutes. The old
shock wasn't nearly in such bad condition as the other side, in fact
it was a replacement junkyard unit from a 190E according to the
painted lettering on the side, so it was harder to get out. A twine
lasso helped compress it enough that I could slip it out quickly.
I'll save it for some kind of spare, the other one is pure trash.
The weld to the muffler is cracking, I'll have to fix that at some
point. I think it needs a reinforcement tie to the pipe too, so that
flexure doesn't crack it loose again. I then lowered the car and put
everything away.
Sunday, October 26, 2008
It's Daniel's seventh birthday today. Some of his cousins visited
this weekend, and whilst here their (donated) 150 kmi 1992 Yukon
vomited up its water pump on the freeway coming back from the pumpkin
patch. Big puddle of 'blood' under it and everything. They needed to
get back home to Yakima, so I checked the oil and handed Lanette the
keys to this car. My brother guessed that it'd be at least $400 to
get it going again, perhaps more depending on what they did.
Monday, October 27, 2008
Craig stayed 'til today getting the truck fixed, to the tune of over
$1000! Ouch, nothing like a little out-of-towner gouging. (I could
have helped, but not really until Tuesday morning. I'd have been at
it a couple of days, and I'd have been happy to do so, but they
couldn't afford the down time. Might have been $300 in parts to
replace all that should get changed out with that kind of mileage on
it.) He drove off with Jill, they met Lanette halfway (in Moses Lake)
and swapped cars back.
Tuesday, October 28, 2008
Today I finally got a chance to drive the car with the new
rear shocks. Much better. (My sister-in-law and my wife
both put in some serious freeway time Sunday and Monday. Both
reported that the car drove well. I concur.)
Friday, November 7, 2008
Score! The U-Pull had in a 190E 2.3, so I dropped by, even though the
weather was miserable, with heavy cold rain. It had both rear
taillights in excellent condition, so they are now mine, at $6 each.
I also got both exterior heated mirror glasses, for $7 each. They had
a 280SE (116) that I grabbed the spare tire holddown from. Maybe
it'll fit, it looks vaguely like what I might need.
Sunday, November 16, 2008
I looked in the trunk, and it was dripping wet. We've had a lot of
rain recently, and the damaged taillight was funneling in water. What
with heating and cooling every surface was covered in condensation,
and water was even dripping out of the trunk light. Time to do
something about it!
I pulled both taillights out so that I'd have a reference surface. I
then hammered out the dents on the one side as best I could. This
messed up the paint something good around there, but it was ruined
anyway. The edge below the light was torn a bit, the body shop had
indicated that some welding would be required. Hey, I can do that! I
straightened out the lower edge area using pliers, then started
welding, grinding, and hammering to get the profile back. That took
some doing. When I started the area was very weak, easily bent with
the pliers, but by the time I was done it was much stronger. I used a
small hammer on the outside to planish the hammer bites from the
inside hammering as best I could, then I mixed up some of my
almost-dead Bondo and smeared it over the area. The hardener had
dried up, but I mashed it in there anyway. It won't be great, but
maybe it'll be good enough? The Bondo was setting up, anyway.
While the Bondo was setting I took the welder to the muffler, which
was flexing and cracking loose where the exhaust pipe went into it. I
welded up the crack, then I welded a piece of 3/16" rod as a strut
between the edge of the muffler and the pipe. That stiffened up the
area considerably, and should prevent such problems in the future. I
then broke for lunch.
...After lunch, and a nap, the Bondo was dry. I used the rasp to take
it down to its rough profile, then used the sander to smooth it off
and feather it. Looked passable. I then sprayed primer on and let it
dry, then painted on a dollop of the gold paint I'd gotten for the 250C, which never did match that car too well.
I think it matches this one better. Airbrush time?
Monday, November 17, 2008
I sanded the primed area lightly and tried to use the airbrush to put
on a finish coat. I didn't thin the paint enough, it was too thick,
and I didn't have time to redo it. It went on spattery and strange,
and the whole vicinity near where I was painting ended up coated in
cotton-candy-like cobwebs. It was the strangest thing I've ever seen.
Harmless, though. The paint job looks pretty rough, and the fact that
I rattle-canned some clear coat on it too heavily such that it sagged
and ran didn't do it any favors. Well, it's better than it was, at
least, and is roughly the right color. (It's richer, golder, than it
ought to be. Oh well.) And it's protected from the weather. It can
be sanded off and re-done later. I put the taillights back, using the
one new one, and I was then out of time.
Tuesday, November 18, 2008
Still a lot of moisture in the trunk, so I disabled the trunk light
again and left it open a crack overnight.
Wednesday, November 19, 2008
Trunk's not dry yet, so ditto.
Tuesday, November 25, 2008
The trunk's still not dry, I've been plagued with moisture
problems. So today I did a booty-ectomy,
removed the carpet, and put a heater in the trunk to thaw the ice
that's on the inside of the trunk lid. (Much of the booty was frozen
to the carpet. The booty and the carpet are now in the garage.)
The new-model 40-quart Coleman thermoelectric cooler I got a couple of
days ago at the thrift shop for $10 was also clogging up the car, so I
removed it. When I tested it I found the exterior fan, a brushless DC
box fan, was siezed. I removed the eight screws that secured it and
its shroud to the heat sink, and found it very dusty and stiff. I
blew it off and slopped some M1 5W20 oil into it. Once it got down in
there the fan started spinning and eventually got up to speed. I left
it running for awhile with the oil cupped into it, then I reassembled
it. Runs fine now.
Wednesday, November 26, 2008
Last night I left the trunk open a few hours to finish the drying
process. And it started raining again. Crap! So I put the
heater in again this morning and left the trunk cracked. A couple of
hours got most of the moisture back out of there.
...After work I took a look at putting in a switch so I could easily
leave the trunk open while having the lights off. (My former
technique of just removing the bulb is not sufficient anymore since
I put in the auxiliary trunk light. I've had
the lamp fixture pulled out and the power wire disconnected, but the
fixture was just dangling there and getting pretty banged up that
way.) I found a nice toggle switch in the junk box, though I hated to
waste it on this. It had spade lugs, but was sufficiently large that
it couldn't easily be mounted in the trunk lid. I next tried a slide
switch from the junk box, but it was a bit too large to fit in the
open part of the plastic lamp carrier. (I'm not fond of slide
switches anyway.) While staring at the situation (and contemplating
that this kind of pin switch is entirely capable of having a
pull-out-to-disable function that is self-resetting, and why didn't
they spend the extra dime on that anyway?) I finally noticed the
threaded bushing around the post. Ding! I got out a .410 shotgun
shell casing and cut it off with the hacksaw so there was about 1/8"
of red plastic left above the brass base. I used the heat gun to
soften the plastic and pliers to squeeze it in a bit, then I put it
over the pin and threaded it over the bushing to set up. Voila!
Instant thread-on cap, with molded-in soft plastic threads. When it's
threaded on the pin is depressed, and the lights are off. I
reinstalled the light fixture in the trunk and tested it. The cap
does protrude down just enough that the trunk can't be closed when
it's on, I'm not sure whether this is a good or a bad thing. The cap
tucks nicely into the plastic lamp fixture just below the lamp when
not in use. If it should bounce out and get lost it'd be trivial to
make another one.
Tuesday, December 16, 2008
I stole the battery for the Frankenheap.
(In a pinch, the closest battery store is 'round back of the house!)
Friday, February 13, 2009
The U-Pull had in two more
190E's, and I checked the VIN's via that site in Russia. One had
a black interior, so I dropped by to see if it had better-looking
interior panels than ours. Yes! I got the two front door panels.
The passenger seat is also quite good, I may go back for that. I need
to look over our car to see what I might be missing that I could grab.
Tomorrow?
Monday, February 16, 2009
I stopped by the U-Pull today,
and picked up both front seats from the black car, and seven (!)
wheels from the two cars. ($20 for both seats, and $20/wheel.) The
front seats are a newer design, they have a manual seat cushion
fore/aft tilt knob, in addition to the usual fore/aft position and
height levers. The upholstery on the passenger side is excellent, and
not all that bad on the driver's side. One little poke/tear in the
pleated portion, not a wear spot so it should be gluable, and some
wear on the side of the seatback where you get in. The armrest is
perfect. I also got all four of the front seat track mount bolt
covers, which this car is missing. I got four 8-hole rims, and three
15-holers, one of them the spare. Some of the tires are even decent.
(Two are unidirectionals.) The 8-holers could be for snow wheels,
they're pretty scratched up. Getting all this booty in the Frankenheap at once was a bit of a chore!
(And stowing it in this car for safekeeping was even more fun.)
I also got a set of rear taillights, one from each donor car, and the
outside temperature display, sensor and all, from one of them. There
was also a big wad of bare stranded copper wire lying on top of one of
the donors. So I grabbed that. Scrap!
Tuesday, April 7, 2009
I drove the 380 SL, and it said
75 °F on the bank sign today. I stopped by Les Schwab and
bought another Group 49 battery to replace the one I snatched for the Frankenheap, $108, and installed it today
after work. I then brought the car up out of storage and topped off
its brake fluid. The trunk rim was full of condensate, there must be
a small leak into the trunk. I also had to remove the car parts
(seats and door panels) I'd stowed in the car, I'd forgotten about
those. They're temporarily in our last garage stall that we're now
using for storage while carpeting is being replaced in the house.
I'll have to dispatch them pretty soon this year, there just isn't any
more room for that kind of crap and Jill gets very cranky if
there's no place for her to park inside. Anyway, the car's ready for
Jill to drive, at least until the 560 SEL is
ready, which I think she'd prefer. (It's bigger, and has an automatic
transmission.)
Wednesday, April 8, 2009
Driving the car I noticed a couple of things: the driver's seat
springs are either broken or soft, and the dome light's again not
working on the door switch. Well, I have plans for both of these
items anyway!
Thursday, April 9, 2009
I looked for the replacement dome light I know I have, and I couldn't
find it. It was nice and clean, and had a map light. I did find an
older, much dirtier one of that ilk, so I took it all apart and put
its plastic into the dishwasher. With any luck that'll freshen it up
a bit.
...Yes, it certainly did. The plastic came out of the dishwasher
looking new, or at least as good as I remember the lost one being.
It's amazing. I put the light all back together, first cleaning the
contacts on the PCB and switch. I replaced the bad map bulb, and
cleaned both bulbs with alcohol. I cleaned the black knurled knob,
and painted a white stripe back on the correct rib where the original
had worn off, I used the MB "Artic Weiss" touch-up paint I have. It
looks pretty good now.
Friday, April 10, 2009
The light fit well, looked great, and worked, except for the timer
function. I took it back apart and resoldered it. I tested its
10 V 100 µF electrolytic capacitor, which was in
tolerable condition though not great. When reassembled it all worked
correctly.
Jill reported that the radio hasn't worked for a couple of days. Its
problem was the fuse. Easily put right.
Wednesday, May 13, 2009
Low on brake fluid again. Topped it off.
Friday, May 15, 2009
Jill reported that the clutch hydraulics were dead this morning. I
threw her the 560 SEL key and drove Ethelred instead; the weather's starting to improve.
Saturday, May 16, 2009
I popped the hood and found the brake reservoir nearly empty, the
chamber that also feeds the clutch. The inside of the car was dry, as
was the brake booster area. However, there was fluid on the bottom of
the transmission, so I guess that's where I need to look. That
cylinder, however, was new a year ago, wasn't it? Oddly, I can't find
a record here of actually swapping it, yet I remember doing so. Or do
I? Certainly I remember buying it...
Sunday, May 17, 2009
I jacked up the car and everything was dry except the bottom of the
transmission, so I removed the slave cylinder. (What a major PITA
that is, and it drips brake fluid all over you as a bonus.) When
operated by hand with a thumb held over the port the thing obviously
leaked air past the shaft seal. (Glortch, glortch.) Failed, after
only about a year. Not too impressive.
Saturday, May 23, 2009
The new slave cylinder came Thursday, so today I installed it. I'd
have done it sooner, but it's such a nasty job... Anyway, I got it in
much easier than it came out: it's clean, nothing's dripping, and I
was able to chase the bolt threads before putting them back so that
they can be spun in quickly with fingertips. The only 'secret' is
that it really helps not to tighten down the mounting bolts until you
also get the feed hose threads started. Oh, and the other 'secret' is
that you use a long length of clear suitably-sized tubing to tie
between a brake caliper bleeder and the clutch bleeder, then pump the
brakes to bleed all the air out of the system. (Bleeder screws are
7mm and 9mm, one each.) Once that was all done I topped off the fluid
and took a test drive. No problems, mon.
On the test drive all was well. I also tried out the AC, and it was
working. Good.
Sunday, May 24, 2009
Today the speedometer started dropping to zero and bouncing heavily.
Broken cable? It's always something with this car! I so
want to like it, but swelp me I don't.
Tuesday, May 26, 2009
It seemed like it was time to start wading through some of the bulkier
items in the garage, such as the replacement front seats I scored back
in February. I got the tracks removed from the
bottom of the driver's seat without apparently breaking anything,
which is a minor miracle. (These newer seat tracks aren't held
together with screws like the older ones, they're riveted together.
That makes disassembly and cleaning much harder.) I had to grind off
one rivet that holds a spring tab on the base to the track assembly,
but it looks like that's what you're supposed to do. I'll use a nut
and bolt to put it back together. With the track liberated I could
take it to the solvent tank and begin cleaning. That's a real pain.
One 'secret' was to wedge some large bolts into the pawls to hold them
open so that I could then force the tracks to move back and forth.
With a lot of sluicing and motion I got them freed up fairly well, and
picked out most of the hair and glop. I painted the raw metal from
the rivet grinding and set it aside to dry. I need to get some more
spray lithium grease, that's the easiest way I've found to lube these
tracks. (I'm not sure this is the best lubricant for the job, but
it's sure easy to apply. Anything else is extremely messy.
The lubricant goes mostly where you want it, and overspray is easily
wiped off.)
Friday, May 29, 2009
I lubed the tracks (spray lithium) and put the seat back together.
That took awhile. I used a big sheet metal screw and a .410 shotgun
base (as a 'nut') to replace the ground-off rivet. When I removed the
old seat from the car I found the rear mounts very rusted, so I
removed the captive nuts and the cover plates and brushed them off and
painted them. I chased the threads on the one that had rusted the
worst. I then put the new seat in, which went fairly uneventfully.
The lubed tracks work well enough that you have to watch out that you
don't launch yourself through the windshield when you adjust them!
While I was there I mucked out the car a bit, including mopping of
that wretched spilled coffee my wife likes to decorate with. The
carpets smell a bit of urine, I wonder what the story is with that?
(I think this has been so since we got it, but the cigarette smell
covered it some.)
The new seat looks good, but does have a couple of cuts in the pleated
part of the seat bottom. Probably glue-able, we'll see if I can patch
it sometime.
Tuesday, March 2, 2010
I got some spec's on the rear-end ratios from the mailing list today:
From the technical data book, the 2.2 manual tranny (201.122 chassis)
had a 3.23:1 rear end 'til 10/85, then a 3.91:1. Your 2.5 (210.126
chassis) auto has a 3.07:1 rear end. The manual version had a 3.64:1.
The 2.2 versions (both auto and manual trannies) that we're dealing
with both have a 3.23:1 ratios.
So, it looks like my spare differential (3.23:1) is not the
'right' (3.64:1) one either, but it's likely to be more satisfactory
than what's on there now (3.07:1). There's likely to be a speedometer
calibration problem, though.
I've also found a nice W201 differential gear ratio chart, the contents of which are (I
hope) reproduced here in a more legible form:
| 190D
2.0 | 190D
2.2 | 190D
2.5 | 190D
2.5T | 190 | 190E
1.8 | 190E | 190E
2.0 | 190E
2.3 | 190E
2.6 | 2.3
-16 | 2.5
-16
|
| 2.65:1 | | | | A | | | | | | | |
|
| 2.87:1 | | | | | | | | | | (3.2 AMG) | |
|
| 3.07:1 | | | A | | | | | | | A | –'86 | '88–'93
|
| 3.23:1 | M4, A,
M5 –10/85 | | | | –10/88 | | M4, A,
M5 –10/88 | M4, A | | | |
|
| 3.27:1 | [M4, A] | | | | | | | [M4, A] | A,
M5 –10/88 | M5 –9/89 | '87+ | (EVO)
|
| 3.42:1 | | M5, A | | | | | | | | | |
|
| 3.46:1 | | | | M5 | 10/88+ | M4, A | M5 10/88+ | M5 | M5 10/88+ | | | (EVO II)
|
| 3.64:1 | | | M5 | | | M5 | | | | | |
|
| 3.67:1 | | | [M5] | | | [M5] | | | | | |
|
| 3.91:1 | M5 10/85+ | | | | | | | | | | |
|
| 3.92:1 | [M5] | | | | | | | | | M5 9/89+ | |
|
| Key: | A | Automatic
|
| | M4 | 4-speed Manual
|
| | M5 | 5-speed Manual
|
| | [X] | Special taxi edition 11/88+
|
| At | 130 | km/h (~80 MPH) the 2.5T M5 turns 2970 RPM in top gear (lowest)
|
| At | 130 | km/h (~80 MPH) the 1.8 M4 turns 4200 RPM in top gear (highest)
|
From this chart I now have conflicting information, my extra
differential is either 3.23:1 or 3.42:1. Neither is right, but of the
two I'd obviously prefer the 3.42:1 ratio. It is also apparent from
the chart that there is no other donor of the 'right' differential
except the never-seen-in-the-States 190E 1.8 (with 5-speed!), or
the nearly-right 3.67:1 of some of the also-never-seen-here taxis.
I'm going to have to measure, or find the identifying mark on, my
spare differential.
Saturday, May 14, 2011
I think this car needs to take another tour of duty, since it has
summer tires and the 560 SEL is so sick. The (newish) battery was flat
so I put it on charge. (I thought I'd disconnected it when I put the
car away, but clearly I hadn't.) I refilled the brake fluid, which
was nearly gone, and blew out the air filter. (Mostly I was checking
for mice, since there was a lot of mouse poop on the air filter
housing.) I dug up the key, I'd nearly forgotten where it was.
Couldn't get it started, though. Battery didn't have enough poop
(yet) to crank all the air out of it. Coughed a few times...
Sunday, May 15, 2011
With a fully charged battery it started pretty easily. I drove it up
top and pumped up the tires, and used compressed air to blow off/out
the dirt. The engine had a very lope-y idle, not sure what's up with
that. It needs new injector return lines, they're weeping. The front
doors didn't want to open from the outside at first, but some yanking
has loosened them up. The car wasn't too happy sitting idle all this
while. I took it for a spin and it behaved as I remembered, and the
AC seemed to still be working. To me it seems very clear now that the
rear end ratio is much too tall. The backup lights seem to be out.
Monday, May 16, 2011
Drove the car to work, and to band. I picked up license tabs after
lunch. The car's door locks and latches are misbehaving quite a bit,
but so far I've been able to get at least one door open when I want
in. One didn't want to lock, etc. Backup lights still out, and it's
not the fuse 'cause the cruise control (labeled as on the same fuse)
worked fine.
Tuesday, May 17, 2011
I sprayed PB blaster into the door latches, they seem to have loosened
up some. We'll see if this helps. I then cleaned the reverse lamp
switch and the passenger mirror switch, both work right again. The
speaker wiring is messed up, I may have mis-wired it or something, I
see my notes from before confirm this.
Wednesday, May 18, 2011
I tore open the radio wiring to see what was up. (And what should I
find on my journey but the missing garage door opener, which
apparently I installed two years ago. Dumb!)
I found out that the problem is that the plug to the radio makes bad
contact, the wiring was all OK. Jiggled it, put it back together. I
might have to do something more drastic. I managed to break off the
other retaining ear for the fader control's plug while I was messing
around. More dumb!
...After work I cleaned the broken fader plug and tacked it together
with cyanoacrylate glue, then potted it in Shoe Goo. I also used a
bit of Shoe Goo to glue down the small fingernail-sized tear in the
driver's seat pleated area, we'll see if it holds. A bit of
turpentine took care of the pitch blob on the windshield.
Thursday, May 19, 2011
Yesterday I noted that the wretched JVC KD-G200 is one of those
light-show specials, and that its clock was not set. I recall that it
is not obvious how to manipulate these settings, so I (re?)downloaded
the manual today. (The secret lies in holding down the SEL button
until the auxiliary settings menu comes up. The channel up/down
button moves from setting to setting, and the volume control changes
the settings.) I set the clock, etc., and reinstalled the glued fader
plug. The tear in the seat seems to be holding. I also glued back
the broken fan control knob, gently, we'll see if it holds up.
...After work I had Daniel vacuum out the car while I worked on
getting the driver's footwell side carpet reattached. I had to pull
off the sill cover, that exposed the plastic rivets that had pulled
out. One rivet was broken, I replaced it with a drywall screw and a
washer. One eyelet on the carpet was torn out, so I used duct tape to
fashion a wraparound splint for it. (All this is hidden underneath
the sill cover.) Looks a lot better now.
Friday, May 20, 2011
I added a bit of water to the radiator tank, it had been flashing low
intermittently. I also replaced the shattered windshield washer
splitter, MB P/N 000 860 08 62 with one I'd
originally bought for the Chicken Wagon, and topped off the washer tank. A
heat gun makes short work of softening the washer tubing for easing
the job. I then handed the car over to Jill.
Wednesday, May 25, 2011
I bought 2m of new injector return line at the dealership today, $21,
and installed new lines after work. That should cure any weeping
that's up top, though I think there may be other leaks too.
Friday, May 27, 2011
Road trip to Antelope, OR. (Young Life's Family Camp, with Jill's
brother and family, the site is the former Bhagwan Shree Rajneesh
compound, the guy with all the Rolls-Royces.) The first leg, to
Biggs, was largely uneventful and turned in only
34 MPG. There was a pretty stiff headwind most of
the way, and our typical speed was roughly 75 MPH,
perhaps that helped.
The heater didn't want to fully shut off, though the AC system was
working when called for. I had to modulate cabin temperature via the
grille flaps on the side and center grilles.
The wiper squeaked, but I came to the conclusion that it was rubber
rather than gearbox even though the glass was wet. The noise seemed
to follow the arm across the glass. The washer worked, but was
anemic. It may be partially clogged, and/or badly mis-aimed.
The fuse blew on the portable DVD player (Audiovox D1708) at Biggs,
and when I bypassed it the player promptly smoked. Something died,
possibly induced by a key-off transient. The road trip relay operated
the travel cooler just fine.
Monday, May 30, 2011
Return trip from Antelope, OR. We got better economy, the leg was 150
miles longer (w/Biggs-Biggs) and yet we still had 1/4 tank left when we
rolled into Spokane. No headwind, and perhaps a slightly slower trip
too. [Jill reports that the car turned in about
38 MPG at the next fillup. Not as good as I'd
hoped.]
On this trip the heater seemed to behave better. I wonder what's up
with that?
Tuesday, June 21, 2011
Jill reports that the speedometer has largely stopped working, the
needle is bouncing. Again. Cable?
Monday, July 11, 2011
Ordered a new speedometer cable (buymbparts.biz). The old one,
201 540 00 68, is superseded (for manual transmission)
by 201 540 15 68. $60.39 (The auto tranny version,
201 540 14 68, is 50 mm different in length.)
Saturday, July 30, 2011
Yesterday I found out that the long-awaited replacement cable had
actually been tucked into the large box that the dash cap for
Jill's 560 SL came in, and which I had not yet
opened. (The dash caps have always been separately-shipped before,
and I didn't even think of looking in its box.) That cable would have
been handy to have on our recent trip to Jackson Hole, WY, since
without it you neither know how fast you are going nor can you use the
cruise control; we'd actually gotten the cable in plenty of time to
install it had I but known. Mea culpa!
So today I jacked up the car, popped the hood, and removed the
instrument cluster. I found that the cable had not broken but rather
the cable body had pulled out of its crimp-on ferrule at the
speedometer end. Having seen that I then remembered that it had done
this before, and I'd just wedged it back together (see here, for example). (Obviously I hadn't checked my
records, knowing this might have changed my plan.) Had I used some
epoxy or the like to resecure the ferrule in the first place it'd
probably have been a permanent fix. However, now that I had paid and
waited for a new cable there was no way I was going to do a hack job,
even though the original cable was obviously of higher quality than
the new one. Out came the old cable (which I saved, just in case).
Turns out there are two rubber boots that go through the inner and
outer firewalls, and to remove the inner one you have to first remove
the windshield wiper, which involved first removing a lot of trim.
Ugh. Once I'd done that the new cable threaded through the car fairly
easily and I got the new boots snapped into place. (I checked, and
the new cable seems to be exactly the same length as the old one.) I
did have a bit of trouble getting the cable inserted back into the
transmission, but eventually I prevailed.
While I had the instrument cluster out I removed the speedometer head
and then removed its pointer and face. (The secret is to lift the
needle over the post and note its resting place, then use two spoons
to pry it off its shaft.) With the odometer exposed I could then
clean it off with a Q-tip and alcohol, the dials were filthy.
They were hard to read at night, and now they're much brighter. While
it was off I re-painted the needle with the tangerine paint that I've
used before for that purpose. I suppose I should have done all the
needles, but I didn't want to take the time. I then put the needle
back on at its zero rest mark and lifted it over the peg, then
reassembled the cluster. Reinstalling the cluster was the normal
pain, until I found that I couldn't quite get the new cable on. I
ended up having to release it at the transmission end to get enough
slack to attach it to the cluster, then I put the cluster all the way
in and then re-attached it at the transmission. Next time the cluster
has to come out I am not going to be happy, methinks. (This
tightness is probably how the original cable got broken in the first
place, I remember having to pull on it quite hard at times.)
I buttoned things up and took it for a test drive, it seemed to work
well. I did not re-install the windshield wiper as I want to do some
gluing on some of the plastic parts, and one of the rubber mounts for
the wiper assembly. I also want to diagnose the heater shutoff valve
which is under there, I think it might be leaking internally a bit
since the AC through the side vents is notably warmer than that
through the center vents, even after a long drive.
I got out the JB Weld and some rubber inner tube, since the original
gluing I'd done on the behind-the-battery shield with Shoe Goo had not
held up in the heat. We'll see if this holds up better or not.
Sunday, July 31, 2011
I checked the coolant valve and it is not moving. The rest of the
HVAC seems to be more-or-less as it should (though the center,
automatic setting of the AC compressor never turns it ON),
but the valve always stays open. The diaphragm on the valve holds
vacuum, so it's a control problem.
I tore into the dash and found the vacuum valve block, which is
underneath the right-hand dash vent, and measured the continuity of
all nine valve solenoids. They were OK. Vacuum supply was good,
which I knew because largely the venting control is good. I used the
MityVac to manually pull down the heater control valve, and it helps
cool the side vents to do so. I checked the continuity of the ailing
circuit (#5) to the control unit, it was good. Looks like a purely
control failure. I removed and opened up the
201 830 05 85 HVAC unit and resoldered all the joints
inside, even though they didn't look that bad.
Inside the HVAC controller are four single-sided PCB's, five if you
count the one for the light bulbs. The customary two connect the
pushbutton array, one of which has a few components and a relay on
it, a small one carries the AC compressor control switches, and one
carries the temperature control analog 'brain': three LM2902 quad
op-amps, one LM2904 dual op-amp, four BDW53A power transistors,
eight BC337 NPN signal transistors, a trim pot, and one of the
trouble-prone Frako electrolytic capacitors, two resistor arrays,
and the usual grab-bag of resistors, diodes, and capacitors. One
big filter capacitor is on the main switch board, along with three
BC327 PNP signal transistors and an LM7808 8 V voltage
regulator, along with some diodes and other discrete components and
a relay for the auxiliary pump.
Three flex-circuits connect the brain board (BB) from the PB array,
a nine-trace and a four-trace ganged together at the Left (Xh)
connector end, and a four-trace at the Right (Xj) end. I imagine
that the BB circuitry is somewhat similar to what is found in the
earlier discrete 000 822 10 03
TEMPERATURREGLER unit.
Brain board connections
| Left | Right
|
|---|
| Pin | Function
| | 1 | Xh-11 Blend Flap Ref. (Vcc 8 V)
| | 2 | Xh-12 Lamps
| | 3 | Xh-9 Cabin Temp
| | 4 | Xh-10 Outside Temp
| | 5 | Xh-7 Evaporator Temp
| | 6 | Xh-8 ???
| | 7 | Ground
| | 8 | Xh-5 Blend Flap Pos.
| | 9 | NC (diagnostic tap?)
| | 1 (10) | Xh-4 Blend Flap, Warm
| | 2 (11) | Xh-1 Blend Flap, Cold
| | 3 (12) | Xh-2 Heater Valve
| | 4 (13) | ???
|
|
| Pin | Function
| | 1 | ??? AC Switch
| | 2 | ??? AC Switch
| | 3 | ??? AC Switch (DEF)
| | 4 | NC (diagnostic tap?)
|
|
|
LM2902 Quad
| Pin | Function | Pin | Function
| | 1 | Out 1 | 14 | Out 4
| | 2 | – 1 | 13 | – 4
| | 3 | + 1 | 12 | + 4
| | 4 | Vcc | 11 | Gnd
| | 5 | + 2 | 10 | + 3
| | 6 | – 2 | 9 | – 3
| | 7 | Out 2 | 8 | Out 3
|
| LM2904 Dual
| Pin | Function | Pin | Function
| | 1 | Out 1 | 8 | Vcc
| | 2 | – 1 | 7 | Out 2
| | 3 | + 1 | 6 | – 2
| | 4 | Gnd | 5 | + 2
|
|
|
A bit of circuit tracing shows that two of the PNP transistors on
the switch board drive its Auxiliary Pump relay, inverted from the
state of the brain board's water valve output. (If the water valve
solenoid is engaged [not heating] then the auxiliary pump is off,
unless the HVAC is switched OFF in which case the
auxiliary pump is also off regardless of the state of the water
valve solenoid.) The brain board is solely responsible for the
state of the water valve, and it's (currently) stuck off. More
tracing on the brain board showed that there was no power to the
base drive circuit for the power transistor driving this signal,
which comes from Pin 1 (output #1) of one of the LM2902's.
No difference in behavior after the resoldering. Out of time, I
semi-buttoned things back up, enough to drive. More later, I guess.
I did leave the MityVac hooked up so that the heater can be turned off
manually.
Monday, August 1, 2011
I tried a spare junkyard control panel, also
P/N 201 830 05 85, no change whatsoever.
Tuesday, August 2, 2011
Since the valve and actuator are known to be good I buttoned up the
under-hood components. The monowiper, as usual, was a royal pain to
get back into place. I found that removing the motor from the linkage
actually helped ease the job, it's pretty easy to bolt back to the
linkage once the linkage is in place. (While the motor was
disconnected I cycled the mechanism by hand, it didn't seem to be
binding at all.) Getting the trim back together was a pain, it didn't
help that I'd managed to get the left and right sides swapped while in
storage. Once I figured out that mistake it went fairly well.
As the heater valve seems to be always on 'heat' I made a little wire
lasso from Ground (right-hand connector Pin 12) to the heater
valve control (left-hand [red-marked] connector Pin 2) on the
pushbutton HVAC array, this will semi-permanently disable the heat,
which will be welcome for Summer. I checked with the MityVac and it
indeed did the trick. It's interesting that the vacuum system has
both a vacuum (#5) and a vent valve (#1) in this circuit, the vent
only operates with power on. Thus the vacuum on the valve is held
when the key is turned off, that's the intended purpose and prevents
the heater core from sucking up a load of hot water via convection
when the key goes off. (At least, until the vacuum on the pod leaks
down.)
Wednesday, August 3, 2011
I finished buttoning up the car, except for the HVAC panel. I did
some signal tracing on it on the bench, no real conclusions yet. (I
did put the spare in the car, along with the bypass jumper, while I
worked on the good panel.) Seems to me that when the ACC is turned
OFF the heat valve should be powered, yet it is not.
That should be a switched operation, really, rather than 'brained', so
perhaps some circuit tracing on the pushbutton array board may yield
fruit. The HVAC panel draws about 150 mA when ON,
about 50 mA when OFF. (Most of that is probably
the auxiliary pump relay's coil.) Tracing showed that this was not
the case, and that the brain's internals are choosing not to assert
(ground) this particular output.
Thursday, August 4, 2011
I powered the HVAC panel up on the bench and poked around. When Pin 2
(negative input) of the LM2902 section that drives the water valve
circuitry is grounded the output asserts and the auxiliary pump relay
turns off, so the output side circuitry is all good. It's just
deciding not to play. I fiddled with the temp control dial and the
sensor inputs, and I could get the AC compressor and Hot/Cold blend
flap outputs to all cycle appropriately. Everything looks good except
for the two observed symptoms: AC on automatic doesn't engage, and the
heater valve never shuts off.
Friday, August 5, 2011
More poking around in the HVAC control panel. With the
panel OFF all fourteen op-amp outputs are in states
that are appropriate for their inputs. (Except for one that appears
to be operating in the analog region there are no output voltages that
aren't at one extreme or the other.) #1 in the lone LM2904 might be
driving (through a resistor network) the positive input of the LM2902
op-amp that drives the water valve transistors, but doesn't exceed the
reference threshold on the negative input enough to make it turn on.
Reference threshold too high? Resistor network out of spec? Fault in
my brain about this section of the circuitry?
Monday, August 22, 2011
The care package with two dysfunctional HVAC panels from Curt Raymond
came today. The deal is that if I can fix both of them then send one
back. If nothing else they should give me something to compare to.
Wednesday, November 23, 2011
The snow's melted enough that I can drive around behind the house
again, so I put the car away for the Winter. (I did disconnect the
battery.) Jill's back in the Chicken Wagon
again, and happy to be there. (Slushbox!) She also doesn't like this
car's CD player, it skips even on the slightest bump.
Wednesday, January 25, 2012
I went to the U-Pull, and
liberated two very good taillights from a 190E they had there. That
should gussy up the dim-looking one, when I get a chance.
Thursday, April 26, 2012
Needed some wheels, and the Frankenheap's
studded snow tires would be a pain to swap out (now that we're into
the seasonal ban) so I dug this car back out again. It was low on
coolant, I poured in some used green stuff I had lying around. (All I
had left, and I didn't want to use plain water. A shame to pollute
the G-05 that way, though.) There's obviously a leak somewhere, I
sure hope it's not the head.
Wednesday, May 16, 2012
Jill's been driving the car for awhile, and the heat is pretty much
stuck on, I need to shut off the coolant flow to the heater core, I
believe, until I can figure out how to fix that wretched HVAC control
panel. I measured the I.D. of a spare auxiliary pump assembly, and it
looks like 5/8" is the closest size valve/hose that will work.
I'll try to pick up a shutoff valve and some barb fittings today, if I
get a chance.
...At the store today I picked up a 1/2" ball valve, and two
1/2"-to-5/8" barb fittings.
Thursday, May 17, 2012
I went to install the new valve, and I found that there was no way it
would fit into the space allowed by the existing piping. I went to
the junkbox and found another 201 vacuum-operated water shutoff valve,
which has a narrow insertion profile, and cut it into another "S" hose
from the junkbox like what was already there. I swapped the assembly
in, and ran a green vacuum line over to a port on the main vacuum
supply. The line can be removed and corked off to restore heat. I
had to put back some coolant, there was a fair amount of spillage
during the install. We'll see if it works, and does not leak.
I also unplugged the auxiliary water pump, since we don't want
it pushing against a closed valve. (You barely need them anyway,
only when idling in very cold weather.)
Monday, May 21, 2012
Cold out. Jill stopped by and I corked off the vacuum to the new
shutoff valve so she could have heat.
Thursday, May 24, 2012
The front end has been shimmying lately, and it feels like tires. I
jacked up the car and swapped the left-side wheels to see if it
follows/cures it. It is obvious that the LR tire is badly worn on the
inside edge, which is a sign of bad alignment. But it was
aligned, and more than once. Ugh.
Sunday, July 1, 2012
Last night I noticed the right brake light was out, I replaced it this
morning.
Tuesday, July 3, 2012
The RF tire went flat this afternoon after Jill got home. (I presume,
I don't see how she could have driven on it while flat without
noticing anything. She says nothing abnormal happened today while out
and about.) I tried to air it up and it leaked out about as fast as
it went in, from a spot on the inside shoulder of the tire. Where the
abnormal wear is. Oops!
Friday, July 6, 2012
Replaced the RF flat with a good used wheel from the spares pile. It's
a Michelin 185/65R15 tire, probably was a spare tire originally.
The original had just worn through the shoulder of the tire, it feels
soft and thin all along there, and there's a blister where it's started
going through the belting there. Shot to hell, that's for sure. I
don't know why the inside fronts of the tires on this car are wearing
so badly, this car has been aligned, and more than once.
Saturday, July 21, 2012
I checked and topped off the AC charge. Seems fine, but couldn't get
it to drop below about 55 °F, and it wasn't all that hot out.
The side vents were distinctly warmer than the center, yet the extra
water valve was definitely shut off, and the heater pipe wasn't
particularly hot. Odd.
Saturday, July 27, 2013
Put the battery on charge, the car's in storage.
Sunday, June 11, 2017
It's been forever since I even looked at this car, but this is the car
Daniel is going to drive. The battery was dead dead dead, so he put
in a new one. He swept out the spiders and I got it started.
(Lot of cranking, I don't think the glow plugs were working.
I drove it up top and Daniel put the battery on charge and pumped up
the (low!) tires.
Monday, May 14, 2018
I stopped by the dealership and ordered delivery valve seals. I had
ordered the special 32-point splined socket earlier this year.
Friday, May 25, 2018
I picked up the seals at the dealership, they were about $10.
Saturday, May 26, 2018
Daniel and I started, he doing most of the work and me fetching tools
and advising. We got the intake manifold removed, and 2 of the
delivery valves replaced. (We ran out of time and brake cleaner.)
We're trying hard to follow all the instructions, of which there are
essentially three important ones:
- Ultra-ultra clean. No dirt can get into the injection
system or it's game over.
- Touch nothing but the O-ring and the flat copper seal,
don't even think about removing the plunger assembly,
even by accident. Say, by using magnetized tools. Oops.
- Rigorously follow the torquing sequence: 30NM,
loosen, 30NM, loosen, 35NM. (That's
22 and 26 pound-feet, respectively.)
Well, OK. We'll do our best. Of note is that #5 was pretty dry
inside, I suspect this is evidence of leak-down that would result in
hard starting after sitting, which problem this vehicle is certainly
exhibiting. The O-rings were hard and nasty, which was expected and
could certainly cause this.
Afterwards we drove to town in the new woods
truck and bought more brake cleaner. $18 for three cans of the
good stuff, which were not on sale today.
Sunday, May 27, 2018
Daniel and I finished the job. Lost a few bolts, got most of them
back. The job was uneventful, except that I decided to check the glow
plugs while they were accessible. #1 broke off inside while checking
the nut's tightness, so I had to replace it. Everything went back
together, and it started fairly readily after purging out the air.
A bit noisy, but we went for a test drive. About halfway through
it quieted down to what I would call normal.
Monday, May 28, 2018
The car started readily. Problem solved?
Bought a new wiper blade, $17. The monowiper arm got locked in the
upwards position, which is apparently common. I slathered oil all over
the place, and pushed really hard. Crack!!! Seems to be OK
again. I hate this design.
Sunday, June 10, 2018
We used this car to get Daniel some reversing practice in the
driveway. It started immediately, and ran normally, so it looks like
the DV seal job was a success. After enough practicing in the
driveway I had him take us to town, where we topped off the tank. I
told him that after this it was on him! We took the scenic route
home, lots of clutch practice. He was a lot better, only getting into
a kill-fest when trying to start out on up-hill intersections.
Saturday, June 16, 2018
A Dangerous Day! Daniel passed his driver's test, and is now licensed
and on the road. (Insured, etc.) Yikes. Let's hope this car survives
the experience, along with him.
Sunday, August 5, 2018
The RR door stopped latching closed, and they'd tied it shut. Sort
of. Today we had some time to look at it, we started by spraying
brake cleaner in. There was a lot of white residue that I suspect was
spray lithium grease, that evil hardening crap. It didn't do
anything, so we removed the door panel and sprayed from the inside
too. Still no good, so we started removing the latch. At some point
when it was all loosened up it broke free and started latching again.
We squirted ATF all over everything and put it back together. Several
of the hooks on the door panel had torn loose, so we brought that into
the house to glue. Shoe Goo and spring clamps, it should be ready to
reinstall in the morning.
Monday, August 6, 2018
Today the LF door, which basically never worked from the outside, got
the treatment. Gunky, but it succumbed to brake cleaner and then ATF
once we opened the door up far enough to really get access to the
latch. Works pretty smoothly now. Getting the exterior lock in and
out was the fussiest bit.
Tuesday, August 7, 2018
Been very hot this summer, and it was finally time to try charging the
AC. It vacuumed out OK, but the compressor would not start once some
test refrigerant was applied. I suspect that one of the safety
devices is to blame, but it will need a thorough diagnosis to pinpoint
the problem.
Tuesday, November 13, 2018
We lost the RR tire some time ago, and it was too worn to repair. We
finally got around to looking at the rest, and they were all pretty
crappy. We bought new tires today, about $400 at Les Schwab. Sure
drives nice now!
Saturday, January 5, 2019
The combination switch fell apart. The end cap popped off and the
switch contact and spring flew out. Daniel snapped it back together,
but it will spontaneously pop off after awhile.
Sunday, January 6, 2019
We went to the boneyard to try to liberate a good combination switch
from a 190E, but we couldn't get the steering wheel off. Also, it had
a good outside temperature display, but its display cracked while
trying to remove it from the cluster housing. (They're very
fragile, and won't take any stress at all.) So, skunked.
Not one to take 'no' for an answer, I popped the end cap off of its
combination switch. Daniel thinks that the worn part on his is the
cap itself, and not the slots in the switch body that it clips to. I
guess we'll see! He put the replacement on the car.
Monday, March 4, 2019
It was 7°F this morning, and Daniel couldn't get the car started.
We really should hook up the block heater! He took
the V10 to school, and we put the battery on
charge.
Sunday, March 24, 2019
We checked, and the last time the oil was changed was 12kmi ago! I
had Daniel do it today, under supervision. We used the vacuum sucker.
Friday, March 29, 2019
We stopped by the junkyard and picked up a working door check, to
replace the extremely crunchy one on the driver's door. $2, it cost
us more than that to get in!
Saturday, March 30, 2019
Daniel installed the replacement door check. It went smoothly, and
didn't take him very long.
Monday, June 24, 2019
Daniel had complained that it drove weird on the freeway on Saturday,
so today we had a look at it. The insides of the front tires were
down to the belts, and one of the wheel weights was gone. He and I
took it to Schwab, the tires were new in
November, and had roughly 3kmi on them. They pointed out that
they had stated then that the car needed alignment badly, and we had
forgotten to do this. (An unusually busy and stressful season, I'm
not surprised it fell in the cracks.) Because of this there was no
warrantee coverage for the damage, but they did eat the mount and
balance for the two new tires we bought today. We also had it aligned
this time, and it was indeed badly out of alignment. The guy said
that he was able to get everything into spec., though. $276.
Monday, August 19, 2019
Daniel reported that the low coolant light went on at the school, and
he poured the remaining water from his gallon jug into it. By the
time he got home, it was low again.
We had a look. Yes, it was low, because the fan had finally scrubbed
a hole in the radiator. We poured more water in and could see it
piddling from the middle of the fins behind the fan. This radiator
was bowed in significantly due to some kind of front-end collision in
its past, before I had bought it; clearance had always been extremely
tight. The motor mounts have loosened up enough that the clearance
finally wasn't sufficient.
Tuesday, August 20, 2019
Daniel pulled the radiator. I thought we'd try pinching the hole
shut, but first we had to do something about the bow. I got out a
rubber mallet and started wailing away on it. (I started gently, and
got a lot more insistent until it started bending.) I figured we
really couldn't hurt it any more than it already was, and we were most
likely going to have to end up replacing it anyway. We got it
straightened up enough to likely have clearance from the fan. We
pinched the holed tube shut along the edge.
Because the AC condensor was also bowed, the newly straightened
radiator would no longer go back in. I used two 2×4's, one
long, to remove some of the bow, prying against the upper radiator
hose fitting while using the rubber mallet as a fulcrum and the short
board as a pad for the condensor. There wasn't too much fin damage
from this. (Not that the AC is working right now anyway.) With this
done, the straightened radiator would go in again.
We pulled it back out and checked it for leaks by covering one port
with a hand and blowing into the other. The pinched fin still leaked,
which wasn't unexpected, but we could also hear leaks all along the
tank where it was crimped to the core. Game Over! The hammering
stress had been too much for it; no need to get out the epoxy to seal
the crimped tube. The radiator was a real mess anyway.
I ordered a new Nissens radiator, $197.58 ($167.79 plus tax and
shipping) from RockAuto. Not as bad as I'd thought it was going to
be. They had a much cheaper one, but it was likely to be no-name
China; I'd never heard of the brand.
Wednesday, August 28, 2019
Daniel installed the new Nissens radiator. It went fairly easily, no
real difficulties. The fit was good, the condensor didn't hit, and
there was a reasonable amount of clearance from the fan. We filled it
with water as I didn't have any more G-05 coolant. We'll correct
that, soonest. We need to be sure there are no leaks, anyway. Water
is good for that.
Daniel took it for a test drive, it seemed OK. It had burped out a
fair amount of air, and he replenished the water. He'll drive it to
school tomorrow, and I also plan to get coolant.
Thursday, August 29, 2019
Daniel drained the radiator and poured in a gallon of G-05, then
topped it off with water.
Friday, August 30, 2019
I saw a puddle under the car when I came home. Yesterday Daniel had
not tightened the drain cock sufficiently. He hadn't lost very much
coolant, he just tightened the drain and used water to bring the level
back up.
Saturday, November 30, 2019
We had a look at the missing heat, and found that I (?) had connected
the water valve directly to vacuum, corking off all heat. I couldn't
find where it had been hooked up, so I just left it open, which will
result in full heat. That's fine, for now.
Tuesday, December 3, 2019
Found a $3 space heater for Daniel.
Sunday, February 16, 2020
The passenger-side door check failed last week, and today we were able
to go to the boneyard and get another one. $3, plus the $2 fees to
get in. They had two 190E's there, it was easy to find a good check.
Daniel did all the work, I was just consulting, and trying to liberate
a suspected-good temperature display. When we got it back home he put
it in all by himself.
Friday, November 27, 2020
Got Daniel to pull the instrument cluster to replace the (failed) dash
light rheostat, which went smoothly. Testing before reassembly,
though, showed that there was no continuity from pin 13 of the round
connector to the light bulbs, so we disassembled the cluster itself.
Yes, there was a blown trace. I bridged over it and we put it back
together. Examination showed that the center locating pin of the
round connector was broken off, and it was on the floor. I epoxied it
back in place. Before installing the cluster in the car we need to
test the illumination circuit in the rest of the car.
Monday, November 30, 2020
The illumination circuit in the car measured good, and when jumped to
pin 13 of the connector the console switch lights came on with the
parking lights. Looking good! Daniel finished the reinstallation,
and the dash lights now work again.
Sunday, January 10, 2021
Daniel is back in college, so I put the car back away down out of sight.
Friday, May 7, 2021
Recently Daniel had noticed that the muffler had broken off the
exhaust pipe. I looked, it seems to have torn cleanly around the
joint, tearing the metal like paper. Said metal was not
rusted thin or anything. Looks like mechanical fatigue that
propagated.
Anyway, yesterday he backed the car up on ramps and removed
the back half of the exhaust system. He wire-brushed the mating
areas, and then he held the pipe onto the muffler and I tack-welded it
in place. I then held the pipe and he did the welding. It took
awhile but the result, while not pretty, looks adequate. He then
reinstalled the system. Fixed!
There were two blown 8A fuses in the fuse box, explaining why the
radio and dash lights didn't work again. Not sure what's up with
that, but we replaced the fuses. He'll keep an eye on the situation.
Thursday, May 27, 2021
Checked the glow plug continuity, the dash light is no longer coming
on. #1 was open. (This one was replaced
relatively recently due to damage, I think we
put in a used plug, or maybe an Autolite from FLAPS.) I recall that
Beru was the very best that could be put in, but I'm getting
conflicting information about what is the correct one to use. GN858
turns up, but the GN series plugs are for afterglow systems, which is
not what the glow plug relay on this car does. The GV series is the
non-afterglow predecessor, but is not so easy to find. No big deal to
'upgrade' to GN, except I'm worried that the GN plug won't draw the
same current as the GV, which would throw off the current-balance
measurement that drives the dash light. GV plugs seem to be selling
in the $30 range, GN are $10.
Monday, May 31, 2021
I ordered two Beru GN858 plugs from FCPEuro. $26.78 with extortion
and shipping.
Friday, June 11, 2021
Daniel replaced the one bad glow plug, #1. It was an Autolite, no
surprise that it had failed early. It was an ordeal, access is bad
and it's hard not to mangle the wire getting it off and back on.
But it works, and the wait-to-start dash light comes on again.
There's a gaping hole in the side of the exhaust pipe between the
muffler and the center resonator. Daniel says that we can fix it
Thursday, his next day off.
Thursday, June 17, 2021
Daniel pulled the exhaust system, wire-brushed the rotted area,
selected a short piece of new exhaust pipe, split it in two, and then
cut/bent half of it to splice over the bad spot. He then welded the
splice in place. (Proud papa!) He holed the pipe where it was rotted
a bit further than he'd thought, but I just built that area up with
wire. Looks like crap, but works. He then put the car back together.
Saturday, January 15, 2022
The car wouldn't start, Daniel thought the glow plugs were dead. (No
light.) He was right, the fuse was blown. Couldn't find a spare, so
I bridged it with two strands of Cat-3 telephone wire, solid.
(24-gauge?) They smoked a bit at first glow, but didn't burn through.
This should hold until the spare fuses I ordered can come.
The fusing current for 24-gauge copper wire is listed at just about
30A, so two strands seems about right.
Friday, January 28, 2022
Daniel tried to start the car on this (cold) morning, and the ersatz
fuse blew. He lost (in the dark) one of the GP relay screws while trying
to replace the fuse wire, and so ended up taking Jill's car to work.
In the daylight I found the screw on the ground. I replaced the 2
links of fused 24ga copper with 3 links, but it still blew
immediately. I checked each glow plug individually for shorts, just
to be safe, and due to the extreme cold they were taking a lot of
current 15+ A according to the battery charger. But, none were
shorted or anything, and all behaved similarly when fed (individually)
by the battery charger. (They start high, and gradually draw less
current as they heat.)
So, I used four links of 24ga wire for a fuse, and the car
started. I put the car on the battery charger.
Wednesday, February 23, 2022
It was something like 4°F this morning, and Daniel was unable to
get the car started at 5:15AM on the way to his
(manufacturing) job. (Starting protocol is very important
when it starts getting cold like this.) He had not replaced the glow
plug fuse yet, so he did this in the dark and the cold, but to no
avail.
Since he ran the battery down and had to cadge a ride to work, for
which he was late, I went out in the heat of the day and put it on
charge. I found the old 'fuse' that he'd replaced, and it had not
blown. Once it was charged I glowed the car, and used the clamp-on
ammeter to prove that it was glowing. I let the plugs cycle off
('click') and then did another 10–15 second glow, then started
it. No problem, though it was reluctant. (It was warmer than earlier,
which helped, as did the slightly-warmed and fully-charged battery.)
Hence, ipso facto, protocol failure. When it's this cold you
get one chance to start, and you must make no mistakes.
Glow, thoroughly, and then crank until it either starts or
the battery dies.
After he got home for work, I again suggested that perhaps he'd find
it advantageous to deploy the block heater. We went out, and determined
that the car had the heater installed, but did not have a cord. There was
a screw cover on it, and it was 100% clean inside. Probably a virgin, and
likely to be functional. No cord, though. We had another thrift-shop block
heater, but the cord was different. I suggested he check the now-defunct
Frankenheap to see if it used the same
heater. It did. I had him steal the cord, and put the cover over
that heater.
We got it plugged in and the cord routed, avoiding thermal and
mechanical hazards, and power connected. According to the Kill-A-Watt
it draws in excess of 450W, which should be ample. You can hear it
sizzle.
I rigged one of the X10 modules and told it to heat from
4–6AM, which should be ample. We discussed block
heater protocol, and routing the cord so that one isn't tempted to
drive away with it still connected. I think he'll be very
pleased with the improvement tomorrow.
Thursday, February 24, 2022
(The car started much easier with the use of the block heater.)
Tuesday, March 1, 2022
Daniel called, broken down by the side of the road. A cursory check
revealed the belt torn and thrown, and the alternator pulley flopping
loose. We towed it home (w/V10) on a strap,
it wasn't too far. D put the car up on ramps and removed the
alternator. The pulley wasn't loose so much as broken, the metal had
torn all around the mounting nut, though the pulley won't quite pull
off over it. We were unable to remove the nut using a 7/8" oxygen
sensor socket (which has hex flats on the outside) and an 8mm Allen
down the hole in the center of the socket. The handle broke off the
Allen, as did the 8mm socket on the stub. This promises to be fun.
Wednesday, March 2, 2022
I found an offset box-end 7/8" wrench, and it was able to work
with my normal 8mm Allen socket-wrench bit. I used the acetylene
torch to heat the nut to red(dish) heat and was able to partially
remove the nut before it cooled and seized. (The pulley itself
contains the flame so that it doesn't melt anything on the
alternator.) Additional applications of heat no longer worked, the
nut seems totally bound now.
Time for another (used?) alternator? Pull-and-save didn't have any
likely donors, and the in-town rebuilts basically weren't available,
and/or were stupid expensive. FCP Euro's didn't have the pulley and
fan, so... $94.05 (shipped and taxed) off eBay for a rebuilt Bosch,
with pulley and fan. An additional $51.75 order from FCP Euro added a
belt and a hood support strut (Stabilus) to the party.
Saturday, March 12, 2022
All the new parts came, and today Daniel had time to put it all back
together. It seems to run fine.
Monday, June 12, 2023
The tailpipe assembly broke off at the front mounting flange. Daniel
removed it from the car until repairs can be made. Noisy!
Wednesday, June 14, 2023
The car wouldn't start. Investigation showed the glow plug fuse was
blown, and a check with the ohmmeter, confirmed with a jumper wire
that nearly melted, showed that one glow plug was shorted. I peeled
the shorted plug's pin out of the connector, and we replaced the fuse
with three strands of solid phone wire.
Monday, June 19, 2023
The muffler fell off again a week ago, and today D had time to work on
it. The front pipe cracked in half just behind the mounting collar
where the two halves join together. (Between the front and center
resonators.) He wire-brushed it all and we re-welded the collar onto
the pipe. It's ugly, but will hold. The anti-seize I'd used before
on the mounting bolts worked well, we made sure to use more upon
reassembly.)
The ersatz 'fuse' blew, he re-did it with four strands this time.
There was no time to dig into whatever the problem was with the one
GP. (It's more likely the harness has a problem than that the GP is
actually shorted.)
Return to Site Home
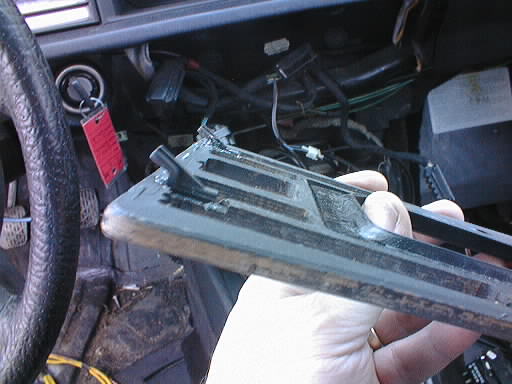
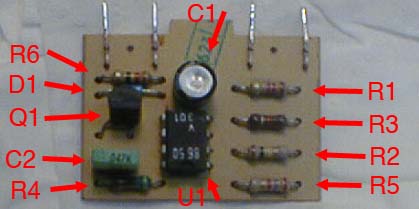