The Frankenheap, 1972 200D, Euro
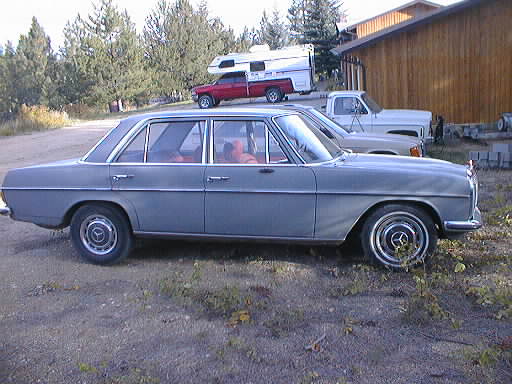
This car was also purchased for its parts, primarily the engine (for
that mythical genset I want to build) and the Euro headlights. For
some reason, I thought it was a non-turbo 300D until the day I showed
up with the car trailer. I guess I can't read, but it was too late to
back out then. Besides, the headlights were something I wanted.
The State thinks this is a 1971 vehicle. I don't know why, as I've
found plenty of 1972 date codes printed on parts inside.
The car had been parked in a yard for several years. The house was
foreclosed upon, and the car was abandoned there. The new owner
wanted it gone, no surprise. Oddly enough, two different people I
worked with are neighbors, and had independently told me about the heap
since they knew I had some old MB's. The procurement process was
lengthy, mostly because this was not very high on the new owner's
priority list, and because the State had to get involved to declare
the car abandoned. We settled on a price of $100 (my suggestion)
since a very ratty similar car (but gasoline, and driveable) had sold
at a local lowball dealer for $200. I might have been able to get it
for less, on a just-make-it-go-away basis, but I wanted the paperwork
too.
Pictures:
According to the US specs in "Mercedes-Benz Diesel Automobiles"
by Nitske:
| Chassis | Axle | Weight | Max. | SAE | RPM†
|
| W115 200D | 4.08:1 | 2970 lb | 81 mph | 61 hp | 4527
|
| W115 220D | 3.92:1 | 2997 lb | 84 mph | 65 hp | 4510
|
| W115 240D | 3.69:1 | 3205 lb | 85.7 mph | 62 hp | 4331
|
| W123 240D <'79 | 3.69:1 | 3210 lb | 86 mph | 62 hp | 4347
|
| W123 240D >'80 | 3.69:1 | 3120 lb | 89 mph | 67 hp | 4498
|
| † | RPM calculated from tire size (175SR14 or 175/14,
aspect ratio ≈82%), axle ratio, 1:1 transmission
ratio,
and the factory-specified maximum road speed.
|
Log of the Frankenheap's progression from parts car to
I-don't-know-what:
Quick Index into Log:
Friday, June 11, 2004
I picked up my parts car today. Unfortunately, it wasn't exactly what
I thought it was. It's a 200D, not a 300D. (Don't ask me how I made
that mistake, other than that this is the first I'd ever heard of a
200D in this body style.) OTOH, it has a manual transmission, and
Euro headlights, bumpers, and rear fog light. No AC, manual windows,
etc. It has rust in the bad places. It rolled easily, and the
parking brake worked perfectly. There were even keys in it, a fact
that the PO didn't even know. The glass is all intact, complete with
really crappy pink tint job, but the car has been vandalized since I
last saw it. The grille is broken out, into the radiator, and the
hood and roof have been jumped on, and all insignia are removed, at
least partially.
I don't know what I'm going to do with it yet, as it doesn't have the
motor I wanted. One fellow here suggested I just bolt any random
turbocharger to it and crank up the fuel, I ought to be able to eke
out the few more horsepower I want that way, assuming it runs. The
manual transmission is a plus, since I wanted to run the generator in
3rd gear to get the RPM's up a bit.
My wife was not too happy to find this sitting in the driveway. (I
hadn't told her about it, since until the very end I wasn't sure that
I'd actually be able to get the car.) She thinks we have too many
cars already...
Monday, June 14, 2004
Looked at the new bone-of-contention more this weekend, and it's a bit
Franken-benzy. I've not seen many cars with both floor and
column shifters! (The floor shifter is a mess, and the column
shifter's handle is missing.) Also, a badged 200D (/8) didn't
normally get a 616 motor, did it? The motor looks pretty modern
around the fuel system, and even has a cigar hose. But it still has
the oil-bath air filter and throttle plate, and a red-capped injection
pump, with a vacuum line over to the throttle plate, and a 615 intake
manifold.
Somebody's been messing around. The heater plumbing is kaput, the
(new-style) alternator is held in place with twisted 10-gauge wire, and
all the valve cover (and related) piping is missing. (There are four
1/2" open boot connections in the area: valve cover, boot just before
throttle plate, and two coming out of a fitting at the rear of the
intake manifold.) The throttle linkage across the top of the motor
isn't there. Also, the clutch drops to the floor and stays there. On
the plus side, the heater fan works perfectly. The wiper motor works,
and seems to have three speed settings on the stalk switch, rather
than the two I am familiar with.
So, what do I have? Anybody familiar enough with what I've got to say
just how much of the original 200D is there? Any thoughts on the
suitability of this (240D?) motor to driving a 50 kW generator?
Or should this be a fix-and-sell project? There is rust in
the body, and plenty of dents.
Tuesday, June 15, 2004
More looking this morning. The engine block tag says it's a 615 915,
whereas the head casting has a 616 011 number. So, maybe this is a 240D
head on the 200D motor? Hard to say what I've got there. There is an
official-looking painted and embossed aluminum tag riveted to the block
with 616 010 2600 88 on it. Chassis is a
115.115-50-137XXX, with a Mechelen Belgium tag on the
radiator support.
I pulled the radiator and fan belt this morning, and turned the engine
over with a wrench. No problem, some hissing and the cam turned. So
I pumped the (leaky!) primer until I got fuel coursing around, hooked
up two spare deep-cycle batteries in parallel to the car, and cranked
her. The salt shaker got red, with about a 60 A draw, and then
it cranked very slowly, with about a 350 A draw. The glow plugs
go out when cranking, by the way. It did manage to cough a couple of
times, but didn't want to start. I'm going to have to get a better
battery situation if I want to start it that way, or maybe fix the
clutch and tow-start it. And fix the primer pump, and probably purge
the tank, etc...
Not sure what I should do with it. I don't know that a 615 motor will
be usable for my genset idea. And the car needs just enough TLC to
get back on the road that I don't know that I could recover my
investment that way. Side mirror is gone, radiator looks shot, tires
pretty crappy, etc. OTOH, the interior is quite tolerable.
"Dads! MBZ 200D. Safe, homely, durable, reliable, slow.
Stick. Easy to work on. Perfect for your beginning driver.
Make offer."
Wednesday, June 16, 2004
I love diesels. This morning I had five minutes free, so I went out
to play with it again. I got another set of jumper cables, and
paralleled them to get a better battery connection to my two free
deep-cycle batteries I was using. Much faster cranking, and the car
started! Nearly immediately after glowing. The CA plate on the car
was tagged '94, so it probably hasn't run (or gotten new fuel) since
then. It idled a little low/rough, but smoothed out with the pedal.
Oil pressure came right up.
I had a small panic when the knob wouldn't shut the car back off,
since I had no cooling system. But I just yanked on the levers on the
IP and it shut off fine. I didn't have to rip off the fuel line.
Obviously the linkages are out of whack.
Nobody has a clue what a 616 head on a 615.915 motor means, in
practice?
Thursday, June 17, 2004
I'm a sick puppy. I went to the U-Pull at lunch today, and raided the
'78 300D and '7X 280SE. Got some grill trim strips that I can
probably cut to fit the hulk, if I go that way, and a windshield wiper
blade holder. (One is missing, but this one might not fit.) And a
non-leaking old-style primer pump. And a used battery of largish
size. And an alternator mounting bracket that I can probably use to
fabricate something a little better than the twisted 10-ga wire that's
there now. And a Becker Europa II radio for the Ebola Fishtank, if I ever get back to that car
and can't fix the 8-track... $33 for all that crap, including a $5
core charge for the heap's old battery that I have to return. 30-day
warrantee on everything, too. No questions asked.
Friday, June 18, 2004
Today's update: The 'new' $12 U-Pull used battery works well, and
started the heap right up. I was also able to get the alternator belt
tight with the aid of a bit of heavy sheet metal bracketing, but I
think I need to re-do this. It's still a bit too flimsy. However,
the generator light was still on, so it's not working right. The car
has an external regulator, but the alternator there is an
internally-regulated one that's flanged into place. I think I need to
redo the wiring a bit, too. The spinning water pump did blow some
more coolant out of the block, so it works at least a little.
So I'm probably off to the U-Pull again, to get an alternator plug off
the '78. Also, the bottom pivot of the alternator is rubber-mounted
and a bit wobbly. It looks (by eye) like the alternator support off a
617 will bolt on, which is a lot stouter. I may try this too.
I also need to get a Suburban bucket seat, for the BIL. FWIW, all
five Suburbans I looked at were gassers.
Saturday, June 19, 2004
Today's update: I put together a decent alternator mount, out of the
bolt-to-engine part (it has a 615 PN) from the U-Pull '78 300D,
and the geared bolt/bracket from the U-Pull '77 280SE. (All that was
left on either car.) That and the bolts I had on the car already, and
laying around. Now the belt adjusts snugly, and you can't make the
fan slip by twisting on it. I couldn't get the Bosch alternator plug
off of either junker, 'cause somebody else already had! So I got one
off of a Rabbit. Wiring it will be the next little project. Which
won't be until next week.
Monday, June 21, 2004
The alternator in the Franken-heap was a mess, as you may recall. The
alternator was held in place mechanically with 10-gauge wire, but the
10-gauge wire there to do the electrical job was all wrong too.
This morning, to go with last week's mechanical fixes, I rewired the
alternator using an actual Bosch alternator plug. The fender wall
regulator is unplugged, and the alternator light now comes on and goes
off properly. Also, the battery voltage was 14.5 V when running.
Success!
Of invaluable help was my vintage 1971 Chilton's, Professional
edition. Lots of good info in there, including distributor curves and
a lot of stuff about the Hydrak(ula). Also manual and auto tranny
rebuild information. But the wiring diagrams were what I needed
today.
Now on to the radiator. And then the clutch. Then maybe I can get
that heap off my trailer.
Tuesday, June 22, 2004
Today's installment: I cleaned off the Frankenheap's radiator, and it
was a mess. Lots of fins washed off as well, and it leaks badly. So
I wandered into the woods to the parts car ("Smelly"), and grabbed one
of the radiators out of it, one I had bought at the yard earlier
because it looked so good I couldn't pass it up. (I'd probably put in
Smelly's own radiator if I were to sell the car as a beater.) This
radiator is for a 123, sans ATF heater/cooler, and is a surprisingly
close fit. One side support had fallen off the original radiator, and
the other was half off. I unsoldered the remaining support joint, and
slipped the two supports and new radiator down into the radiator slot
on the Frankenheap. Fits pretty well, the 115 and 123 core sizes are
very close. The original lower hose was OK, but the top one was a
little too short. However, Smelly's hose is long enough, and only
needs a little collar to adapt to the (smaller) thermostat fitting
size. I'll wrap it in something tomorrow, and see what happens.
It may be that the heater was all disconnected because they had the
radiator full of stop-leak. I'm hoping so, anyway.
Wednesday, June 23, 2004
Today's Frankenheap update: The radiator is in, plumbed, and filled.
There's only water in there now, with whatever residual coolant was
left in the block. I had to 'shim' the upper radiator hose where it
goes on the thermostat housing, because the 'new' hose from a 123 is a
bit too large. But two inch-wide collars of old bicycle inner tube
stretched over the fitting really helped fill the gap. The hose clamp
tightened right down.
I have also wedged rubber stoppers into the cut hose bits that used to
go to the heater core. A stirrup of inner tube helps hold the stopper
in, when clamped under the hose clamp that's holding the hose to the
stopper. Really crappy arrangement, but enough to allow the car to
run for now.
Which I did, for the first time since I got it. It idled well for
several minutes, and never got very warm. Dunno if the thermostat is
a little open, or whether an idling 615-oid just doesn't develop much
heat. Regardless, I was able to play with it. (The alternator is
working, yay!)
Interesting throttle arrangement. I'd always heard that the tube from
the throttle butterfly to the injection pump was for idle speed
regulation, but near as I can tell, it's the only means of
varying fuel amount. That is, it's reacting to manifold vacuum much
like a gasser would. The throttle pedal revs the engine nicely, and
is only connected to the throttle butterfly. The only connection
(currently) to the injection pump is the vacuum line. The
ought-to-be-there mechanical link across the top of the engine is
missing, and I'll need to fabricate one. (I have a too-short link
from a 123 that I can extend.) Anybody know how long it ought to be,
and what its purpose is? The shutoff and idle speed cables also don't
work, big surprise.
There's also a 1/2" open fitting on the boot to the intake manifold.
Unfiltered air enters there. Anybody know where that ought to be
plumbed?
Guess I next ought to work on the clutch. If that were working, in
theory I could drive this heap off of the trailer. That'd be nice.
Thursday, June 24, 2004
Today's update: The shutoff knob didn't work, because the
shock-mounted (with rubber) brace for the outside of the Bowden cable
was broken. The rubber had torn. So I removed both pieces and
cleaned them thoroughly, using solvent and then brake cleaner. I
reached for my handy tube of Shoe Goo to try to see about reattaching
what was left, and found the tube half-dry. Trying to squeeze some
out popped the bottom of the tube open. So, I scooped out what I
could get that was semi-tacky and potted the whole bracket in a big
wad of Goo. The stuff didn't stick very well to other things, but it
did stick to itself, so maybe the potting job will hold. Maybe not,
but I'll figure out some cheap way to get this to work. No sense
spending money on a parts car!
The vintage Chilton's is being very helpful. In it were the length
measurements of the three throttle link rods, of which I have only
two. So I'll be able to fabricate one out of the 123 link I have, and
maybe a framing nail. Love that welder! Tomorrow I anticipate
putting back the Goo'd bracket, and making the throttle link. All
that'll then be left (towards my goal of driving off the trailer) is
the clutch hydraulic failure.
Thanks, Marshall, for the snippet of injection pump documentation. It
clarified how this pump works. (Completely differently than what I'm
used to.) FWIW, there is a rack damper spring in there, but
it is internal, and non-adjustable. In fact, the missing throttle
link is what is responsible for engaging the damper at idle.
Friday, June 25, 2004
Have fun with the clutch!
I'm hoping it's not too bad. I have a spare slave cylinder
laying around somewhere. Filling the brake reservoir shut
off the brake light, but didn't do anything for the pedal
to the floor clutch behavior.
...potted the whole bracket in a big wad of Goo. The
stuff didn't stick very well to other things, but it did stick to
itself, so maybe the potting job will hold.
So far, so good. I hooked the bracket back up this morning,
and now the engine can be started and stopped from the
dashboard knob! The Goo job seems stout enough to hold up.
So I'll be able to fabricate one out of the 123 link...
Also went well this morning. The 123 link was about 7" long, and the
Chilton's said it ought to be 12.1" long, so I went down to Smelly
(123 woods car) and grabbed one of the door lock link rods, and cut
about 5" of it out of the middle, and cut the 123 link in half. Then
I welded the three pieces together, and ground the welds down, and
painted the rod. Looks good, and works well. With that link in
place, and some minor adjustments here and there, the idle speed knob
on the dash now works well.
The car starts easily, idles well, and revs nicely.
Oh, for a working clutch!
Monday, June 28, 2004
Today's update: I got the clutch bled, via the by-the-book hose from
the front brake bleeder technique. I had to pump for quite awhile,
but the clutch pedal gradually started behaving itself. I can't tell
if there are any serious leaks, because I had a few pop-off episodes
which made a bit of a mess, but the clutch seems to work. I even
started the car and got it to strain forwards and backwards on the
ramps a bit before I ran out of time. So the butched-in floor shifter
seems to be adequately installed. (The torn boot is not centered
correctly, and an untorn one wouldn't last long before tearing.)
Looks like tomorrow I'll attempt to drive it off the trailer! Then
maybe get out the shopvac and pressure washer and start to remove a
lot of the squirrel residue, and maybe hose out the nasty-smelling
trunk too.
Heady times!
Tuesday, June 29, 2004
Today's update: Last night I drove the Frankenheap off of the trailer!
No problems whatsoever, and I buzzed around the property honking the
horn, just to make sure my wife noticed. My boy was in the passenger
seat, too. A good time was had by all. Even my wife, but she was
probably just laughing at me.
This morning I cleaned the non-interior of the car, removing all the
maple seeds and grunge I could from the exterior crevices, engine
compartment, etc. The trunk got a thorough hosing. I scraped off the
nasty window tinting (man, never do tinting yourself!) too.
I took the car for a short drive, and it performed well. Got it up to
about 65 MPH at one point, and no problems. Steering was tight.
Didn't seem gutless at all, either. I just wound it out to the shift
pips on the speedometer each time. Handled the washboard just fine,
and was very torque-y. I only downshifted to 3rd going up
our steep hill, and was doing about 25 MPH because of the
washboard. The car held its speed, and was even able to accelerate
once past the washboard.
The temperature needle rose about halfway to what ought to be normal
on last night's bit of foolery, but after the wash this morning it
never moved at all, even though the hoses were nice and warm.
The brakes still need some work, I'm hoping a good flush will do it.
I only did one brake during the clutch episode, and had run out of
fluid. I'm going to clean out the interior next, and then if I've got
any sense I'll let it sit while I decide what to do with the car.
It ran great, IMHO. I kinda hate the idea of parting it out, but the
rust is probably terminal. (But not for awhile yet.) It really would
be good as a boy's first car, for the few years it has left. But
my boy's only two!
Wednesday, June 30, 2004
Not much to report today. I vacuumed out the window-tint confetti I
made yesterday, and cleaned up the back seat area. Found almost $0.30
in corroded change, so I'm well on the way to making my investment
back! The back seat is in quite good condition, but one of the two
carpets is pretty ratty.
I also reshaped (heat gun) a length of 1/2" tecalan I nabbed at the
U-Pull yesterday, and hooked the two open holes in the breather system
together. I hope they're happy together! And I installed two wiper
blade assemblies from the U-Pull 116, which are the correct shorter
length for the 115, and removed the 123 blade assembly I had there to
protect the glass.
The door latches (strikers) got shots of WD-40, and they are now all
operating properly.
I suppose tomorrow I'll clean the front seat area, and try to work on
bleeding the brakes if I can remember to get more DOT3 today. After
that, assuming it goes well, I'd say the car will be in shape enough
to drive anywhere, ignoring the legal issues. (Licensing, insurance,
outside mirror.)
I'm starting to wonder if this might be a good WVO-mobile, I've been
wanting to play with this, but didn't want to risk the Chicken Wagon since it's currently our backup
sedan. There's lots of trunk room in the Frankenheap, I have an extra
intact 123 fuel tank that could maybe sit in there. And if I put the
other radiator in the heap I could run the fuel through the
transmission cooler fittings for fuel preheating. Maybe I should grab
the electric fuel pump off the 280SE at the U-Pull, I'm sure that
would come in handy for filling up or something.
Thursday, July 1, 2004
Today's update: Just vacuumed out the front of the car. With all the
dirt, mud, and rust sucked away and the carpets removed, you can see
right through to the ground at both outside corners. (Time for some
flattened beer cans and some caulk!) The carpets cleaned up fairly
decently, considering.
Got sidetracked at the passenger door switch, the dome light is always
on (unless switched off), and the door switch was disassembled. Ditto
with the glove box light. So, both of those are being repaired now,
the glue should have set up by tonight. I haven't bled the brakes
yet. But that's next after the interior lighting is straightened out.
The hardboard back panel of the driver's seat was off and all curled
up, so I soaked it down and am pressing it flat, with newspapers to
soak up the water. We'll see if that goes well or not.
I'll have a new project soon, I just won a 40 kW genset for $404. Unknown condition.
Propane-fired 6-cyl Hercules engine, Kohler 3-phase generator. Ought
to be a nice mate to the Frankenheap's engine, if I go that way.
Friday, July 2, 2004
Today's update: I bled the brakes, and got out some nasty-looking
stuff, but there was no material improvement in braking ability.
(It's poor.) I can hear the vacuum booster doing something, but I
don't know if it's working well or not. I'll have to investigate
further, the car could well need another MC. I also replaced the
leaking cigar hose with a (free) U-Pull one, and put in one piece of
new (yes, new) cloth-covered return hose to replace one that
was weeping.
The glove box and interior lights now work properly, and all that is
reassembled. The seatback panel is gluing up now, and ought to go
back in tomorrow. I probably need to go through the instrument pod
(lights, mostly) once too. But otherwise she's nearly done.
Saturday, July 3, 2004
We drove the car to the next-door-neighbor's today, to attend a party.
(I'm not sure I even technically left our property, since the county
road is on an easement through our property.) I'm sure we weren't
really legal, but it was only 100 yards or so...
Anyway, it worked well, and to dress it up for the party I'd tied a
small toy chicken where the missing hood ornament ought to be. Didn't
get much comment on it though. Disappointing.
It was dark enough on the return trip to turn on the lights, not that
we really needed them. Hmm, the instrument lights are out, as is one
low beam. More work!
A fun incident happened on the return trip: We entered our driveway to
find a deer in the flowerbeds. My wife hates this. A lot. So I lit
out after the deer in the car, honking the horn and revving the engine
madly as we raced through the yard. The deer doubled back on the
access road around the house, and so did we. We bounced along having
a great time terrorizing that deer. My wife enjoyed it ('cause of
chasing the deer), and my son enjoyed it ('cause we were driving
through the yard). I enjoyed it too. A great time was had by all.
Except for the deer.
Tuesday, July 6, 2004
Today's update: The seatback is now in place. I went through the
instrument cluster, and got the dimmer working again. Some serious
corrosion on there, but a wire brush in the Dremel on the disassembled
parts made short work of it. That got the lights working again. I
also disassembled the clock, and cleaned it and resoldered the thermal
fuse. It works again, but doesn't run for too long. I suppose I need
to do more on the clean/lube front or something. Many of the support
posts for the lock rings that hold the glass faces in the instrument
pod were broken, resulting in loose glass that buzzed and rattled. I
used Shoe Goo to glue the hollow support posts back in place, with
screws down the ones that had something to bite on the far ends. The
glass is now all clean and tight. The chrome trim rings also got
glued back on, as they were coming off.
Monday, July 12, 2004
Today's update: I have half-installed a new hood release cable from a
116. It took some doing to get the old cable out and the replacement
threaded. I lubed the 'new' cable by duct-taping one end into my
vacuum oil sucker and dipping the other end in ATF. Then I put on a
vacuum and let it suck oil through the sheath. Very smooth operating
now. I still have to flange up the handle end, since the 116 stuff I
have is not quite right, and the 115 stuff that ought to be there,
isn't. I don't expect it to take too long to do, and then no more
vise-grips to open the hood! I solvent-tanked the very dirty hood
latch, which helped a lot too.
Tuesday, July 13, 2004
Today's update: The new hood release (from a 116) is in.
I just need to get some longer screws so that the cover can
be installed too. It works!
Wednesday, July 14, 2004
Today's update: I tackled the (non-working) Alpine radio. All three
in-line fuses behind the console cover (below the ashtray) were blown,
but there were no obvious shorts, and new fuses brought things mostly
back to life. The 4" kick panel speakers are shot (surrounds are
rotted), but you can listen to it OK anyway. Not much bass, of
course. It's mis-wired a bit, the key has to be in position 2 for the
radio, not 1, but that's not horrendous. The automatic antenna even
groaned appropriately. Of course, the mast is sheared off, so I've
got some work to do. Like the shark Chum in Finding
Nemo, once or twice it spit out a little bit of skeleton (the
toothed nylon leader) and sucked it back in. I have a spare
Hirschmann or two that I ought to be able to substitute.
The hacked-in floor shifter was completely missing the reverse lamp
switch, but I had an extra and screwed it in place. Not wired in yet,
of course. I wonder where the old column shifter switch is/was? I
had to use the jigsaw to cut the hole in the console plate a bit
larger to make room for this. Another bit of butchery had the
emergency flasher switch screwed into a hole in the side of the
console, by your knee. The knob was also missing. And there were two
plugs in the holes in the faceplate of the console, where I suppose
that switch (and something else?) ought to have been. I moved the
flasher switch to the console plate, and moved the metal cover to the
hole in the side, but I'll still need a red-dot knob I guess. I
thought I had a spare, but no. The flashers do work, if you have good
strong fingernails and can pull it out.
Friday, July 16, 2004
I removed the broken Audiovox power antenna, and am in the process of
substituting a Hirschmann 6000U (courtesy of the U-Pull). I actually
procured two antennae, and was able to make one good one out of two.
One had a good mast, the other had an intact pinch roller bearing.
(I've replaced these bearings before, and it's a pain. Much easier
[and nearly the same price] to just swap a good bearing assembly from
another U-Pull antenna, assuming you can find a good one.)
Using alligator clips, the Hirschmann works properly with the Alpine
stereo, so I'm in the process of splicing wiring and physically
mounting the Hirschmann. The Hirschmann is a lot quieter than the
Audiovox was.
I've bypassed the length switch provisions, so the Hirschmann is
full-out or full-in only. Though I have the dash switch, it doesn't
match the other controls in the 115 and offers little value in a
non-convertible, besides being more work. (Antenna whistle is
noticeable in those, so just-enough antenna extension is desirable.)
Monday, July 19, 2004
The Hirschmann antenna is in, and working well. I have connected up
the 'new' reverse lamp switch. The original switch (from the column
shifter) is in the engine compartment, as is the usual connector that
has the neutral-safety switch contacts as well. A few extra feet of
black wire poked through the firewall extended the connection to the
floor-mount switch. This works well, though I did have to remove some
corrosion on the reverse lamps themselves to get reliable lighting.
The yellow nylon rope that was holding up the muffler is gone. I
welded some 1/4" wire to the tailpipe, and bent some hooks in it. A
couple of standard rubber donuts (used) finished the job.
The rock pip in the (Euro) headlight has been filled with clear epoxy.
Not as invisible as I'd hoped, but it's watertight at least.
I had a set (3-1/2) hubcaps laying around, in brown, which are now on
the car. The bent fourth would work well enough for this POS, after a
bit of hammering, but it's missing three of the four spring clips. I
guess I'll have to come up with some, or another cap.
The car is pretty much done. Still need another headlight bulb (R2 base, #7951?), and an outside mirror
head, but otherwise it could be licensed and driven. If winter came
I'd have to hook up the heater core, I guess. Certainly not a problem
right now. I suppose if puddle season came along I'd need to flatten
some beer cans to cover the holes in the floorboard corners. Wouldn't
want to get a road-shower!
Maybe I'm not that done after all, but I'm tired.
Saturday, August 14, 2004
My youngest cousin (18, still no license) expressed a vague interest
in this car. We'll see...
Saturday, August 28, 2004
Yesterday a kind soul sent me a care package of parts, which are
nearly all I need to finish. The important piece was the driver's
door mirror, which is legally required (since the car had one
originally), and I don't want to attract the wrong kind of attention.
Anyway, the 'new' mirror is exactly what used to be there. It's kind
of tired, but that matches the rest of the car. Anyway, installing it
was not easy. You can't really get at the studs that come through the
door. I had enough trouble trying to get the nuts started that I took
the door off entirely and turned it over, letting gravity come to my
aid. (No power windows and locks means door removal is trivial.)
While there, I noticed that the check strap mount had rusted away from
the rest of the door, which explained why the door would open so far
even with a mostly-intact check strap. So I got out some scrap sheet
metal (from an old microwave, 0.022" or about 25-gauge) and had at it.
I smacked the metal back into rough plane with a BFH, and then bridged
over the rust with the metal, using my MIG welder. I made quite an
ugly mess, but it's in the hinge area and behind the interior panel.
It's also plenty strong enough. A little rattle-can black paint and I
was done. Should last a year or two, easy. I also bridged over a
rusted through place down where the bottom of the front track for the
window attaches. That's a bit stiffer now, but the whole bottom of
the door is pretty bad through there. The rubber seal doesn't have
anything behind it along the bottom of the door. Good enough for now,
I guess. I had to install a new plastic moisture barrier. As with
almost all older cars, some bright boy has figured out that it must
not be necessary and has removed it. Which is completely wrong if you
don't want the fiberboard door panel to turn into mush.
I put in an entirely-intact check strap from my spare parts pile while
I was there. It was intended for the Ebola
Fishtank, but I suppose I can find another one sooner or later. I
hate pot metal...
The hubcap from the care package was even the same color (but less
faded) than the three good ones I had on the car, so I don't have to
hammer my fourth one into shape. So now it's looking fairly
presentable, if brown caps on a gray car can be described that way.
Monday, August 30, 2004
The Kenwood 4" speakers in the kick panels were shot, the cone
surrounds were rotted. So, I replaced them with a pair of cheap
no-name 4" speakers I got at Goodwill for $3. Not great, but a
distinct improvement. They fit exactly so it was easy, and I'm
staying in budget.
Tuesday, August 31, 2004
Installed the care-package shifter boot stuff (from an actual
floor-shift manual 115), which looks somewhat better than the POS
aftermarket boot that was butchered in there. The fit is not perfect,
since this is a US part flanged into a Euro console, but it'll do.
Tuesday, September 7, 2004
I took the Frankenheap in today to be inspected. (Gave it $10 worth
of the first new fuel it's had since probably 1994. I also had to
un-knot the seat belt, I don't know why the PO didn't just use the
slip buckle to adjust the length.) It passed, except that the "Junk
car" paperwork is screwed up. So I still can't get it licensed.
The 200D behaves well on the freeway. Plenty of power it seems to me.
I wouldn't call it underpowered at all. Certainly not
over-powered, of course. It was able to hold speed, and even
accelerate, up the hill west of Spokane. It's a bit noisy at speed,
but I do still have holes in the floorboards, and the panel under the
driver's side of the dash is missing. There may also be an exhaust
leak, I've not looked for one yet. Also there's plenty of wind
whistle, but I have a lot of sharp metal edges that aren't normal.
One scary thing was that as I got off the freeway I heard a
nasty-sounding intermittent squeaking. Which I found was not coming
from the front of the engine, as in water pump or alternator, but the
rear of the engine, around the injection pump area.
Y'know, I'd been meaning to check the OEL level in that thing...
After the inspection I headed off to the nearest qwik-ee-mart to get
some overpriced oil. Damned thing took most of a quart! [Later found
leaked out the overflow port. It doesn't actually hold much oil.
Sorry, qwik-ee-mart!] But the squeaking stopped. Dunno what
permanent harm I may have done it, but it was certainly stupid. I had
just forgotten to do this, I should have done it when I first thought
of it instead of putting it off. There's a reason they switched to
engine-oiled pumps shortly after this car was made!
Wednesday, September 22, 2004
Mailed another junk car notice to the last registered owner, this time
to the correct address the WSP came up with. Will take up to two
weeks to get a resolution out of this process.
Monday, October 18, 2004
The certified mail containing the junk car paperwork was "Delivery
Refused", and came back to me! Good, that was the best possible case.
I took it (unopened) to the licensing agent, with all the rest of the
paperwork, and walked out with two license plates, a registration, and
a promise of a title in the mail! We're home free. $50 deeper into
the hole than I expected though, as I had to pay for that one-time
State inspection.
Tuesday, October 19, 2004
I pumped up the tires, picked the pine needles off the car, and
it started right up. No problem. I bolted the rear license plate on,
loaded three gas cans in the trunk (we're doing firewood right now)
and drove it to work. (The front plate will have to wait until the
front bumper situation is straightened out. It's practically falling
off the car.) What better car to haul crap in than our crappiest car?
No problems, and I really enjoyed having a manual transmission. The
200D seems to have plenty of power, that won't be an issue. Getting
cold though, so I'm going to have to do something about the heater
soon. Not so much for comfort, though that is a factor, but to keep
the glass clear!
Wednesday, October 20, 2004
Yesterday the high beam blew out on the side that had already lost low
beam. The bulb's seal failed, and the filament burned up. So I stole
the new R2 bulb from the Unimog and put its old burnt-out-low bulb back in.
Gotta get me some more R2's! The headlights were set in
'find-my-lost-contact-lenses' mode, where the high beams were pretty
much OK as low beams. So I cranked them both up a bit. We'll see if
they're better tonight. It can be tricky to get these Euro-pattern
lights set just right, it took me a few weeks to dial in the new
E-codes on my wife's 450 SL. I threw a
screwdriver in the glove box just in case.
Also out were the courtesy light, and the trunk light. All these had
been working recently. The door switch had popped apart due to failed
rivets, I was able to screw it back together, and now the courtesy
light works again. The trunk lamp was just corroded, jiggling it
brought it back.
While I was at it, I unfroze the heater valves. Liberal doses of PB
Blaster loosened them right up. I flushed quite a lot of packed dirt
and crap out of them too, as they are open to the elements. They move
easily now. Maybe too easily, it could be that they'll leak. We'll
find out when I finally get around to plumbing the heater back to the
engine. Someday.
I think the car needs new motor mounts, I'm getting a lot of
intermittent motor-buzzing-on-frame-rail sounds. Maybe later.
Tuesday, October 26, 2004
Heat! I have heat! This morning I finally had a little time to spend
under the hood of the Frankenheap, and I plumbed in the heater core
using pieces of heater plumbing I'd salvaged at the U-Pull, from a 123
and a 116. Nothing fit right, but I was able to force everything
anyway. A hacksaw came in handy to shorten a piece of hard pipe to
run by the exhaust pipe.
It blew warm air at me on the way to work, and doesn't seem to be
leaking. Even the (very loose) heater valves. All the heater
controls act as they should.
You take a working heater pretty much for granted these days, but just
try driving a couple of weeks in cold (and getting colder) weather
without one to learn to appreciate it.
The to-do list is getting pretty short these days. I still want to
switch to my less-good radiator, and do a cooling system flush and
refill. And maybe weld up some of the holes in the floor. I need to
sew up a couple of passenger seat seams. And if I trip over some
non-etched side glass someday... But today she just entered the
realm of a practical daily driver. Ahhh.
Wednesday, November 10, 2004
Fee, fie, foe, fum. Where's my coolant?
The coolant level was low on the Frankenheap this morning. I'll give
it one fill-up, before I assume that the heater core is leaking.
After all, there could have been a big air bubble in there. There
were no signs of external leakage, and without the heater plumbed in
there had been no coolant loss.
It's also eating brake fluid, on the rears. I know I've still got
some work to do there.
Nearly 200 miles on this (first) tank of fuel, and it's still well
above 1/2 on the gauge.
Saturday, November 13, 2004
No sign of coolant loss. Will keep an eye on it.
Friday, November 19, 2004
Today another care package came. The heap's now got a nice pretty
emergency flasher bezel and knob, and a functioning passenger-side
door check strap. As a bonus, the pieces of the old strap aren't in
the door anymore, so the door doesn't rattle and clank when you shut
it. Also in the package was a functioning (?) temperature gauge
assembly, which will get installed soon. But it is in °F, I'd
like to swap gauge faces with the broken °C one first, if that
looks easy enough to do.
The car's been a pretty good daily driver this last month. I'm 320+
miles into its first full tank of fuel, and we're still a bit above
1/4 on the fuel gauge. Good mileage I think, but not stellar.
Saturday, November 20, 2004
Decided this weekend was a good time to tear into the cooling system
to finish its winter preparation. Removed radiator, alternator, and
air cleaner in order to gain easy access to the side of the engine to
remove one of the plugs so I could install the block heater. I was
heating the side of the block in that area, and ran out of acetylene.
Bummer. My propane weed burner wasn't hot enough to do the trick, nor
is my 3/4" hex 'wrench' stiff enough, so that pretty much blew the
weekend for working on the car, it's up on blocks all ripped apart.
(The weather was absolutely perfect, too.) Monday I'll have to get
some more gas and a better wrench.
On the plus side I got the 'new' temperature gauge installed. I
swapped the °C face from the broken gauge onto it. The trick to
removing the needle was to use two spoons to pry up on it at the
shaft. I put the probe into a pan of boiling water and stuck the
needle back on at the 100 °C mark.
On the minus side one of the front brake calipers is leaking badly.
So I stopped by the U-Pull and picked up (off the ground!) a caliper
from the 240D (123) that's currently there. (That was easier than
liberating one from my 123 parts car, as I knew the calipers were
loose on the ground at the yard.) I hope it will substitute. The
leaky caliper currently has Kroil on its to-be-removed fittings, and
I'll try to tackle it Tuesday.
Tuesday, November 23, 2004
More Acetylene in hand, and with a big 3/4" Allen wrench I tried
again. I cut a little over an inch off from the long end of the Allen
wrench to make a hex bit for my 3/4" socket set, which goes down to
19 mm (just right). I used an abrasive cutoff saw, and there's
still plenty of Allen wrench left so I didn't ruin it either. (It was
extra-long to begin with.) The first pass with heat and the wrench
with a cheater bar (fence post driver, actually) resulted in nothing
but back pain. So, I removed the water pump housing and the
thermostat housing. There were two benefits from this: with more
coolant removed from the block the target plug was now surely 'dry',
and with the thermostat housing out of the way I didn't need an
extension on the socket wrench, resulting in more direct application
of torque to where it needed to be. Applying more fire, and then
standing inside the engine compartment on the cross-beam and anti-sway
bar and really straining my back... CREEEEAAAAK! It let
loose!
Finally, I'm on my way. Putting in the block heater itself was easy
at this
point. Cripes what a PITA this was. I don't ever want to do this
again. But if I have to, I'll know to get out the big guns
immediately.
But I'm not done yet, because as I start to reassemble the motor it
turns out that the throttle linkage now runs smack into the block
heater. Crap. But I was able to bend the linkage into a big curve so
as to sweep over the top of the heater. It seems to work right, but a
real test is still some time away.
Of course I'm still not done, because the episode with the weed burner
had partially melted the tecalan hose from the throttle butterfly to
the injection pump. Not something you can do without, unless you want
no throttle, or maybe a runaway engine. I cut out the mangled section
of line and replaced it with a section of metal brake line, which fits
snugly inside the pipe. I hope this will work.
And since I was there, I removed the alternator pulley and moved the
spacer washer from the back, where it was putting the pulley out of
the correct plane, to the front where it merely keeps the nut from
running out of threads at the back of the shaft. This little
annoyance has been bothering me for awhile.
Out of time. More tomorrow morning (I hope).
Wednesday, November 24, 2004
I finished reassembling the motor. While I was there I flushed the
cooling system. I tried to use my second-best (?) spare radiator
instead of the good one. Partly because this heap hardly rates a
near-new radiator, and partly because the other one was for an
automatic tranny, and I have visions of using the transmission cooler
fittings for WVO fuel heating. But I think that radiator leaks. It
was raining pretty good, so it wasn't easy to tell for sure. And it's
too cold to run with plain water for an extended experiment. Rather
than risk losing a load of new antifreeze I put the good radiator back
in. Maybe next time!
I did plug in the new block heater, and I could hear the gentle sizzle
of it operating. At least that has seemed to work out. I still have
a brake caliper leak, and I really need to do at least a bit of
welding so I don't lose the front bumper, but all things in time.
The car drove to work just fine.
Friday, November 26, 2004
Installing the block heater required bending a curve into the throttle
linkage, but this resulted in suboptimal foot pedal characteristics.
So I removed the offending link, cut it in half and welded in a piece
of concrete form retaining nail about 3/4" long, approximately
restoring the chord length end-to-end to what its original length had
been. Grinding removed most of the crap, and then a little black
paint was applied for rust-proofing.
The car feels 'right' to drive again.
I also wired into the car a cheap Harbor Freight battery
charger, hooked to the block heater's short extension cord. This
is wired in turn, via a relay, to the blower fan's low speed. So, now
when the car is plugged in the blower comes on low automatically. All
that remains is to rig some kind of heating element in the air intake
plenum. That, and actually hook up a small battery charger to the
battery while I'm at it. I bought one of Harbor Freight's small
battery tenders for this purpose, but that'll come last.
To mount the relay I took a spare 123 relay box and found a spot between
the battery and the fuse panel where it would fit. I hammered two
slots into the inner fender wall with a small cold chisel for its
mounting ears to tuck into. (Just like in a 123, but less cleanly.
And without the mounting screw on the other side. But good enough for
this car.)
The relay isolates the motor power from the car so that it doesn't
power up the 'ignition' while it's at it. The blower motor, and its
speed controlling resistors, are available right on the top of the
firewall above the brake booster. It couldn't get easier than this!
At lunch time the car just got its second full fillup, at just over
400 miles. I calculate it at 26.1 MPG. This is a mix of
driving, but probably not more than 50 freeway miles. Mostly
commuting to work, and lunchtime errands. The needle was again on
empty, and the light never came on (but the bulb's good). Just over
15 gallons, at $2.25 per. It'd be nice to know what the 115 tank is
supposed to hold.
The (replaced) temperature gauge was reading about 70 °C
today. I don't know if it's right, or whether the termostat opens a
bit early, or whether it's supposed to be down there. I'll shoot it
with the IR thermometer some time to find out about the gauge.
Wednesday, December 1, 2004
I had bought a 3800 W 220 V universal water heater element
to use as an air intake heater. (On clearance: $4.) I figured it
would draw 1/4 that power on 110 V, so I tried it out this
morning. It draws about 950 W of power, and gets to a dull red
heat in open (but cold) air. And it's water-rated. Sounds perfect
for use in the air intake plenum, and should keep the car's total
power draw to about what a common space heater uses, which is
tolerable.
I removed the air intake cowl in order to determine how to put the
heating element in there. I used a 2" hole saw to cut a hole in the
firewall through which I will fit the element. The heating loop needs
to be bent around some to fit in there without getting too near
anything, especially the don't-fail-me-now fan. I may need to rig
some supports too, because the heating element is 'soft'.
But I ran out of time, and put the wiper blades back on temporarily,
leaving the cowl open.
- Q:
- What happens when the vacuum hose between a 615's throttle
butterfly and the injection pump breaks off and you try to
drive to work anyway? (Obviously I didn't know this had
happened while cutting the hole in the firewall.)
- A:
- No, it doesn't have a runaway engine. Instead, it idles
somewhat faster than normal. And it blows HUGE gouts of
gray smoke (because it's getting full fueling to go with
nearly no air). I didn't see this at first due to the icy
windows until I reached the first stop. As it warms up it
runs faster, but not more than half throttle, say.
I was able to turn around and make it back home for some duct tape.
You can modulate the engine speed using both the throttle (for air
regulation) and the dash-mount STOP knob (for fuel regulation). All
while managing clutch and brakes on icy surfaces. Great fun. And
when it's running this way, yes you can stop the engine by pushing on
either the anti-reverse air flap or the dash STOP knob.
Thursday, December 2, 2004
Got the heater
element mounted in the firewall, and fired her up. It all worked! It even cleared the
windows in the hour and a half it was running. The engine started
very easily, too, so the block heater is working just fine. One
problem: the heating element mounting flange, not being in contact
with water, is getting too hot with extended running. I'm going to
have to mount the element via standoffs or something. It's
overheating the firewall insulation, and its plastic insulating shell
melted off. The car was all stinky inside when I got back out, but at
least I could see!
Friday, December 3, 2004
I remounted the heating element on standoffs, totally inside
the air plenum. That'll keep the mounting flange from starting any
fires. This morning's test proved that out, it's fine in that area
now.
It's still getting the air duct too hot near the element, however. I
think I have to spread out the heating element over more area, it's
too coiled up right now. Maybe I'll cut the mounting flange in half
and loop it down past the fan (but not too close!) and mount the other
end on the other side of the car. I need to maximize the airflow
across the element, right now too much heat is wasted, and is building
up in bad places.
Sunday, December 5, 2004
While trying to re-route the heating element I cracked it, ruining it.
Too many bends while trying variations out. Good thing I'd bought a
spare! Routing it over to the other side will be no good, it'd get
too close to the heater control cables and the wire to the blower.
The new routing on the passenger side seems to be much better, but
there are still hot spots. I'm thinking of making a sheet-metal tube
to enclose the element, hopefully directing (ducting) most of the heat
as hot air through the fan that way.
A dark day, however. While milling around the front of the car I
found that the 'good' Euro headlight had eaten a rock, and was
shattered! The chrome surround was holding it all together and I
hadn't lost any pieces, but she's no longer pretty. I took out the
lens (pieces) and epoxied them back together. How nice. And I
thought the little rock pip in the other side was bad. I know you
can, theoretically at least, get new glass lenses for these Hella
lamps. I did so when I destroyed the Euro lens on the Unimog. The
Mog 'dealer' was able to get it via the Hella part number cast into
its mate. The price wasn't even too bad for the Mog part, but I
wonder what this would run to if I were to fix it.
On the plus side, since I had the light all apart I took a look at
fitting H4 bulbs into the R2 fixtures. (As you may recall, I'd stolen an
R2 bulb from the Unimog in order to get the car on the road. R2 bulbs
aren't too easy to come by around here, and their performance is
nothing to write home about anyway.) Near as I can tell by eye the
flange-to-filament spacing is the same for R2 and H4 bulbs. The
inter-filament spacing looks to be about the same too. It would make
sense that this be so, as the R2 bulb is the parent of the H4. The
mounting ears on the flanges are different, however.
So I took my severely burnt-out R2 bulb (normally I'd throw away old
light bulbs, but I've kept the bad R2's for experiments such as this)
and de-soldered the mounting flange from the bulb base. With a little
bit of reaming the H4 bulb then fit through the hole in the flange and
the top of the H4 bulb base snugly wedged into the flange. A little
bit of filing and the three H4 ears then had slots in the R2 flange to
drop into. Voila! The H4 bulb is now sitting in almost the same
plane as the R2 did, inset into the fixture only by the thickness of
the R2 flange's sheet metal. (Not far, that is, and substantially
less than the filament's dimension on this axis.) I had to nip half
of the two smaller ears off the H4 bulb's flange in order to fit the
spring collar of the fixture over the bulb assembly. Putting both the
R2 and the trimmed H4 bulbs into the Euro fixture yielded similar
views of the filaments in the reflector. Applying power to both bulbs
on the bench resulted in similar light patterns on the wall. The H4's
was brighter, of course.
The H4 is now what's in the car, if it proves out at night I'll be
able to return the R2 bulb to the Unimog. As they burn out I'll
probably convert them all to H4's. Those are commonly available
around here, unlike R2's. They're brighter, too, and are available in
higher wattages if you want to go that way. I later found that halogen R2 replacements (HR2's) are available
through Daniel Stern
Lighting, but the adapter flange, though a bit time-consuming to
create, will be less expensive in the long run. Had I found these
HR2's first, however, I'm sure I'd have just bought some.
Use H4:  in place of R2:
 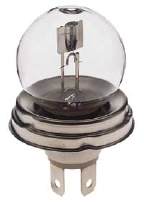 using the dead R2's base as an
adapter plate. Or purchase:
using the dead R2's base as an
adapter plate. Or purchase: 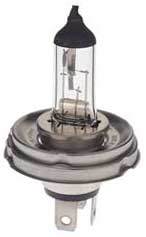
Some quotes from Stern's site:
| H4: |
These 2-filament bulbs with P43t base are for high/low beam
headlamps and Cibie BiOscar fog/drive beam lamps. Fun
facts: The H4 was the world's first 2-filament halogen
automotive bulb. It was introduced in Europe in 1971, and
was used in many millions of European and Japanese
headlamps starting in that year, but wasn't legalized in
the US (where it was designated HB2 or 9003) until over two
decades later, in 1992!
|
| HR2: |
H4 halogen bulbs on P45t base. Upgrade your vintage European
headlamps to modern-car light levels! These updated halogen
bulbs fit and work correctly in all 1950's through 1980's
European high/low beam headlamps originally equipped with
tungsten R2 bulbs. Light output is much higher, life is
much longer.
|
Monday, December 6, 2004
A lot of snow and ice on the car this morning. All locks and doors
frozen shut. The preheater system worked well, though. While it was
cooking the ice off the glass, I ran around the car with a heat gun to
liberate the doors and the trunk. I shot some de-icer into the door
handles once they were free. The car started very easily due to the
action of the block heater. If I don't catch the car on fire, I think
this project is going to work out well! Still need to work on making
the heating element safer.
Tuesday, December 7, 2004
Last night was a band performance, so I got some night hours in. The
new H4 bulb is noticeably brighter than the other side of the car with
the R2, and the lighting pattern seems just fine. This is going to
work out! On the other hand, there was some fog. The fog lights in
this 115 are the most pathetic things I've ever (not) seen. (Their
reflectors are almost completely corroded away.) I'd probably get
better effect out of a couple of kerosene lanterns hung off the front!
I have some cheap Harbor Freight auxiliary driving and fog lights I'd
bought on sale for this car, but installation is going to have to wait
'til some other more important things are done. Such as welding the
front bumper back on the car so that there is a stable place to put
these lights. The relay box is already there, and I have some spare
MB relays to go into it.
Got about three inches of snow overnight, though it's not frozen to
the car since temperature is just at freezing. While the block heater
was running (why not, after all?) I fabricated a rough elliptical tube
out of galvanized sheet metal (flashing left over from the SDL's belly
pan fabrication) to encase the plenum heating element. This should
cut down a lot on the radiant heat getting parts of the car too hot.
I shaped the end of the tube into an elbow pointing at the fan blades.
That should also shield the blower motor itself, as well as the fan
blades, from 'seeing' the hot element. The other end is just open.
The tube is slotted to go over the element, and two ears are welded to
the tube to bolt to the element's base. About the time I was
installing this assembly into the car, the entire engine was
noticeably warm to the touch. The block heater seems very functional.
With the encased preheater in operation things stay much cooler in the
area. The windows became warm enough to melt the snow as it fell, and
there was no longer a bad 'hot' smell inside after extended operation.
There was much less waste heat in the air cowl area, and though the
element is getting hotter than it did indicating somewhat less airflow
across the element, the net effect is positive. I think this heat
shield will be very satisfactory. I plan to button the air cowl back
up next. Then, on to other things!
Wednesday, December 8, 2004
Ugh, a filthy morning out. Blowing semi-slush rain, landing on an
inch or two of slushy snow. Into this paradise enter self, armed with
a long thin plastic tube and a can of ATF, and a desire to lubricate
the blower fan motor before I buttoned up the air cowl. I sucked a
couple of inches of ATF into the tube and plugged the end with my
tongue to hold it there, wedged my hand down into the air cowl, and
found the end of the motor with one finger. With another I flipped
the fan blades, and I could feel the shaft at the end of the motor
spinning. With the other hand I guided the tube down to rest next to
my fingertip, and blew the ATF onto the end of the motor. Repeat the
story for what I hoped was the bearing at the other end. I then
plugged in the car so that the preheater system started running the
fan. It did seem to run smoothly, but it mostly always had. (There
was just an episode or two of mild squeaking that made me want to
address the issue. That could have been brush squeak, though.)
Time will tell if this didn't work. But I needed to get ready for
work, so I put the grille back on and replaced the wipers. I was
really pretty wet and cold by this time as my coat was soaking
through. BRRR.
Thursday, December 9, 2004
Finally a chance to get to that leaky brake. I've got my longest-free
morning, and the rebuild kit is in-hand. The caliper even came off
with relatively little difficulty, and I got the pucks blown out
without a lot of problem. This caliper's rubber actually looked
pretty good. Too good. In fact, the reason it was leaking is because
a chunk is cracked off of one cylinder! No way this is going back
together today. The 123 spare I picked up (literally) is, upon close
examination, not a suitable replacement.
Now I've got to find another caliper that fits. Needs to be cheap,
but it can be in need of a rebuild since I've already got the kit.
Friday, December 10, 2004
Stymied on the brake front, and since the appropriate end of the car
was already jacked up and had its wheel off, I tackled welding the
front bumper back on. It had been hanging on that side from a piece
of baling wire looped through the hole for the headlight wires on that
side. The rearward brace was also completely loose, and tied on with
wire.
Examining the brace first, I found that the captive nut from the
'frame' had pulled out of the frame, taking a divot of frame sheet
metal with it. I wire-brushed the nut and the area, and pressed it
back into the hole. It fit well. Using a magnet to hold it in place
I tack-welded one side in with the wire-feed MIG. I then removed the
magnet and ran a bead around the whole thing. I then ground the weld
down fairly flat so the brace could bolt back on right. Voila!
That at least was easy.
The other end of the brace, the main bumper hanger, was in much worse
shape. Battery acid and road salt had pretty much eliminated all
sheet metal in the area. The bumper was well bolted to this flange,
which was just hanging out in space. What I did was to wire-brush the
area, then wedge the bumper into approximately the right position. I
then took some scraps of thick sheet metal and welded them between the
flange and the remaining sheet metal in the area. It's not very
strong, but it's certainly better than what was there. The bumper
itself flexes more than the mount does, so I'd call it a success.
It should be noted that the other side of the bumper mounting is
mostly rust-free. The lack of a battery in the area helps, as does
the oil coating the area got from the oil-bath air cleaner located
just above. There's something to this 'English undercoating' thing,
methinks!
The next step was to weld the already-had-been-welded-by-somebody-once
end of the brace back onto the flange. I bolted the one end back to
the frame and bent the other against the flange, then welded it back.
Whatever metal the other end used to bolt to was long gone. The final
step was to rattle-can some black paint all over the place. There,
done! All the welds are fairly crappy, because I am not a good
welder. But on this car it hardly matters, and this is all
out-of-sight stuff anyway. I didn't want to have the bumper drop off
the car in a pothole someday, and I needed some stable metal in the
area for when I add the auxiliary lighting.
Remaining to weld on the car are the great gaping holes in the fronts
of the rocker panels. The visuals are disturbing, and there is road
noise coming in them. I'm also worried about splashing. I've got
some sheet metal (microwave oven covers) I can put over the holes.
Classy!
Tuesday, December 14, 2004
Today at the U-Pull I nabbed a complete set of brake calipers, with
better-than-what-I've-got brake pads. With any luck tomorrow I'll be
driving the car to work again. I also got a cruise control speed
sensor and the combination stalk with CC lever, and the two pieces of
side glass that are fogged on my car. And the splash guard for the
driver's-side fenderwell, which is missing too. That's important to
have to cut down on the rust potential (sadly realized). (The other
stuff is for future projects.) $67.
That glass was difficult to get out. I hope I have better luck
installing it.
Wednesday, December 15, 2004
I put the brake pads from the 'new' caliper on the rear side that was
scraping metal. Then I installed the 'new' caliper on the front to
replace the broken one, and bled that caliper. I ran out of time to
do anything more. I've must say that brake work on these cars has got
to be as easy as it gets.
On the way to work the braking was much improved! It pulls a
little to the new side now, so I may go ahead and swap out the other
front caliper. Or at least bleed it again. Regardless, I'll go over
the other side of the car's brakes next.
At the U-Pull today at lunchtime, besides picking up some commissioned
items for fellow listers, I found a few goodies for myself. Main
items are a set of Kangol seat belts for the rear seat, a brass
radiator (rather than the aluminum/plastic one from a 123 that's
wedged in there now), and a thermostatic clutch and fan. The latter
ought to slightly improve fuel economy. The seat belts will be nice
in that I can then move the baby seat to the back, for the odd times
when I've actually got the kid with me in my work-commute car. The
original radiator, by now determined to be completely kaput, was
returned to reclaim the core charge for this new one.
Speaking of fuel economy, so far this second tank of fuel (now at the
halfway mark) is beating that of the first tank. As an experiment,
and to help clean the cobwebs out, the first tank was driven mostly in
third gear. This second tank I'm upshifting to fourth at anything
over 30 MPH (most driving), much as you would with a gasser. (I
do floor it at all times until I reach cruising speed.) It may be
that this diesel, with a throttle butterfly, exhibits some of the
gasser tendency to consume proportionately more fuel at higher RPM's
with the same work level. One theory is that this is due to the work
required to pull a vacuum against the throttle plate.
Or maybe it's just happier being driven. Or maybe it has something to
do with the bottle of Chevron diesel injector cleaner I dumped in it.
More time will tell.
Thursday, December 16, 2004
I put the brake pads from the other 'new' caliper on the other rear
side, though it didn't need it as it turns out. That side was fine.
Then I installed the remaining 'new' caliper on the other front wheel,
and bled it. These calipers were from a '76 300D, which might have
had slightly different brakes than the older 200D.
While I was there, I replaced the duct-taped broken vacuum line to the
injection pump with one from the U-Pull 220D, and I replaced the
vacuum line to the brake booster with the U-Pull 300D's, which has
taps for accessories. (I'm working towards getting a cruise control
installed.) I rigged up a vacuum gauge off the tap so I could see it
as I drove to work, as I wanted to keep an eye on the vacuum level to
see if the pump is good. All appears fine, the vacuum pumped down to
24" over several seconds, and nothing bad happened on the way to work.
Braking was perfectly fine, the caliper change has removed most of the
pull during braking. The gauge would dip when the brakes were
released, which is to be expected.
I did notice that I need a new tie rod on one side, one of its ball
joints is a bit loose. Next time I go to the U-Pull I'll see what I
can liberate.
The other project this morning was to wash the filthy seat belts I
got. A bucket full of soapy warm water did the trick, and they're
hanging out to dry. I can install them tomorrow, I think.
I must add that while I was working on the Frankenheap this morning, I
had plugged in the preheater system. Not only was the block nice and
warm by the time I went to work, but the car was all lukewarm inside
and the windows were totally clear.
The only thing better would be an Espar or Webasto fuel-fired
preheating system. That would work anywhere, but would probably cost
more than the $35 I spent on this system.
Friday, December 17, 2004
This morning I installed the rear seat belts I procured recently. It
went more difficultly than I would have thought, because the plastic
plugs in the bolt holes were stuck in and wouldn't unscrew without
tearing out their #3 Philips pattern. But a chisel and the BFH saved
the day. Having forgotten which belt came out of where, I used the
belts in the 250C as a model. The pattern makes sense, you don't want
the end you tug on to be against a wall. The baby seat is now in back
center, and cinched down tightly. Much more secure than the
arrangement in the front seat.
One bad thing is that I found the rear footwells to be small lakes.
Obviously this car leaks in the rain, which I had suspected for some
time. Oh joy, another project. For now I've pulled the rear carpets.
At the U-Pull today at lunchtime, besides picking up some Christmas
presents for my brother, I found a few more goodies for myself. I
picked up a fuel sender, so that I can clean it out and make sure its
low-fuel lamp contacts work. Then maybe swap it in later. I also got
a tie rod, from which I can steal an end to replace my loose one.
And, a really ratty set of US headlights, in case I ever want to sell
the Frankenheap but keep its lights for the 250C. I think I've also
got a warning buzzer, which I hope to rig to the lights. (I've
already left them on once.)
I'm still eyeing that rear glass with defroster grid...
Monday, December 20, 2004
Today was loose tie-rod ball joint day. The inside passenger-side
joint had something gross like 1/16" of play in it. Enough to go
"chunk-chunk-chunk" when you yanked on the wheel when it was in the
air. The boot hadn't visibly failed, so I don't know why it was worn
out. But it was. So I removed the correct end from the tie rod I got
at the U-Pull and replaced it. I used heat on the mount, along with
hammering and a pickle fork to remove the joint. Before I started, I
made a piece of stiff metal rod into a U shape to span between the
dimpled centers of the tie rod bolts. This so I could restore
alignment to where it was before the operation. (Modulo the undesired
slop.) Then I just counted turns when I unscrewed the old end, and
put in the new end the same number of turns. Once temporarily
installed I used the caliper to check the length, it needed adjustment
by two turns. Then I tightened everything back down. No more
looseness!
Today I also got eBay notification of winning auctions for an actual
"200D" 115 trunk legend, and two euro headlight glasses. $42+ for all
three items, shipped. Those will go a ways towards dressing the old
girl up. I believe I will keep the glasses in reserve, the existing
broken-and-glued rock-eaters can continue to eat rocks this winter.
I plugged in the preheater system after I was done working on the car,
to run while I got ready for work. It got to run for less than an
hour, and it wasn't enough to fully clear the windshield of ice. I
think the 900 W air heater is a close match for the engine block
heater, in terms of running time per effect. Both want to run for
more than an hour (but less than two) to have maximum effect. (I
should have plugged in the car while I was working on it, but I needed
the extension cord for the work light I was using.) I cleared out a
garage bay, so I'll be parking inside for awhile, and oughtn't need
the preheater then.
The next project might be the driving/fog lights. But nothing more
will be done for a little while as we've got to prepare for the
holidays.
Tuesday, December 28, 2004
Back from our all-too-short vacation, and back to normal. Today at the
U-Pull I got the 115 rear window with defroster grid. $8. I may put
it in the Frankenheap, or I may just hang it on the wall. The joker
is the new gasket I'd require, and installation. (Which probably
ought to be professional. Perhaps I'd get a break if I were to remove
and clean up after the old one myself.)
...I got a quote for professional installation (all parts supplied by
me) for $150! This from the glass place that the local dealership
farms their jobs out to. Maybe I need to learn to do this myself, eh?
Wednesday, December 29, 2004
Filled up again, the third time, and got 28.8 MPG. Not quite the
30+ I was hoping for, but closer. It still may be running cool, which
can hurt a little, and it's still got the direct-coupled fan. Both
issues can be addressed, so I've some hope that I can eke out a little
more economy. The last tank lasted me for exactly one month, which is
not bad.
Thursday, December 30, 2004
This morning I installed an auxiliary 2-fuse block from the boneyard's
late-model 115. It's screwed to a piece of heavy sheet metal (a
circuit breaker panel knockout) bent into an L so that it can be
screwed to the flange on the side of the existing fuse block. I
pulled out the existing fuse block and ran a heavy tap to the feed for
Fuse #1 (always-on). This feed terminal is very heavy, and feeds the
glow plugs, so there's no shortage of available current there. (You'd
never glow with the headlights on.) I also tapped one of the
high-beam connections. Another MB relay has been snapped into the new
relay box that I installed earlier. No relay wiring besides the one
coil connection to the high beam circuit, though. So far all the wire
I've used has been from MB wiring harnesses, but I suspect I'll have
to get out the roll of black when it comes time to actually hook up
lights. I'm aiming to add both driving and fog lights, using two
relays (separately fused).
Tuesday, January 4, 2005
Tried to wash the windshield (out in the garage) with a squeege sponge
full of hot water. Y'know, just a quick wash and wipe just like at
the gas station to get the grime off. (The car's washer system is
still defunct.) Water froze to the window and I had to scrape me a
porthole. No time for more involvement.
Wednesday, January 5, 2005
This morning, while running the car preheater out in the garage in
order to (I hope) heat the window enough that I could wash it without
the hot water in the squeegee freezing to the glass (like yesterday),
it popped the breaker. When reset, the heating element seems to be
defunct. So, not a complete success story yet, I guess. And the
window's still dirty.
Thursday, January 6, 2005
I love welding! This morning I put brackets on the front of the car
to which I will mount the (cheap) driving and fog lights. I removed
the bumper, and while it was off I re-attached the loose bit of
aluminum used-to-be-shiny trim that was flapping in the wind, and
replaced a missing bolt that holds the fender (I guess) to the
radiator support. With that miscellany out of the way, I went to get
the welder and found it still rigged for aluminum. So, I side-tracked
a bit and welded the crack I had put in one of the genset's piston skirt ribs when I was pounding it
out of its rusty bore. Then I put the welder back to steel.
The euro bumper supports are just thick sheet-metal forward-facing
"T's" sprouting out of the front of the car, with holes in each side
of the top for the bumper bolts. Using scrap steel, I welded a stout
"C" shape to the inside rear edge of the T, set back a bit so that the
bumper would clear. The ears of the C face forwards, the bumper
itself sits in the channel. The T's flex from side to side a bit more
than I'd like, so I welded a brace to the other edge of the C. The
other end of this brace goes under the aforementioned radiator support
bolt. The bracing results in the whole bumper being much stiffer than
before. I hate lights that jiggle.
This operation was repeated for the other side, then I applied a
little bit of rattle-can black paint to the welds and bolted the
bumper back on. The result is four nice stout little ledges to which
I can bolt lamps. (Two above the bumper and two below.)
Friday, January 7, 2005
Wretched POS cheap made-in-China Harbor Freight (and equivalent)
driving and fog lights are mounted, and grounded. Still need to do
the wiring. The plastic housings are so flexible that the lamps will
still jiggle when you thump the bumper regardless of how stout the
perches are. I imagine that the rubber gaskets won't seal well due to
the lack of stiffness in the housing. On the other hand, smashing them
into curbs and other rocky items won't really break my heart, either.
Saturday, January 8, 2005
Got the lamps wired up. Fairly straightforward process, except that
the tap for the fog lamps turned out to be very difficult. I decided
to tap the fogs inside the connector in the left headlight shell, and
run the wire back through the channel to the engine bay, and thence to
the relay box. This avoided digging into, and damaging the wiring
harness. But, that wasn't easy. The tap was easy enough, but snaking
the wire back through that rubber sleeve was very difficult. The
sleeve was all hard and twisted. Moreover, the upper end wasn't
attached to the inner fender wall anymore because they'd hung the
bumper from a piece of wire threaded through that hole. With much
labor I was able to finally get the wire snaked through the sleeve.
With much more labor I was able to wedge the hardened rubber grommet
upper end of the sleeve back into its hole. That ought to help keep
moisture out of the headlight, too. While I was there I used globs of
weatherstrip cement to plug up the small tears in the sleeve. I
think. With that done, the rest of the wiring was easy. The two
auxiliary relays (high beam and fog) are fused separately, though they
needn't be. Because I wished to keep the fogs off when the highs were
on (old DOT reg, but more importantly to save the alternator), I
needed to wire the two relays together. Just like in my wife's SL headlamps, the 'ground' end of the fog relay
coil goes to the new high beam filaments. When off, they're a virtual
ground for the fog relay.
The other day I went on the freeway with the car, and the road slime
was unbelievable. I really needed the windshield washer, but no dice.
But soft, what liquid over mine foot gushes? It is the frog, and
truly it is but done.
In the evening I had a few extra minutes, so I removed the leaking
washer pump. These rubber 'frogs' are always leaking, and are no
longer available, so I'm told. (Pity, because it's a pretty
cheap-looking part. Ought to be a couple of dollars or thereabouts.)
As usual, the skinny neck where the tube exits is rotted in half. The
rest is in pretty good condition, though some small cracks are
starting to form in the main body. I decided to glue it up so that it
would be dry by morning. I cut some strips of bicycle inner tube, and
used rubber weatherstrip cement to glue them over the cracks, and
around the skinny neck. I also glued 'flashing' strips down the neck
and onto the body to bolster the joint. Over all this I potted the
joint in Shoe Goo, for strength, and set it aside to dry.
Sunday, January 9, 2005
With the frog all patched up, I reinstalled it. Next step was to
examine and fill the tank. I removed it from the car, covered the
hole with my mouth, and blew. Well, it sure leaks air! Examining it
closer I found five separate cracks in the body, all of which would
leak. The ones near the top would prevent it from being filled very
full, but the bottom ones were slow leaks. (I knew it leaked because
I'd partially filled it once when I'd gotten my foot wet and it had
all leaked out by the next day. I guess it had frozen or something at
some time. Out came the Shoe Goo again, and after an acetone wipedown
to clean the cracked areas I gunked them up. I kept blowing into the
tank and caulking until it held slight air pressure. Then, this got
set aside to dry.
With the Dremel, I was able to gouge some ratty screw slots into the
rusted screw heads that retain the rear fog lamp lens. With some
'crunching', these badly rusted screws came out of the plastic.
Inside, it was in perfect condition, reflector and all. The bulb is
intact and making good contact, yet the rear fog does not work. I
guess I get to chase wiring problems. I used two drywall screws to
replace the nearly-dead screws that were there. I may try some
O-rings to keep corrosive crap out of the screw shaft holes.
Monday, January 10, 2005
With the gluing all dry, it was time to plumb the system. I hooked up
all the disconnected hoses and put some water in the tank. I stepped
on the frog, and heard hissing down by my foot! Great, my repair
wasn't good enough. Close examination showed that it was leaking past
the plastic tube that's stuck into the neck. I had wondered about
that joint, but I didn't want to glue the tube in if I didn't have to.
But as it doesn't leak too badly, that can wait until I finish the
rest of the work. I really need/want the washer to work.
Neither nozzle would deliver water to the windshield, big surprise.
With the hose disconnected, the frog could pump water all over the
place through the tubing. The driver's-side nozzle was only slightly
clogged, a session with a dental pick cleaned it out. The other side
was a mess, and was really clogged. It was difficult to work on while
on the car, so I removed it. The trick here is a piece of hard tubing
of the right size to push upwards from below. The tubing compresses
the mounting ears, and the thing pops right out of the hood. I used
some washer cutters I had, which are sharpened tubes in a range of
diameters. I just picked the one that fit best.
On the bench, I can see that the plug is a bit of steel! Somebody was
trying to clean it out and broke off a needle in there. I messed with
it for awhile trying to pick out the obstruction before giving up and
liberating a spare nozzle assembly from my junkbox. (It had come off
my wife's 450 SL when it got a heated washer
nozzle upgrade, and seems to be an exact match.)
With this taken care of, and the tubing flushed of old crap, the
washers then both worked. A quick session with the dental pick
aimed the washer streams, and I was done. Except for the leak.
Finally, I removed the still-leaking frog and dried it out. Then, I
cut the collar off of the plastic tube so that it could be inserted
into the hinge of the pump mechanism from the other side. Then, I
glued the tube into the neck using weatherstrip cement, assembled the
pump and reinstalled it. I didn't replumb it because I need to let it
dry first. I plugged the water hose with a fat nail so all the fluid
wouldn't siphon out. Later today, or maybe tomorrow I'll reconnect
the tube and see how it goes.
...Did try it out, and got my feet wet for my trouble. I had tried to
only lightly glue the tube into the neck, so that it could be removed
if necessary. But that leaked, so it was time to bring out the big
guns. Also, the tube kept popping off and geysering the under-dash
area with nice blue wash. When I got home, I removed the frog again
and sluiced out all the moisture with acetone and blew it dry. Then I
potted the whole tube joint area with Shoe Goo. That'll hold! (I did
it at night so that it would be dry enough to install in the morning.
That tube's never coming out again, but I guess it doesn't really need
to, either.)
Tuesday, January 11, 2005
With the glue again all dry, I replaced the frog. I also cut off the
spread end of the tubing where it attaches to the frog, because it was
popping off yesterday. The tube now goes on nice and tight. The frog
doesn't leak either, but the washer nozzles were again clogged with
crud from the long-open and dry lines. So, I removed them from the
hood and cleaned them out. While removed, I pumped the frog a few
more times to blow out the lines again. Then I reinstalled the washer
nozzles. No problems this time, and they work well. I may have to
repeat this a few times until things finally clean out completely.
Not everything always works out properly the first time, as should be
obvious by now. The fog light wiring cleverness is one example. The
virtual ground for the new fog light relay works well on my wife's SL,
because the only fog lights are relay-controlled. However,
on this car I didn't disturb the existing fog lights, so they
act as a virtual ground when the high beams are on! This means the
auxiliary fog lights come on with the high beams unless the
original fog lights are on. Bummer. This morning I cut the virtual
ground lead from the fog relay and inserted a diode, so that the high
beams can't backfeed the relay through the old fog lights. All fogs
are then on when they're switched on, and the auxiliary ones go out
when the high beams are on. Now the lights all work properly.
...Except for the rear fog, so I took another stab at that. I checked
more thoroughly, and indeed found +12 V back there when the rear
fog was switched on. But the ground to the lamp was defunct. I dug
into the wiring inside the trunk wall, and found a rusty ring terminal
lying loose. I reconnected this to a nearby screw, and then the rear
fog light worked again. I pulled the knob off the light switch and
found the rear fog illuminator lamp burned out, so I replaced that
too. Now the fog light system works perfectly. I reattached the lens
using two O-rings under the screw heads, maybe this'll keep the new
screws from having their shafts rust like the old ones did.
As a final touch, I dumped in a bottle of water sequestering agent
(alcohol that I picked up cheap at the liquidator's) into the fuel
tank. This to match the bottle of injector cleaner I used already.
That should finish off the car's snake oil regimen.
On the way to work I actually cleaned the windshield, and it worked!
Finally I can see through this muck they spray on the roads. If only
it would stay on the roads and off the cars...
Wednesday, January 12, 2005
Today I dug out the free used hood liner I brought home from the
U-Pull. It was out of the '76 300D, and was mostly intact, though
coming loose from the hood. With a bit of care it came off the hood
in one piece, and the foam wasn't completely disintegrating yet. I
took it in the first place to cushion the two side windows I got that
day, though I had a vague plan to put it into the heap if it looked
good enough. Some days ago at the liquidator's I'd procured a quart
of flooring contact cement (which looks like Liquid Nails in a can)
for $0.99, and a $0.69 4" paintbrush to apply it with. I laid the
liner over the engine, for drip protection, wiped down the hood
surface, and started digging gobs of cement out of the can with a
stick. (It was very cold out there.) I wiped the gobs on the
paintbrush, and then smeared the cement onto the hood. When it was
more or less evenly covered, I started pressing the liner into place.
It worked out well enough, though I didn't get the thing perfectly
placed before it started to set up enough that I couldn't shift it
anymore. And there's a crease down the middle. It'll do, however,
especially considering that it's half decomposed already. And it does
dampen the thrumming of the hood when it's manipulated, so I think
it'll help cut some noise. This would have been much easier
with the hood off the car and lying flat, but that's a big pain to do.
If it had been a new liner, I think I might have gone that
way. (Unlike the liner I put in the SDL, this car's hood won't go
vertical, which was of considerable aid when doing the SDL.) I spent
too much of the glue's working time fighting its dropping off the
hood, and not enough positioning it. Vertical or upside down
orientation would have prevented this. This job won't last very long
because of the state of the foam, but it was easy and cheap to do, and
I don't care that much either.
Yes, the new auxiliary lights are real POS's. While leaning over the
engine to install the hood liner, I pushed against one of the new
lights. SNAP! Broke clean off the base. What garbage. I knew they
were cheap, but this is ridiculous. However, I actually had two sets
of these (the original package fell off the shelf and broke a lens, so
I replaced it at the next sale), so it was no biggie to swap lamp
housings. At this rate, however, my spares won't last long! I
definitely need to stay out of the automated car washes now.
Thursday, January 13, 2005
Today I tackled the (defunct) car preheater system again. Once I
removed the air cowl (tedious) I could remove the bad heating element,
and it became obvious that its problem was cracking of the element
where I had bent it to shape. This is obviously a bit on the
difficult side to do well. (Well being defined as something that will
hold up.) It fell apart into pieces in my hand. So, having suspected
that this was the problem I embarked upon the Mark II version.
Yesterday I'd bought a heat gun at Harbor Freight (on-sale at $10)
with the intent of gutting it to supply heat for the cabin. (I
preferred to use a heat gun as the donor rather than a [much cheaper]
hair drier, because they have metal construction rather than plastic,
a necessity due to their higher temperatures. Also, the volume of
delivered air is much less, and can be easily taken up by the cabin
fan. I had visions of half the heated air blowing back out of the air
cowl rather than being sucked into the car. Also, the low-volume heat
gun fan is much quieter.) This heat gun had two settings, and I'll
use the lower one. That leaves some power (from the standard outlet
rating) for the block heater, etc. Also, this particular heat gun
runs the fan slower on low as well, so it's quieter than when on high.
It's still a lot noisier than my (good) Milwaukee heat gun, of course.
Anyway, I disassembled the heat gun and removed the heating cartridge,
which is a metal tube with the ceramic-mounted heating element inside
it and a fan stuck on one end. I took a 10" section of 2" exhaust
pipe I had laying around, and stuck it through the 2" hole in the
firewall I'd made in the first place. I angled the tube and inset it
so that its delivery end was well into the plenum so that the supplied
heat would be taken up by the fan. I welded two washer 'ears' on the
tube to line up with the water heater element mounting holes that were
already there, and bolted it down. As a trial, I slipped the heating
cartridge into this tube and turned it, and the rest of the car
preheating system, on.
Letting it run awhile I felt around in the plenum, and as I'd feared
the car wall off the end of the pipe was getting kind of hot. So I
removed the pipe and cut the end off at 45 degrees, then I welded the
cut-off piece over the end so that the exiting air has to take a turn
by bouncing off the end of the pipe rather than the wall of the car.
This causes the hot air to be aimed directly at the fan, which should
prevent undesirable heat build-up.
I buttoned up the system and ran it for an hour or so, and it worked
very well. The heating cartridge is still just sitting inside the
tube, it will need to be secured better. Also, shrouding of the
wiring needs to be done, it's too exposed. But this is all just
simple mechanical fooling around that can be done with nothing more
involved than having the hood up. Also, if this system fails it is
very easy to get at to repair.
The original reason for using a down-rated water heater element was
because it should take getting wet inside the air plenum. However,
due to the exhaust pipe shroud in this version, the more delicate air
heater of the heat gun is well-protected. I don't expect
environmental issues to cause a problem, unless it's vibration.
Friday, January 14, 2005
The new used "200D" badge came, so I installed it. Looks much too
nice for the car. The speed-nuts that it was originally held on with
were not included, nor did I have any. I didn't want to use regular
nuts to hold it on because it's so easy to overtorque the aluminum
mounting posts. But I did have some brass knurled thumbscrews that
I'd been carrying around for years (from an old multi-tap dry cell)
that I decided had been 'saved' long enough. So I threaded the
aluminum posts of the badge 8-32 to match the nuts, put on a dab of
Lock-tite, and screwed them on. Beauteous!
The new used euro headlight glass came too. Though they are Hella
like what's on there, the shape is subtly different. The originals
are more rounded across the front, the new ones are flatter. I
haven't tried mounting them to see that they really fit. That'll suck
if they don't.
Since I was in the area, I finalized the air plenum preheater. After
considering it overnight, and even though I really don't like the
effect, I came to the inescapable conclusion that the best protection
and mounting for the heat gun guts was the heat gun case itself! What
cinched it was finding that the inside diameter of the plastic nose of
the gun matched the outside diameter of the exhaust pipe segment. So
I reassembled the heat gun, forced the nose piece onto the pipe, and
then attached the nose piece (bayonet lock with retaining screw) to
the heat gun. It's very solid, but it sure looks hokey. Works good,
though. I used it this morning to good effect. We're having a cold
snap, and it's well below freezing even in the garage now. Outside it
was 8.8 °F when I left for work. (For insurance I threw jumper
cables and a snatch strap in the trunk, to go with the boots,
overalls, flashlight, tools, and gloves.)
The only remaining unfinished part of the car preheating system is the
battery charger. I have it, but space is getting limited in the area.
I think I can combine the guts of the two battery chargers into one
box. Unfortunately due to the way the circuitry worked out I can't
use only one to do both jobs. I'm going to think harder about this,
though.
Saturday, January 22, 2005
Today was bright and balmy out, it's time to get out the welder! I
jacked up the driver's side and took off the wheel. I wire-brushed
the area and tried to clean up the area for welding. What a mess,
it's amazing how far the cancer can spread and not really seem that
bad. I cut up some strips of metal from an old microwave oven lid,
0.022" or about 25-gauge, and brushed the paint off. I then proceeded
to weld over all the holes I could find.
This was very tedious, there were a lot of holes. I didn't try to
restore the correct (and complex) configuration of sheet metal in the
rocker panel area. I just covered the crack/hole from the inside with
one piece of metal, and then covered over the bottom of the rocker to
keep water and dirt out. Some hammering resulted in a presentable
profile to the new metal. The remaining time was spent tying this all
together so that it was (I hope) watertight from the outside. I did
leave a drain crack at the trailing edge of my new metal.
There were also two holes in the door sill on top, so I removed the
door to gain access, and covered them up with strips of metal.
With this done, I buttoned up the car again. This entailed painting
all the welds, putting back removed trim strips, both inside and out,
gluing back down the sill cover, putting back the door, etc. I also
put in a new U-Pull plastic splash shield to replace the one that was
missing. All of this work took all day, dark-to-dark. Very tedious,
but I hope worth the effort when it comes to drying out the interior
of the car and cutting out drafts, dirt, and noise. It should extend
the life of the car a year or two, easy.
Sunday, January 23, 2005
Now for the worst side: the passenger! I jacked up this side of the
car, and started cleaning it off. Much worse and more widespread
cancer, all the way back to the rear of the front door. The firewall
is also compromised all the way up to nearly the top, but only near
the outside edge. I began welding on the firewall, because it seemed
like the place to start. It's also easier to reach.
It became obvious that I needed to put in large strips of new metal
here, since the rusty metal was too rotten for clean welding, but the
microwave oven lid is just too hard to work with, and really is too
thin (0.022" or about 25-gauge) for easy welding. So I caved in and
went to the hardware store to get some 16-gauge weldable steel sheet.
This stuff is much easier to weld cleanly into place. Also,
I'd used enough microwave oven to be able to advertise the fact!
Once back on the project, I put in two strips that took me down to the
beginning of the rocker panel. By then, it was dark again, but I'd
gotten enough done to feel some small sense of accomplishment.
There's a long ways yet to go, though.
I started a number of small fires inside, btw, from residue of the
firewall insulation. A small can of water was useful to douse the
area from time to time to keep from destroying the car! That'd suck.
Monday, January 24, 2005
The anti-fire water applications of yesterday had shown that the
original welding on this side was too contaminated to seal. The
topmost 'repaired' section was no good as water had seeped through all
of it, so I ground that all down and cut a strip of new metal to cover
it up properly. That really is the secret to easy welding: ruthless
grinding back to good, thick metal, and new steel. (I wonder how many
times I'll have to [re-]learn this lesson before it sticks?) Pity
that it's not going to be possible to do everywhere here, due to the
extent of the rust.
The firewall, at least, I now consider to be more than well repaired
so far as strength goes. It's almost a job to be proud of. Good
thing, because the rest of the welding won't be, I think.
I was only able to get this far, plus do some wire brushing and
cleaning of the rust back along the floor corner before I ran out of
time (it being a workday and all). This side is going to take much
longer to do, that's for sure. Days, easily. I hope to be done by
the next weekend, though.
So that I could drive the car, I threw the carpets back in to cover
the hole, and installed the other plastic splash shield I'd gotten at
the U-Pull. The old metal shield is badly rusted, so I think I'll be
going with the plastic one. I had to use the heat gun to un-bend the
shield, since it had come from the crunched side of the car I got it
from.
Wednesday, January 26, 2005
Today I began tackling the nasty holes in the passenger side. To make
room for crouching in the car (Crouching Welder, Hidden Rust?), I
removed the passenger seat. (I don't need it, so it'll probably stay
out until the repair is finished.) I ground through the rusty crack
in the sill that's about 1/2 inch above the floor level all the way
back to the front seat mounting point, and ground down heavily into
the thick seam that's there to try to expose more good metal. (The
rust goes a bit farther back, but I can't really get at it without
tearing off the seat mount, which I'm not going to do. I think it'll
be all right to ignore this.) While I was at it, I poked some holes
through the bottom of the rocker panel (using just my fingers!) to let
out several cups worth of dirt, rocks, and rust flakes. Then I used
the shop vacuum, plus a piece of 1/2" hose and some duct tape, to
snake into there to vacuum out what loose garbage I could. What a
mess!
With this auspicious start, I began bridging the crack in the sill
with new metal, starting at the rear. I was able to get two strips
installed this morning before I ran out of time. The welding beads
don't look too bad, even where they tie into the heavy (and rusty)
seam at the bottom. I used a lot of wire to burn out the rust along
the bottom before I sealed it up. (I don't know how 'sealed' it might
actually be, but it's certainly strong enough now.)
From here, though, it's going to get slower as there's a lot more
missing metal as you run forwards in the car.
Thursday, January 27, 2005
Not much time today, but I was able to put in one 8" strip of metal to
bridge over most of the crack along the top of the sill where it meets
the side wall, from the door opening forward. The metal is very thin
and ratty here, this wasn't easy to do. It was raining, so I stuffed
a towel in the hole to keep the splashes out on my way to work.
Friday, January 28, 2005
I welded in three chunks of metal along the vertical part of the
(mostly missing) sill interior. This ties around the corner to the
firewall too, so it's strong. This new metal covers most of the hole
that's on the inside of the car. I still have to do some corner
treatment at the floor, and I have to build the horizontal top of the
front part of the sill, but it's going well.
There's still quite a lot left to do on the outside, since I
have to close up the holes into the rocker panel area. And there's a
lot more hole than rocker, I think! There's a good chance I'll be
able to finish on Saturday, though.
It's still wet, so the towel was put back over the remaining holes in
the floor for my drive to work.
I filled up again at lunch, 440 miles and exactly one month since last
time. Still only getting 28.6 MPG, I really need to look at the
thermostat and cooling fan to see if I can nudge it up a bit...
Saturday, January 29, 2005
With a full day ahead of me, I was able to finish boxing in the
interior space of the car so there were no open holes to outside.
That took awhile! I also did some prep work on the outside, getting
ready for boxing in the outside surfaces. I removed the outside trim
piece that goes the length of the car below the doors. Then I peeled
open more of the bottom of the rocker panel and dumped out more rust
and dirt, and I was able to vacuum out more of it too. I used the
grinder to liberate the huge loose chunks of Bondo that were there,
with screening embedded in it. Not a very good (long-term) rust
repair, I'd say!
Sunday, January 30, 2005
Didn't have too much time today, but I was able to weld in a heavy
shaped piece of metal (the last of my 16-gauge sheet) to be the front
of the rocker panel. I'm going to have trouble with the joint to the
fender, as I don't want to weld to the fender itself, yet I can't
really get behind it to repair the piece that's back there that the
fender normally screws to. I sure don't want to have to take the
fender off the car, so I'll just make do.
I also welded in a strip of my microwave oven material to form the
first of the bottom of the rocker panel curve at the front of the car.
This thinner metal, though a pain to weld, is thick enough to do the
job, and bends into a relatively smooth curve much easier.
There was one setback: I was underneath the car pecking away with a
small hammer on the U-channel that goes under the floor, dislodging
(by vibration) all the dirt and rust that was in there and letting it
fall out of the holes that are there to keep it drained. A whole lot
of crap came out of there, more than should fit it seemed to me. Then
I noticed light coming out the drain hole. WTF? I got out and looked
in the car, and found a hole
cratered in the floor. Apparently the channel clean-out came a few
years too late! The floor was rotted away above the channel, and had
only been held in place by the asphalt covering. So I pulled off
chunks with my fingers until it got solid again. Now I've got another
hole to repair inside the car, so I'm not done there. I went to the
store to get more black paint, and another sheet of thick metal. The
thin stuff is too hard to work with for this kind of repair. (Flat,
rusty, no curves required.) I shouldn't need very much of it, but it
never hurts to have some extra on hand.
Monday, January 31, 2005
I was able to finish the boxing in of the front of the rocker panel,
using another strip of microwave oven lid material. This completes
the whole front area back to the jack point. It's all boxed in,
painted, and screwed together, splash guard and all. I shouldn't have
to be removing the front wheel anymore, which will save some time.
All that remains is to bring new metal back from the jack point to
cover up the biggest remaining holes.
That and the crater in the floor.
I'm just about out of shielding gas (again!), I expect to run out
tomorrow or the next day. I've got a bad habit of building up weak
spots out of bead, much as you'd fill in a hole that you accidentally
punched in the sheet metal (of which I do plenty!), and that really
consumes time, which consumes gas. (And wire, of course.) I need to
break this habit! It's so much less expensive (and probably faster)
to just splice in a little snippet of new metal...
Tuesday, February 1, 2005
I cut out the tattered remains of the rocker panel bottom, from the
jack point back to about the rear of the front door. With this
entirely open, I could see that the rusted sill wall that I'd stopped
repairing (while working from the inside) at just before the front
seat mount was indeed rusted through several inches further back. So,
I ground it clean and welded a strip of steel over it from the
now-accessible outside. I then vacuumed out the remaining (intact)
rocker panel as best as I could, and then ground clean all the edges
of the big hole where I need to weld new steel in to form the new
bottom of the rocker panel.
I then cut a big piece of microwave oven lid to fit this hole, and
trimmed it to size. Next I bent it into the rough shape required, and
wire-brushed off the paint from all the edges where I will be welding.
(Cleaning off the paint is the worst part of using used sheet metal.)
Time was getting short, so I just spot-welded it in place to keep the
rocks out of the open hole. I'll weld it into place properly tomorrow.
Unless I run out of gas halfway through.
Wednesday, February 2, 2005
I began welding the seam on the bottom of the rocker panel, but I got
less than halfway through when I ran out of gas. (Just as well, I had
a morning meeting to get to.) This seam is still pretty dirty, so
it's slow going. The top, where it's all clean steel, will go much
easier. Probably two more days to finish up the welding. One for
finishing the rocker, and another to cover the floor crater.
The empty bottle sits nicely in the car where the passenger seat used
to be! I'll fill it up again today at lunch.
Thursday, February 3, 2005
With a new bottle of gas in hand, I welded the remaining seams on the
rocker panel. I left a small crack open at the rear for drainage.
The bottom joints are nasty, but the rest look fine. It was just too
dirty down there for good welding, but I didn't want to grind away all
the metal. I still have to do some joinery around the front jack
point, but I painted most of the new panel anyway. Also remaining to
do is the last floor crater. One more day ought to do it.
Friday, February 4, 2005
Finishing day! I completed welding around the jack point, so it's all
tied together. Then I cut chunks of new metal to cover the floor
crater. That went in very easily since I was basically just welding
to that heavy channel that's on the bottom of the car, except that a
couple of the seams opened up along the sides, where the rust had
crept into the floor beyond the channel. I went under the car and
welded some narrow strips of new metal over these cracks, and I was
done! After grinding the beads down, I painted everything, and then I
used a cheap rattle-can of rubberized undercoating to coat the new
metal.
I do still have to put the car back together, of course. But
I've been driving it all along, and I drove it in to work today. (I
had the day off, but I needed to come in to get money to purchase my
next car[s] this weekend.)
Saturday, February 5, 2005
I put most of the interior back into the car. I left the seat out so
that I can address its torn seams. I also put back the exterior trim
I had removed. This isn't perfectly attached, but I think it will do.
I tried a rattle-can of gray paint on the rocker, but it's not really
a very good color match, I think I might have preferred the black.
Tuesday, February 8, 2005
Yesterday we brought home our two new diesel MB's (parts car 115
and a 300 CD), so this morning I went
out and stole the trunk star off the 115 for use on this car. I also
tried adjusting the passenger door for less wind noise (but I don't
think it's right yet), and I removed the passenger seat cover. It has
a ripped seam, and I'm going to try to get it sewn up.
Wednesday, February 9, 2005
Yesterday I dropped off the bottom seat cover at the upholstery shop.
They charge $48/hour for this kind of work, but don't anticipate it
taking very long at all. This morning I liberated the seat back
cover, which also has a ripped seam. I'll drop that off today.
Thursday, February 10, 2005
I patched the corner tears on the front door (both) weatherstripping,
using little strips of bicycle inner tube. I also pushed strips of
rubber behind the passenger-side weatherstripping at the front of the
window frame, where it looked like it was a bit deformed. (The
channel it pushes into is very rusty there, I scraped out the loose
rust too.) My theory was that this deformity was the source of the
wind noise, but driving to work this morning didn't show much (if any)
improvement. The search continues!
Friday, February 11, 2005
I tried a trick I'd vaguely remembered, and doused the window frame
(outside) with baby powder, then used the air compressor's nozzle to
blow it all around. Then I opened the door, and noted a small streak
of powder where it got past the weather strip. So I got out more
bicycle inner tube and tucked more strips underneath it (against the
frame) to force it out a bit in the area where it was leaking. The
window frame already fits snugly against the door frame, and I've
fiddled with the door hinge and striker positions all I'm going to.
But the baby powder stinks enough (pew!) I didn't try it again to see
if it was better. On the way to work this morning, I think the wind
noise was less, as it seems more equally distributed left and right
than before.
I also used some more rubber strips (and weather strip glue) to tie
together a couple of tears on the bottom seals of the doors.
Considering the age of this car, the seals are actually in very good
shape.
Monday, February 14, 2005
More work on the weather strip, but no difference. I think I'm going
to have to go for a drive while using a piece of hose as a stethoscope
to find out exactly where the wind noise is coming from.
I pulled the (cracked) ring hood ornament (no center) from the new 115
parts car, and epoxied it together with a center star (from another
hood ornament) that had been found in the Frankenheap. I used JB Weld,
of course. The result looks perfectly passable, especially if you
don't look closely. Because the star was pinched into the divots in
the ring pot metal where the original star came out, it should be
fairly secure, provided the epoxy holding the ring back together
doesn't let loose.
Monday, February 21, 2005
I tried to install the repaired hood ornament, only to find that it
requires a much bigger hole in the grille than the broken one (chicken
perch) that's there. I guess I'll have to swap grilles if I want to
repair this. (Someday.)
I decided to spend the afternoon at the U-Pull, and grabbed the front
three motor mounts off the 220D that was there. (About $5 for all
three, in decent condition.) I had to pull the hood and the engine to
get them, but that was pretty easy at that point, using one of their
portable hoists. There was a new '75 450SE there from which I got an
intact (though mildly corroded) trunk star.
Today's fillup yielded 30.7 MPG! Finally I broke 30, and this
was no doubt due to several extra freeway trips into town. Which
extra mileage is also responsible for it only having been three weeks
since the last fillup instead of a full month.
Tuesday, February 22, 2005
Today I swapped out the collapsed and rotten motor mounts with the
ones I got at the U-Pull yesterday. I'd been putting off dealing with
this problem a long time, but as it was a beautiful day and I'd just
procured a pretty decent set of mounts (better than the others I had
in reserve), so I tackled it as a bit of therapy. This was every bit
as joyful as I'd expected, though I must say it was much less
grueling than the same job on my wife's 450 SL. Still, it took several hours, and the
worst part was getting all the bolts started again. (You leave them
loose until they're all started if you want any chance of success.) I
cut a piece off of one of my 6mm Allen wrenches so that I could put
the stub into the bolt and then turn it with a small wrench, but I
lost it down into the subframe. Fortunately I had already tightened
the one bolt that required the stub to do, the rest were do-able with
my regular wrenches. (I'm going to have to get a full set of
sacrificial Allen wrenches, I keep needing these stubs too often.
Next time I go to Harbor Freight, maybe.)
With this done, it was off to the U-Pull again, to pick up the clutch
master cylinder and the not-quite-fully-decomposed driveline center
bearing support off the 220D hulk. I expected to notice that the new
mounts made a difference.
Wow. Yeah, it's different! It transforms the car, and raises the
priority of dealing with the remaining noise problems, namely the wind
leak and the driveline center bearing support. With those tackled,
and if it had cruise control, there'd be nothing preventing this car
from being suitable for a long road trip.
I also picked up the seat covers from the upholstery shop. They'd
stitched closed both open seams ($20), but they'd forgotten to renew
the stitching (like quilt stitching, really) that runs down the middle
of the seat panel, which ties it together and to the loops that poke
through the cushion to be fastened below, keeping the whole plane
taut. Rather than mess with this, I'll just get my sister-in-law to
help me using my Mom's industrial Pfaff sewing machine to run a couple
of stitches down these. This should be relatively unskilled labor, as
opposed to closing up actual seams.
Wednesday, February 23, 2005
During yesterday's operation I again snapped one of the cheap
POS driving lights off the car. I glued the case back together
yesterday, and this morning before work I put it back on the car.
This is getting old!
Thursday, February 24, 2005
Took another stab at the wind leak, and rearranged some of the bicycle
innertube strips that are bolstering the door seal. I don't have much
hope that this is the cure. However, I took a closer look at the wing
window seal, and it looks a bit iffy to me. Hard. So I duct-taped
the window to the door frame, inside and out. I figured that the
drive to work would show if I was on the right track, and then I could
narrow it down from there.
Yeah, the drive to work was quiet. On the way home I'll pull off the
duct tape to see if it comes back. Should be pretty easy to narrow
down. I may have to play some games with RTV and waxed paper to get a
better seal. (The seal is intact, but probably hard and gapping. It
looks good, but obviously [!] is not working well.)
The list of wanna-do's is getting kind of short, but so is the season
for driving a winter beater! Soon it'll be time to move on to a
different (and better) car.
Friday, February 25, 2005
I finally fixed that pesky wind leak. I tucked more bicycle innertube
strips behind the weatherstripping for the passenger wing window, both
inside and out, and that has cured it. Wind noise in the car at speed
is now equalized, with no obvious point sources.
Monday, February 28, 2005
Driving into town today with my son (on the freeway), I must say that
with the 'new' motor mounts and the wind leaks cured, the car is
generally very pleasant to drive. I wish I'd done it sooner!
We were calling it "Daddy's Noisy Car" (for my three-year-old), but
now we can't anymore, as it's really no noiser than anything else.
Tuesday, March 1, 2005
I snapped off yet another of those POS Harbor Freight auxiliary lights
this morning. I got a little bit out of my 'glide path' backing up
this morning, and crunch!
The wretched things break off if you even look cross-eyed at them
(though this morning's mistake was probably a bit much to expect any
light to survive), I think they're all half glue by now.
I'm lucky that I didn't break the glass, I don't have any spares and
it doesn't glue back together all that well.
Sunday, March 6, 2005
With the help of my sister-in-law (OK, so I only watched), we fired up
my mom's big Pfaff industrial sewing machine and renewed the stitching
on the passenger seat center panels. This reattached the loops that
hold the covers' centers to the pads. She said it was a good thing
that the machine was already loaded with sufficient suitable thread,
since she doesn't know how to do that. I doubt anybody in the family
does, now.
Friday, March 11, 2005
I took a look at the U-Pull driveline center bearing support collar I
picked up and decided that while worn, it looks pretty salvageable.
It's torn around one half, but what remains looks pretty good. So, I
got out the acetone, the bicycle inner tubing, and the weatherstrip
cement to 'repair' the torn portion. I washed the thing down with
acetone and a toothbrush, and rubbed cement into the cracks, then
glued strips of tubing over these areas on both sides. If this works
it certainly won't be as good as a new support, but it'll be a lot
cheaper, and way better than what's there now! (It has torn
completely loose, and the bearing flops around a lot. I get a lot of
thumping on the floor if I start out too 'hot'.) Good enough for this
car. I got it about half patched before I ran out of time this
morning.
Saturday, March 12, 2005
Finished the patching of the driveline center bearing support. I'll
probably have to wait for another weekend to put it in, since it'll
take more time than I have on a workday morning, and I don't want to
leave the car undriveable.
I glued (using rubberized fabric repair cement) a canvas patch behind
the crack on the top of the bottom passenger seat cover. This had
actually punched through the fabric backing of the Tex. I then
experimented with a vinyl patch repair kit I had, but the results
weren't great. The repair, though complete and more or less the right
color, is not really that strong, the crack kept coming back when the
cover was flexed. It also looked a bit cancerous. Maybe more
experimentation later will help.
I then reassembled the passenger seat. It's loads of fun to reattach
the covers! I took some 1-1/2 foot long wire (leftover welding wire)
folded it in half and threaded it through the loops on the covers.
These ends were then poked through the holes in the pads, so that once
the cover was partially in place the wire could be pulled to bring the
cloth retaining loops through the holes in the pad to where the
plastic retaining clips could be reinserted. Not really much fun, and
kind of hard on the hands since you're in there fighting for turf
amongst the seat springs.
I glued the one small tear on the back of the upper cover (where the
seat back panel tucks in), rather than try to sew it back shut. It's
small, and not too obtrusive. I think it'll hold. The complete seat
was then set aside to dry.
Sunday, March 13, 2005
I installed all the remaining interior of the car. This was more
time-consuming than originally planned, because I first took out the
driver's seat. It had always leaned to one side, it looked like
somebody had misaligned the two gear-driven seat hinges. I realigned
these so that the seat back was straight, and a lot more comfortable.
The chrome trim strip that runs down the passenger side door sill
interior was shot (mostly off, and all bent up), and I had earlier
procured a replacement at the U-Pull. To install this replacement was
a real PITA, since I had to remove the B-pillar trim, the rear seat
bottom, and the side kick panel. (Which required in turn partial
removal of the wind lace both front and back and the speaker.) While
I was there I noticed a small rust hole in the door frame, so I welded
that shut. Getting this all done and back together took a fair amount
of time.
Extra fun: I had assumed that somebody had swapped the two seats,
because the adjustment handles were on the outside, and because the
tear on the passenger seat bottom cover corresponded exactly to where
the worst wear on a driver's seat usually is. So I tried to swap them
'back'. No, that doesn't work! The seatback adjustment knob then
runs into the center console tray. Obviously if there had been a swap
in the past, it was more elaborate than just bodily swapping the
entire seat. More than I wanted to mess with, so I just put the
driver's seat back, and reinstalled the passenger seat too.
The carpets were put back in to finish it all off. Remaining for this
year are the driveline bearing support, installing the non-fogged
replacement side windows, and the clutch cylinder.
Wednesday, March 16, 2005
I swapped out the passenger side window with the $8 replacement from
the U-Pull that is not etched (fogged). One minor problem: the new
window is noticeably greener in color than the original. Both windows
are factory (Sekurit), but I noticed that the original one has a code
of D89 on it, while the greener replacement has a D51 code. The same
color/code situation applies to the other two windows scheduled for
replacement. The other 115 diesel car I have also has D89's, and are
clear. Who knew that there was such a difference? Not I, and it's a
bit too late now to do anything about it. I've already bought the
windows, they're long past returning, and there is no ready source of
D89's around (other than my other 115), so I guess I just get to live
with it. The color mismatch is much less annoying than the
bad fogging that's there now.
I estimated that I didn't have time this morning to also swap the rear
door's windows, as that is a much bigger job, but I did remove the
door panel, etc. in preparation for next time.
Thursday, March 17, 2005
I swapped out the other two (rear) passenger side windows with the
U-Pull replacements. It's not easy being green, but the lack of
fogging/etching of the glass is nice.
The worst part of this job is partially removing the glued-in window
channel liner without ruining it. There is a screw for the rear
quarter glass behind it, and I don't think you can rotate the sliding
window the requisite 90° to remove it without pulling the lower
guide (metal) out, which requires that it also be detached from the
liner. Incidentally, the manual is wrong in that it says that the
door weatherstrip must be pulled out in the area of that quarter glass
retaining screw, but you don't need to (and shouldn't!) do this. Mine
tore when I tried to ease it out of the channel, and I was rather
peeved to find that I didn't have to do this anyway. I glued it back
together so there's no real harm done.
Anyway, it went back together pretty straightforward but the window
cranks noticeably more difficultly than it did before the operation,
no doubt due to the abuse the window channel liner suffered at my
hands. While I was there I vacuumed out the interior of the door to
remove the water-retaining (rust-inducing) detritus. I also made a
new plastic sheet to cover the access hole, since the original was
missing. (How unusual!)
All that remains to do before it's about time to park the car until
next winter are the driveline bearing support and the clutch cylinder.
It's kind of too bad, because the car is finally becoming very
pleasant to drive. But next winter it'll be very nice to use.
Saturday, March 19, 2005
With an open day in front of me, it was time to jack up the car on all
four corners and have at it. I had the front up on ramps, and the
rear supported by jack stands under the control arms. As a safety
measure, the jack was left up underneath the differential, though not
exerting pressure.
Before I got started on the driveline, I shot all the relevant bolts
with PB Blaster. I also used a cold chisel to matchmark the two
driveline halves. (I do learn, eventually!) The rear half of the
driveline was fairly easy to remove. I removed the three mounting
bolts to the flex ring, the two holding in the collar, and the brace
for the spring return on the parking brake. Two pipe wrenches served
to loosen the nut on the driveline itself. Then it was just a matter
of prying and pulling to slip the shaft out to the rear. No real
problem there. I left the front half in the car.
With the shaft out, I was able to drive the decrepit center support
off the driveline by tapping with a hammer, after removing the circlip
of course! Upon examination, the bearing from the car was in much
better shape than the one from the U-Pull. It rotated quiet and
smooth, versus the hard dry bearing sound from the other. (Though not
yet ruined feeling, it was close to the edge I'm sure.) So, I used a
wooden drift, a hammer, and an anvil to drive both bearings from their
support collars. The 'good' bearing came out OK, with the seal only
pressed in a little bit in spots. It wasn't damaged. The 'bad'
bearing came out hard, and got its seal ruined in the process. No
great loss, of course.
Anyway, I gently pried the seal out of the 'good' bearing, and then
cleaned out the bearing with brake cleaner. Then I worked moly wheel
bearing grease into it and pressed the seal back into place. It now
felt like a new bearing. A bit stiff, but very smooth. I drove the
bearing back into the support collar, using the 'bad' bearing as a
drift. It's good for something after all! I used glycerin to lube
the bearing edge to ease its passage into the rubber-coated collar.
The driveline was a bit harder to restore than it was to remove,
because the collar was now a part of it! Still, with judicious
wiggling and prying it was able to slip back into place. The splines
were cleaned with brake cleaner and then lubed with the moly grease
before reassembly. At this point it went back together easily, with
the marks lined up! I left the big nut somewhat loose, as well as the
two collar mounting bolts.
With this back in place I started the car and put it into gear. I
revved it up to freeway speed, and everything was OK. Leaving it
idling, I went under to check the exhaust system for leaks. None
found, so I stopped the engine and then went back under the car to
tighten up the driveline bolts now that they'd (in theory) settled in.
With the car up in the air and moderately warmed up, it was finally
time for that first oil change! What a mess, this car has the same
wretched oil filter system as the 107 gassers do, which dumps used oil
all over the place when you take it off. I wanted to at least dump
out the oil filter since I wasn't replacing it (I didn't have a new
filter element). The topside oil sucker doesn't work on this car
either due to the small dipstick, so I had to do it all the
old-fashioned (messy) way.
I ended up fairly black when I was done, but I put in about six quarts
of Delo 400 oil, which brought the level up to the full mark. (Or
maybe a bit above.)
This all actually took somewhat less time than I'd anticipated, so I
decided to tackle the clutch cylinder too.
First I disassembled the 'new' one I'd bought at the U-Pull. In part
this was to learn by doing, since I had no idea of the condition of
the U-Pull part. It came apart easily enough, and I found that it was
full of goo (some kind of sediment). I washed it out with brake
cleaner, and it cleaned up nicely.
Now that I wasn't afraid of the guts of one of these anymore, I
removed the deteriorating one from the car. It was a PAG rather than
an ATE, but otherwise looked very similar. It also had some sediment
in it, but the telling feature was that one side of the lower
(pressure) seal was shaved-looking, and soft. A smoking gun! Having
looked at both of my candidates (with another one in reserve in the
other 115 in case I really ran into trouble), I decided that the
U-Pull one was the way to go. I cleaned it even more thoroughly, but
I had difficulty putting it back together. (The plunger got wedged in
the cylinder bore and didn't want to move.) My mistake was in not
using brake fluid to lube the thing before reassembly. Instead I used
brake cleaner. Bad idea. Going back together the lower (pressure)
seal caught on the lip of the retaining circlip's groove, and got a
tiny chunk torn out of it. Aaaargh! This was just as bad, or maybe
worse, than what had happened to the original one due to wear.
Particularly disheartening since the seals had otherwise seemed in
pristine shape.
Close examination, however, showed that the lower (pressure) and upper
(leak capture) seals were the same part. (Though different than the
parts in the PAG cylinder.) Obviously the job of the upper seal was
less strenuous than the lower, and I think its only job is to reclaim
any leakage that gets past the first seal. So, I pried both seals off
the plunger and swapped them. Then I gently reassembled the cylinder,
but this time used brake fluid to lube the parts before reassembly.
The thing slipped together without incident, and seemed to be in good
shape afterwards. At least the cylinder was free to move now.
With the cylinder thus 'refurbished', I reinstalled it in the car.
That was easy enough, but now there was the small job of bleeding the
clutch cylinders again, via the brake bleed screw. I'd done this
before, but it was very messy. And it was again! I had a lot of
trouble with the tubing popping off the clutch bleed nipple.
Eventually, however, I was able to get the clutch bled. I did run
through a small bottle of brake fluid doing it. Then I tightened up
the bleed screws, and tried it out. The clutch pedal felt better than
ever, and the brakes even still worked.
Finally it was clean-up time. I got the car on the ground, and drove
it up and down the road. No problems, it worked fine. I went inside
to eat (it was just going on noon) and clean up, then it was time for
the real test.
I drove to a couple of stores, and the U-Pull (to return the unneeded
driveline I'd bought earlier). On the freeway the car behaved itself
very well. Quiet and smooth, well, for it anyway! The intermittent
thump from the driveline during start-off was gone, as was the minor
driveline vibration at speed. The clutch behaved perfectly every time.
At the gas station, at 475 miles on that tank, and again almost
exactly a month since last time, it even turned in its best-ever
mileage: 32.1 MPG. Not bad at all.
It's too bad that once I get home with it the car is going to get
parked until next winter. It's finally in pretty enjoyable shape, but
I've got lots of other car projects to tackle, and the weather is
definitely improving. We're done with salt and snow. It seems that
whatever I'm driving is whatever I'm fixing, so that's how it's got to
be.
Monday, September 12, 2005
Weather is cooling off again, it's getting close to time to start
whipping this car into shape for the season. (Especially since it's
currently our most economical car, and fuel is up to $3 a gallon!
With no AC it's not a good choice for high summer, but the rest of the
year it'd do fine.) I dug out one of my spare VDO quartz clocks to
see if it could be made to work. (The tick-tock clock repair didn't
'take'. I am surprised at how much having a non-working clock bothers
me, so I'm willing to put some effort into fixing it.) This spare was
very noisy, but did work. So I opened it up, which is very difficult
to do and involves prying the bezel crimp open and prying off the
bezel, without damaging either the bezel's appearance or the
ability to reinstall it. Then I lubed (ATF) the fast-moving gears,
and cleaned the front plastic. It's running on the bench now, to see
how it keeps time. It's much quieter now, at least.
The quartz clock made by VDO for cars of this vintage is unusual when
compared to the quartz clocks we're all familiar with. The ubiquitous
quartz clock movement has a quartz crystal all right, and an
electronic divider chain, but it drives a stepper motor and small gear
train at 1 pulse per second. Very efficient, and very cheap. This
VDO clock, while still using a quartz crystal and an electronic
divider chain, drives a high-speed synchronous motor and a
longer gear train. It resembles the common wall-powered clock of
years gone by more than anything else.
Thursday, September 13, 2005
The clock is keeping pretty good time, so it'll go into the car soon.
I swapped the front grille from the (leaving us today) parts car 115,
the one that supplied the hood ornament I repaired last February. (The repaired ornament wouldn't fit the
Frankenheap's grille since it required a large hole in the grille,
whereas the Frankenheap [and also the Ebola
Fishtank] had a small hole for the hood ornament. I'd planned on
swapping grilles too, but had never gotten around to it. Last
chance!) My son ought to be happy to get his plastic chicken back,
he's still going on about it! The neighbor will have to
supply his own mascot, assuming he also doesn't want to cough up bucks
for a new ornament.
I put the battery charger on the car while I was working on the
grille. As its tick-tock clock had stopped running, there was
negligible current draw, and the battery only took a minor amount of
charging. Not true of most newer cars left alone for that
amount of time, and it won't be true of this one either once it gets a
working clock. Easy enough to disconnect the battery during off
seasons, though.
While there I cleaned up the attachments of both grilles, now they're
both pretty secure, and the Frankenheap's 'new' ornament looks
pretty good. I also removed the extra parts that had accumulated in
the 115 parts car's trunk, it's only keeping the parts that it needs
to go back together. When complete, the neighbor buying the car will
have his own Frankenheap. One that looks a lot better, though. As
the Frankenheap is now in pretty good shape, except cosmetically, it
makes some sense to off the parts car. Especially since:
- My wife hates having so many cars around, even the ones
she doesn't have to look at. Let's score some easy points!
- The 'parts car' is a better car than the one for which it
was nominally an organ donor. It's a bit of a waste to snitch
parts off of it for the Frankenheap. (I won't count this
grille/ornament business as the ornament on it was ruined to
begin with.)
- The parts car was deteriorating in the woods. It'll be much
better for it to be repaired and put on the road.
- Somebody actually wants it! If the neighbor succeeds in
turning it into a commuter car, I'll have a vintage MB car buddy
right next door. Even better than my cousin. (Sorry Ian, you
had your chance. You can keep feeding that thirsty old Ford
pickup.)
Friday, September 14, 2005
I put the VDO quartz clock into the car. Fool that I am, I hadn't
noticed that I'd gotten the face rotated when I'd reassembled it until
I was trying to put it in the dash. Not wanting to have to lean my
head 45° to the left whenever reading the clock, I took it back
apart to correct this. Everything always goes slower than planned!
As soon as I'd removed the tick-tock clock from the dash it started
ticking again. When I powered it on the bench, it began working
correctly. Wretched thing! I gave it to the neighbor for his $100
115 car (our former parts car). With any luck his car will work out
as well for him as ours did for us, though that clock may give him
trouble.
Tuesday, October 25, 2005
Checked the clock, and found it keeping pretty good time. Good!
Tuesday, November 15, 2005
Put the battery on the charger. Now that it has a clock that actually
draws current, it needs periodic recharging just like the rest of the
fleet! It's long past time that I'd be driving this car to work, if
I had a job. But I don't, so the car is still dormant.
Monday, November 28, 2005
Today turned out to be snow tire day. (It snowed last night.) The
tires on this car are shot, and rather than purchase another set (which
we can ill afford right now) I instead rustled up the Hakkapeliitta 1's
that had been used on the 450 SL. (We're
much less interested in driving the SL during the winter now that they
salt the roads around here. That fact is one large reason the
Frankenheap was deployed in the first place.) This was complicated by
the fact that the alloys that the Hakka's were on need a different lug
bolt than the steel wheels that were on the car. But I was able to
scrape up enough of the longer bolts to do the job. I also had to
chip out the melting ice puddles in the back footwells, and dry it out
with a heater.
However, it did start right up after I'd had it on its
preheater system for about 20 minutes. And that was only to attempt
to dry the inside of the window so I could see out of it. (A lot of
internal condensation due to the leaking rear window.)
Tuesday, November 29, 2005
Dang. One of the snow tires is leaking, it was down to 15 PSI this
morning. Sigh, more crap to fix.
Two of the four glue joints on the hood star failed, so I took it off
and brought it in for more gluing. This time I made the wads of glue
bigger. We'll see if it helps. Really it should be silver-soldered
or something, but I've never done that.
I moved the baby seat from the 450 SL to
this car, and while I was installing it I noticed that the rear-window
defroster, a cheap Chinese fan/heater thingy, now looks like it had
been made by Salvador Dali. Completely melted into wavy shapes due to
the sun beating in on the rear deck where it had been stored all
summer. Not only the housing was wiped out, which maybe I could have
corrected and/or lived with, but the blower's squirrel-cage fan was
destroyed as well. Not a total loss, however, as I then got out the
other one that was unopened in the trunk, and used the dead one's
power cord to lengthen the new one's. This will allow better routing
of the cable. (The dead one can supply a motor, a switch, a lighter
plug, and a heating element to the junk box. Around here I keep [Use?
I wish!] everything but the squeal!)
I also made a little sheet-metal bracket that wedges behind the
seatback to help hold the fan in position. It used to tip over so its
feeble jet of barely-warm air went nowhere useful. Memo to self: next
spring when putting the car away, put the fan someplace else!
...On errands today (such as getting license tabs for it) the car
behaved well. It was even snowing most of the time, but no problems,
and only a little fishtailing going up the hill. The relatively poor
interior lighting (only one dome light) is not great, as is the lack
of a real rear window defogger, but otherwise it was a pleasant trip
for us all. I think my wife is a little surprised that this car is as
nice as it is now. The functional (!) heater blower was very useful
on this trip, we had a lot of interior fogging.
Wednesday, November 30, 2005
I installed the re-glued hood ornament this morning. The snow that
fell overnight on the warm car had frozen all the doors shut, so I
just plugged in the preheating system, and 20 minutes later the
windows were clearing and the door opened. It doesn't get any easier
than that!
Thursday, December 1, 2005
When I got home from errands I decided to finally measure the head
temperature to contrast with the reads-too-low 'new' mechanical
temperature gauge. The IR thermometer said it was about
150 °F, which is low. The gauge reads about 70 °C,
so they're in the rough same ballpark. Time for a thermostat, I
guess.
Tuesday, December 6, 2005
Temperatures are dropping to single-digit (°F) territory, and I
think the fuel in this thing (from March) might be a Summer blend. I
dumped in some fuel additive and went on some errands in the 'warm'
part of the day (near freezing) to mix it up. Still a lot of interior
condensation. Fortunately the defroster fan works well, and even the
feeble rear fan (now that it's somewhat mounted in place) performs
usefully.
Tuesday, December 13, 2005
On errands today I'm still having trouble with the flashers (need to
go through the relay probably), and I'm hearing what sounds like a bad
front wheel bearing. Fun.
Wednesday, December 14, 2005
I jacked up and checked the front wheels, and I didn't notice anything
like a bad bearing feel on either side. However, a couple of the lug
nuts were not very tight, that may have been it. While it was up, I
took off the slow leaker and sent it into town with my wife, we'll see
what Les Schwab has to say about it.
I also removed the flasher unit and went through it. It got a good
cleaning and greasing of the switch contacts, and a resoldering of all
the components since I was there. The hardest part is getting the
case back together. The knob slides the PCB back and forth, and the
case has part of the track in it. The trick seems to be to pull out
the knob before putting it back together. It still took several
attempts. It's working, but it will take some time to prove whether
or not its intermittent problems are gone.
And, since I had the console apart, I took a look at the wonky shift
knob. It twists, and it shouldn't. With enough disassembly I was
able to get it all apart. I also disassembled (for comparison) the
spare shifter I'd put in the trunk. Examining both units, it became
clear that the problem with the car's shifter was that the main
plastic bushing was all hogged out. There's supposed to be a roll pin
(about the size of a #18 drill) that holds the slotted bushing on such
that the shaft doesn't twist in the bushing, but this was all crunched
in allowing quite a bit of twist, and had sharp edges that were
chewing up the bushing allowing even more twist.
Unfortunately, the good bushing and pin from the spare don't fit the
shaft, and the shaft itself is differently shaped than the original.
I can put the good shaft in, but it is much straighter than the one
that was in the car, and puts the shift knob in a suboptimal place.
I'm experimenting with building up the hogged-out slot in the old
bushing with Shoe Goo. I don't have a lot of hope that this will be
successful. Other options are to just use the new shaft and live with
the mispositioned knob, or to bend the new shaft to be more like the
old.
I modified an HP 18 V 2.25 A
switching power supply wall wart (from an inkjet printer) to supply
the fan power for the preheating system. This should free up the
battery charger to then be used to charge the car's battery, which was
the final part of the preheating system's original concept. The fan
system right now eats about 2.25 A at 13.8 V, so the
switcher ought to be able to do the job if the voltage can be reduced.
It's small enough to tuck into the battery charger case, and was only
$2 at the thrift shop.
I've modified the output voltage of several of these wall-wart
switching supplies, one can often do the deed just by poking around
with a modest-valued resistor, placing it in parallel with each one in
the back end of the supply. (The idea here is to perturb the value of
the voltage-setting feedback resistor a modest amount, and see if the
output voltage changes.) I didn't manage to get anywhere with this,
so I sought out this
document on small switching power supplies, and the associated UC3842
Application Note, as this supply seemed to contain one of these
chips. (I couldn't really tell as the chip is buried under glued-down
heat sinks but, it was an 8-pin DIP, and I found +5 V on
pin 8 relative to ground [pin 5], so it seemed to be a
match. +12 V was on VCC [pin 7], and there was a
RC network on pin 2, the voltage feedback pin, which was also at
2.5 V which, according to the App Note, pretty much confirms that
this is the chip.) Tracing out the components, I eventually figured
out which two resistors set the output voltage. The high-side one was
marked 100k, so I bridged a 200k resistor across it and found that it
would drop the output to 15.xx volts. Experimenting showed
that nothing smaller than 150k in parallel with the existing resistor
would allow for the supply to work, and this value ends up putting out
14.8 V no load, which is probably close enough for the purpose.
It's just to run a fan on low anyway, the fan's already got its own
hefty series resistor to accomplish low speed. If I wanted to get
closer to 13.8 V I could probably mess with the low-side resistor
too, but that would almost certainly require removing SMT components.
I soldered the 150k resistor in place across some through-hole
component leads, avoiding messing with the SMT parts altogether, and
glued the wart back together.
Thursday, December 15, 2005
I put the 'repaired' front wheel back on. They didn't tell my wife
what, if anything, they found wrong with it. We'll see how it holds
up.
The Shoe-Gooed shifter bushing came out better than I thought it
would. I used a Dremel with a cutting bit in it to buzz a new slot
through the blob that filled the old hogged-out slot. A #18 drill was
a near perfect fit through the shaft's hole, so I used it as a
placeholder for the to-be pin. The excess Goo that was inside the
bushing didn't interfere with the shaft, nor did the excess on the
outside prevent the bushing from going into place. Next, I grabbed a
nail from the scrap bucket that seemed to be about the diameter of a
#18 drill, cut off a length, and shaped it to length and fit using the
grinder. That took a little while, but I didn't want to steal the
roll pin from the spare shifter mechanism. I don't see why this solid
pin won't work as well as the old roll pin, provided it fits snugly.
It's not like the pin can escape once it's in place, so its lack of
spring-grip shouldn't be an issue. The Goo build-up that is in the
old ruined slot seems fairly stout and didn't immediately crumble away
during testing, so I am hopeful. I greased everything and installed
it in the car, then I reassembled the console. The shifter works, at
least with the car off, and no longer has that extremely disturbing
twistiness to it. Feels pretty good, actually. The pull-up for
Reverse is much more crisp and definite now, and should eliminate the
old 'am I in first or reverse' quandry that I've been having. It
ought to be particularly helpful for my wife, if she ever were to
drive this car.
I put the to-be fan power supply outside to chill, and after an hour
or so I plugged it in. It didn't power up for many seconds, it may be
that this will not be a good choice for the fan supply. It may have
had a cold-start problem from the beginning, or perhaps the
modifications induced it. More research is required, I'll leave it
out overnight and try it again in the morning. It's supposed to be
particularly cold tonight.
... On the road today the car behaved itself well. The 'wheel
bearing' noise was gone, so it was just the two loose lug
nuts. The turn signals behaved every time, the lock-up seems to be
gone. (I still have to fix the weak detent, of course.) The feel of
the shifter is much improved now that the slop is out of it.
I used the $5 thrift-shop portable Sony CD player (with tape adapter
and both wall and automotive power cords) that I bought a little while
ago for the car. It worked! The Alpine was a little rusty on the
tape slot at first, but eventually got with the program. Tunes!
Friday, December 16, 2005
The switching power supply started up just fine in the morning, so
perhaps there's nothing wrong with it. I connected it in place of the
preheater's battery charger, and found that it runs the fan well at
less than 3 A of current, and holds 12.6 V under load. So
it should work out. I measured the reverse leakage of the battery
charger, and found it to weigh in at 0.2 µA, so perhaps it
can be connected full-time. That's the plan anyhow, unless I can find
a relay in the junk box I'm willing to give to the cause.
Thinking about this more, I'm not comfortable with leaving the battery
charger connected full-time, mostly due to the potential for
transients cooking the diodes. So I grabbed a big 120 V relay
from the junk box (my last one) and hooked it into the charger so that
it opens the output circuit when power is disconnected.
I installed the switching power supply into the battery charger case,
which was a tighter fit than I'd thought, mostly due to the power plug
attachment sticking out farther than I'd realized initially. I buzzed
a hole in the back panel for the strain relief output of the SMPS to
poke out of. I then found a wall-wart power socket to put into the
car so the SMPS can be unplugged easily. (Partly because the plug end
from the SMPS has an LED in it, so I didn't want to cut it off.) Then
I put it all back together and tested it. Success! The battery
charger puts about 2 A into the fully-charged battery of the car,
which is what I wanted. (An temporary overcharge condition to warm up
the battery too.)
The final preheater schematic: Illustrator
PDF
GIF.
There are four separate 110V-powered elements to it, five if you count
the extra relay in the battery charger. It's a busy circuit, but it
surely does work!
Tuesday, December 27, 2005
I installed the WirthCo battery disconnect that I bought yesterday
(half-price at the liquidator's). I've been wanting one of these for
awhile, but they're not very cheap. It was difficult to get it to fit
so that it didn't run into the hood. There are cheaper ones that are
a lot smaller, but I kind of like the knife switch.
Friday, December 30, 2005
Datemobile! We left the SDL (what we might normally have driven) home
on date night so that our babysitting houseguest would have something
semi-normal to drive in case of an emergency. It worked well, though
on a dark rainy night the wipers (which had been doing well I had
thought) showed obvious signs of having hit the wall. Got to get some
more blades! The reserve light came on with still 1/4 tank indicated,
which was odd, so we stopped for fuel. Pshhhhhhhhhhhhhh-Tunk! Oh oh,
the tank vent is obviously not working, there was a lot of
vacuum in the tank, enough to make it 'oilcan' when it was released.
As I'd left the key on so that the heater fan and radio would keep
working for my wife, I could see that the reserve light went out once
I removed the cap. This tank (from last March) in fact only turned in
29 MPG over 435 miles rather than the substantially better figure that
the gauge behavior had hitherto been implying, which is more what I
would have expected for the circumstances. Got to find and fix the
tank vent before it ruins the fuel tank, assuming it hasn't already.
Until I do, I'll have to 'burp' the tank periodically.
Monday, January 2, 2006
I bought new wiper blades at the liquidator's. Trico, my favorite
brand for these. Half-price!
Tuesday, January 17, 2006
On the freeway today I noticed that I was following a semi truck at
70 MPH, and was getting passed by most everybody. Hmm, sounds
like the speedometer is reading high. I checked a mile marker or two
and indeed it's off. I'll have to research this more. I never really
noticed this before because I just don't spend that much time on the
freeway in this car, and when I do it isn't often that I'm setting my
own speed.
Friday, January 20, 2006
I've been noticing that the blower fan doesn't always start by itself
when I plug the car in. Every time I pop the hood and turn off the
noisy heat gun to be able to definitively hear whether the blower is
running or not the blower kicks in. I think the heat gun is dropping
line voltage at the end of the extension cord enough that the SMPS for
the blower fan won't start. A better idea altogether is to hook up a
relay to switch power on for the heat gun after the SMPS
comes up. This is better because the heat gun won't come on until the
blower is moving air (theoretically), which should prevent cooking
anything if there's a problem with the SMPS. I'll need to dig up a
relay for this.
Tuesday, January 24, 2006
I installed a relay driven by the preheater's fan supply so that the
heat gun won't come on unless the blower (theoretically) does. It
seems to have cured the weird start problem with the SMPS on too-low
line voltage. It's also safer, since the heat gun won't start unless
the blower motor is powered. (The schematic has also been amended
with this new relay.)
Tuesday, February 21, 2006
Finally I got tired of burping the fuel tank every time I drove it,
and the weather warmed up a bit, so I cleaned out the fuel tank vent
fitting (behind the bumper) and the line that goes to it. There was
mud in there, with a bug (I think) that crawled in there to make a
final plug. I had to drill it out with a piece of copper romex wire,
but once I did I could again suck and blow through the fitting to the
tank. The mud extended several inches up the line, about halfway to
the little expansion tank.
Wednesday, April 19, 2006
Painted a seat hinge cover that I got at the junkyard. The car was
missing one cover, and the replacement is bamboo, not black. A little
rattle-can black paint did the trick. Unfortunately the seat was
missing the retaining clips, I think the car originally came with a
later style that clipped over the outside of the hinge rather than
centered posts that slipped into spring clips. I found some of the
clips on some seats I'd laid in as spares. Removing them wasn't too
hard, but installing them was a royal pain. Though they escaped
several times they didn't get lost. Once the clips were in place the
painted cover snapped into place easily. Looks good!
Wednesday, May 17, 2006
Moved the car down out of sight of my wife.
Friday, July 14, 2006
At the U-Pull I nabbed a 115 quartz clock, from a '76 300D, for use as
a spare for our two compatible cars. The clock seems to keep good
time, though the hour hand is misaligned about a half-hour's worth.
This is unfortunate, as there's no easy way to open these to realign
them.
Saturday, July 15, 2006
Went to the U-Pull and nabbed another set of tires (on rims) for it.
One's a studded snow tire, but most of the studs are gone. I should
be able to neuter the few that are left somehow. I also bought a
rather nice underhood pad, if I don't need it for either of my 114/115
cars the neighbor can have it. It came off easily with a putty knife,
and is almost entirely intact. The foam is not rotten yet.
Sunday, July 16, 2006
That 115 quartz clock has kept excellent time for days, so this
morning I drilled a tiny hole in the clear plastic behind the bezel
(where the instrument cluster light enters) and poked a paper clip in
there. Run underneath the hour hand, kind of in its crease, the
hand's pinned in place sufficiently well so that it won't move when
the time is adjusted. I then experimented a bit until I got the hands
properly aligned, and put a dot of Shoe Goo over the hole. Off to the
spares shelf!
Monday, July 17, 2006
I brought the car up out of storage again and put the U-Pull tires on
it. I had to pry the studs from one, but they came out surprisingly
easily with a small screwdriver. I think I may go back to the yard to
get the other studded tire, they come out easily enough and that way
the two rear tires will match. I looked at the three remaining tires
from last summer (the fourth was sent off as a spare for the Albatross), and they're not in good shape at all.
Maybe one of them might serve on a car, but the other two should be
discarded as the rubber is rotting. That's what I thought when I took
them off, and that's why I got more U-Pulls. (I had been going to use
the profit from the Albatross's sale to get it
new tires, but I decided to put that money into the 190D instead.) I put the one leaky studded tire
that came off into the trunk for eventual delivery to Les Schwab.
Arrrghhh! Sitting in the car I looked up and found a huge hole in the
headliner, right over the visor. Mice. Wretched little bastards, I
need to put out more poison I guess. That headliner was in nearly
perfect shape before this. The interior was the only halfway decent
thing about the car. (That and it runs so well.) I also did some
wasp killing, but that's normal for a stored car.
Tuesday, July 18, 2006
I dropped the leaky tire off at Les Schwab, and they said it was
caused by peeling chrome on the rim, so they used bead sealer on it.
Fair enough!
Wednesday, July 19, 2006
Went to the U-Pull and got the other snow tire off the 115 300D. Also
nabbed the block heater for the neighbor (who bought our spare 115).
Pulled the studs from this tire, and also found a staple and a nail in
it. It leaks air, so it's off to Schwab with this one, too!
Thursday, July 20, 2006
On my way to the U-Pull again I dropped the leaky tire off at
Schwab, and picked it up on my return. I then put it on the car, and
put the donor's spare (which had been temporarily on the car) into the
trunk as its spare, as it was in better shape than what was there.
The former spare went onto the discard pile. (Don't know what will
happen to it ultimately.)
Friday, July 28, 2006
The Frankenheap has been dripping fuel for a couple of weeks. I
hadn't had time to deal with it until today. I jacked it up, and
before I tackled the (wet) fuel hoses I noticed that the differential
was very oily/dirty. I chipped off the worst of the chunks around the
filler plug and then wire-brushed it off. The plug came out easily,
and a pinkie dip showed that it was down significantly. I poured
together several remnant bottles of gear oil, and managed to assemble
about half a quart that I could squirt into the differential. That
brought the level up to nearly full. The leak appears to be largely
at the passenger side half shaft. It's no doubt a slow leak, it'll
probably be good again for a few more years. I'll try to keep an eye
on it.
The return fuel line looked the worst, and messing with it showed
seepage through the braid, enough to drip. I was unable to loosen the
clamp screws, but I could pry the ends off of their fittings,
clamps and all. The hose was brittle, no surprise, and tore in half
on one end. I replaced it with some new 5/16" line I had, and two
good salvaged clamps. (The old clamps were too far gone to reuse.)
The feed line, which is an odd reduction size of rubber, also looks
like it is seeping. I don't have a new piece, but I found the crappy
"cigar hose" that I took off this car, it had cracks in one end but
not the other. (I had to do some serious excavation in the trunk to
find it.) I cut off the good end and used it instead of the correct
(and custom) rubber piece. It wasn't quite as snug a fit as it should
be on the big end but the band clamp cinched it down anyway. Jalopy
time! I needed two more clamps, as the originals were too rusted to
reuse. I drained the tank into a boat gas can before I put on the
'new' rubber; there wasn't that much fuel left in it, maybe a gallon
or two. (I'll have to be sure to take the 1-gallon can of diesel with
me when I go to fill it up in case I run out on the way there.) I
left it up on the stands while I went in for breakfast, I'll see if it
has any leaks when I return.
...No leaks.
I boxed up all the 'enhancement' parts I found in the nearly-full
trunk, such as cruise control, etc., and labeled it for ease of future
location in storage. I deployed all the rest of the parts into the
more-or-less correct parts piles. It has been far too long that the
trunk was unusable because it was full of crap! I also rearranged the
trunk light wiring clips on the hinge, they were all bunched up and
the wire was slack and vulnerable to being caught on things.
I then completely emptied the trunk and vacuumed it out. I also
washed the trunk mat. The trunk floor is not in good shape, there are
a number of through holes. While the mat was drying I assembled the
tool kit I'd been collecting for the car, and put it in its plastic
case. (Wrenches, screwdrivers, pliers, jumper cables, and a tow
strap. I think I'm missing 15 mm and 19 mm wrenches, but am
otherwise covered. Could use a pair of wire cutters too.) I then put
the few items back in the trunk that belonged there, and it's a real
improvement!
Monday, July 31, 2006
Needed to use the car today, and had to fill it up. Only 28 MPG,
but it sat a lot (which never does the mileage any good) and
there was that fuel leak...
The speedometer is squeaking, I need to get right on that before
something breaks.
Tuesday, August 1, 2006
Lubricated the squeaking speedometer cable and head with M1 5W20.
I think it was the top end of the cable that was squeaking, not the
head.
Tuesday, October 31, 2006
I was at the U-Pull (for the 190D), and found
myself a bouquet of auxiliary lights. The ones on this car are cheap
nasty Harbor Freight lights. They work well enough, but they are
plastic and break off if you even look at them funny. There were two
Beemers there, probably 328's or the like (I didn't really look), that
had auxiliary lights on them. One had a set of Bosch fog lights under
the bumper, obviously factory issue. While they are also
plastic-bodied, they're obviously much better than the cheapies, and
at least have a swivel shock mount. The glass, however, is largely
ruined, but I know that this is a replaceable (and available) item.
(They're just like MB in this department.) I'll have to look into
that before any potential deployment.
The other donor had its original headlamps entirely removed and
replaced with a row of four Blazer (aftermarket) driving lamps! They
are chromed metal, a bit rusty now, but the glass and reflectors were
in good shape. The car didn't have any low beams as a result of this
surgery, near as I could tell. The lamps were also extremely flimsily
mounted, I can't imagine that the operation could have been considered
satisfactory, except perhaps monetarily when compared with buying
replacement factory lamp assemblies (for whatever reason). Anyway,
though they're a bit past their prime, and really no better than the
HF lamps I already have, they are metal, so I'll probably
swap them out at such time as the HF lamps need attention again.
Having four I'll have spare glass lenses for the two I'll put on the
car.
Wednesday, November 1, 2006
I put the bouquet of lamps in the trunk. (I called them a bouquet
because I carried all six of them around with their wire tails
clutched in one hand. A more elegant term than the equally-suitable
'bouquet of rats'.) Seems a shame to start piling parts in there
again, but it was the best place for them (for now).
Thursday, November 23, 2006
Mopped maybe a gallon of water out of the rear footwells. Almost time
to start driving this car again.
Saturday, November 25, 2006
Plugged in the car preparatory to bringing it up for its tour of duty.
The preheater fan didn't run, I suspect that wretched switching power
supply didn't come on. It started uneventfully, and I drove it up out
of storage. Brake fluid was a bit low, do I have a leak? I can't
remember! Needs licensing too.
Monday, November 27, 2006
Bought the license tabs. Roads very mucky/slimy with salt. Wish I'd
gotten this car going already!
Tuesday, November 28, 2006
I (finally!) put on the snow tires. I also put the heater in the car
as the preheater blower system is not working and the car was very
icy. I'm sure it's the SMPS not starting, 'cause the heat gun didn't
go on either (now that it has a protective relay). At least the block
heater and battery charger components are working. I need to find a
good 12 V switching power supply.
At 15 °F the heater is having a hard time keeping up. (I
still don't think the thermostat is quite right.) The insides of the
windows are icy from all the moisture that's not yet been cooked out
of the car from its long hibernation. I put the space heater in for
overnight, and cracked a wing window.
Wednesday, November 29, 2006
Still cold! The car dried out some, and it's starting all right at
8 °F in the morning (with block heater help) and
16 °F after work. The funky seat belts are a bit difficult
for my boy to operate, now that he's graduated from a baby seat (with
its own belt) to a booster.
The freeze/thaw cycle has frozen all the doors shut, and the ratty
rubber door seals are tearing up. Sigh. I need to repair that, then
spray the area with silicone or something. Shoulda done that earlier!
Monday, December 18, 2006
The clutch seems to have gotten air in it somehow, and is nearly
unable to disengage. I jacked up the car this morning (a very frosty
one) and bled it using the hose from the front brake caliper trick.
That seems to have fixed it, we'll see how long it lasts.
Still have done nothing about the door seals, or the preheater. Or
the leaky rear window for that matter.
Tuesday, December 19, 2006
Is that clutch getting more air in it? Methinks something has got to
change, if so! I wonder if rebuild kits are available for the master
and slave cylinders, I'm sure that's all it needs to be good as new.
Wednesday, December 20, 2006
Changed the burned-out auxiliary high beam bulb. Stinking POS Harbor
Freight lights don't make that easy.
I also removed the battery charger/fan power supply from the
preheating system, and found that the stupid SMPS (switch-mode power
supply) is indeed no longer working. I'll probably have to find
another one. At least I can still put a space heater inside, but
that's so inelegant...
Tuesday, December 26, 2006
Got tired of waiting for the clutch cylinders to fail and strand me
somewhere, so ordered new hydraulic components from Rusty over the
phone while on our Holiday road trip. They ought to be waiting for me
when we get back home, then I'll just have to make time to do it.
Thursday, January 4, 2007
Mopping out the car after every precipitory event is getting old. I
dug out a partial tube of that thin RTV window sealant and tried to
put it over the worst gaps in the extremely tired rear window seal.
We'll see how it goes. I tried to do it in the morning, but the damp
rag I was using for cleaning just froze to the car, so I took it all
to work and did it at lunch time. I didn't have enough sealant left
to do the whole thing, but I tried to get the obviously bad spots.
Saturday, January 6, 2007
Finally got sick of parking outside and cleared the front of the
garage for a home for the 450 SL, so I could
again park in its place in the center bay. (I also did this last year
so I could work on the 190D inside. Makes for
a pretty cramped garage layout!) Will make working on the car easier,
and ought to keep it drier inside, especially if the window sealing
didn't really work.
Monday, January 8, 2007
Installed the new clutch slave cylinder. That was the most likely
culprit in my leaking clutch system. We'll see. If it cures the
problem I probably won't install the other parts yet.
...Yes, the car is completely fixed by just the slave cylinder. It's
a vast improvement in driveability. I'll just hang on to the other
parts for now.
Wednesday, January 10, 2007
Re-glued the driver's door seal back in place where the ice had torn
it loose. There was a piece at the bottom missing, I cut a section of
scrap seal to length and glued it into place. I then spray-siliconed
the seal and door area to prevent this ice-gluing in future. Maybe.
The door is rusting badly in the weatherseal channels, the stuff will
barely stay in place as it is. Oh well!
The door light switch had also gotten wet inside and wasn't reliable
anymore, so I disassembled and cleaned it too. I may have installed
it last time with the drain hole up rather than down. Removing it was
difficult, as it had started to rust into place. I broke off some
chunks of the flange. I greased the hole to prevent further rusting
and to ease reassembly.
Thursday, January 11, 2007
Cold outside, 11 °F right now. The heater fan has started
shrieking intermittently in the cold, and the rear door won't latch.
Friday, January 12, 2007
I bought a 'new' 12 V 1.8 A SMPS at the thrift shop
yesterday, complete with an old portable Canon inkjet printer, and
today I reinstalled that part of the preheating system. Works fine,
except that the heater blower is shrieking sometimes. I must
get that taken care of soon before that blower motor gets ruined.
Replacing those is extremely difficult. (Merely lubricating it is no
picnic, either.)
The rear door my son usually uses was really quite messed up, and the
latch was prone to freezing up. I took the door apart, and found that
yes indeed the vapor barriers were non-functional. I removed the
latch and solvent-tanked it to remove all the old gummy gritty
lubricant, then blew it dry. All the moving bits got a nice coating
of M1 5W20 from my oil can, whereupon it all started working
much nicer. Reinstalled, and with the striker adjusted a
bit, the door now works perfectly. The vapor barriers are also glued
back into place.
As an extra bonus, I found that the reason the inside door release
wasn't working is because the latch has a child safety switch, a small
sliding (when cleaned and lubricated!) button on the latch plate.
Who knew? This was in the wrong position.
...After sitting out in the cold all day at work (no noontime journey)
it got in a pretty good cold soak: never above freezing today, windy,
and probably about 10 °F when I went to start. I had to glow
twice, and crank for several seconds each time to get it started.
Really I just needed to glow some extra the first time, but I don't
have a lot of arctic experience with this type of system. Fortunately
the weenie battery was up to it.
In this kind of weather it takes a good long time to heat the cabin.
When I got home I measured the head temperature, with the gauge at
about 80 °C the IR thermometer indicated about
150 °F at the sender. At least one is reading wrong, but
they're both lower than they ought to be, which would
adversely impact cabin heat, fuel economy, and engine longevity. Time
to install that new thermostat!
Saturday, January 13, 2007
Brrrr! 1.8 °F outside this morning, about 8 °F in
the garage: perfect weather for changing a thermostat. Not. With two
space heaters pointed at me it wasn't too bad, so long as I didn't
move ouside their sphere of influence. (One was an old-style radiant
heater of a kind I remember my grandma had, it was definitely better
for this purpose than the other one. $7 at the thrift shop.) Anyway,
the job went easily, the thermostat housing on this engine is right
out front and on top, I can't imagine this job being any easier. The
most difficult part of the job was cleaning out the threads of the
housing since the tap wrench didn't fit in there and I had to use an
open-end wrench, which is slow. The housing was clean inside, no
signs of bad corrosion. The old thermostat was German and marked
80 °C, but it had no bleed hole. The new one was marked
79 °C and had a jiggle valve, which I made sure was uphill.
With all threads clean, bolts and housing, it went back together
easily. I just re-used the (green) coolant, this spring I want to
flush the system out properly. It's just too damned cold for that
kind of thing right now.
We'll see in a bit whether this fixed the problem or not.
...Well, it doesn't really read higher on the gauge, and the IR
thermometer says it's maybe 10 °F hotter than before. I
guess that's an improvement, but I do believe I need to block the
radiator in this weather, I think air cooling is working too
effectively!
The new SMPS may be a bit weak for the load, it tends to cycle on and
off quite a bit coming up, sometimes until the heat gun is manually
cycled off to let the blower start running first. I was worried that
at 1.8 A it was a bit small, the one that came out was
2.25 A. I'll keep looking for a bit bigger one, 3 A would
be ideal.
Sunday, January 14, 2007
Another fine f*****g cold day for working out in the garage. I pulled
the air intake grille and blopped some M1 15W50 oil (last time I
used ATF) on both ends of the blower motor. Lots of hand-scraping fun
trying to get into there. (As before, the trick is to suck up some
oil in a long piece of tubing and hold it there while you snake your
hand [with the tubing] down to the motor and get things aligned by
feel. Then you blow the oil out onto your target. Repeat as
necessary.) While I had the grille off I applied some more paint to
some of the places under the grille where the paint was failing.
The blower motor sounds much smoother already. Oh, and a beefier
extension cord mitigates the preheater cycling at startup. I also cut
a piece of cardboard to cover the radiator, perhaps that will help
cabin warmup time. We'll see.
Monday, January 15, 2007
The blower motor lube job hasn't done the job, this morning it started
shrieking when I plugged in the preheater system. I don't think I can
actually get lube to the rearward bearing, I know the forward one
wicks up some, I can feel the spinning end of the shaft, there's no
way it cannot get at least some lubrication.
I bought 15 mm and 19 mm wrenches for the toolkit at the
pawnshop today. Pretty much completes the set of tools for the trunk.
Unless I think of more stuff to put there.
Wednesday, January 24, 2007
Yes, the low-fuel light is definitely not working. Absolutely
certainly. Ran out of fuel after work today going to pick up my son.
Of course it's freezing cold, and dark, and I managed to roll to a
stop in the middle of a bunch of half-frozen mud puddles in a side
lot. Walked to a nearby gas station, twice, since the little 1-gallon
jug that was all they had for sale didn't put enough back in the tank
to get a prime going. The clapped-out primer pump on the engine was
nearly unable to pump, but I was able to remove the banjo bolt on the
fuel return line and blow into it to pressurize the fuel tank. (Yay,
toolkit!) With that and lots of pumping I was eventually able to get
some semblance of priming going, albeit with lots of leaks at the pump
and a nice spray on me from the removed banjo bolt. Many starting
attempts and extended grinding of the starter were required, I was
really surprised at the stamina of that crappy used battery I have.
It was nearly empty when it finally fired up.
Once I got it started again I ran it to the station and filled it up.
Left it running on high idle during the fillup, didn't want to risk a
shutdown so soon after getting it going. I also left it running while
I picked up my boy, over an hour late. (Good thing it happened where
it did rather than on the freeway, and before I picked him up
rather than after.) When I got the car home I put the charger on it
to complete the replenishment. I really need to replace that primer
pump, and I ought to look into the lamp situation. (I'd like to
retrofit a lamp-test function like the newer cars have, all it takes
is a diode and a resistor.)
Diesel: Tastes better than gas!
Thursday, January 25, 2007
Checked the low-fuel lamp, and it's good. I went back to the trunk
and pulled the connector to the sender, and shorting out the correct
two pins lit the lamp. So, either the sender's bad, or I had a bad
connection at the bulb that was rectified by the laying on of hands.
We'll see. The sender is not so easily removed as on later cars, and
that is the most likely suspect.
I tightened the trunk latch, which was starting to come unscrewed, and
greased it. It was starting to get sticky, like all the other
latches. It seems better now.
Sunday, January 28, 2007
The right rear door was also a bit messed up, its latch would
sometimes freeze up and the handle was getting a bit loose from the
yanking. As on the other side, I took the door apart, removed the
latch and solvent-tanked it to remove all the old gummy gritty
lubricant, then blew it dry. All the moving bits got a nice coating
of M1 5W20 from my oil can, whereupon it all started working
much nicer. I removed, oiled, and reinstalled the exterior
handle, which had been a bit loose. With everything reinstalled this
door also works perfectly. I probably ought to do the same thing to
the front doors, too.
Monday, January 29, 2007
Oiled (externally) the front two door latches and strikers. They
don't really have any problem that requires full disassembly, at least
not yet. I checked, and I can now lock the car, unlike before. If I
want to: it seems kind of pointless most of the time.
Tuesday, January 30, 2007
Filthy conditions on the freeway last night, the salt was really
flying. (Evil rotten DOT bastards.) I went through a lot of washer
fluid. So this morning I mopped off the worst of what was on the
glass and chrome. At least I'll be able to see. I had to use hot
water to keep it from freezing as it hit the car!
Thursday, February 8, 2007
Took a look at the right-hand fog light (stock), as it seemed to be
out. Yes, the bulb envelope seal failed and the filament burned up.
Unfortunately it's an odd size, a Neglin (Holland) 12 V 45 W
10086 bulb. A quick internet search yielded nothing, and it doesn't
look much like anything else. It appears that I could break off the
glass and braze an H3 to the base, but that would be, umm, awkward to
say the least. I don't see an easy way to make some kind of adapter
to use a US-standard bulb, unlike the R2 to H4
conversion. This fog lamp's not worth much, its reflector is
extremely corroded and I have an aftermarket bumper-mount fog light,
but I do like everything to work. We'll see what I can turn up.
I tackled some of the under-lamp rust that is setting up shop on that
side. It really needs a welding session and some ham-handed body
work, and some new undercoating. Maybe later. I just ground, poked,
scraped, and painted. Now there are drain holes!
Interestingly, next to the 10086 fog lamp is an empty 4 W bulb socket.
The car's harness doesn't supply power to it, however. I'm guessing it
is for parking lights in countries where the city light is not suitable.
...At NAPA, as expected, no joy. Will probably have to flange up
something in the dead bulb's base. Probably an H3, I have some
yard-sale bulbs that were cheap enough not to lose any sleep over.
The mailing list coughed up this
for Neglin bulbs, but I couldn't find this one. Only eight bulbs, and
nothing that matched the part number or was even close.
Another suggestion was to look here,
thence
here, and thence
here,
here, and
here. Very interesting!
Also very interesting for possibly re-plating headlight reflectors are some
of the smaller kits from Caswell.
Saturday, February 10, 2007
I found an excellent resource, Don's
Bulbs, and this fog's Neglin #10086 bulb uses a BA20s base, a S11 envelope, and a C6 filament. (By Don's notation, anyway.)
According to Don's database, this bears a I/12V/45W/BA20S/S11
designation, and he has them! Unfortunately, they are $27 each.
Hardly worth it given that the stupid reflectors are so corroded that
the lamps barely work. This is also almost an Osram #7301, for future
reference, which are $15 each. Still a bit steep for the purpose. I
may yet pursue soldering an H1 or H3 in place on the dead bulb's base.
I already have several H3's, they were $0.50 each at a yard
sale.
I measured, and the (transverse) filament should end up about 29mm
from the bayonet flange.
Tuesday, February 27, 2007
The U-Pull has its inventory
on-line now! They had a "1978 400E", but the VIN indicated 450 SEL.
So I dropped by and grabbed a fan and thermostatic clutch which I hope
to use on this car, and a spare fog lamp. (I've been collecting, for
maybe shifting one of our 123's over to driving lamps in its fog
holes, with 116/107 factory fogs slung under the bumper.) Most of the
easy pickin's are already gone off the car.
Wednesday, February 28, 2007
Was going to work on the Chicken Wagon
today, but more than four inches of snow have accumulated this morning,
and it's still coming down. Sheesh. Will work on this car instead,
which is inside. I installed the aluminum fan and thermostatic
clutch I procured yesterday in place of the stock weenie four-bladed
plastic fan. It attached perfectly, except that the 116 fan is just a
bit large for the shroud. It may scrape unless I can get the radiator
and its shroud centered perfectly. As you may recall, it's sporting a
123 radiator that fits relatively loosely in place, and the shroud
bolt holes are part of the loose-fitting metalwork. Even if it's not
finished yet I think it can be made to work well eventually, I don't
believe the motor mounts on this car allow for much movement. The
purpose of all this is to reduce parasitic drag and maybe improve
winter fuel economy, not much fanning is needed in winter.
The fan clutch from the 116 appears to be very well made, it's put
together with screw covers and circlips which might mean that it's
more repairable than usual. I had a good look while wire-brushing off
the grunge. Even if it never fully couples at all the parasitic
coupling will probably be good enough given that this car just isn't
driven in high summer. I'll definitely keep the old fan around, just
in case!
...Yes, it scrapes a bit on acceleration and bumps. When I looked, it
had shifted a bit, so I'll need to put some spacers in under the
radiator.
Thursday, March 1, 2007
I removed the radiator supports (normally soldered to the radiator,
but on this particular car unattached yet wedged in tightly), without
having to open the cooling system. With those out (and that wasn't
easy, the radiator had to pivot backwards into the engine to release
one of them!) I was able to glue small 3/16" wooden blocks to the
bottoms of the rubber guide/pad pieces that slide in the channels in
the car's sheet metal, thus lifting the radiator supports to which the
shroud is bolted. With even greater difficulty I was able to work it
all back together, whereupon the shroud bolted back into place with
equal clearance on all sides. (The shroud is really what holds it all
together so the radiator doesn't pop out into the fan when driving.)
I hope this will solve the problem. I won't mind the occasional
scrape under exceptional circumstances, such as big bumps, but last
night it was getting kind of bad. I couldn't even accelerate normally
without scraping, when I looked this morning it was obvious that
things had settled relative to yesterday's assembling, and there was
effectively no clearance at all between the shroud and fan.
...Yes, that fixed it.
Monday, March 5, 2007
Tonight my son was complaining that he couldn't get his seat belt
fastened, so I pulled first on one end, then the other. PING! The
aftermarket belt roller flew apart. Nuts.
Tuesday, March 6, 2007
In the daylight I found the pieces of the roller; nothing was broken
but it didn't roll very smoothly. So I greased the spring and the
spinning plug and reassembled it. Took some fiddling to get the
tension, orientation, and position on the belt right, but after that
it behaved itself again.
Thursday, March 8, 2007
Yesterday I bought some more runny RTV windshield sealer, and this
morning I did the rest of the rear window. Let's see if it keeps it
totally dry. It's been pretty good since the last partial gooping,
but not perfectly dry. (The formerly not as wet side was still a bit
wet. The former lake was gone.)
Tuesday, March 13, 2007
Today at lunch I checked the U-Pull's online inventory
list, and found a new-to-me 1970 250, it can't have been there
very long. 114.010-12-XXXXXX. So off I went, hopeful that it might
have some nice doors or something. Yes! A nice nearly rust-free
sedan that was probably sidelined due to Zenith carburetor or ignition
problems. (There were loose parts in the trunk.) Somebody had gotten
the interior door hardware and screwed up the console, and had taken
the tranny, but there was still plenty left. Maybe half (or more) of
the good stuff was already gone. For $45 I was able to nab the two
front doors, with mirrors! (The right mirror alone seems to
sell for something like $100 on eBay.) The rubber door seals were
also very good, as were the B-pillar seals. The white color is
certainly not a match, but paint will probably be easier to deal with
than rust. I put one door in the trunk, and the other in the back
seat.
The seats and carpets are also very nice. Bamboo, or nearly so. But
I don't think I need them. I'm thinking about going back for the rear
door and trunk seals, if they're as good as the fronts. I wonder if
the hood from this 114 will fit my 115? Fenders? I seem to recall
that the 114's engine compartment may be longer to fit the 6-cylinder
motors. The car is largely dent- and rust-free, it seems a shame to
let it go to waste. Whether the Frankenheap would ever wear
these new parts is another interesting question.
Wednesday, March 14, 2007
I put the new doors away. They're down in storage.
...Today at lunch I went back to the U-Pull, and the car had been
picked some more: the windshield was gone, the console had been
removed (but not taken away), the speaker grille was gone, etc. But,
my hood was there as was the rear door and trunk weatherstripping, and
it was all in very good condition. So I grabbed it all. $31.
Turns out a 114 hood can almost fit in a 115's trunk, if the
hood safety catch is removed and you don't care about scratching.
(It couldn't go through the rear door into the back seat.) The thing
needed to go in an additional inch to let the trunk close. So I tied
it down with a bungee instead. When I got home I put the hood away
with the other parts. The donor car has definitely been repainted,
but in the same color.
Looking at the fenders, their condition wasn't sufficiently good to
make them worth the removal. They're certainly better than mine, but
they're not perfect: some small dents and some rust at the bottoms.
So I think I'll leave them, the removal not being a trivial task.
(We're talking two removals and one reinstallation. And, as always,
paint. Just not worth it.)
Thursday, March 15, 2007
Well, it finally happened. The driver's seatback cushion has holed.
The perforated piece has started to fail. Sigh.
Monday, March 19, 2007
I had a little time left this morning so I installed the 'new' B
pillar weatherstrip. We'll see if that affects the stud noise that
has been creeping through in the area.
...It didn't.
Monday, March 26, 2007
I got in the car to go home from work, hit the key and nothing. No
alternator light, no glow plug action, no cranking. Dead as a stone.
Crap. I popped the hood and found that the positive battery cable had
come loose, probably going over the speed bump just before I parked.
(The clock had stopped at about the time I'd gotten to work.) Due to
the way the preheater system is laid out
there's a bit of tension on that cable that encourages such
misbehavior. I got the wrenches out of the trunk and put the cable
back. After that no problem, things were back to normal. Good thing
this wasn't my wife's car!
Tuesday, March 27, 2007
Getting a heartbreaking hole in the seat back upholstery? Mysterious
scratches on your new belt? I probed the hole with my finger and
found, of course, a broken spring end. Damn! The upholstery was
pretty decent for its age before this happened. (I can always get a
new belt.)
Time to weld! I removed the seat from the car and then took off the
seatback panel. The seat back has what I would call 'ribbon' springs,
versus coil or serpentine wire, and one was broken where it took the
sharp bend from the rear of the frame to mate with the main ribbon
that spanned the back in that area. The broken end had worked its way
past the main ribbon and dug a hole through everything. Fortunately
it was able to wedge into its proper place due to the location of the
break, so I didn't have to rig anything to hold it in place. I soaked
a small towel and worked it between the spring and the pad, and draped
towels and rags over everything to protect the seat. I used the
wire-feed welder to weld the broken spring ends back together. As is
usual, I don't trust a welded spring to hold, the welding heat ruins
the temper. So I got a strip of scrap mild steel and bent it around
the joint, then tacked it together. If the spring breaks again right
there that should hold things together enough to keep the broken end
from going on another journey of discovery. (Ouch!) The rivet had
failed on one of the two center vertical channels that also help
support the headrest, so I ground it off, repainted the area, and
pop-riveted it back into place. Then I reinstalled the seat back
cover and put the whole thing back in the car.
Wednesday, March 28, 2007
...On the other hand, some days it's nice to own a heap. This morning
I went around the car with the power wire brush, taking off anything
that looked like rust. Then I hit all the brushed areas with a rattle
can of gray paint. Looks lovely. (But not really any worse than
before.) The car's not supposed to be beautiful, and I'd prefer to be
driving around in iron's solid state rather than some of the
alternatives. Any non-new car can start to get rusty, the advantage
of this old heap is that using a wire brush and rattle can is quick
and easy, and completely in character.
That noise leak at the driver's window is probably caused by door
misalignment, but I've already messed with that about as much as I
can. (Recall that I had to weld the hinge area of the door back
together, so the geometry is automatically suspect.) So, I rolled the
window down, took up the rubber mallet, and started whanging away on
the window frame to drive it closer to the body. It's closer now, so
I'll see if it's less noisy later this morning.
In a mood to make a difference, I then stripped off the old trunk
weatherseal. Though tattered at the sealing lip, the main body was
still intact enough that it came off in only two pieces. After wiping
down the channel and the replacement (used) seal I ran a bead of 3M
weatherstrip cement along the channel, then tucked the seal into
place. The trunk is relatively hard to close now, it takes a fair bit
of slamming, unlike before. I've left the trunk open for it to dry in
place while I get ready for work.
...The stud noise still seems pretty strong. But if I lay my jacketed
forearm up alongside the trailing door edge it goes away, so it's not
coming through the glass.
Thursday, March 29, 2007
I started to wonder if the skritching from the studs might be coming
through the rear door seal, mere inches away from the front
seal I've been working on. So this morning I stripped off the rear
driver's-side door and B pillar weatherstrips and replaced them with
the good used ones I had procured. The old door seal was pretty ratty
and came off in pieces, though all four plastic retaining clips did
come off intact. (As did the ones in the junkyard.) The worst bit
was where the screw from the rear quarter window comes through the
frame, trapping the seal. I managed it without having to dig into the
door to pull this screw. The main secrets to removal are to use a
thin putty knife to slice the glue along the front edge up to each
clip then twist the knife to pop it out, and when pulling the strip
out of the channel to give it a twisting action that pulls the inside
edge first easing the strip out of its channel. Installation is
similar, the strip is tucked in outside-edge first and then the putty
knife is used to push the inside edge in. You have to make sure that
all the corners are started first then fill in towards the middle,
otherwise natural stretching can cause you to have a lot of slack at
the end, too much to go anywhere. (Then you get to pull it and start
over. BTDT.) And don't force anything, that foam tears easily. If
you're doing it right and the channel's not rusty you won't tear
anything that's not rotten.
Unfortunately there is a fair amount of rust along the door bottom.
Not enough to prevent the seal from attaching like on the front doors,
but more than I'd like. Sad. I wonder if I should go back and get
those other two doors at the junkyard? I hate to invest another $45
in 'maybe' on this car, plus it's just more crap to store. The front
doors are clear losers, especially the driver's. But the rears...?
Now that the 'new' seal's had a chance to take a set from yesterday,
the trunk closes much better.
Friday, March 30, 2007
There's still a lot of stud noise. I'm starting to wonder if it's
creeping in around the semi-loose window, or worse yet, channeling up
through the door to the window from the big rusty holes in the bottom.
Will try sealing the glass in its channel. But tomorrow is the last
day I can legally drive on studs, and I no longer have a usable set of
non-studded tires for it. I'm not planning to purchase any, either!
I'd better get busy.
So I had a close look at the window, and the outer lip of the rearward
window channel liner (right by my ear) was pretty much gone. I took
some tin snips and cut off a long narrow strip of foam rubber from one
of the dead weatherstrips I removed yesterday. (From one of the
better sections.) I glued this in the window channel in place of what
was missing. (Probably fabric, originally.) While that was drying I
noted that the outside glass wipe strip was very bad as well, so I
removed the aluminized trim strip and pried off the wipe. It was very
rusty and decomposed. The top lip of the door's window opening was
also getting very rusty, so I wire brushed it, masked it off, and
rattle-canned it gray. I set up a radiant heater to help it dry. The
fuzz on the wipe I removed was mostly still there, but peeled back
from its proper spot. I used weatherstrip cement to glue it back into
place. This won't really last, since the fuzz is decomposing and the
wraparound cloth that it used to be attached to that held it in place
is gone, but it should be better than it was, at least for awhile. I
can always glue on a foam strip later. (Or better yet, find a good
used wipe to replace it with.)
I wire-brushed off the worst of the rust on the wipe's metal spine and
painted it black to try to slow down the general decomposition in the
area. I put it in the oven to dry, I don't really want the paint on
it to fuse with the paint on the door!
The wipe and trim strip installed uneventfully, except for the wasp
that was living under the scrap wood I was going to use to drive the
wipe back on. Fortunately he was cold. The window goes up and down
rather stiffly, the foam strip may be a bit too thick. Oh well!
...Yeah, that got it. Now I can hear the skritching from the other
side of the car, whereas before it was masked. Good, just in time. I
filled the car on the way home, it got 30.5 MPG this last
most-of-a-tank, it was probably summer fuel and of course there is the
thermostatic fan clutch to help out... I wanted to put it away with a
full tank to minimize water buildup. Mission accomplished. I parked
it down below in storage and emptied it of everything, then popped the
hood and opened the battery cutoff switch. I boxed up the good used
weatherstrips in the trunk, and threw the nasty old ones in loose. (I
may want to cut some more filler pieces from them.) I put the
burned-out fog light bulb in the trunk too, it'll have to wait until
next time. I put the rear window heater in the trunk, it won't melt
in the hot summer sun that way. I hope.
It's ready to wait out the time until next winter.
Friday, June 8, 2007
Mouse nests in two of the other stored cars. I put D-Con in the footwell.
Tuesday, October 30, 2007
I found a couple of Bosch fog lights on a BMW at the U-Pull today. They're better
units than the cheapies I have, though not quite so solid as the
normal under-bumper MB fog lights. The shells are still plastic.
Potential replacements for the nasty Harbor Freights that are hung
there now.
Wednesday, November 7, 2007
I've long had an idea to build (if I couldn't purchase) a small 400 W
or so generator for taking along for emergency starting aid and the
like. My idea would be to use a weed-whacker motor driving a small
alternator for battery charging, etc., with an inverter to make
110 V power for the standard block heater. (A tiny battery might
also be required to jump-start the alternator.) The exhaust could
even be pointed at the engine block for additional starting heat.
Today at the discount shop I found a defunct 4-cycle whacker for less
than $20, so I bought it. The shaft is bent, and the pull rope is
stuck out. I have no idea whether or not this will ever get used, but
I just haven't seen any extremely small lunchbox generators out there,
1 kW is about as small as they go and they're a bit large for
what I want.
Tuesday, November 27, 2007
Snow! We got three inches in the night, I guess it's time to get this
car out again. I reconnected the battery, plugged it in, and brushed
the snow off while it preheated and the battery charged a bit. I
pumped up the tires, all needed at least some air, two needed all of
it. Then I started the car. It cranked for awhile, but then caught.
Because of the snow, it took me a number of attempts to get it up the
hill to the driveway. I then topped off the brake fluid, deployed the
rear window defroster-ette, and put in the baby seat. One of the rear
doors is extremely stiff, I'll have to address that. For now, we'll
just use the other side.
At lunch I got it licensed.
Wednesday, November 28, 2007
A hard freeze this morning. The preheater system had some trouble
getting going, the +12 V SMPS was intermittent for awhile. Also,
the blower motor squealed for a long time before it settled down.
Thursday, November 29, 2007
More snow. The preheater worked a bit better this morning, but the
SMPS still 'flashes' for awhile on startup. Do I need yet another
one? Blower squealed for awhile too. This is getting old.
Monday, December 3, 2007
I took the LR passenger door apart to grease the door check. 0 for 2
today, counting the same job on the Chicken
Wagon! It wasn't the (old-style) check at all, in fact it was the
hinges themselves freezing up. Old-style checks aren't prone to
seizing, anyway. I greased the check while I had it apart, and
greased all the car's door hinges. Much better.
The clock has pretty much stopped working. Again. And the rear floor
is wet. Again. We had a lot of rain recently, more than an inch.
Either it was enough to power through the seal job, or the freeze/thaw
opened it up. Sigh.
Wednesday, December 5, 2007
There was some RR quarter panel rust starting, so I hit it with the
wire brush so that I could paint it. The brush chewed through the
Bondo in the area and exposed the holed sheet metal. I ended up
cutting out about a 4×10" area of ruined metal, and scraping out
a whole bunch of wet dirt that was collected in the bottom of that
panel. New metal time! Figures.
The mud was either accumulated detritus from the trunk, or else had
started to work in from the small holes at the leading edge. Either
way, it wasn't good to have there.
Thursday, December 6, 2007
More rust work. I welded in some metal. To ease access to the inside
piece I jacked up the side of the car and took off the wheel. I used
jackstands as death-protectors. This time of year it is dark out at
6AM in the morning, light was an issue. The rusty
nasty metal also was difficult to deal with.
I'm just about out of shielding gas, I'll probably run out tomorrow.
Friday, December 7, 2007
Picked up some more shielding gas. It's gone up, $77! I seem to
recall it was $50-something last time. I also reinstalled the hood
star that broke apart when I slammed the hood a week ago. I glued it
back together, this time with a little Shoe Goo. The epoxy seems to
have been too brittle. Really this should be silver-soldered, but I
hesitate to try that myself on something that matters.
In the evening I pulled the clock, and found that the reason the hands
were getting misaligned and that it finally stopped running was that
one of the plastic gear axle nubs had snapped off. I've dealt with
this before, on my 560 SL. I got out a small
drill (PCB type) and drilled (carefully, by hand) down the center of
the axle. I then cut a piece of wire and pushed it into the hole.
Insty-hub! The clock face prevents the new axle pin from backing out
of the axle. We'll see if it works, but at least the clock can be set
again. The most puzzling aspect of the problem was that I had to
drill out the brass rivets that hold the front plate onto the plastic
locating feet. Screws are too bulky to put it back together, so I
stitched wire through the holes and crimped it down. Seems to be
holding good enough. The plate is locked into position by plastic
pegs that are still intact, the wire just ties the plate to the pegs.
As always, getting these quartz clocks apart and back together again
is the worst part. The bezel is crimped on. I've got the crimp bent
to the point where the bezel can be snapped on and off with a little
judicious twisting and pushing.
The clock is powered on the bench right now to make sure it can run.
A non-functional dash clock really bothers me, for some reason.
Saturday, December 8, 2007
The clock seems to have kept good time overnight, so I installed it
back into the car.
Thursday, December 13, 2007
Filled up the first time since last March. Only about 25 MPG.
OTOH, I did take an hour's nap with the engine idling one day...
Tuesday, December 18, 2007
Coming home I noticed that I have lost the low beam on the right-hand
side of the car, it looks like the other R2 has bit the dust. Time to
make the other adapter and put an H4 in it!
Wednesday, December 19, 2007
I removed the offending light fixture, and the R2 from it. As
before, I de-soldered the flange from the barrel of
the R2 lamp. I reamed the flange (using some kind of tapered body
shop tool and a hammer) so that the H4 bulb (actually a half-priced
discount store 9003/HB2) could then fit doggie-style through the hole
in the flange from the rear. (The H4's barrel will fit as-is from the
front, but it ends up in completely the wrong plane that way.) The
top of the H4 bulb's base, which is larger than the barrel, wedges
snugly into the enlarged flange opening. I filed slots in the
flange's top lip for the the three H4 ears. The H4 bulb sits in
almost the same plane as the R2 did, inset into the fixture only by
the thickness of the R2 flange's sheet metal. As before, I had to nip
half of the two smaller ears off the H4 bulb's flange in order to fit
the spring collar of the fixture over the bulb assembly. Voila,
again!
Flush with success, and faced with a little extra time this morning, I
tackled the fog light. By eye it looked like a standard H3 bulb would
have its filament in about the right place if its flange was perched
on top of the barrel of the (dead) Neglin 10086 fog lamp. I broke the
glass out of the base of the Neglin and cut the wire of the 50-cent
garage-sale H3 to length to reach through the center pin of the bulb
base. I opened up the solder hole and put the wire through, then
clamped the flange to the top of the barrel. A hot soldering iron
secured the flange to the barrel, and attached the wire to the power
nub. I oriented the filament the same way as the stock bulb. (Or so
I think.) I had to do a little filing in order for the composite bulb
to fit into the socket, the barrel fits into the socket pretty deeply
and the H3's flange is a little larger than would fit. Fortunately it
was only a little excess solder that prevented the bulb from fitting,
otherwise I'd have had to file the flange flush with the barrel all
the way around. Unfortunately, the next time this burns out I'll need
to unsolder/resolder to replace the bulb. That's not too convenient,
but unlike most of the assholes around here I only turn on the fog
lamps when it's foggy enough to require them to improve my ability to
see the edges of the road. That's not a lot of hours in a year!
(Approaching zero, in fact.)
With both stock Euro bulbs thus replaced with commonly-available US
bulbs I put the lamp assembly back on the car and tested it. It
worked fine. Success!
...On the way home it was apparent to me (when parking in front of the
garage) that the H4's don't have exactly the same low-beam pattern as
the R2's, the upwards right-side 'wing' is much muted with the H4
bulbs. I thought I'd noticed this with the one earlier replacement,
and this second confirms it. Probably this is due to slight
unavoidable lamp geometry changes, the H4 doesn't
have exactly the same filament structure as the R2, though
the structure is very similar. (The major apparent
difference is in the orientation of the high-beam filament, which
can't explain low-beam differences.) It's a minor enough difference
that it's certainly not worth putting up with all the other ills of
the R2 just to get the 'wing' in all its original glory.
Sunday, January 6, 2008
Today was very snowy, so my original plan of doing some welding was
off. Instead, I got out the defunct $20 weed whacker I'd picked up in
November (for potential use as a tiny auxiliary generator) and took it
apart. The big trick there was that the centrifugal clutch assembly
unscrews from the shaft, it doesn't pull off. Another difficult point
was removing the large speed nut that holds the recoil assembly to the
plastic housing. I ended up breaking the nut so it doesn't grip so
tightly any more. It turns out the only thing that appears to have
been wrong with the motor was that the recoil start spring had come
loose inside, it wasn't even broken. I managed to get it all back
together and then the thing would turn over normally. I didn't try to
actually start it, though, so there may be more actually wrong.
Mounting an alternator to it could be interesting, however.
Friday, January 11, 2008
One of the cheap nasty POS fog light housings was falling apart again,
so I replaced it with the (broken and glued) spare housing.
Replacement was made more difficult by a frozen ground screw that
broke off. I ended up having to drill a new hole for a new
self-tapping screw, which was a festival of pain in itself. (Finding
a screw, and a drill that was sharp enough to go through metal.)
Somehow the original hole and screw seems to have becomed hardened
(it is right up against the welds) and wouldn't drill out.
Tuesday, January 15, 2008
That steaming POS switching power supply in the preheater system is
really starting to piss me off. Click-click-click-click-click... It
won't start up in the cold, which naturally is when you want it most.
This morning it never did snap out of it. And the temperatures are
predicted to keep dropping all week, we're headed for single-digit
temperatures. Definitely territory where an ungaraged diesel can use
some help.
I really need to get rid of the complex electronics, no matter that
it's small, and go to a second battery charger (simple linear) type
circuit. I only need about 3 A. A transformer and some diodes
will do it. Sadly, looking at the schematic I again see no way to get
both a battery charge and a fan supply function from the same power
source. (The existing battery charger.) An isolated second
supply is required to avoid back-feeding the car's electrical
system under all circumstances if I want to use the existing blower
low-speed resistor. I have a couple of 12 V 20 VA
transformers that came out of some desk lamps that I put into the camper. In parallel that'd be 40 W, or
3.3 A at 12 V, so that's in the right ballpark. And I
already have them. Two transformers would also tuck into the existing
battery charger box easier than one larger one, so I think I'll look
into that. I'll also need a bridge rectifier (four diodes versus
two), these transformers are not center-tapped. The most difficult
aspect of this will be the mechanical, naturally.
Wednesday, January 16, 2008
I pulled out the preheater system power supply. (No fun, it was
13 °F outside.) It looks like I can fit the two transformers
into the case where the SMPS was, but I need some long thin screws to
go through the transformer mounting holes. I cut some sheet metal to
serve as brackets.
...Today at lunch I bought some screws. About $6 for a bag of
miscellaneous #6 hardware. (I bought boxes of washers and nuts, and
an assortment of screw lengths. I'm always short of nuts, so many
extras sounded like a good idea.) I also bought a screw-mount bridge
rectifier at Radio Shack, about $3. Sure it's going to cost me $10,
but if this works out I'll be done messing with this thing. I should
have done it this way in the first place, but I was excited about
using the cheap small lightweight surplus power supplies instead of
'big iron'. Well, big iron pretty much always works unless you kill
it, whereas complex electronics do not.
...After work I cut and drilled six sheet metal brackets, and fastened
the two transformers together. The brackets all have 90° bends to
make feet for mounting to the case. Tomorrow, perhaps, I can install
the assembly into the case.
Thursday, January 17, 2008
I installed the transformer assembly into the battery charger case.
That took an hour, nothing lines up when it's all freehand cutting,
bending, and drilling. I had a little more time left, so I then wired
it up and plugged it in. BRRRR-ZAP! Oh man, did I make a mistake.
(Nothing like working in a rush!) Somehow I'd confused the
transformer primaries with the secondaries and wired it up backwards.
I was putting 1200 V into the bridge rectifier, not 12 V!
It's rated for only 400 V.
So I had to take it all back apart, because the leads were on
the wrong sides of the transformers and wouldn't reach otherwise. I
flipped them over in the mounts and reassembled, including rewiring.
Miraculously, the bridge rectifier seems to be unharmed. Can't say
the same about the LED that is (was) in the plug to the rest of the
car. I guess I can live without that. Though running behind, I
managed to reinstall the thing in the car and try it out.
It seems to work, imagine that. We'll see if it holds up with time,
that was a pretty severe stressing the parts got.
Friday, January 18, 2008
Another two days and $10 shot to hell. I thought the preheater was
working kind of feebly, some of the heat was even escaping out the top
of the air intake grille and the airflow inside, though warm, was
barely detectible. So I got out the meters. The thing is only making
about 7.5 V while pushing 1.7 A, which is only 13 W, a
far cry from the 40 W I expected. I opened it up and checked,
and both transformers are pushing current. They're just less capable
than the printed rating, imagine that! Either they were crap to begin
with, or I killed them. Back to the drawing board, regardless.
So I had another switching power supply stored in the trunk, a Samsung
that's rated at 12 V and 3.5 A, or 42 W. I clipped it
in the circuit and even though it was about 15 °F outside it
started right up and ran the fan noticeably faster. I measured, and
it was making about 11.5 V at 2.8 A (32 W), which is
tolerable. If only it doesn't have a problem with extreme
environmental conditions. I guess I get another session to rip out
the transformers and install this thing. Joy.
Monday, January 21, 2008
I pulled out the preheater system power supply. Again. (No fun,
again, it was another 13 °F morning. They predict that we're
headed for maybe 20 degrees colder in the next few days, so I need to
get this taken care of.) I then removed the new transformer system.
Sure came out easier than it went in! I restored the AC wiring to its
former configuration and slipped the new SMPS into position. Easy. I
cut off the cable and soldered the connector to it. I then put it all
back into the car and plugged it in. Everything worked, no problems.
It's so cold that even though I put a space heater into the car while
I did this (to take the place of the preheater) none of the ice on the
windows melted, even in the hour the heater was running. Brrr! With
the preheater restored and helping (and set on high), the ice finally
started to melt.
At lunch I went to the U-Pull and got an AC compressor for the 190D. This was a spur-of-the-moment thing, and
the only tools I had with me were in the emergency kit I'd made up for
the trunk. It became apparent that I am short a few tools. I really
need a set of Allen wrenches and a 1/4" wrench for driving the
screwdriver bits. A larger crescent wrench would also be a good idea.
(I managed to borrow such a wrench from a helpful Russian, it only
took a second or two to loosen the big AC hose. The yard is always
full of Russians and Mexicans, those guys still know the value of a
dollar. Hard to talk to, though.)
Tuesday, January 22, 2008
6 °F this morning. Not much to report, except that the
preheater (which is functioning properly) was unable to dent the frost
on the glass. I put the little space heater inside the car too.
Needed to pump up the front tires and add brake fluid. Stupid slow
leaks.
Wednesday, January 23, 2008
5 °F this morning. That is all.
Thursday, January 24, 2008
9 °F this morning, a warming trend!
Friday, January 25, 2008
12 °F this morning, the trend continues.
Sunday, January 27, 2008
Heavy snow today. Took out the power and snowed in the 2WD
cars, such as this one.
Tuesday, February 5, 2008
The car's been snowed in for a week or so. I did do some shoveling
behind it this morning to prepare for getting it out now that the
roads (and some of our driveway) are plowed, but there's lots more to
do. And more snow is expected.
Friday, February 8, 2008
More snow undid all my good effort, but this morning I finally managed
to fully dig out the car, in spite of back pain. It started easily,
although both front tires were nearly flat from their slow leaks. I
did manage to forget protocol and drive off with the car still plugged
in, but it seems to have come unplugged with no harm done. Stupid,
stupid, stupid!
Tuesday, February 12, 2008
I managed to knock a fog light off in a snow bank in our driveway.
Same one I've broken several times before. Are those things ever
cheap pieces of s**t, not to mention being mounted down in harm's way.
Maybe I should spend more than $8 per pair? (I have some fogs off a
BMW in the trunk, should I ever be motivated to upgrade.)
...After work I glued the light housing back together. Shoe Goo,
naturally.
Wednesday, February 13, 2008
I remounted the repaired fog light. Again. I used some grease on the
screws, they had started to rust to the point where they didn't want
to turn. I also went to the back fog light and cleaned up the
connections so it would work again.
Tuesday, March 18, 2008
I put the car down below. It's time to stop driving it, in favor of
the 380SL. (I still need to do some welding,
however.)
Tuesday, April 22, 2008
I had to pump up the front tires today, they were nearly flat. It's
really time I did something about those. (I was in the area and had
just repaired the POS replacement Harbor Freight air compressor that
had the regulator housing split on it. Voila! No more regulator.)
Wednesday, April 23, 2008
The car started immediately, no troubles. I brought the car up top
and jacked up one front wheel. The wrench in the trunk, although the
right size, was crudely made (in the USA, even!) and the hole was off-center
in the casting. That made a fat spot that wouldn't really let the
wrench turn on these Bundt wheels. So I used the grinder to take down
the high spot, after which the wrench worked just fine. (Once the
wheel was off I put a coat of primer on the wrench's newly-bare
metal.) I put the wheel in the truck to take
to Les Schwab, since I'm going
there today to purchase new boat trailer tires.
I also put the battery on charge, since that was convenient. I hadn't
disconnected it while down in storage and the clock takes its toll.
...At lunch I picked up the wheel. They said the leak was due to
peeling chrome and that there wasn't much they could do about it,
it'd already had bead sealer applied. Nuts.
...After work I painted the end of the wrench black with the new can I
picked up at Ace Hardware. (Cheaper than at Lowe's, but much less of a
selection. Everybody has black, however.)
Thursday, April 24, 2008
I put on the 'repaired' wheel and took off the other leaker. Lacking
the truck today, I bagged it and put it in the storage bucket of the
convertible.
..The tire shop called. He said this wheel had the exact same story,
and offered to show it to me. Sure, says I, so I dropped by and had a
look. The entire metal wheel was chromed, inside and out.
Where the chrome breaks over the outer lip of the wheel, it's apparent
that small fractures (or gouges) in the chroming at the edge of the
rim have over time let corrosive salts and/or water get under the
chrome layer. Damage creeps in and along, eventually undermining the
bead seal area. Then it's game over. I had him put the tire back on
and I took it home. Assuming the disruption at the shop didn't make
it worse, I guess it's not so bad that it would hold air for a week or
so before needing to be pumped up again.
I'd always thought they only chromed the face side, leaving the rest
alone. Ha!
Friday, April 25, 2008
I put the wheel back on, first using candle wax to coat the bolt
threads. Irony is putting away your snow car, again,
while it's snowing! Sigh. This time I disconnected the
battery and cleaned some of the crap out of the car. I removed the
crayons so that they wouldn't melt to the seats, and took the plastic
defroster fan out of the rear window so it wouldn't go all Salvador
Dali on me like the last one.
I honestly don't know when I'll be able to get to welding up
the hole I made in the side of the car last year. There's just so
much else to do that's more important...
Monday, August 11, 2008
I was at the U-Pull today looking for my ever-elusive EHA valve for my SL (skunked, naturally), and
found a 200D finnie that had a set of parallel glow plugs retrofitted
to it. Too bad I didn't have a suitable wrench... Maybe tomorrow.
Tuesday, August 12, 2008
I got the parallel glow plug conversion system from the 200D finnie,
relay and all. The car looked like it had a later 240D engine in it.
(It had an engine-lubricated injection pump.) I also got a 'chrome'
air intake grille and wipers from the 280. $20. Really too bad about
the 200D, it wasn't all that rusty and looked to be in fairly decent
shape. Looked like an abandoned project car. Too bad about the 280,
it wasn't very rusty at all. Lots gone, including the glass, doors,
and dash. I wonder if it would be worth getting the blower fan? Most
of the hard stuff in the way of getting it has been done already.
It's stiff enough that it couldn't have been working anymore, but it
could also serve as a rebuild base. However, the last thing
I need is another project. Just like the 200D's engine and tranny
could be the basis for driving the second big
generator. Not!
Friday, November 28, 2008
Snow car day. I put the battery charger on the car. It only drew
current for a few seconds before it was topped off, the battery cutoff
switch really does work. I then moved the cord to the preheater
system, which fired right up. I ran it while I pumped up the tires,
picked out the wasp nests, and topped off the brake fluid. The car
started uneventfully, and I drove it up to the driveway just as our
first real snow started coming down. I plugged in a heater and put it
in the cabin to dry things out as it was a bit damp feeling inside.
It was really quite uneventful. (Unlike the Chicken Wagon.)
These
instructions for building an injector pop tester are rather
interesting. I've been a grease gun fan myself, but now I can
see how the bottle jack approach could be better. Interesting...
Sunday, December 14, 2008
An arctic blast has arrived. It was 3 °F this morning, we
had a high of maybe 7 °F. And windy. I plugged in the
preheater system to thaw the car, and with it running and the
space heater in the car it was certainly warm inside, but even after a
couple of hours the ice didn't melt off the windshield! It got a bit
loose, though, and the wipers (and my hands) dispatched it. The car
started fine, though a bit sluggishly, but this weather is expected to
last a week or so, and I wonder if the car'll make it through OK?
It's a lot to ask of an old wrong-sized battery...
The heater blower is squealing nearly all the time now. I wish it
were possible to actually lubricate it. I wonder if I could snake a
small video camera down in there to see if I can find a path to that
rear bearing? It's possible to lubricate the front one, but that rear
one just can't be found by feel.
Monday, December 15, 2008
Crap. The tires were a little low this morning, but it was so cold in
the garage that the air compressor wouldn't start. I took it to work
anyway, meaning to run the car to Les Schwab at lunch time, both to
take care of the tire pressure and to get some heat into the engine so
it'd start after work. But work was insane, and I never got out.
Mistake.
It wouldn't start after work, too cold and the battery too
cold/weak/old/small. We had theater tickets, too. Real theater,
Sweeney Todd, not the movies, and we couldn't be late.
Jill came and got me instead, after shuttling the babysitter herself.
After the bloody fun-fest we dropped back by work, and I found that
the one tire was now too flat to drive. I changed it while I let the
car battery charge off the jumper cables I keep in the trunk. (The
jack leaned against the car and rubbed the rubber bumper button out of
its socket and scraped up the paint on the side. Nice.) The car
wouldn't start then, either. So I charged it again a bit and hooked
up the tow rope that I also keep in the trunk. (Be Prepared!)
Starting it wasn't easy: I needed third gear and yet it still wanted
to skid; we towed it with the Chicken Wagon.
(I glowed the car while it got up to speed, then dropped the clutch.
I had to do this several times, Jill wasn't really going fast enough.)
It fired once and ran a few seconds, long enough for me to flash Jill
to stop, then it died. We had to repeat the exercise.
(She hates this kind of thing!) Once running solidly it was
fine. It's cold outside! 7 °F when we got home,
but at least it's a lot less windy than yesterday.
I have some work to do.
Tuesday, December 16, 2008
0 °F this morning. Brrr. I suppose that the $12 used battery
(that I installed on June 18, 2004) has done
all I can expect of it. Time to steal the Group 49 battery out
of the 190D, if I can. Complications:
- It's cold (Hey, I think it bears repeating);
- The preheater system shares the battery tray, leaving less room
for an actual battery;
- I only have an hour (and here I sit in the warm
wasting some of it—see Excuse #1).
Maybe I'll have to drive Ethelred (the
380 SL) to work instead. If it'll start.
...I did get the battery swapped, the preheater junk still fits between
the battery and the master brake cylinder, though not nearly as neatly
as before. Unfortunately the handy battery cutoff switch doesn't fit
on the negative post anymore. Maybe some time later I'll look into
that, it was very nice to have.
Since I was there I changed wheels back. I had to put a radiant space
heater on the air compressor for half an hour to warm it enough to
start. (Neither convection heater could start their fans, so I had to
dig up a radiant heater. It's cold!) I pumped up the flat
tire, now back on the car. I used the car's jack, after I put the
rubber bumper back in its socket and lubricated the screw with ATF. I
had an extra minute or two and went to the other side of the car and
jacked it up. Up close the horrible scraping noise sounded like the
brake backing plate, which it turned out to be. I bent it a bit and
the noise went away. That'll be nice.
As a safety measure, to go with the jumper cables I already carry, I
put the boat's battery in the trunk. Just in
case.
Wednesday, December 17, 2008
With the new battery starting has been much improved. Good.
A friend loaned me a small B&W pinhole video camera, it's about 1"
square by about 1/4" thick with a short barrel coming out of the face,
and thumbscrewed to a little yoke. It has a pigtail with the usual
wall-wart +12 V and video connectors. (These things are well
under $20 now.) The plan is to see if I can use it to find a way to
lubricate the rear bearing of the heater blower motor. Step one is to
screw it to a stick for probing. I can use the preheater system's
+12 V power supply connector, and I have a small LCD TV in the
camper. If it looks like it will work then I'll have to remove the
wipers and the air intake grille and go looking. At least it's warmed
up this morning: back to a balmy 7 °F!
But I was being a bit dumb: instead of prototyping this all out in the
cold I fished around in my junk box until I found a suitable
+12 V wall-wart. As I tend to collect these it should have
occurred to me to do this first so I could work in the warm! I
removed the detachable side speakers from the camper's TV and hooked
it all up. It works! Now to find a stick... I'll only take it all
outside when it's ready. The camera seems to be fairly
light-sensitive, I suppose it's meant for surveillance. If it's too
bright things wash out. It's a bit grainy, but I'm only looking for
guidance here, not great detail.
But, it's too cold to muster further interest in going outside.
Maybe next time.
Thursday, December 18, 2008
The poor car is now buried under 2' of snow, as is the entire
driveway, and the road. They claim that this is the most snow the
area's ever got in a single day since they began tracking it in
1889 or thereabouts. Until they plow the road, and we shovel out the
driveway, there's no real point in digging out the car. That'll be
days, I'm sure. It looks kind of forlorn under that mound. (You
can't see any of the car itself, naturally.) I guess we'll be driving
the truck, instead. (If anything.)
Sunday, December 21, 2008
I got the car dug out today, it took me something like two hours to
give it access to the track we shoveled in our driveway Saturday. The
front tires were flat again, too. But it started right up and bulled
its way to church through the snow drifts that formed last night. The
blower worked flawlessly on high today, for a change. No shrieking.
I broke another one of those POS Harbor Freight fog lights smashing
through the drifts, I'll have to glue that up. The alternator brushes
may be going out, the fan speed jumped up and down today, and once I
saw the alternator light on dimly. I should check the belt first,
though.
Monday, December 22, 2008
Six more inches of snow in the night, enough that I think I'll be
taking the truck to work instead.
Tuesday, December 23, 2008
I pulled off the broken fog lamp and used Shoe Goo on it. Again.
Saturday, December 27, 2008
Looks like the 'Pineapple Express' is blowing through, after the snow
all morning it warmed up and things started melting aggressively. I
swept off the car, and by nightfall it was completely clear.
Sunday, January 4, 2009
We needed to do some welding on the neighbor's tractor blade and the
car was in the way. It hasn't moved in weeks, but he first scooped
out the snow behind it so it could get out. I let it idle for a
couple of hours with the heater on to dry out inside, as condensation
had been at work. (The tires, naturally, were quite flat. I'm
getting tired of that!)
Friday, January 9, 2009
Finally a day I can drive this car again! The roads have pretty much
cleared, and the driveway is again passable. So I tackled this car.
First I used brake cleaner to clean and blow out the air compressor
hose, it'd gotten full of dirty oil the last time I used the vacuum
sucker. Oops. With that accomplished I used the fix-a-flat can I'd
bought to put about half in each (leaking) front tire. We'll see if
that helps. The tires got pumped up the rest of the way with air.
I plugged in the preheater system and the space heater in the car,
it'll be good and warm, and with clear windows, by the time I leave
for work. I then put back the repaired fog lamp, and tested the
lights. Looks good.
Wednesday, January 14, 2009
We've returned from our belated (now that the weather has relented)
Christmas trip and the car's tires are still full of air (one at 31#,
the other down to about 27#) so I can take it to work. That's a good
sign!
Thursday, January 22, 2009
Well, the sealer seems to be working on the front tires, they lose
air at a much slower rate. Acceptable, at this point.
The clock is losing time again. Rats.
Monday, January 26, 2009
I checked the tires again, the fronts seem to have lost no
pressure! More than acceptible, in fact. (One of the rears was down
a little, but that's nothing.) It's cold again, I woke up to
7 °F temperatures.
Tuesday, January 27, 2009
I removed the failing clock, last repaired December
7, 2007 (and originally installed September 14,
2005) and I put the spare clock (from the bench, and procured
July 14, 2006) into the car. I hate
having a clock that doesn't work. We'll see if this one works better.
As I recall, this clock hasn't been opened up, I only realigned the
hour hand. I put the failing clock on the bench power supply to see
how it will behave in the warm.
...At lunch I loaded up the car with booty from the discard pile at
work. Mostly a bunch of heavy sheet metal, suitable for welding
supplies. Some shelving racks, I might be able to use them as
shelving. We'll see. If not, scrap!
...On the way home the new clock is apparently keeping good time. So,
apparently, is the old one, inside in the warm and on a bench supply!
Wednesday, January 28, 2009
I removed the booty from the car and stowed it. I topped off the
brake fluid. Don't know exactly where it keeps going! The engine oil
was also low, I put in about 2 quarts. Oops.
The old clock is not keeping good time, on the bench it's
now losing steadily.
Friday, January 30, 2009
I got an unexpected day off (at work the building's main power
transformer died yesterday) so I tackled the hole in the side of the
rear rocker that I'd opened up last December. I
flattened one of the scrap sheet metal boxes I'd picked up at work Tuesday and cut it up with the Sawzall. I used
the wire brush to remove the rust that had formed on the car in the
year since it was opened up, and started welding in the new metal. I
used the 'new' Hobart. Four hours
later I was done. It was a tedious session of weld, bend, grind.
Repeat. I had a lot of pinholes that formed where I tried to join the
new to the old metal. (The old metal was not in great shape, and the
joint was at a formed crease in the bodywork.) The cheap Harbor
Freight flux core wire didn't work that well, though I believe the
welder itself behaved properly. I primed and painted it, including
the inside, after the welding was done. The profile of the repair is
roughly correct. The result is a bit lumpy, but not too
objectionable. Better than the gaping, rusty, sharp-edged hole that
it once was!
And I love that I used some of our cast-off work product to repair my
car.
While I was under there I couldn't help but notice that the rear half
of the right-side rocker is rusting out now. (The front half was
fixed four years ago.)
Saturday, January 31, 2009
I partially removed the turn signal stalk switch and filed the detent
grooves in order to get the things to stay on during turns. It only
takes a few easy strokes of the file to make a big difference, you
do not want to go too far or they won't cancel at all! (Not
even by hand.) They stay on now, but a test drive will be the real
proof. This has been bothering me for a long time, I can't
believe how long I let it go even knowing it was an easy job. The big
connector was extremely difficult to separate, so I smeared a little
oil on the pins before putting it back together. Maybe that'll help
next time.
I then tackled the rust holes that were forming underneath the
passenger-side headlight, due to the undercoating that was peeling
loose (and which I removed) and trapping moisture rather than
repelling it. I filled in the holes with the welder, and some bits of
leftover metal box from yesterday. (I used the Miller 175 this time,
since I wanted more control and cleaner welds on the rusty bits.) I
also filled the unsightly hole in the top of the fender where the
stalactite of Bondo had fallen out. Then I ground off what I could to
restore the profiles. (Some of the welding was behind the bumper, and
inaccessible unless I wanted to remove said bumper, which I did not.)
I then wire-brushed the areas, and the rust starting near the other
headlight bucket, primed, and painted the work areas. It's not
beautiful, but it should be more durable. If I really wanted it to
look good I'd Bondo the top and do it right. Done for another day!
Thursday, February 5, 2009
Today the preheater's heat gun
burned up, I guess it wasn't built very tough. I have another water
heater element I got at the thrift shop for $2, I've been thinking
about revisiting that approach. Getting it bent to fit in the air
plenum without ruining it is the hard part.
This evening I noticed that I've lost one backup light. I need to
replace it!
Saturday, February 7, 2009
I checked the backup light, it was just loose in its socket. I
cleaned it and got it working again.
I tore open the dead heat gun, figuring that at the very least I'd
need its power cord for any replacement system, and found the motor's
rear bearing melted and siezed and its diodes burned up. Yeah, it's
dead all right! The nichrome heating element looked good, though the
excess heat had burnt one power wire off, so I liberated it and hooked
up the power cord to it alone. Perhaps this can be installed so that
it has air drawn through it when the blower's running? I then removed
the air intake grille and slipped the heater cartridge back into its
place. With the blower running I could feel some warm air coming
through, but I don't think it's enough. Visibly the heating cartridge
gets quite hot inside, and in fact stayed orange-hot for some
tens of seconds after power was removed. I need to come up with some
sort of small 110 V fan to rig to this to keep it from
overheating again. Something a bit quieter than what was there
originally, perhaps a computer box fan? Later.
I then got out the borrowed pinhole video camera and tried to use it.
It was too dark inside the air plenum so I lashed a C7 Christmas light
to the same stick. That helped a lot, but the assembly was just too
ungainly to do much good. I did use it to help guide my oil tube in,
but I think I could have done just about as well without it. I
attacked both ends of the motor, I hope that I got oil in the right
places. The fan ran smoothly after the operation, but it was running
pretty good today anyway. I then buttoned up the car again. I
dressed up the aluminum air intake screen with some rattle-can flat
black paint before installing it.
I had a look at that water heater element I'd nabbed, but I don't
think there's any way I can fold it up small enough that it'd fit
inside the plenum without either burning something it was too close
to, or itself breaking in an attempt to wad it up small enough. Too
bad, that'd be the best method of getting heat into the plenum.
Tuesday, February 10, 2009
The blower fan squeaked again this morning. Crap. It does seem
better than it was, but that one squeaking episode is disturbing.
I grabbed a three-wire computer cooling fan from the discard pile at
work, it's rated 12 V at 250 mA. (Of the three such fans
there today, two were siezed up.) Not a very powerful fan, obviously.
Wednesday, February 11, 2009
Today I played with the cooling fan on the bench and I found that on
the power supply the Black wire was negative and the Yellow positive.
(Leaving White as the presumed tachometer wire.) The fan turned
nicely and was very quiet, but only moves a modest amount of air.
Enough for the preheater? We'll see.
I got out the heating element and checked its motor taps. I found two
(of the four) terminals that had 14 VAC on them, so I dug out a
full-wave bridge rectifier that I'd used for one of the prior
preheater version attempts, and hooked it all up on the bench.
Nothing but buzzing. So I got out a small filter capacitor and wired
it in too. That did it. The fan blows air, but not a whole lot. I
suppose I should try assembling the mess into something that'll work,
but I was out of time. (This is turning into a real pain in the ass.)
Saturday, February 14, 2009
I cut out a cardboard template for the air funnel to mate the box fan
to the heating element and got it shaped. I then traced it out on a
piece of microwave oven sheet metal, and cut and welded that into
shape. (That took hours, in fact.) As a side-job I got Daniel to
weld! (Here, and here.) I gave him a chunk of metal
and the helmet, and he tried writing his initials on it with the Hobart. It sort of worked. After
practicing a bit he used a clean piece of metal so that he could take
it to school or something like that. It didn't really work out so
good, but I'm very proud of him. He's calling it art now. ("This [spot] is a
bird, and this is a...")
Myself, I'm not so proud of. Once I got the sheet metal banged into
shape I wired up the heating element and the fan, and got it all put
together. By early afternoon I was ready to test. When plugged in the
thing fired up and started blowing out hot air, so I slipped it into
the car. After a few minutes, the new preheater caught on fire! (Not
enough airflow.) Disgusted, I threw the abortion into a snow bank to
put it out. Some time later I'll salvage what I can from it.
I'm going to have to come up with another heat gun or hair drier. But
in the meantime I'll just continue to use the space heater inside the
cabin.
Tuesday, February 17, 2009
The locks were so sticky this cold morning that unlocking the trunk
(which I had locked yesterday at the U-Pull) was difficult. I used
spray graphite lock lube on it and the two doors, which helped
immensely. Yesterday's booty for the 190D and
the Chicken Wagon filled the car pretty well.
Unfortunately the weight and pressure from the seat I had turned over
in the front passenger seat opened up a seam in the back. The
upholstery in this car is pretty tired.
...At the U-Pull today I picked
up a set of 14" Bundts from a 300 SD. They're in a lot better
shape than what's on this car, at some suitable point I'll be able to
switch. They're painted, not chromed.
Thursday, February 19, 2009
Yesterday I prowled the thrift shop looking for preheater ideas, and
ended up buying a hot-air popcorn popper for $6. By eye it looked
like it might be suitable. This morning I took it apart. Inside was
the usual snail-shell centrifugal blower feeding a heating element in
the snout. It had not one but two overtemperature safety switches, so
it might be a good thing to use here. The motor bearing I can see is
metal, at least, unlike the dead heat
gun's. Unfortunately the tube end was too large to go into the
pipe in the firewall as-is, so I cut off the extraneous plastic bits
and used the bench grinder to take down the diameter of the thick
high-temperature plastic nose so that it would then fit. I glued the
nose back to the housing, since the retaining parts of the housing had
been cut away. Once the glue had set up a bit I hung it temporarily
in place and turned it on. The windows were nice and frosty, so it
was a good test. After an hour or so the windows were cleared, though
this wasn't a particularly cold morning.
Friday, February 20, 2009
I drilled a screw hole in the pipe through the firewall, then mounted the heater in it and drilled
the hole on into its plastic nose, then pinned it in place with a
sheet metal screw. It should hold just fine that way.
I then opened up the air filter housing, I thought it was about time
(after all these years) that I checked to see if there was actually
any oil in it. There was, and very gloppy black stuff it was too. It
also had a nice dirt crust on the bottom. I dumped/scraped it all
out, and then sluiced out it and the the filter element with bad
gasoline. I burned off the goo in the housing, which turned the
tenacious oily crud into loosely-attached dirt that was easily gotten
rid of with a little wire brushing. I then reinstalled the filter
housing in the car and refilled it with used motor oil, and put it all
back together. Two of the three rubber mounts for the filter housing
are broken off, but that's not really an issue.
Tuesday, March 10, 2009
Just thought I'd mention that even though it's now Daylight Savings
Time, an event I've always associated with Spring, it's
12.9 °F this morning with some 2" of new snow. Stupid
Congress. The preheater system definitely needed the help of the
space heater in the cabin this morning.
Wednesday, March 11, 2009
3.2 °F this morning, let's hear it for the block heater.
(Though 45 minutes of preheater/space heater didn't melt the ice on
the windshield today, only sublimated it to a degree.) No, it is not
yet Spring!
Thursday, March 12, 2009
More brake fluid. Sheesh!
Monday, March 30, 2009
I picked up the 560 SEL today so the
neighbor got a chance to drive the Frankenheap home. I noticed that
one of its brake lights was out. (He thought the heap was just fine,
perhaps this will goad him into completing his copy.)
Tuesday, March 31, 2009
I replaced the burnt-out brake light.
...After work I filled up the car for the last time this year.
Tomorrow I should be retiring it for the season. (Legally I'm
supposed to, because of the studded tires.)
Thursday, April 2, 2009
I awoke to 1–2" of snow this morning, 3–4" on the cars.
Retired for the year? Maybe not just yet!
Tuesday, April 7, 2009
OK, retired today. I drove the 380 SL, and it said 75 °F on the bank
sign. I think we can finally dispense with the winter beater and
studded snow tires. I put the car down below and disconnected the
battery for the summer.
Saturday, July 18, 2009
At the U-Pull today I found a
metal grille on a 220D, so I bought it. ($13). Just in case I
feel like a change!
Saturday, November 28, 2009
Now it really is time. I got out the car preparatory to its beginning
its winter service. I topped off the battery, which needed very
little, hooked it up, and the car started readily. No problems, and I
drove it on up to the upper parking. It started and ran perfectly,
just what I like, though it did need more brake fluid. It looks like
hell, but sure is a nice car in most ways that really count. I put
the space heater in and cracked the windows a tiny bit in order to dry
it out from its long 'sit'. I'll need to clean the inside of the
windows, but that's about it.
Sunday, November 29, 2009
I scraped up a bottle of Windex and some paper towels and washed all
the grunge off of the inside of the windows. I'd rather have used my
spray bottle of alcohol/ammonia, but I couldn't find it.
Monday, December 7, 2009
Time to switch over. Cold outside, too: 7.5 °F this morning!
All the tires were between 10–20 PSI, and it was so cold
the air compressor wouldn't start until I'd pointed a space heater at
it for awhile. Got the tires pumped up, though, and the preheater
plugged in. Space heater inside the car, too. The preheater had
fallen off of the pipe through the firewall, and was hanging up on the
starter. The plastic got brittle and the one retaining screw
obviously didn't cut it, I'll need to do something better to secure
this.
Wednesday, December 9, 2009
Last night I was waiting in the car, idling, for my family to show up
and it never really got warm. The parasitic coupling of the fan blew
a lot of air over the engine, and in the under 10 °F weather
that wasn't helping. I put some newspaper over the radiator, which
helped marginally, but this morning I found that it had slumped off.
I cut a nice piece of cardboard to completely cover the radiator; in
this weather it doesn't need any cooling air.
Monday, December 14, 2009
We couldn't find the license tabs, so I had to go purchase a replacement
set. $8.25, not too bad for a 'stupid tax'.
Tuesday, December 15, 2009
Just in time, we had about 4" of snow overnight. Time to start paying
the rent, car!
Tuesday, January 5, 2010
It needed a quart of engine oil and a bunch of windshield washer
fluid.
Saturday, January 9, 2010
Lately it's been getting pretty noisy, and I noticed when I had the
window open that there was a lot of exhaust noise. Today I jacked up
the car and lowered the exhaust system. (That was fun, the three nuts
holding the pipe to the manifold were very corroded. The smoke wrench
is the secret there, get the nuts red-hot and they come right off.)
Unfortunately the car has to be quite high in the air to actually
remove the whole single-piece exhaust system, it's possible that it is
not in factory configuration. I was able to swing the tailpipe out
under a wheel for easy access, the main problem was the top of the
pipe was open at the bend right before it goes into the muffler. I
used the Hobart welder and what scrap
steel I had left to stitch it up. The welding job, being on badly
corroded metal and with poor flux-core wire, is terrible. Functional,
however. The entire exhaust system is very rusty, I doubt whether
I'll get more than a year out of it. Damned salt! I really need a
new one, but naturally that is not cheap. There was also a hole
beginning in the top of the resonator, which I stitched over with a
piece of metal from an old SL muffler. (I was running out of clean
sheet metal. I also ran out of flux-core wire and had to finish the
job with the gas-shielded Miller. I'd been trying to use up the
crappy Harbor Freight wire, I'll replace it with name-brand wire.)
There was a small hole in the bottom, but I couldn't get at that with
the system on the ground. With the worst holes covered up I
reinstalled the exhaust system, using anti-sieze on the manifold
bolts. I started the car and the problem was obviously cured. I
could feel a bit of puffing out of the patches here and there, but so
what. There was also some on the bottom of the resonator too, but I
can take care of that later if it gets worse. This all took four
hours, I was thoroughly tired of working on it by then.
Monday, January 11, 2010
Filled up today, first time since last March!
Just under 30 MPG, just over 400 miles.
Wednesday, January 13, 2010
On the freeway I heard some odd noises. I stopped reasonably
soon and had a walk around the car, but couldn't really find
anything...
Thursday, January 14, 2010
Odd noises explained, the muffler fell off on the road today! It
snapped off right next to my welded patches. I guess I'm not done
there...
Friday, January 15, 2010
On the way to work I found the rubber muffler bumper near where the
muffler fell off. I guess the muffler hit the ground and jammed
backwards, knocking the bumper off the chassis. I picked it up for
reinstallation.
I stopped by a muffler shop today and nabbed some cut-offs.
(2–3 inch pieces of new pipe.) I also bought more flux-core
welding wire for the Hobart. Ten pounds this time, $55 at Big R
(on sale) for the 0.035". I'd lost a rubber exhaust hanger with the
muffler yesterday. As I was at the U-Pull I got a couple more, along
with a rather nice trunk mat and carpet from a 114 gasser.
Sunday, January 17, 2010
Yesterday it rained heavily all day, so I had to wait 'til today to
fix the muffler. I put the rear of the car up on ramps and selected
the best piece from my scrap exhaust collection to collar the break.
I glued the dislodged rubber bumper (114 987 00 39, aka
479076-28) back to the frame, as the rubber 'tit' had torn half off.
(Shoe Goo, of course.) I had to notch the new collar in order to get
the best fit to the ratty tailpipe, and its prior welds. I didn't
need to remove the exhaust system, lowering the back was sufficient.
The new collar was somewhat larger than the exhaust pipe, so I welded
a strip onto the pipe remains so that I could then weld the collar to
that strip. I welded the new collar onto the muffler, then welded the
collar to the exhaust pipe. I had to grind and re-weld a number of
times in spots to cure exhaust leaks. I found another hole in the
exhaust pipe and had to weld a patch over that. That took nearly as
long to do as the muffler, because it was much less accessible. The
whole job was something like three and a half hours. (The off-the-car
part was so easy, but underneath the car, not so much.)
The muffler ended up a bit cocked so that the rubber hangers and
bumpers don't fit as well as they did. Oops. I broke a rubber
hanger, but I got two Friday so I was still OK.
Of note is that the Hobart wire was much shinier and smoother than the
cheap Harbor Freight stuff, and seemed to work better. It was a bit
too large for the job (the old stuff was 0.030"), but surprisingly it
fit through the gun's 0.030" tip. (I should get the correct tip,
which Big R carries. I also will need some more 0.024" bare wire for
the Miller, I noticed it was getting low when I tried to borrow its
0.030" tip [which doesn't fit].)
Monday, February 8, 2010
While picking Daniel up at school today the car scared me with a loud
roaring noise, which I figured out was the fan. When I got a chance
to stop and check it out I found the thermostatic fan clutch bearing
siezed. I slopped some motor oil over the shaft and got it loosened up
again, but I doubt that'll last long. If I can't fix it I'll have to
go back to the plain fan. (Or do without a fan altogether, given that
you really don't need one in the winter.)
Car's sure a lot quieter now!
Saturday, February 13, 2010
Topped off the brake fluid, the light's been flickering again.
Tuesday, February 16, 2010
Caught a hideous rock (?) today on the city streets. I'm surprised
the windshield is not broken, though it's got a spray of pits in it.
There were little round beads imbedded in some of them, like molten
metal spray, but I saw something flip up from the road, like a rock.
It's a mystery...
No, it's not. I think the molten metal bits are spatter from the
welding I did on the fender. Next time cover a
lot more of the car with wet towels! The pits from the rock are as
you would expect.
Monday, February 22, 2010
The clock is starting to lose a lot of time, several hours
today. (I didn't drive it all weekend, of course.)
Friday, March 5, 2010
Last fill-up of the year.
Saturday, March 6, 2010
Today I put the car away for the Summer. But first I ran around the
car with the wire brush and a rattle-can of gray paint. On the RR
door one of the rusty patches was a Bondo-d hole, that's some more
real special work the PO did on this car! I ground that off and
welded it up, but that took some doing. (I used the gas-less Hobart
welder, it was easier to get out.) I had to grind flat and re-weld
several times before I was satisfied. Looks like crap, but isn't a
hole anymore. There were several other similar holes that showed up
in the car, but I had limited time to devote to this, so I just
painted them. Maybe next time! I then ran the car down to storage
and disconnected the battery.
Sunday, November 21, 2010
Got the car out for the Winter. Two mouse nests (hood and trunk), and
several wasp nests. But as it was sub-freezing today, and snowing,
that was not an issue. (Long past time to switch cars!) With the
battery reconnected, the tires pumped up, and the preheater connected
for a bit the car started immediately. No problems. I ran it up top
and plugged in a space heater to fully dry it out.
Monday, November 22, 2010
Date night! We had a houseguest, so he stayed home to watch Daniel
while Jill and I went to band practice. The weather was bad, as
predicted, and rehearsal (which was sadly necessary!) was cut short.
We made it almost all the way home, but we ran into blizzard
conditions and drifting on one road I should have been savvy enough to
avoid. (I had gotten stuck there once before and there was a
marginally better alternate route.) We were going OK even though
visibility was terrible, paffing through a few drifts high enough to
wash over the hood like waves, when we ran afoul of cars stalled at a
stop sign at a bit of an uphill at the juncture to our road, and were
forced to ourselves stop...and join the party. We were stuck in the
'wind tunnel', the worst bit of road in the area, in single-digit
temperatures and sideways winds, with visibility mostly whiteout. The
car was rocking with the wind, and the roof was drumming. The car
kept us warm, and the heater fan was working well on high, but the
high snow-filled winds and low temperatures took their toll in spite
of the covered radiator and thermostatic engine fan, and the engine
temperature slowly dropped. After an hour and a half or so,
punctuated with other arrivals most of whom could get away again, the
county plow came by and pulled us and the others out. In the meantime
our own road had become impassible, and we were so cold and
disheartened (we'd both gotten out and pushed a lot, both our own car
and others) that we headed the other way, with the wind, rather than
wait to maybe get snowed in again or bashed into and took refuge for
the night with nearby friends. By then it had gotten so cold and
windy that with the substandard engine temperature the windshield was
more or less permanently iced up and I had to drive with my head out
the opened door. That added to the fun, and on top of the earlier
ingress and egress activity resulted in a rather snowy interior. And
there were still drifts to deal with that way, too, though lesser
ones. Fortunately traffic was nearly nonexistent and we got through
and parked out on the street.
In the morning the interior of the car was frozen solid, and I
couldn't even begin to start it. I had the space heater, though, and
I borrowed a long extension cord and a current bush and let 'er rip
for an hour or so. That got the starter knob unthawed enough to start
the car, whereupon we went home. That trip, in daylight and with no
wind, was uneventful. Most of the drifts had by then been plowed back
some. I cleaned up and then it was back out to school and to work,
late to be sure but undaunted. I left the car running while at home.
The car actually acquitted itself pretty well, we were asking a bit
too much from it. The now-ancient Hakkapeliitta 1 snow tires still
worked well. Had I only gone the other way it would merely have been
a bit of a hairy trip. As it was, it was an Event.
Tuesday, November 23, 2010
The driving lights are again staying on when the car shuts off. It's
the damned relay sticking again. I tapped on it and they shut off,
but this is disconcerting. It also means that they stay on with the
low beams, which is not friendly at all—when it sticks.
Wednesday, November 24, 2010
More fun today. Neither of our other two winter vehicles (both
diesels, the Chicken Wagon and the Dodge pickup) would start today as it was
0 °F out and they'd not been adequately prepared for the cold
which came on suddenly. (This car's preheating system worked
admirably, as usual.) Jill ended up driving this car around town all
day. (Not her favorite vehicle at all.) And then when she came to
pick me up at work she'd had a sudden flat somewhere before she pulled
into the parking lot. (I'd told her to keep an eye on that tire [RF]
as it'd been leaking a bit more than normal lately.) I had to change
the tire in front of the entrance, with a headache and feeling sickly.
(The spare is an old Pirelli 185HR14, probably an original spare tire,
though not from this car.) The jack started collapsing the
underpinning of the car, this is the stuff I'd welded up (from rusty
tatters) years ago. Probably too thin, or else it's falling apart
again, or both. Sigh. I dropped the tire off at Les Schwab on the
way home.
The tire shop called later. The tire (Nokian Hakkapeliitta 1
195/70R14, originally purchased for Jill's 450 SL) was ruined by driving on the flat, it
was full of rubber 'coffee grounds'. The guy said it doesn't take
long at all. No idea what the original inflation failure was, but he
said the wheel was still OK. Crap, I was going for at least 10 years
on those tires and didn't make it! I'll try to look for a used one to
make up the set again. They may be old, but the tread and studs are
still good.
Monday, November 29, 2010
I picked up the tire and wheel from Les Schwab.
Monday, December 6, 2010
I'd been looking on craigslist for awhile, and finally found a set of
used Hakka 1's that ought to work, and at a price I could live with:
$50 for 4, claimed 30% tread left but it looks like it might be
slightly better than that. Many studs gone, but not all, and
definitely more worn than my set. They're 185/70R14 off of a Subaru,
which might be a bit closer in size to what the car ought to have.
(175 SR 14, a size designation almost gone today, which is
probably close to a 175/80R14.)
Tuesday, December 7, 2010
I had a close look at the 'ruined' tire, and while it's not in good
shape anymore it looked to me to be perhaps just this side of ruined.
So I got out the 50-grit sandpaper and cleaned up the bead and
vacuumed it out. I used the power wire brush to clean up the
corrosion on the rim and then went over it with the sandpaper. It
looked good enough to try, at least. I got out the tire irons and had
a whack at it. (One good tire spoon, and one recently-purchased POS
from Harbor Freight.) First I sprayed the beads with Simple Green
(soap), then I put the wheel into the tire from the back side, using
the irons, and making sure the directional arrow on the tire was going
to end up the right way 'round. Then it was just a matter of kneeling
on the face of the tire while I worked the irons to seat the bead.
(You have to make sure the bead of the tire is nestled into the
channel in the center of the wheel as you work the irons around the
bead or you have zero chance of doing the deed.) Schwab had kyped my
Schrader valve and valve cap when I'd taken it in, but I had ready
spares. I then used the air compressor to inflate the tire, the beads
popped into place and I aired it up to the correct pressure. I put
the assemblage into the trunk, we'll see if it holds air. In theory I
now have a spare again, which is comforting, and if it holds air I'll
swap it back onto the car.
I stowed the tires I'd bought in the garage, it may be that I need
them yet.
Wednesday, December 8, 2010
The tire held air well, so I put it on. We'll see how it behaves.
Underneath the car's getting mighty rusty. It'll be the death of it,
someday. The RF outer brake pad doesn't look like it's braking, the
disc under it wasn't scrubbed smooth.
Thursday, December 16, 2010
I'd been thinking of this for years, and yesterday I finally scraped
up a power inverter and a short
string of miniature colored Christmas lights we weren't using this
year. This morning I installed them in the car around the upper rear,
I used bent paper clips to hook them into the window trim. The
inverter's under the passenger seat, and the string snakes out and up
the passenger B pillar. I moved all the dead lights to the plug end,
away from what shows, it worked out well. Ho, ho, ho!
The biggest problem was the inverter, it has blown every cigarette
lighter fuse it's ever been shown. It's the initial inrush current
that's the problem, before you even turn it on. After I replaced this
car's blue fuse I solved the problem by wiring a
1/2 Ω 20W power resistor from the junkbox in
series in the inverter's power cord. After that, perfection.
I also sprayed WD-40 on the RR door latch, it was starting to stick a
bit.
Monday, December 20, 2010
More snow. While brushing off the car I managed to (finally) snap off
the hood ornament. It broke in a different place this time. Sigh. I
don't know if it can be silver-soldered or not, the glue hasn't been
working that well.
Saturday, January 8, 2011
The clock has been dysfunctional since last year, today I finally
pulled it out and had a look at it. (Getting it out is easy, just a
7mm wrench. Opening it is a miserable exercise in reversing the
bezel's retaining crimp using your favorite blood-drawing tool.) The
capacitors are still fine, but one of the intermediate gears' plastic
axles has snapped off. Exactly like the
previous clock.
I put both clocks on the bench, and neither showed (oscilloscope)
signs of reduced drive strength on the 60 Hz motor drive. (At
one point I'd convinced myself that the IC in the first clock had lost
drive strength, and I had plans to bolster it with an old 4049/4050
CMOS driver IC. I see no sign, now, of that being a useful exercise.)
Both motors felt like they had the same amount of torque on the first
drive gear.
I then tried a new trick and used a candle and a piece of broken-off
clarinet needle spring to try to make a new axle for the broken gear,
and this was a mistake. The heat, and some poor aim, caused the two
concentric gears to start to fuse together. I had to take the clock
completely apart and cut out the fused plastic to get things moving
again. I then, like last time, used a fine drill in a pin vise to
make a nest for the new axle, which I then heated and slipped into
place. The rest of the fun was reassembling the clock; just like last
time I had to use wire to lash the front faceplate to the body of the
clock. (You have to cut the heat-staked plastic nubs off with a razor
blade to get the faceplate off.)
Sunday, January 9, 2011
I reassembled the clocks. I then put the newly-repaired one back in
the car. Somehow I managed to blow the fuse, so I had to replace
that. While I had the dash cluster out I removed the rheostat and
cleaned it, it's been acting a bit flakey lately. Anyway, the clock
was running again so I put the dash cluster back. We'll see how the
clock keeps time once it's out in the cold for awhile.
The fight against entropy is never-ending...
Tuesday, January 11, 2011
8 °F this morning and the clock seems to be keeping good
time. Excellent!
I stopped at the auto parts store and bought more brake fluid, It was
getting low again. It was on sale at two for one, so I bought two as
I seem to use a lot of this stuff.
Friday, January 21, 2011
I've been smelling fuel lately and it looked like the cloth-covered
injector return lines might have been weeping, so I got out the last
of my replacement hose (MB P/N 615 476 03 26) and
replaced what I could. My records show that I
replaced one of the four (five, counting the plug at the end) pieces
nearly seven years ago, but I didn't write down which one! I
guessed, and replaced all but the last injector's line (and the stub),
using all the hose I had left. I'll need to get more, the stuff fails
suddenly and we have several cars that use it.
Since I operated on the clock the instrument cluster hasn't been
staying in place. I think that pressure from the speedometer cable
was pushing it out a bit, so I crawled under the dash and pulled it
down. It runs next to the accelerator pedal, it's actually fairly
easy to do. I pushed it down and out of the cabin, we'll see if that
helps.
Sunday, January 30, 2011
It's sure easy to neglect a winter beater. I changed the sludge
oil today; only 9,200 miles and six years on the last batch! (I knew
it was low and I'd started to see the oil pressure gauge slow down on
its way up in the morning, and I knew it was long past time to change
it so I didn't put more in until I got a chance to change it.) I
still didn't have a proper oil filter, so I drained the old one and
washed off the screen filter, and dug the sludge out of the can before
reusing the old one. (Again.) What a mess! This situation was not
ideal, but better than nothing. I poured a little oil into the
injection pump's reservoir too. I also mopped out the back seat
footwell and aired up the tires.
Saturday, February 12, 2011
It was windy and 50 °F today, excellent conditions for
washing the dead mouse residue out of the trunk. I emptied it and
vacuumed it out, then scrubbed the trunk walls and floor, and the mat,
with hot soapy water. I then rinsed it with the hose, drained it
(lots of holes!) and vacuumed out the remaining water. The weather
took care of the rest of the drying.
The tank vent was again clogged, I ran a wiper blade spine up
it and dug out more dirt. Those damned mud-daubers really like it up
there! The 108 471 00 81 vent grommet was torn, I used
cyanoacrylate glue to put it back together. To keep the bugs out in
future I wadded a bit of copper kitchen pan scrubber into the vent
where it comes through the side of the car behind the bumper.
I put the bouquet of auxiliary lamps, the
junkyard door seals, the metal grille, and the shifter boot in the
rafters over window #1 in the new garage. This junk doesn't need to
ride around in the trunk forever! The spare trunk mats (one rubber,
one fuzzy) went onto the trunk floor. The trunk actually looks nice,
I got the tow rope and jumper cables rolled up and put back in the
plastic toolbox, and put in a hand air pump. The rest of the trunk
detritus went into the garage spares piles. (Except for the dead
mouse and all the poop, that went into the brush! Oh, and the jugs of
various fluids and a spare belt are nestled around the spare tire.)
Friday, April 1, 2011
Time for a bit of TLC. I aired the tires and checked the oil, good.
I re-oiled the fan clutch bearing, just in case. The hood pad has
been coming down, so I got out a rubber glove and the big can of
crappy environmentally-friendly contact cement that I hate and
slathered some around, then used a broom to hold it up while it dried.
It never did want to stick well, so I went to the brush pile and found
a long hardwood stick, about ½" in diameter at the
small end, and wedged it behind the lip of the hood at one side. I
then eyeballed it at the other (fat) end and cut it at an angle that
would wedge into that side. I then bowed the stick and tucked the
wedge in. The stick bows up nicely, holding the pad up in spite of
glue failures, and seems very secure. Some minor repositioning got it
out of the way of things like the windshield washer tank lid, which
protrudes upwards and is fragile plastic. A couple of thin sticks
wedged crossways behind the big stick completed the retaining web.
That should hold until the pad completely disintegrates.
I used more penetrant on the one rusty door (LR) hinge, it seems to
have been getting a bit worse lately. I would like to remove the
hinges and heat the bad one red-hot to free it up, but they're welded
to the door frame. I could remove the door and tackle it that way,
but that still might not be pretty! I removed the broken driver's
seatback adjustment knob cover (which probably got pounded by the
seatbelt adjustment buckle on a door slam) and used cyanoacrylate glue
to put it back together. Good enough for one day's effort, I think.
Sunday, April 3, 2011
Welding day! Yesterday I got back the $50 gas-less Hobart welder that
the neighbors had borrowed, so I whacked away a bit at the car's rust
problem. I filled in one pinhole up by the driver's headlight, and
then chopped away at the hole in the side by the RR passenger's feet.
I removed the trim strip and cut away a bunch of the ratty rusted-out
rocker, the back section I hadn't addressed last
time, and wire-brushed what I could. What a mess! I removed the
seat belt from the anchor, and noted that the remaining metal was so
loose back there that in an accident it is doubtful that the belt
would have held. Not good! I cut out the rusty part, just above the
'waterline', and started welding in new sheet metal strips. Some four
or five hours later I'd finished closing up the inside wall, it is one
of the worst-looking welding jobs ever. (I have a real problem with
burning through, then I circle the hole and fill it back in. Often
the hole spreads quite a bit before I get it back under control. It's
a gift!) I wire-brushed everything, in the process I managed to snag
the loose strings of the ruined side carpet and rip loose a big chunk
of the carpet that wound itself around the brush spindle. Another
mess! Anyway, with the wall cleaned off I rattle-canned some primer
on there, inside and out, then some gray paint. This phase should
cure the interior noise problem, but I have a lot left to do on the
outside. I used anti-seize on the seat belt anchor when I put it
back.
When I jacked the car up I noticed that the RR rubber brake line is
weeping. I need a new one, but the rust back there is bad enough that
I imagine that removing the old one will be a real treat.
Wednesday, May 18, 2011
Yesterday I noticed the LF tire was completely flat, so I pumped it
up. This morning it was flat again, so I took it off the car and put
it in the 190D's trunk.
Thursday, May 19, 2011
I forgot about the tire yesterday, so I took it to Les Schwab today.
They took one look at it and called it ruined, tread separation; I
brought it home. I noticed that there was some fine steel wire poking
out of the side of the tread, but it looked more like it had been
driven into the tire than coming out of the belts, I was able to pull
it out with needlenose pliers. I think it might have been FOD. Once
aired up the 'tread separation' lump on the tire disappeared, so I
wonder if it's real or not. I used the hose on the tire and it was
the outside bead that was leaking very badly, I couldn't see any
bubbles from the tread or sidewall area, not even where the wire had
been. I can probably continue to use this tire if I dismount it,
clean the mating surfaces thoroughly, and remount it. I may try that
next Fall. In the meantime I put on one of the many junkyard spare
wheels to get it through its onerous parked-over-the-Summer duties. I
had Daniel vacuum out the car while I did this.
Tuesday, July 5, 2011
A report from the mailing list indicates that the replacement
headlight reflectors from Turkey are good things, circa $60 at this
time.
Friday, November 18, 2011
3–5" of snow predicted by this afternoon, there's already
one or two inches on the ground this morning. Perhaps it's time to
get this car ready to drive? (I've been busy getting the Chicken Wagon going, I guess I'm running a little
bit behind schedule!) I put the battery on charge, aired the tires,
and replaced the license plates. (New revenue source for the State?
There's nothing wrong with the old ones, I bought them myself when I
got the car, but the State now requires periodic replacement.
Bastards. This car has non-US mounting holes, I had to drill new
holes in the new plate, more work for me.) Windows needed cleaning,
but I didn't really have time. I topped off the brake fluid, and by
then it was ready to start. It did, with no problems at all.
...On the way to work it was apparent that the brakes were not
entirely happy, I think it's time to replace those weeping rear hoses.
Also the grommets on the reservoir, it looks like they have been
leaking a bit. I ordered these things from Rusty, should be about $35
or so. (He commented that he'd never seen a
115.115-50-XXXXXX VIN before.)
Sunday, November 20, 2011
I removed the bad LF snow tire from the wheel. That is not
fun! I then used 80-grit sandpaper to clean off the beads of the
tire, vacuumed it out, and used the sandpaper and a scraper to clean
up the mounting flanges of the wheel. What a mess, the tire was full
of little round rubbery pellets, presumably the remains of the canned
sealant. The tire went back on the rim much easier than it
came off, per usual since the surfaces are all clean and soapy, and
sealed immediately with air. At pressure there were no signs of leaks
along the mounting flanges. Success? Will let it rest a day or two
to see.
Tuesday, November 22, 2011
I installed the snow tire, we'll see how it holds up, and checked the
inflation on all the rest. I cleaned off the windows, they were
gloppy inside from storage. I sprayed PB Blaster penetrant on the
rear brake hose fittings.
Saturday, November 26, 2011
While out Christmas shopping with Daniel I finally remembered
that Radio Shack supposedly carried Caig Deoxit, rumored to be a
miracle substance, so I stopped by and bought some. I sprayed a shot
into the highly intermittent dome light switch, and within minutes
(and with a few actuations) it began working perfectly. [And has been
so for nearly a month now.] I'm a convert!
Thursday, December 1, 2011
The brake parts came. Now I guess I have to get to work!
Saturday, December 3, 2011
I jacked up the car, only the RR hose was wet and oozing. It was cold
outside with a few flakes drifting lazily out of the sky, so I decided
to do only that side. The reservoir wasn't as empty as I'd thought,
so I also decided to defer the reservoir grommets until later. I put
the extra brake parts in the trunk. I removed the RR wheel and took
the brake caliper off the car. The easiest way to work on the thing
is to cut the hose, which I did. (There was no way that hose was ever
going to get used again!) When you do this you can use a box-end
wrench instead of a flare on the hose ends. The PB Blaster had been
working, both nuts actually broke loose from the hoses fairly easily.
The nuts, however, were themselves pretty well rusted to the hard
lines. I used the acetylene torch to heat the one on the caliper to a
red heat, enough to break it loose from the pipe. I used the torch to
burn loose the rust holding the remains of the old brake hose to its
bracket, and knocked the fitting loose onto the ground. The weird
thing was that several seconds later there was a loud 'POP', like a
firecracker, and flames blew out of the fitting! All the rubber was
then gone, I think it blew it somewhere under the car. Very strange,
especially the time delay—like a fuse. (Vaporized brake fluid
[an alcohol] reached a combustible mixture in contact with the
ultra-hot metal?) The torch hose didn't reach all the way back to the
wheel, though, so rather than move the torch rig out of the garage I
used the propane torch to heat the on-car fitting. That also did the
job and got everything loose that needed to be. I used wire brushes
to clean things off well, taking care not to get crud into the brake
guts, and then used anti-sieze compound on the nuts and the lines. I
also removed the brake bleeder and cleaned it off, then used a bit of
anti-sieze on its threads, taking care not to get it down to the
sealing surface. I then reassembled everything, making sure the new
brake hose didn't have any twist in it when it was in operating
position.
Enlisting my son's help I then bled that brake. Though I have some
bleed-by-yourself tools the traditional two-man approach works best.
I made sure the brake reservoir didn't run low, I didn't want to have
to start all over and then bleed both sides! We then aired up the
tires and took it for a drive, the brakes seemed like they ought to.
Done for now!
While I was under the car I noticed that one of the exhaust donuts had
broken and fallen off, so I replaced it with another junkbox one. The
patched-up exhaust system is definitely showing its age, but I think
I'll be able to get this year out of it. (It desperately needs a full
replacement.)
Friday, December 9, 2011
Yesterday I noticed when Jill drove off in this car (long story) that the LR taillight was
out. This morning I replaced it. It's still kind of intermittent,
I need to work on the contacts.
Friday, December 23, 2011
I had some time, and it was a beautiful (though cold) morning, so I
dug into the taillight assemblies. I started by cleaning the lenses
in warm running water using a small bristle brush. (They were filthy,
the lens seals are very old and tattered and dirt gets inside.) I set
them aside to drip dry. The sockets were all very dirty so I used a
small wire brush on a stick (like a small paintbrush) to scrub out the
insides. The bulbs all fit loosely, so I pried out on the spring tabs
a bit to tighten the fit. I cleaned off the bulb bases with the brush
and sprayed Caig Deoxit on the bulbs and the sockets. (I also sprayed
the trunk light switch.) Some of the bulb glass was coming loose from
the bases so I used a bit of cyanoacrylate to resecure them. I
plugged in the car's battery charger (part of the preheater system) and turned on the key and got
all the rear lights going at once. I fiddled with things until all
bulbs were no longer intermittent. The RR brake lamp was sub-wattage
so I swapped it for a brighter one. The LR housing had split above
the marker lamp, possibly due to an overwattage lamp at some point, so
I put some duct tape over the crack to help keep out dirt. I noticed
that neither license plate lamp was working so I pulled the right-hand
access cover and removed the two 7mm bolts that held the right-hand
fixture in place, and found that its 3 W cartridge lamp (weirdly
small in diameter, but otherwise just like the more common 5 W
and 10 W lamps Mercedes uses) was good. Fool that I am I should
have checked the power feed first. There was no power at their plug
on the LR light housing.
Crap, this little chore just got harder. Unplugging the harness
connector from the lamp assembly was difficult, the pins didn't want
to separate. I had to pry on the bakelite connector and I managed to
snap off the cover, breaking the ears off one side of the body of the
shell. At least I could then use needlenose pliers to pull out the
six individual contacts, they were well-corroded into place. I used
cyanoacrylate glue to put the ears back on the connector shell. I
removed the assembly from the car and managed to get the pieces
separated without further breakage. The connector pins and sockets
are part of a plastic board that snaps into the housing, I carefully
pried open the many retaining snap clips and got the board separated
from the housing. The board was built as an early form of printed
circuit style board (though probably not using printing technology)
and there was a serious case of corrosion on the (aluminum?) 'traces',
if this continues to progress the lamp assembly will not work for much
longer. I cleaned it up, and found that the brass strip that tied one
of the sockets for the license lamps to the power feed pin had broken.
(The extra contact-less bulb socket in the assembly shares this feed.)
I scraped the mating brass edges clean and bent it up into contact and
used a hot 85 W soldering iron and some hemostats as heat sinks
to protect the plastic to solder it back together. I also found that
one of the bulbs' spring contacts had broken off and was floating
around loose. (There are two per bulb, a brass contact and a steel
spring right behind it for support.) I cleaned it off and lashed it
to its steel spring leaf using twisted copper wire. I soldered the
wire to keep it from unraveling, the wire not only holds it in place
mechanically but will also help keep the electrical connection intact.
(I hope.) I tested all the traces and contacts using the lab power
supply, I set the current limit to 2 A, more than the biggest
bulb needs, and used it as a high-current ohmmeter. All connections
could still take the current and trip the overcurrent limit. The
degraded traces are still working, as was the lashed-on contact leaf.
The light's housing and plastic reflector were filthy, so I
ran them through the dishwasher while I made the other repairs. When
I put it back together I had to relieve the plastic a little bit to
allow for the soldered brass strip's new position, and the big lump of
solder on it. Miraculously I didn't break any plastic while doing all
this. I reinstalled the lamp housing into the car (the body seal was
actually still in pretty good condition), and used Deoxit on the
connectors. I turned on all the lamps again and this time the license
lamps were both lit, and no bulbs were intermittent.
The backup lights are not that big or bright, so I lined the backup
lamp wells in the housings with aluminum foil to help out. That
should help brighten things up back there. With that all done I put
the dried lenses back and the lights looked great! I turned
everything off and unplugged the car.
Sunday, January 8, 2012
The under-dash cardboard panel on the passenger side had torn loose
from its retaining spring-clip rivets and was hanging down annoyingly.
I Shoe-Gooed a thin hardwood strip along the edge of the cardboard and
clamped it into place while it dried. After it had set up I removed
the clamps and pushed it up into place, then drilled holes by eye for
the spring clips. They went in far enough (though not graciously due
to the increased thickness of the wood strip) to hold it up it seems.
Anyway, it looks a lot better than it did. We'll see if it holds up.
Wednesday, January 11, 2012
I also filled up the washer reservoir, the nasty crap they spray on
the freeways around here is really tenacious goo. Monday really gave
the washer a workout, but so far the Shoe Goo glue job on the frog has been holding.
It was cold, 16 °F, and even though both the preheater and
the space heater were going inside the car it didn't clear the
windshield in the 45 minutes I ran it before I left for work.
Gotta plan farther ahead on days like this!
Thursday, January 12, 2012
Aired up the tires again, it's no fun doing this when it's
13 °F outside! I put in a second space heater in order to
get the windows cleared this morning.
Saturday, January 21, 2012
Yesterday I hit the berm at the bottom of the road (where the plows
hadn't done the job right) and broke off a fog light (again). Today I
removed it and dried it, then glued it back together with Shoe Goo.
What a pain.
Tuesday, January 24, 2012
I put the glued-together light back on the car. Wasn't really able to
get it aimed high enough, but that's how it was before it broke again.
Monday, March 5, 2012
I've recently been hearing a rattling under the hood that sounds
suspiciously like the fan, so today I checked. Yes, it is
loose, and will need repair or replacement before it comes off its
post and flies through the radiator. Nuts. That 116 visco-fan has
been far more trouble than it's been worth. (I had been
hoping for quieter operation and greater fuel economy. Maybe I got
those, but it's been a big PITA.)
Wednesday, March 7, 2012
Cold outside this morning (25 °F) but I really need to make
sure my radiator is protected against shredding death. I looked for,
but could not find, the original plastic fan. I did find, however,
another clutched fan (a Behr VISCO-LUFTER) that was
more suitably-sized for this car, and it wasn't obviously shot. I
installed it, which was a real PITA. The problem was that the
oversized 116 fan I had put on couldn't come
out of the car without removing the shroud and the upper radiator
hose. (The replacement could slip back in without these extra steps,
not that this helped any.) I also found that it was quite difficult
to get all four fan bolts started since they're long enough that they
interfere with the fan clutch itself if you have the thing fully
seated. I had to start them all a thread or two by hand with the fan
held away from the water pump and pulley, then walk them all down in
parallel. Slow, especially with numbing fingers.
The sad part is that once the new fan was on and secure I could feel a
bit of wobble in its bearings. Crud. Still, better than what was
there. Interestingly, the dead 116 fan clutch looks like it might be
meant to be repairable as it seems to be held together with bolts!
(P/N 116 205 12 06, also marked 31.4717.02, and "Alu"
in a kind of winged stylized logo; all this on the assymetrical fan
blade assembly itself. The clutch is Behr, marked 4088.3 and "LE".)
I may be able to replace the dead ball bearing in it, as it otherwise
seemed to be in decent operating condition. I can see a standard
snap-ring that looks like it might be holding it in. We'll see
sometime, I guess. (The more-typical Behr replacement is crimped
together and is essentially non-repairable.)
...At lunch time I noticed that the (left) broken headlight lens that
I glued before has finally fallen apart again,
the clear 5-minute epoxy I'd used didn't hold up to the sun and rain
and had yellowed and flaked off. (Well, it did make it eight
years!) At home I took the headlight off and cleaned the old glue and
dirt off, and started gluing it again, using the same stuff as last
time. It wasn't too bad, but I had to mix several small batches of
glue and hold the pieces in place until it set up, then do the next,
etc. It took three sessions to glue the four pieces back together. I
left the assembled lens to cure overnight.
Thursday, March 8, 2012
Since it was all apart I decided to record some of the headlight's
part numbers. It's a Hella assembly, 100 951 is cast into the
aluminum frame, the chromed trim ring is 100 710. The main
reflector has "9DR 101 111-00" printed on it, and "4W" and
"(34 8)". The fog lens is marked "E4" in a circle, and has "906",
"907", "SF-S58", and "SF-S21" cast into it. The (highly-corroded) fog
reflector has "1ER 001 165-07", and "K-8239", "35W",
"SF-S21-45W" and "906" on a sticker. The main lens carries "E1" in a
circle (four of them, actually), "22798 R6", "4561 R6", "E4"
in a circle, "906", "4561", "4561 R7", "K 8239",
"14-101 055", and "A" in a circle. (It's amazing you can even
see through it with all that cast into the glass!)
The yellow (?) fog reflector was extremely rusty, and barely
reflective over any of its surface. I wire-brushed off the worst of
the flaking, sprayed it with 3M's Super 77 glue, and then attached
some aluminum foil to the surface, shiny side out. Extremely crude,
but it could hardly be worse than it was! I also washed the dirt off
of the fog lens. On the bench the fog lamp seemed to throw more light
than it originally had, so I guess it is an improvement.
I then reassembled the headlight and put it back on the car. I tested
all the lights and they worked.
I started taking apart the 116 fan clutch. Looks like it has two
bearings in it, both are shot. Not sure how it should come apart
for new bearings, the screwed-down cap just covers the inner bearing.
The eight body bolts probably expose the fluid chambers. Scared to
open it, but I don't see an alternative.
Thursday, March 22, 2012
Happy Spring! About 2–3" of wet, puffy snow this morning.
Had some yesterday, and some blizzard-like conditions on the weekend.
Anyway, I took another shot at the fan clutch and was able to remove
the fluid chamber cover, but only because there were enough missing
balls in the bearing in the cover's side to let the bearing come
apart. The inner race is tight on the shaft. The exposed
chamber contains a thin layer of a very viscous gray grease-like
material. I suspect that there is a fair amount of ground aluminum
(from the bad bearings allowing things to touch that shouldn't?) in it
giving it the gray color. I think my silicone oil might serve as a
replacement fluid medium, assuming I can get it all apart without
breaking anything, re-bearing it, and get it sealed again. There is a
crude spring-loaded centrifugal slide valve that closes a passageway
between the two apparent sides of the big close-fitting spinning disc
inside the clutch. That's all I can see right now.
Tuesday, April 3, 2012
I used a bearing puller plate and a 2-jaw puller to remove the inner
race from the shaft. I then used a 3-jaw puller to push the shaft
through the center and out. The secret was to put heavy tension on
the puller, then hammer on the shaft to break it loose. It had to be
done like this every step of the way, it was very tight. Once the
shaft was out the snap ring could be removed with needlenose pliers,
and then I used the plate puller to remove the other dead bearing's
inner race from the shaft. I still have to remove the outer races
from the clutch housing, but first I have to figure out what to do
with the goo.
Wednesday, April 4, 2012
I cut open a milk jug and scooped the fan goo into it. I then drove
out the bearing races using a punch, it was less difficult than I'd
feared. I don't see any sign of any kind of thermostatic element
anywhere, just the one spring-loaded sliding gate valve in the rotor
that would seem to be purely centrifugal. The rotor has a bead in its
outer rim that takes a screw thread path, that's obviously the pumping
channel from the back to the front chambers.
...At lunch I went to Brown Bearing with the remains, and they sold me:
| (1) | 6002-2RS | Bearing | 9.50
|
| (1) | 6201-2RS | Bearing | 6.43
|
| (1) | 7410 | Oil Seal | 2.50
|
$20.03, with tax. The bearings are Nachi brand, the oil seal is SKF.
Saturday, April 14, 2012
I'd stalled long enough, I started putting the fan back together. I
started by cleaning the rear (engine-side) race and putting the
housing in the shop oven. I put the new bearing in the freezer.
After that they slipped together so easily I doubt that the
temperature differential was necessary. In fact, it wasn't, because I
found that I could not install the new seal from the inside because
you don't want to hammer on the exposed seal lip, so I had to remove
the bearing again and put the new seal in first. Because of the
staking for the former seal it really didn't want to go in
from either side, I had to use a socket to drive it in with
the BFH. There was some deformation of the seal's metal support ring
due to the force required to get past the staking. After that I put
the bearing back in and installed its snap-ring retainer. I then put
the assembly in the oven and put the shaft into the freezer. Once
temperatures had stabilized I put the shaft into the rear bearing, and
it did not want to go in, even with the temperature
differential. I had to drive it in, hard, with the BFH. At that
point it was clear that the seal doesn't mate with the shaft, but
rather with a relatively loose spacer ring that I'd been wondering
about. The ring slipped onto the still-cold shaft easily, too easily
really. I'm not sure that there's really a good seal there, since it
looks like grease will probably slip out the shaft-side surface of the
sealing ring. Oh well, it's not coming apart again without ruining
the new bearings. I then cooled the shaft assembly and put the rotor
into the oven. After a suitable delay I tried to install that, and it
was really hard. I had to pound quite hard with the BFH on
the socket I was using to drive the rotor on over the shaft. Once I
got it driven on far enough not to interfere with the stepped portion
of the shaft that is for the front bearing things rotated smoothly and
without drag. At that point I was out of time to proceed further. I
did clean out some grit that had gotten into things, and by handling
it I think I can confirm that the working fluid is a heavy silicone
grease, since it leaves that silicone 'feel' after wiping it off my
fingers with a rag.
Sunday, April 15, 2012
I scraped the saved goo back into the fan clutch, minus any bearing
chunks and dirt that I could avoid, then replenished what I guessed to
be the 'missing' amount with the clear 12,500 cst silicone oil I'd purchased
some time ago. (I first tested it for miscibility, it passed.) I'd
guessed a couple of heaping tablespoons' worth. The viscosity seemed
close enough. When turned by hand, with the oil pouring down into the
rear chamber, it started to tighten up and then I could see oil being
pumped back out the front rim of the rotor. Seems right to me.
I still don't know how this clutch becomes thermostatic, I tried a
heat gun on the centrifugal sliding valve and it doesn't seem to
exhibit a bimetallic characteristic of bending away from the hole as
I'd expected. Still, so long as it spins at least a little it'll be
good enough for winter duty. (I could almost get away with no fan at
all, but that makes me nervous.)
I wiped the sealing surfaces and then put the cover in the shop oven
and the clutch in the freezer, and then after temperatures stabilized
I slipped the cover onto the clutch and tightened down all the screws.
It seems OK now, or OK enough at least.
...Later in the day I finished the job. I put the fan blade ring in
the oven and the clutch assembly in the freezer. Having done that
they went together easily, and I used the four bolts to secure the two
together. The torn paper gasket on the front bearing cap was a pain,
I used a razor blade to remove it all and then replaced it with one
side of of the cardboard box the oil seal came in. I drilled holes
through the bearing cover and into the paper. I then used a small
gasket punch to clean up the holes, placed the new 'gasket' shiny side
down, and tightened the screws. I then cut around the bearing cover
with a razor blade to remove the excess and finished tightening the
screws.
I then went out to the car and removed the temporary (bad) fan. (I
see that it's also missing the bimetallic element and plunger pin on
the front, besides having bad bearings. Why do I keep crap like this
around, anyway?) Remembering last time I also removed the top
radiator hose. The repaired fan then slipped into place past the
front of the shroud, and I mounted it with the four bolts. Tightening
those a flat at a time with an open-end wrench is always a joy. I then
put back the shroud and the radiator hose, and tidied up the area.
Then I started the car. It exhibited quite a roar, and it didn't really
settle down as I sat there and played with the throttle, so I hopped
in and went for a drive. Within a couple of hundred yards I heard the
fan noise drop off, so I turned around. When I stopped the engine I
saw the fan spin about half a turn or so at stop, and when I turned it
by hand it definitely felt 'loose'. Good, I think we're done here.
Monday, April 16, 2012
I've been doing some thinking and some reading, and it may be that
this viscous fan clutch is not thermostatic. It may in fact
be only RPM-sensitive and is intended to couple at idle and
low speeds and decouple at higher speeds, making the assumption that
the car is moving when the engine revs up. The fins on its body might
be just for dissipating the heat from the clutch slippage itself.
This would make some sense, I suppose, but I doubt it's as useful as a
more elaborate clutch. Perhaps that's why we don't see this kind
anymore. Still, it's probably perfect for this car, given
how it's used.
...A little driving experience shows that the fan couples, at least
some, at any speeds lower than freeway RPM's. Puttering along the
back roads in fourth gear I can hear the fan, but it goes away if
accelerating briskly. Not optimal, but probably tolerable, at least
for now. I guess you could say that this is an RPM-limited fan, given
the nature of the internal valving. Maybe someday if I find one of
the smaller and lighter-weight thermostatic fans, either usable as-is
or rebuildable, I'll try again. (The one I had been using is missing
the thermostat parts.) The fan seems to uncouple above maybe
2,500 RPM, somewhat above 45 MPH in high gear, or at just
about 40 MPH in third gear. (Too bad I'm always at fourth gear
by those speeds.) The fan seems to be working perfectly, but I just
don't like it.
Oh, and a good chunk of the 'rattly fan noise' was in fact not the fan
at all, but rather the rattling of the loose exhaust hangar at the
transmission. I'll need to address that at some convenient time.
Wednesday, August 29, 2012
Fallow maintenance: Aired the tires and put the battery on charge.
(The clock eats juice.) Special surprise: a mouse was building a nest
on top the battery. Beady little eyes looked resentfully at me before
she scurried off. Let's hope she makes the cats happy...
Saturday, November 10, 2012
Time to dig out the car again, I connected the battery and plugged in
the preheater system, aired the tires, and etc. Got it started and
the snow melted off, and drove it up and down the hill, but that was
about it. It runs OK, but that LF tire goes flat in a day and must
be addressed soon.
Saturday, December 1, 2012
I pulled the wretched LF wheel off the car, and poked desultorily at
the tire. I do not want to do it by hand... While out on
errands I bought Harbor Freight's cheapie tire changer, it was on
sale. $43, we'll see if it helps any.
Monday, December 3, 2012
I put together the lame-ass tire changer, and it's definitely no Coats
machine! Still, it had to be better than crouching on a tire with a
BFH and some tire irons, right? Well, maybe. It would have
been better screwed to a pallet as they suggest, but it's usable even
loose. I did, however manage to bend both the handle and the
mounting foot of the thing, just while breaking the bead on my tire.
(I think I had the shoe catching against an interior bead of the
wheel, which meant I was pushing metal and not rubber.) What a POS!
The metal is far too thin and soft, it looks far better than
it is. Still, I did manage to get the tire off,
though not without some trouble. There is definitely corrosion on the
inside of the wheel, I'm sure I can make it better, but good enough?
The tire is definitely on its last legs, if not beyond; I guess we'll
see. I managed to completely crush the valve stem during the
operation, apparently you have to watch out for that. I'll need a new
one, the only spare I have is far too big.
...On the way to work I stopped at Les Schwab and got another
valve stem.
Tuesday, December 4, 2012
I used the powered wire brush on the wheel's sealing surfaces, that
got off the corrosion and smoothed things out. I then rattle-canned
some silver-gray paint onto the flanges and put the wheel into the
shop oven (on low) to dry. With any luck this will protect the metal
somewhat against further corrosion. I next used sandpaper to clean
off the sealing surfaces of the tire, and used some black weatherstrip
cement to fill a couple of imperfections in the sealing surfaces.
We'll see if this helps, the tire is probably shot due to sitting flat
for so long anyway.
Wednesday, December 5, 2012
Turned off the oven, it oughta be dry enough!.
Thursday, December 6, 2012
I was sick the last couple of days, so didn't get to the tire until
today. I slicked it up (soapy water) and installed the new valve
stem, then vacuumed out and installed the tire. The tire jig helps,
but it's still not exactly easy. When fully inflated and sprayed with
soapy water it doesn't seem to be leaking. We'll see.
Friday, December 7, 2012
The tire held air, so I put it on the car. We'll see if it's any good
once I can drive it again. I went over to the other side and removed
that leaking tire. (I'm going in order of leakiness, this
car has three wheels that need attention.) I removed the bent foot
from the tire changing jig and hammered it back straight on the anvil
using my old friend, the BFH, then put the jig back together. I
mounted the tire on the jig and this time was more careful. I used
the spray soap to slick up the rim area as I broke the bead on the
tire, that helped immensely, and I made it a point not to crush the
valve stem to death. One thing that helped in removing the tire was
to use the point of the tire iron to claw its way along the edge holes
in the Bundt rim. (Nothing you'd want to do on a nice wheel!
A Coats machine with a powered spindle driving the removal iron would
sure be a lot easier, and better.) There were a lot of chrome flakes
inside the tire. Once things have dried I'll do a cleanup on the rim
and tire and see what I think.
Saturday, December 8, 2012
Got the second wheel wire-brushed and painted and into the shop oven.
(Ran out of paint, will need to get more for any more wheels that need
it.) Managed to lacerate a couple of fingers on sharp chrome flakes,
which broke off under the skin. It took a few tries, and some time,
to notice all the pieces and get them out. Gotta be careful with that
stuff! Wood splinters are bad, but metal are worse. (I think glass
shards are probably the worst!)
The mounting flange of the wheel was heavily corroded, too.
Sunday, December 9, 2012
Feelling pretty punky today, so all I did was sand the sealing area of
the tire to clean it up, and vacuum out the tire. Turned off the
oven, that wheel's baked long enough. I did this while waiting for
Daniel to come out for our Christmas tree hunt.
Monday, December 10, 2012
I mounted the second tire and pressurized it. We'll see if it holds
air 'til tomorrow.
Tuesday, December 11, 2012
Tire's fine, so I put it on the car. I painted the back of the
mounting flange with a thin coat of anti-seize, and also put a dab on
the threads at the end of each lug bolt. (None on the flanges!) I
then aired all the tires, spare and all, and plugged in the car to
warm up. (The two repaired wheels didn't need anything.)
...The car drove to work well, the tires seemed fine. I had a little
trouble with the flasher not wanting to work, but some cycling seems
to have cleared that up. I need to clean the glass on the inside.
Also, the wiper intermittent switch (inside the motor?) doesn't seem
to be working right, they'll stop immediately instead of finishing
their sweep and parking.
Friday, December 14, 2012
I removed the flasher/switch from the car and opened it up. Again.
(I guess the last time wasn't all that recent.)
I wiped off the contacts and sprayed Caig Deoxit G on it. (The D can,
the good stuff for this, was empty so I had to use the other can that
is intended for gold contacts. These aren't gold, they're raw
copper.) I oiled the knob's shaft and put it all back together. It
still exhibited some intermittency, but I guess it always has. It did
seem better, though.
Saturday, December 15, 2012
I checked my car's schematic, and it looks like the wiper parking
problem can be blamed only on the cammed switch located within the
wiper motor itself, which looks like it might be able to be
accessed beneath a screw-on cover on the motor. Joy. (That
conclusion really needs to be checked, though, because it looks like
the older non-intermittent wiper circuit might run the cammed
power through the external switches. Definitely time to do some
meter-based sleuthing before digging into the motor.)
The flasher, at least, is definitely behaving better since its
operation.
I also ordered (via Amazon) more Caig Deoxit. I bought a large can of
dilute 5% spray, a needle applicator bottle of the 100%, and some
fader spray. About $50. Expensive, but this stuff is worth it.
Thursday, December 20, 2012
The intermittent wiper function spontaneously started working right
today. With any luck it'll stay that way!
Friday, December 21, 2012
The Caig Deoxit came, so this morning I sprayed the driver's door dome
light switch, which had started to become intermittent again, and
pulled out the blower switch knob and gave it a generous shot right
down its bore. (I referred to a spare switch assembly from the parts
pile to see that it would have good effect.) The switch has always
been stiff, and this loosened it up to a normal feeling and
it started to work reliably on the low setting. Success!
I also posted this summary today of the Caig product, which I
wholeheartedly endorse:
The Frankenheap (200D 115 Euro) has always had trouble with
its turn signals 'sticking'. Like the proverbial cat at the door,
"I wanna come in, I wanna go out", they would either flash or not at
their whim. Usually grabbing he flasher knob (red-dot pull knob on
console) and cycling it a bunch would bias it towards working, but
you never could tell. I've opened it and cleaned the contacts
several times [1, 2, 3, 4] over the years, and resoldered the PCB. It
helped, but pretty much at least once a week the lights would stick
on anyway. I've done a bunch of flashing by hand using the
stalk, which is annoying but at least is possible.
Anyway, since the last time I operated I'd gotten some Caig Deoxit,
which I had used to miraculous effect elsewhere, but I was out of it.
(I'd bought it at Radio Shack, it was a 2-pack of tiny spray cans, one
the usual 5% product and one for Gold contacts.) The Gold product
only has a tiny fraction of the ability to clean and protect non-gold
contacts that the regular has, but I used it anyway as it was all that
was left.
I did not want to purchase that particular package again, as too small
and 50% something I didn't want anyway, so I mail-ordered generous
supplies of the good stuff: a large spray can of the 5% solution, a
needle drip applicator of the 100%, and a spray can of fader cleaner,
for use on scratchy radios, dimmers, etc.
Anyway, the flasher is inside the knob/switch, and is oddly
constructed: the knob is attached to the PCB and pulls it back and
forth. There is a row of eight or so copper contact patches at one
edge, and a bunch of springy contact fingers that ride on them, and
which are connected to the external pins of the switch. The spring
contacts look normal, but the copper patches are just raw copper and
oxidize quickly.
No amount of cleaning or burnishing would last for all that long. I'd
used regular contact cleaner the first time. It lasted a little
while. Then again, but with burnishing of the copper and protective
grease. It worked, for awhile.
This time I shot it with the Gold spray. It is now working perfectly
again, probably better than it ever has for me. If it should go out
again I am now armed with a lifetime supply of the good stuff.
(Needle applicator, for switches that are opened up. The spray is for
quick jobs, and which I will no doubt exhaust long before the bottle.)
The Caig stuff works, the dome light in the Frankenheap is now
reliable, from both doors and the overhead switch, and has been for
years. (I think the driver's door switch might need another shot, as
once in awhile now you might need to jiggle it to get the light on.)
Wednesday, January 9, 2013
I changed the oil after work, it was a bit late. I had been getting
low oil pressure on corners for awhile, but I didn't want to top it
off since it needed changing anyway. With another cold snap coming I
didn't want to put it off any longer. I still don't have a
replacement oil filter, so that stayed in. Again. I made sure to
dump some fresh oil into the injection pump, and it certainly needed
some: the initial drips out of its bleed tube were definitely fuel,
not lubrication oil. I kept pouring in oil until it stopped dripping
diesel. It took more than I would have thought. Oops? The engine
got about 5 quarts, which seemed to put plenty on the dipstick.
I also aired the tires, topped off the brake fluid and the windshield
washer fluid.
Tuesday, January 29, 2013
I finally broke down and bought a new windshield wiper blade. Only
one, I hate that you basically can't buy new rubber inserts only, at
less for the pair than for one new blade assembly now. (And one only
is what it got today.)
I also found that the washer tank was leaking again, one of the glue joints was starting to fail. I cleaned it up
and re-glued it, I guess even Shoe Goo doesn't hold forever. (It's
out of the sunlight, but something caused degradation, the glue was
discolored and coming loose from the plastic.)
Wednesday, January 30, 2013
The repaired clock seems to be losing time. Drat.
Thursday, January 31, 2013
I could hear the clock running, so I set it again. It seems to be
kind of stiff, perhaps it's just in need of some cleaning? I did use
Deoxit on the fuses, and twisted them in their sockets, just to be
sure.
The washer tank repairs seem to be holding.
... After work the clock was still on time, so perhaps it's OK again?
Tuesday, February 12, 2013
Last night I again had a bout of the LH rear turn bulb going
intermittent, it mostly only happens on one particular turn on the way
to band on Mondays. I cleaned it today and used Caig Deoxit on the
bulb's base. We'll see if this helps.
Wednesday, February 20, 2013
The center muffler fell off on the way home! The pipe to it
is now dragging on the ground. It's a lot noisier than it was...
It's been needing a new exhaust system for a time now, there's
not really enough left of the original metal to weld to.
Saturday, March 2, 2013
I pumped up the driver's side tires and jacked the passeger side of
the car high in the air and put jack stands under it. I then pulled
out the muffler, and the resonator from the trunk where I had stowed
it, and had a good look. It actually looks repairable, barely, if the
"S" between the resonator and the muffler is replaced. (The metal
there was thinned by the bending.) I cut it out and used duct tape to
hold it together to serve as a pattern, I'll take it to a muffler shop
and see what they'll charge to make a replacement. That and a couple
of collars of scrap cutoff tubing, along with a flap of metal (from
the old Gillet muffler from Jill's 560 SL)
to cover the rot in the resonator's side, ought to do it.
The rest of the car underneath doesn't even look too bad, the
unfinished rocker panel welding hasn't seemed to rust any worse since
I last worked on it.
Monday, March 4, 2013
The local independent muffler shop made me a replacement "S" of exhaust
pipe, $27.
Saturday, March 9, 2013
Started welding the exhaust system back together. I cut a sheet of
metal off the old muffler from Jill's 560 SL
and used it to cover the bad side of the resonator, and welded a
collar around the entrance pipe where it had snapped off, to act as a
socket for welding back to the front pipe. I cut the new "S" pipe to
length and got it welded to the muffler in position, and tacked to the
pipe coming off the resonator. It's important to make sure the tack
welds are truly in the right position before finalizing the welds, I
do a lot of trial fitting.
Sunday, March 10, 2013
I finished the welding, the most 'fun' part was, of course, the weld
of the newly repaired muffler assembly to the pipe coming from the
engine, since that is done upside-down under the car. Ratty welding,
but adequate I suppose. I found the 2" U-bolt to the transmission
mount was missing, and I didn't have another one, so I went to town
and bought a replacement.
Monday, March 11, 2013
I installed the U-bolt, used anti-sieze on it, and hammered the
threads to keep it from working loose. Ready to go!
...The car is nice and quiet again, I drove it to work. I didn't get
all the pipe angles right, the system will occasionally, under stress,
knock against the car body. Plenty good enough, though.
Sunday, March 17, 2013
I lubed the locks, that helped them a lot. On the way to a concert I
got off the freeway, and the car settled into a rough lumpy idle.
When I gunned it a lot of smoke came out the back. It's acting like
when it had a leaky pipe to the IP from the throttle butterfly. I
wonder if there's a leak there, or if the IP is getting sticky inside
and was overfuelling? It settled down after that.
Friday, April 19, 2013
Past time to put the car away for the Summer. I filled the tank today
and parked it after work.
Thursday, October 3, 2013
Fall! I pumped up the tires, cleaned out the bees, and put the
battery on charge. I've been toying with the idea of heating the
steering wheel. My latest plan is to wrap the wheel with friction
tape, wind a layer of closely-spaced uninsulated iron or nichrome wire
over it, then cover it with another layer of friction tape. After
trials, either remove the mess or cover it with a nice leather wrap.
(Wheelskins? We like those a lot.) I can wind about 1' of thin wire
around an inch of the wheel's approximately 4.5' of circumference,
let's call it 48' of wire total if we leave off the spoke areas. The
real questions are what wattage is appropriate, and how to connect
power to it in a clean way. I have heard that 50–60W is not an
unreasonable number, but that sounds rather high. It is said, though,
that the cold wheel can really soak up the heat. Let's assume 48W,
and 12V. That's 4A, which should be easy enough to supply. The
resistance would need to be 3 ohms. So I need wire with a
resistance of 0.0625 ohms/foot, or 0.205 ohms/meter in a
fairly thin gauge such as 22. Copper has a resistivity of
1.68×10⁻⁸Ω·m, iron
1.0×10⁻⁷Ω·m, for an approximate
ratio of 6. If we scale a copper AWG resistance table accordingly we
get 20 AWG as our closest choice in iron wire. This ought to be
0.0333×6=0.2Ω/m, so 15m of wire, or 49', gets us our
3 ohms.
Monday, December 2, 2013
Finally we've had a conjunction of cold and wet; snow and ice
are here. Time to start driving this car and retire the SEL. I'll miss the seat heaters!
Tuesday, December 3, 2013
The insides of the windows were gross, so I cleaned them off
with an alcohol/ammonia mix. Much better!
Monday, December 9, 2013
The two tires on the left have been leaking way too much, so I Slimed
them. I've never used this stuff before, only the fix-a-flat variant,
which is a different material, so I guess we'll see. It wasn't much
fun doing this at 14°F, but it's a good ten degrees warmer than it
has been.
Tuesday, December 10, 2013
This morning the temperature gauge worked normally, this evening it
sat on the bottom peg all the way home. As it is a mechanical gauge,
this is not a good sign.
Wednesday, January 8, 2014
The oil was very low, I put in a couple of quarts, and managed to glop
some into the injector pump too.
Thursday, January 9, 2014
Filled up on fuel for the first time this season. Maybe nine months
since last time? Got 29MPG, down a bit perhaps because there was more
than an hour of idling with the heater on while getting a bit of rest.
Monday, January 27, 2014
The LF tire finally croaked today. It was low this morning, so I
filled it. On the way to work it started to feel really bad,
so I stopped and looked, and it was lower then ever. I wheeled right
into Les Schwab, and they popped it off, and it had an oozing soft
patch right in the tread face, with a bit of steel showing through.
Game over! This, I believe, is the last of the Hakkapeliitta tires
I'd bought in 2000, for Jill's SL. They sold me a used tire to
replace it, an Aurora, whatever that is, but it looks a lot like the
Hakka that came off. $43.
Sure drives better after the change!
Thursday, January 30, 2014
RIP Frankenheap? On an errand after work today, on a snowing and very
icy evening, I was rear-ended at a stop light, and pounded into the
car in front of me. No one was hurt, but the cars... My rear bumper
was pushed in, and the trunk is jammed shut, but on the whole it
doesn't look too bad. However, on the front I dove under the bumper
of the SUV in front of me, which pushed the grille into the radiator,
and popped it. One of the Euro headlights was smashed, as were both
auxiliary high beams. The grille and surround are ruined. The hood
won't open either.
After all the paperwork exchange the car seemed driveable, but halfway
home the heat went out. The coolant loss got to be too much, I guess.
I slowed down to minimal throttle in third gear, and made it the rest
of the way home air-cooled. I noticed no ill effects.
I'm pretty saddened by the whole thing, I'm not sure what to do next.
One thing's for sure, I'm not sure what to next deploy into the winter
bumper-car festival. I don't want it to be the truck.
Friday, January 31, 2014
I took some pictures, and managed to get the trunk open. It's bent,
the thing really doesn't want to open. There's more damage back there
than I thought, a taillight lens is broken, and the trunk lid line on
the right doesn't fit anymore. The hood line is also not good on the
right, and with the snow brushed off I see a big crease in the hood.
I managed to hammer the hood open, getting a prybar behind the lever
to release it. (This is actually fairly easy with the grille missing,
and some good light. Once open I could see that the radiator had been
pushed into the fan, and there was coolant all over the engine. Nuts.
I was, with some difficulty, able to remove the radiator, fan, and
shroud. Easy access, now. The car can probably be rendered driveable
relatively easily, but it's definitely been done some real damage.
To wit:
- Rear
- Right taillight broken, but still operable;
- Rear bumper pushed in;
- Rear trunk wall pushed in;
- Right trunk side wall buckled;
- Trunk lid bent slightly;
- Trunk lock out of alignment, won't unlock once locked.
- Front
- Right headlight smashed. Bulbs still OK, but open to weather. Trim ring bent;
- Auxiliary driving lights destroyed;
- Fan blade broken;
- Radiator holed;
- Lower radiator hose sliced open by alternator pulley;
- Radiator support (crossbar) pushed in;
- Right radiator support channel crushed;
- Left radiator support channel bent;
- Horn support strut bent;
- Hood creased;
- Hood release cable damaged;
- Right fender front pushed in;
- Grille and surround destroyed;
That's a pretty long list.
Saturday, February 8, 2014
I finally got a chance, post-adjustor visit, to get out and work on
the car with an eye toward patching it up enough to get it back on the
road. (Snow tires would be really nice to have right about
now!) I waited until the car was in the sun, and above 20°F,
under which conditions it's actually fairly pleasant to work. (Just
about noon.) I started by removing all the broken crap from the
front, I'd already removed all the grille and the radiator and fan. I
completed the removal by taking off the grille surround, and all the
damaged headlights. With easy access to the radiator support area I
got out a nice array of BFH's in the 5#–20# spectrum and a big
crowbar. Is there nothing a BFH cannot do? I used the
crowbar as a hook and drove the pushed-in parts forward using a BFH,
and did the best I could to straighten the radiator support channels.
I pushed in the crease on the hood with a rubber mallet, and drove the
front edge forward with a BFH. I moved the radiator support forwards
until the hood latch again went into the hole in the hood, and
generally did a lot of prying and hammering until the front part of
the car looked kind of normal again. This was none too good for the
paint, but we're long past caring about that now. I went to the back
of the car and drove the trunk wall rearwards until the trunk latched
normally again. That was actually fairly easy.
With the metalwork all 'done' I then moved on to putting things back
together. I checked the damaged radiator, and it could not even begin
to hold mouth-applied air pressure. I looked in my spares pile and
found a brass 115 radiator that seemed to hold pressure. (At least
some, anyway, no guarantee that it doesn't have a slow leak.) I used
the propane torch to remove the soldered-on side guides, which were
for a narrower channel than my car has. I had some wider guides that
I had been using to shim the (now-destroyed) 123 radiator in there,
with them press-fit onto the radiator, much like the situation with
the 123 radiator, the assembly slipped down into the newly-restored
channels; it fit perfectly, I used the rubber donuts to tie the
radiator to the radiator frame. I looked around and found the
original small plastic four-bladed fixed fan, and put that back in
place of the chipped viscous-clutch fan. (That had never really
worked out for me, there was little point in putting it back.) I left
off the shroud, the last thing we need in a winter car is more
efficient cooling! I found that the lower radiator hose had been
sliced into by something, so it was no good. I had another one,
though, in the spares pile. The upper hose, which is in fact the
wrong hose entirely, did not fit the radiator, it was too large. The
same was true of the other end, and I'd made a folded 2-layer sock of
bicycle inner-tube to shim the diameter there, so I did the same for
the radiator end. The system seemed to hold air pressure when I blew
into the radiator. I tightened up the alternator, it had been
slipping a bit lately.
All this took about three hours. The sun went behind the trees, so I
wrapped it up for the day. All that's left is to put some coolant
into the system, and get some kind of headlight on the right side.
And maybe some kind of screen rigged to protect the radiator in the
absence of a grille. Assuming no engine damage from the lost coolant,
it should again be driveable, if not beautiful.
Sunday, February 9, 2014
It's not nearly so nice out today, I waited a bit later, but no sun.
I went into the garage and searched more carefully for parts, and was
able to find the all-metal 115 grille I'd laid in for potential use on
the 250C. I'm not sure I want to use it
here, though. I also found the 116 grille insert I'd bought for cutting
off some repair plastic. That turns out to bridge nicely across the
radiator, pinned in place by the grille surround mounting ears. I
might go that way for now, it looks somewhat better than a gaping dark
hole. I did not find any spare headlights, and I was reluctant to
steal one off of the 250C. I dug some more, and found the spare glass
lenses I'd bought for these headlights. They were flat-front, not the
curved-fronts that were on the car, but they were Hella. I tried one,
and it fits! I used a hammer to try to remove the bend from the trim
ring, and I think it worked. There's a crack, as this is pot metal,
but it doesn't look too bad. It looks a little funny compared to the
other one, I may end up putting on both flat lenses and retiring the
(broken, and glued-together) curved lens. I had to replace the 4W
city (parking) light bulb, but the others were all still intact. I
put the headlight back on the car, that helps the looks a lot. The
auxiliary fog lights are not working, and there are no auxiliary
driving lights, but the car looks driveable. I had a little coolant
to pour in, but not enough to restore the car to the road. Jill is
supposed to be fetching me some.
...She forgot, so I had to drive out (in her car) and get some.
While watching TV I glued together the broken taillight lens,
using Shoe Goo.
Monday, February 10, 2014
In the light I poured in the antifreeze and started the car. It took
some doing to get it burped of air, and everything working correctly.
Unfortunately there is a pretty good leak in this radiator, that is
not good. I'm going to park with a pan under it, to catch and recycle
it. I lashed the 116 plastic grill insert to the front of the car,
that'll protect the radiator somewhat and make the car look not quite
so tatty.
...Parked all day at work there was maybe 1" in the catch jar, not
too bad, really. I poured it back into the radiator before taking
off. It had been snowing heavily all day, no way I would have been
able to even get to work in the SL I'd been
driving in the interim, much less get home! When I got home I got
stuck in the driveway. The snow is too deep, the belly is dragging.
I'll dig it out in the morning.
Tuesday, February 11, 2014
Ow, my back hurts. Digging out the car was a royal pain, the driveway
is banked a bit there and the car just wanted to slide off the packed
ruts sideways and into the ditch. Eventually I prevailed, but there
was a lot of shoveling, and pushing (from the doorway) with the car in
gear. I also went out to the berm and dug out a channel, using the
potato fork and a stout coal shovel.
On the worse side, the radiator is leaking pretty badly now. Jouncing
over the berm at the driveway end may have done it in, I don't know.
The collection jar was nearly full overnight, and it's nearly a stream
coming out at times when it's running. The level is below the core,
so the loss is significant, I don't know if I'll be able to drive it
today or not. I ended up putting in maybe 3/4 gallon to get it back
up. I loosened the radiator cap to try to prevent the system from
pressurizing and blowing out coolant. In the winter we don't need
the system to be pressurized.
Going to work I managed to get stuck crosswise in the driveway, the
snow is thawing. That was fun. After fueling up this morning I
bought more coolant, and mixed it up into two jugs to keep in the
trunk. The car was parked 'til evening, and there was next to nothing
in the drip jar. Keeping the cap loose looks like it might be just
the ticket.
Friday, February 14, 2014
Leaving the radiator cap loose is a winner. There has been some loss,
but not enough that I've had to use any of the coolant I bought. The
collection jar has been a failure lately due to the high winds, it
just blows away. The car's driving pretty well right now, but it
looks (even more) like crap and I do miss the deerspotter auxiliary
headlights.
Monday, February 17, 2014
Vile weather this morning, blowing rain. The radiator was nearly
empty. I found that the main leak was that the pinch-style hose clamp
really wasn't very good, and that the leak had opened up during the
weekend. I backed it up with a USA worm-gear clamp, and the leaking
stopped. I ended up using most of my two gallons of spare coolant to
fill it back up, and getting it burped was a chore. Eventually it
started cooling right, and the heater started working. I got pretty
wet, though, in my trips under the hood on the way to work.
...Got a quote from the insurance company today after lunch. $1,683
and change. So do I keep driving the heap, or take the cash and
transplant the drivetrain into a better body?
Thursday, February 20, 2014
I cleaned the glass and grille out of the back seat.
Friday, February 21, 2014
Headlights! I went into storage and found the bouquet of auxiliary lamps I'd laid in, and
mounted two of them on the perches in place of the destroyed plastic
HF POS's. Only eight years after procurement! I had to drill the
perch mounting holes bigger, and only one of the four 'Blazer' lamps
had a good bulb. Turns out one of the HF's H3 bulbs was still intact,
so I swapped that one in.
I took a rough aim, it'll probably take some time to dial them in.
They're aimed out and up, to light ditches and curves for deer
spotting on the way home.
The auxiliary fog lights are still inoperative. They're not overtly
damaged but no longer work regardless. I'll have to check into that
next time.
Saturday, March 1, 2014
I went to see a carcass today, in St. Maries. The guy'd had several
of these, and kept this one as the best body. Relatively rust-free,
but not in the greatest of condition. I suppose it probably is in
about the condition the Frankenheap was in when I got it. It's the
newest body style, with ribbed taillights and the USA bumpers and
lights, and no wing windows. It's AC-equipped, so the console is the
bulky one. Has a lot of extra parts with it, bumpers and a hood,
etc.; he's cleaning house. (There's a driver's door for the Chicken Wagon that's not all bent and rusty.) I
agreed to buy it all for the $200 asking price, the sale to be
consumated in a month or two when the weather's good enough to go get
it all with the truck and trailer. The car's really back in the
sticks, about six miles. I thought we were lost nearly the entire way
there from the nearby town.
Friday, March 7, 2014
We took the car skiing at Mt. Spokane today, and it worked well.
(We would have taken Jill's X5 but it was
in the shop.) Very slushy
conditions on the road, but we didn't get stuck. I think Jill was
surprised. There was a lot of oil smoke when coming down the hill on
engine compression, I wonder if the overheating
episode took out the valve stem seals?
Sunday, March 9, 2014
I made the mistake of locking my trumpet in the trunk today. (Two
gigs, needed C trumpet for one, and Bb for the other.) The trunk will
not unlock. That was a nightmare. My good trumpet, music, and good
leather coat are still trapped in there.
Monday, March 10, 2014
After taking apart the trunk latch in the 250 C, and deducing what must have
happened to explain the exact symptoms, I removed the license plate
and drilled a 1/2" hole in the outer rear wall of the trunk
directly underneath the latch lever. In the rain, which was the worst
part of all this.
I then used a 5# hammer and a chunk of heavy steel rod to drive the
inner trunk wall forward, maybe 1/2" or so. That moved the
latch relative to the lock enough that the trunk could then unlock
again. I used duct tape to cover the hole, it even closely matches
the color of the car, though the license plate hides the surgery.
(Duct tape and BFH's, it doesn't get any better than that!)
It should be noted that the value of the retrieved
trumpet far outweighs the
value of the car, especially in its current condition. 10:1 maybe. I
was not going to stop 'til I had it back, but it was nice
that a relatively delicate operation was all that was needed. (I have
much bigger hammers, and I'm not afraid to use 'em!)
Wednesday, March 26, 2014
I dropped by Goodwill, and picked up an extra-large zip-up sweatshirt
in red, no hood. I zipped the splitting driver's seatback into it,
zipper to the back and sleeves inside, and now there's no more getting
poked by scratchy horsehair pad, and no more wadded-up
out-of-place-blanket. It even looks halfway acceptable. $4, for this
semi-permanent fix.
Sunday, March 30, 2014
I finally picked up the long-awaited engineless
W115 body, $200. It's a
lot rustier than I'd like, the underneath is pretty bad.
(Floorboards, trunk floor, etc.) I am unconvinced that I will do a
swap, but it will be a good source of body parts, regardless. It came
with an extra hood and bumper. Also with a trunk lid and a driver's
door for a W123, and some bumpers for it and a grille, too. And a
York and an R4 A/C compressor, in unknown condition. Pretty much
cleaned him out of old Mercedes stuff. (He's moving.)
Loading onto the trailer was pretty easy, the PO had a tractor with
a stout front loader. He just lifted the front of the car and pushed
it up onto the trailer. Unloading was a different story, I chained
the car to a tree and pulled the trailer out from under it. A bit
hard on everything, and the bumper caught the trailer on the way
off and ripped off the back bit of rail, but that's easily repaired.
This was made more difficult by not having a key, and the front wheels
are locked in a turn. I used a chain to tie off to a tree on the side
as well to keep it from climbing the trailier on the way off.
The rough treatment was not unjustified, because the car's condition
really isn't that good. I've been thinking of it as parts already. I
and a neighbor did this, and we used his truck. Mostly because ours
is still fresh-painted and unwaxed, and is enough longer than the
necessary in-the-woods maneuvering would have made the job somewhat
impossible.
Tuesday, April 1, 2014
Time to put this car away again, I filled it up yesterday on the way
home and it turned in its best-ever mileage: 33 MPG.
I should wreck it more often!
Friday, September 26, 2014
The insurance settlement check came a few days ago, and today I cashed
it. $1,928.56 in the ol' pocket. The notice from the State came
today, demanding I surrender the title.
Wednesday, November 12, 2014
I got the car re-licensed today. About $75 total. There was a $30 or
so fee to resurrect the title, which should come in six weeks or so.
No additional fuss, it was as easy as the clerk claimed it would be.
Monday, November 17, 2014
Started the car just to see if it ran, no issues whatsoever. I must
address the corroded wheels on the left side, though, the tires won't
hold air, especially on the rear.
Saturday, November 22, 2014
I was going to remove the tire from the leaking corroded LR wheel
today and clean it up, but it became clear during the removal process
that the wheel is completely shot, and must be replaced.
(Pieces broke off the rim during the tire removal!) I spent
three hours or so fighting that cheap Chinese POS Harbor Freight tire
changer getting tires off the bad wheel and the donor replacement, and
the Hakkapeliitta swapped onto the good wheel. I had to ruin the
otherwise inoffensive tire on the donor, I could not get the bead to
break on the back side. Anyway, that is finally taken care
of. The summer the Hakkapeliitta spent half-flat did not do it any
favors, I'll need to do better in future in these circumstances.
Sunday, November 23, 2014
I went out and pulled the leaking lower radiator hose off, using a pan
to catch the remaining coolant. I cut a collar of bicycle inner-tube
to pull over the radiator outlet, then I put the hose back. That
really ought to cut the leakage, which was due to the old used hose
being a bit too large on that end. Anyway, I filled it back up,
replaced the lost coolant, and idled it until it burped and I could
top it off. Ready to drive!
In the evening I took it on a shakedown cruise, after washing off the
inside of the windshield. It ran great.
Tuesday, November 25, 2014
I think this will be the last year for the poor old 'heap. Though
it's running great, the rear doors are starting to have trouble
closing; I think the rusting body is sagging. Getting punched hard in the ass last winter couldn't have
helped.
Saturday, November 29, 2014
I glued the falling-down headliner back up in back, and re-hung the
Christmas lights.
Monday, December 1, 2014
The heater fan didn't work today. That could be bad. Also it sounds
like a pretty significant exhaust leak is opening up.
Wednesday, December 3, 2014
The heater fan problem was merely a blown fuse. It wasn't running on
the preheater either because the motor is a bit sticky. Once I goosed
it with the key on and on a higher setting, then it settled down to
normal operation too. Just in time for the snow/ice they're predicting.
It's mostly been very cold (10–20°F in the mornings for weeks),
but dry, so I haven't had windshield clearing problems yet. (In the
mornings the space heater I use inside the car does the job.)
The intermittent brake boost loss is possibly due to a split plug on
the main vacuum line. I used some heat-shrink tubing to reinforce it.
Thursday, December 4, 2014
The fuse blew again. I tried a 16A fuse instead, but only tried it on
medium speed. I think the motor needs more lubrication, and it draws
stall current if you put it on high, which is too much for too long.
I guess I need to open up the air plenum again, with luck some lube
will do it. Without luck...
The muffler's been making noise again, today it basically broke off
the pipe from the engine. Again. It's very loud, but still suspended
via enough hangers that I did not lose it.
Saturday, December 6, 2014
We had a bit of a break in the weather, so I jacked up the car and
tried to weld a bandage over the break. Unfortunately just as I got
started I ran out of wire! Later in the day I made it to Big R
(now renamed to North 40 Outfitters, wtf?) and bought more. About $70
for a 10# spool of 0.35" flux-core wire. Tomorrow?
Monday, December 8, 2014
I removed the windshield wipers and the air intake grille, and
lubricated the blower fan. (Again. Has it
really been eight years?) Got my wrist all scraped up, again. I hate
this job. I used Mobil 1 5W20 motor oil. The pot-metal casting
for the passenger-side windshield wiper blade broke while I was
putting it back. Evil stuff, that pot metal. It seems to be intact
enough to hold together even broken as it is, but this does not please
me. Anyway, the fan is working again.
Thursday, December 11, 2014
Well, the muffler really fell down today. The patch fell off and I
couldn't get the thing out from under the car. So I had to drive home
at 15 per, scraping all the way. Ground off (literally!) quite a bit
of metal, I don't know if I'll be able to fix this easily or not.
The emergency flashers stopped some miles into our scrapey trip,
as did the clock. The dome light did, too. Fuse, no doubt.
Finished the trip with the right blinker on instead.
Sigh.
Saturday, December 13, 2014
I didn't get much done, but I did get the car jacked up. The road
rash doesn't look as bad as I'd feared. The dome lights and clock are
mysteriously working again.
Sunday, December 14, 2014
The forward end of the exhaust pipe that was dragging on the ground
was all collapsed. I got the end of the pipe opened back up, and the
ruined metal broken off. (Yes, it's that thin!) I rooted around in
the garage and came up with an 8" piece of scrap exhaust pipe that
would slip over what was there, and used it as a sleeve to bridge the
break and cover up the missing metal. I then welded it into place.
It leaks a bit, but the noise is gone and it seems sturdy enough
again. I replaced the one rubber exhaust hanger that had disappeared.
Monday, December 15, 2014
I put in some engine oil, which was low, and while I was at it I
slopped a bit into the injection pump. I tested the fuses, and rolled
them in their sockets, and all seems well again. I re-set the clock,
and replaced the burned out indicator in the flasher switch. Ready to
roll again!
Wednesday, December 17, 2014
I decided to take another stab at that wretched intermittent LR turn
signal, so I removed the lens and the bulb, cleaned the socket and
used a dab more Deoxit on it, bent the center contact tab out a bit
more to add some tension, and used a small piece of copper wire to
wedge into the socket with the bulb. It was pretty loose and rattly
in there, IMHO, so maybe this all will improve contact. I guess we'll
see. It's working now, anyway.
...No, when I got back home after work it was out again, but this time I
had a few minutes to mess with it. I took off the lens and fiddled
with the bulb, nothing. I removed and replaced the connector,
likewise nothing. However, while pulling sideways on the connector,
flexing the body of the lamp assembly, the bulb came back on. There's
a connection problem inside the body of the lamp assembly.
That'll be fun.
Monday, February 9, 2015
I seem to have put this car away for the winter, in favor of the
SEL.
Monday, March 9, 2015
I got the badly-leaking LF tire, the newest
one, fixed today. (It would only hold air maybe two days.) No charge
at Les Schwab. I dropped it off as a loose flat, that's the surest
way to get it done gratis. (Not 100% reliable, but it often works.
I did buy that tire there, though it was used.) The RF tire
is also leaky, but not nearly so bad. Need to do it next, but not
too soon so they don't think I'm abusing the privilege or anything.
It holds air about a week.
Wednesday, March 25, 2015
I'd bought Jill an aftermarket seat heating pad for the X5, for use before we got actual aftermarket seat
heaters put in; she'd tried it
maybe once and thought it sucky. (No real surprise there, this was a
long shot.) This morning I fished it out of the Goodwill pile and
measured it at 4A on high (3A on low), which is about 50W at operating
voltage. I thought that was not unreasonable, so I tried it out on a
trip in to work in the SEL. Though slow and a
bit puny, you could definitely feel some heat, so I thought
I'd throw it into this car.
Getting it, and keeping it in place will be the hard part,
but the seatback should end up held in place by the sweatshirt seat cover. I guess we'll eventually
see how it stays in place, no doubt it'll be a bit of a pain.
Next winter maybe we'll see if it's worth it or not.
Tuesday, November 24, 2015
Snow! I pumped up the tires, put the block heater on, and the
car fired right up and took me to work. I love this car...
Sunday, November 29, 2015
The RF tire was leaking badly last Spring, and it didn't get any
better over the summer! (It spent the summer with that corner blocked
up.) I had taken to carrying the portable air tank with me, so that I
could refill the tire before driving home. I had put Slime in it, to
no avail. I finally had a chance to pop it off the car and have a
good look. I was expecting a bead leak on those wretched
chromed rims, but a spray with soapy water belied that. The leak
was through the sidewall of the tire in a soft place, this
tire is shot. The 1583 date code tells me that this tire has done
more than its duty, being in storage and/or in service for 32 years!
I scraped up a 195/70 Contintntal spare tire and put that on instead.
I have another set of studded Hakkas, but they're 185/65, and not the
same height. This would work on the front, but...
Monday, December 7, 2015
Driving home from work, trying to shift into second as I pulled out
of the parking lot, the shift lever snapped off! Yikes! I was able
to wiggle the stub into third gear, and thoroughly abuse the clutch
taking off. Shifting between third and fourth was possible without
the lever, but nothing else was. I was able to get home OK, on only
two from-stop starts.
I'm going to look into welding or brazing this back together.
Wednesday, December 16, 2015
Too many other activities, and a general lack of daylight and time,
meant that today (a use-it-or-lose-it vacation day) was the first
chance I had to tackle this. I took it apart and fished out the other
piece, then cleaned the metal, including wire-brushing. The steel
looked stressed and split. I brazed it, I've had poor luck welding
together things like this. It went together OK enough, but rather
sloppily, but it still managed to fit back into the plastic bushing.
I drove the car and so far so good, we'll see how it holds up.
Thursday, February 11, 2016
The speedometer died today. I'm questioning whether it's worth
fixing at this point or not. There's a big crack in the floor
of the back seat, and the passenger seat is starting to fall
through the floor.
Thursday, March 17, 2016
No heat! Somehow the coolant has gradually disappeared. I pulled
over and poured in most of a gallon of water, and all was well. I
don't think any damage was done.
Saturday, November 26, 2016
Put the battery on charge, and jacked the car up to have a look at the
big hole under the passenger seat. What a mess! The car is not long
for this world, that damned salt they put on the roads is eating it
alive. I welded a big chunk of heavy computer sheet metal over the
biggest hole. Will that do the job?
Monday, December 12, 2016
I finished getting the car ready to deploy, only to find that it could
not start. After the glow I hit the starter, and it groaned a bit and
then reverted to clicking. After that it couldn't even glow properly.
A little checking showed that the battery has failed, some kind of
open circuit on the bulk of one of the plates. It has normal voltage,
but no ability to deliver significant current. I installed this
battery in 2008, I guess it doesn't owe me
anything. (The battery itself was
new in 2007, so it really didn't owe me anything.)
Tuesday, December 13, 2016
I ran around the fleet looking for a battery to steal. None of the
batteries in the upstairs storage cars, all on tenders, were usable.
I guess they don't last forever. I was out of time to pursue this
any further.
The RR tire goes flat in a day, and it definitely needs replacing.
Wednesday, December 14, 2016
Checked the downstairs cars, nothing working or suitable. Dang.
Stopped off at Les Schwab and bought another one, an H8, nearly $180!
Dang, these things have gotten expensive.
Thursday, December 15, 2016
New battery from yesterday installed, car started easily. A bit rough
and lumpy driving, and the flashers don't want to flash. But it goes.
Thursday, January 12, 2017
The passenger wiper blade has been shot for ages, and I resent the
current market's insistence on replacing the entire blade assembly, at
several times the cost of before. I'd found a thrift-shop blade
refill, too long, and tonight I finally cut it to length and used its
rubber strip to put back into the existing assembly. I had to recycle
the stainless metal spines of the old rubber, but that wasn't that
hard. It is a lot harder than it used to be.
Thursday, February 2, 2017
Flat tire! The RR tire finally holed, through the belts. Oops! I
was on the freeway onramp, not a bad spot, actually. Could have been
a lot worse. Anyway, I could barely get the car jacked up, the jack
point is so rusted out that the corner of the car collapsed
significantly. I did get it in the air, but the wheel was stuck
firmly to the hub. No amount of kicking, or whaling away at it with
the spare as a battering ram, would dislodge it. I had to call my
wife to bring me a 5# hammer before I could get it off and continue on
to work.
Friday, February 3, 2017
I changed the tire, always a monumental pain. I had 4 spare
185/70-14's in storage, and I put one on. It's about 2.25% smaller,
around 1/2", I hope this won't annoy the differential. This 'new'
tire, if I'm reading the date codes right, is around 8
years older than the ruined one! I put a hammer and a small
hydraulic floor jack in the trunk, for next time.
Monday, February 6, 2017
The muffler fell off. Again. Broke off at the front, the entire rest
dropped to the road intact. Actually it held together pretty good, my
last repair was decent enough, I guess. (I had some real trouble
breaking my sleeve joint repair apart so that the pieces could go
decently into the trunk for the trip home. So that was good.) Just
more rust/rot in yet another place. Sigh. Also, the RF wheel is
skreeking. May be a very persistent rock, or a bit of wire, or
something like that. Will need to check that out thoroughly, though.
Bearings and brakes are rather important! More important than
mufflers, anyway...
Saturday, February 11, 2017
Got the car jacked up, and checked out the wheel. Couldn't really see
what it was, but it's surely a rock behind the splash guard. I then
spent a bunch of time welding the muffler assembly back together.
Used a lot of wire patching holes, too. Most of the earlier repairs
are actually pretty solid. The whole thing needs replacement, for sure.
Sunday, February 12, 2017
Daniel and I hung the muffler back on, it's easier with two sets of hands.
I slid a collar over the front where the pipe slipped into the downpipe,
and spot-welded the mess together.
The floors are bad. I see that you can get a full floor side
for $90 right now, I wonder if it would be worth it to extend the life
of the car another year or two? Lotta cutting and welding involved...
Wednesday, February 15, 2017
I ordered a new passenger-side rocker panel, $60. Haven't selected the
vendor for a passenger-side floor pan yet.
Thursday, February 16, 2017
I wanted to get the floor pan from Eckler, who was offering
it for about $90. When I tried to order it yesterday it was up to
$120, so I called today to see if I could get the old price. No, but
they were willing to go $100. Do-able, except for the $260
truck-freight shipping charge! No sale, and the guy wasn't at all
surprised. I instead ordered the $121 pan from FixMyRust, the same
vendor as the rocker panel. Shipping was free. We'll see how it
goes, and maybe do the other side next year.
Saturday, February 18, 2017
I removed the LR taillight assembly and disassembled it again. The
flasher lamp has been intermittent for years, in spite of several
rounds of attention paid. I figured it was the strange 'printed
circuit' getting flakey, there's certainly a lot of corrosion on it.
I soldered some wires directly to the supply pins, and ran them to the
bulb socket. The negative lays through the barrel so that it will make
good connection to the bulb, and the positive I wedged between the
contact leaf and the steel spring leaf behind it. I then put it back
together. It seems to be working fine, but it will take some time to
see if the intermittent failure is cured.
Thursday, February 23, 2017
The rocker panel came today. Made by Klokkerholm, P/N
35 20 00 2, it looks good. Big.
So far there have been no turn-signal anomalies, the operation seems
to have been a success.
Friday, February 24, 2017
The floor came. Pretty crude stamping, IMHO, but would still be light
years better than what's there now!
Saturday, February 25, 2017
Jacked up the rock-bearing wheel, and removed the brake pads. Then I
could see that pesky rock, which dropped right out with a judicious
application of a screwdriver. Wow, does that make a difference. The
weatherstrip on the bottom of the driver's door was dragging on the
ground again, I glued it up and in. (The channel is rusted, it can't
stay there as intended.) I topped off the underhood fluids while I
was there, and used duct tape to secure the headlight trim rings, and
to cover the bad fender rust at those points. It's nearly a color
match! It was too cold out to be interested in doing anything with
the sheet metal.
Tuesday, April 4, 2017
The car donated its new battery to the SEL
so that it could make it in to the shop under its own power.
Friday, May 5, 2017
Today I bought another battery. $119 at Home Depot, of all places.
(It might get stolen for the 190D, we'll see.)
Friday, December 15, 2017
Alas, RIP the poor Frankenheap. Awhile ago I'd pulled the passenger
seat to see about rust repair, and it's just too far gone. The
replacement sheet metal doesn't have any of the reinforcements,
mounting points, etc., and those are all shot too. This is just too
far gone for me at this point. Barney was
acquired recently as a proposed winter beater replacement.
So, today I emptied the trunk, pumped up the tires, put the battery
temporarily in place, started it, and made its penultimate drive down
below to a temporary place where it will sit until I can strip off
some of the parts, like the lights, before moving it to its final
resting place. (Going to keep the drivetrain for awhile, else it
would be headed to the knackers instead.)
Sigh.
Wednesday, February 23, 2022
The 190D wouldn't start this morning, and I
suggested Daniel use its block heater. However, it was missing the
cord, the same cord this car uses, so I had him steal the cord off
this car and swap it for the dummy plastic cap.
Return to Site Home
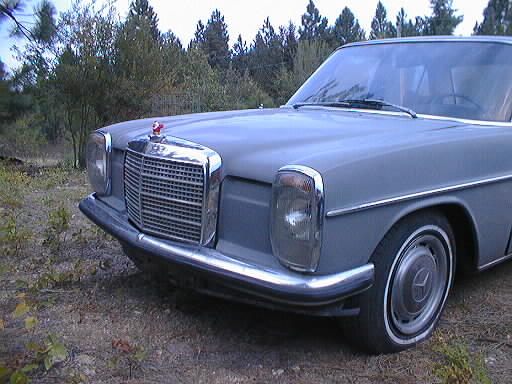
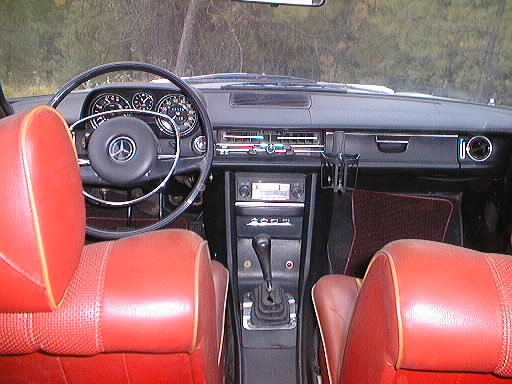
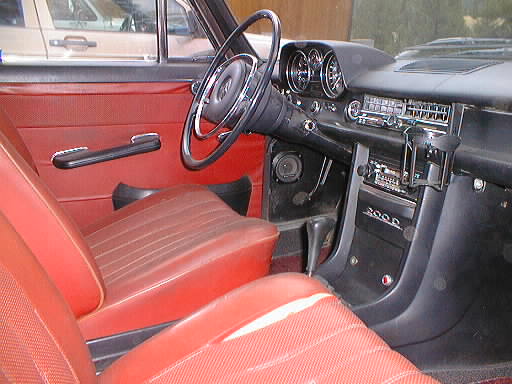
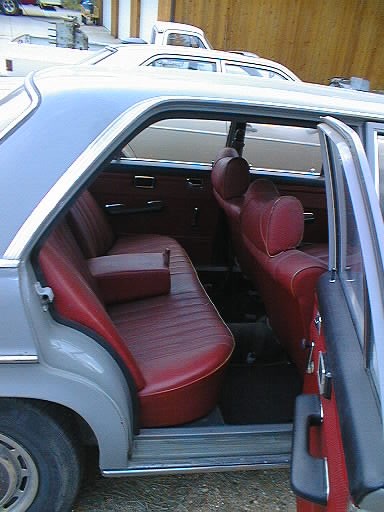
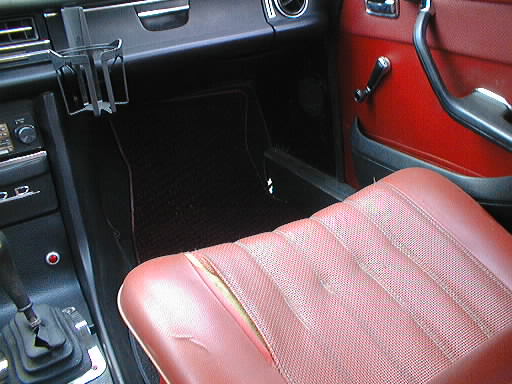
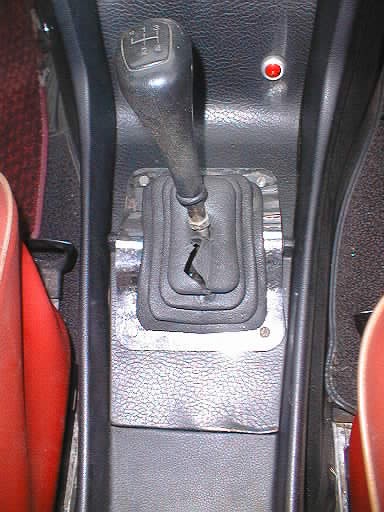
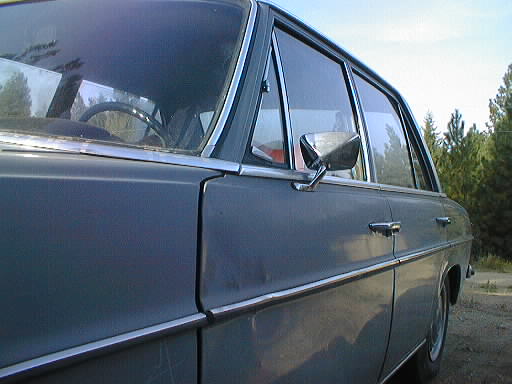
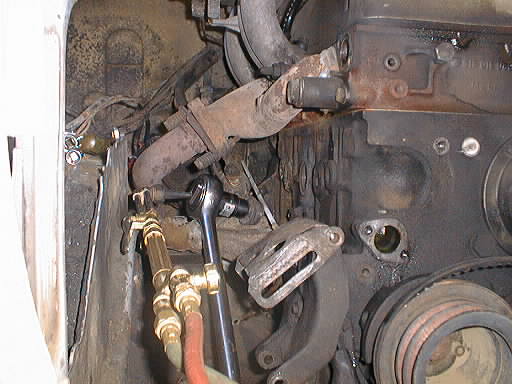
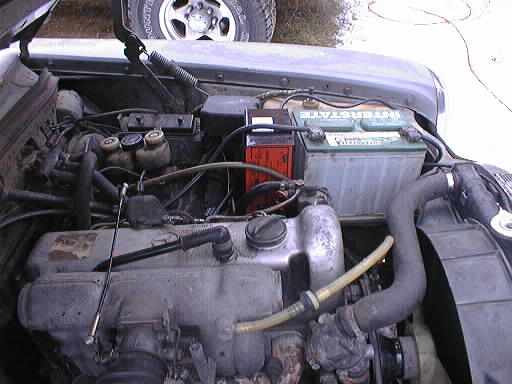
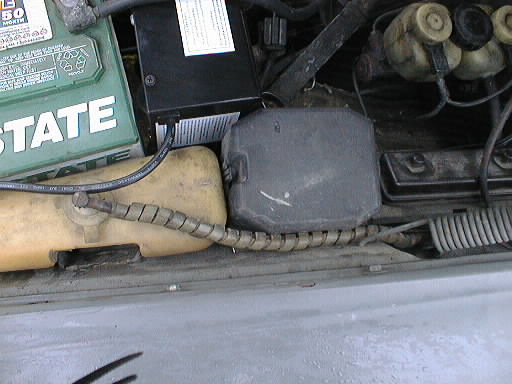
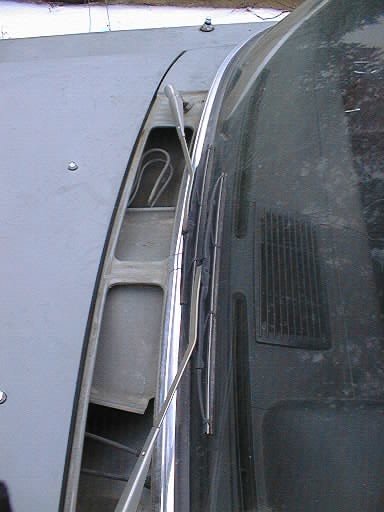
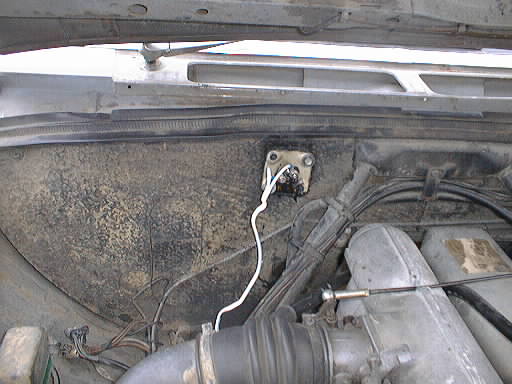
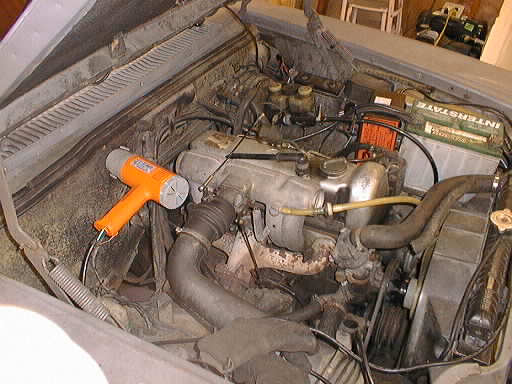
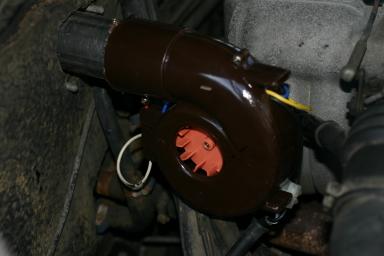
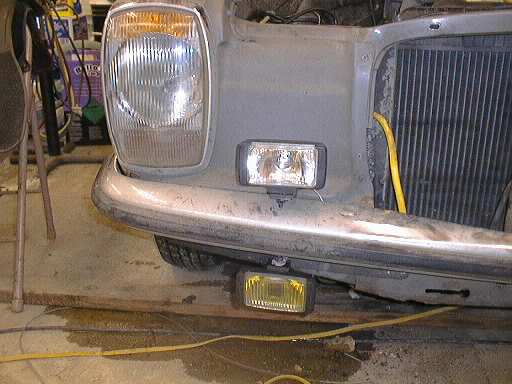
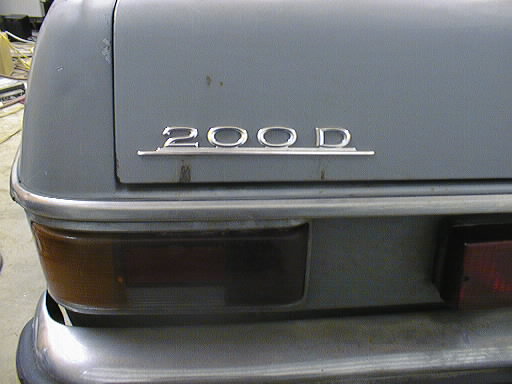
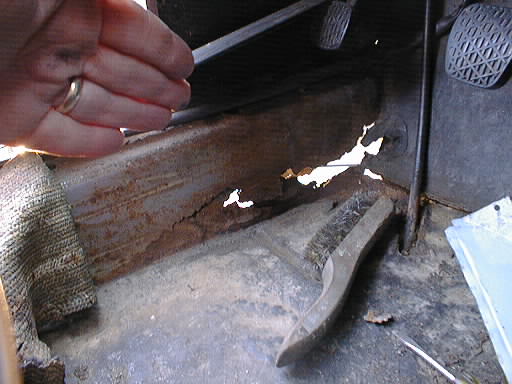
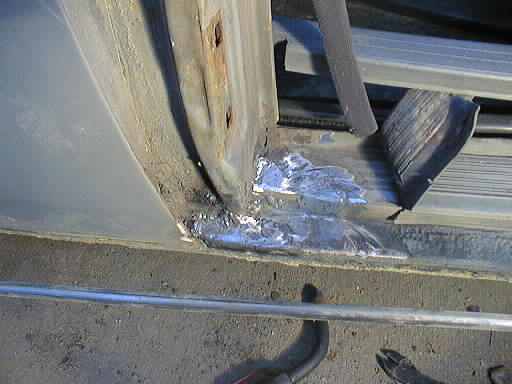
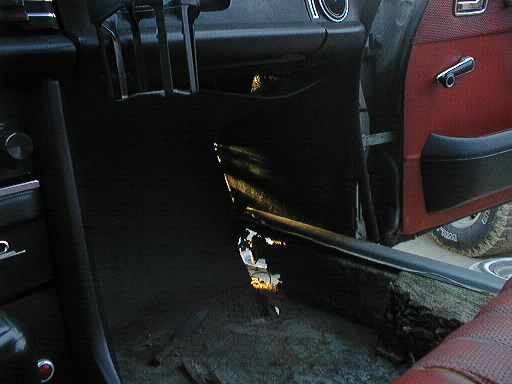
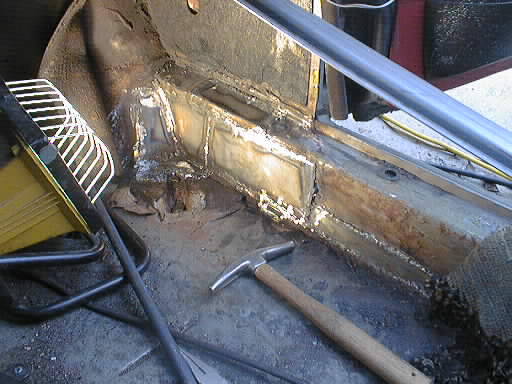
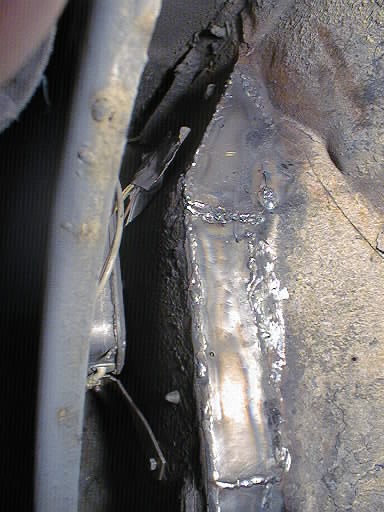
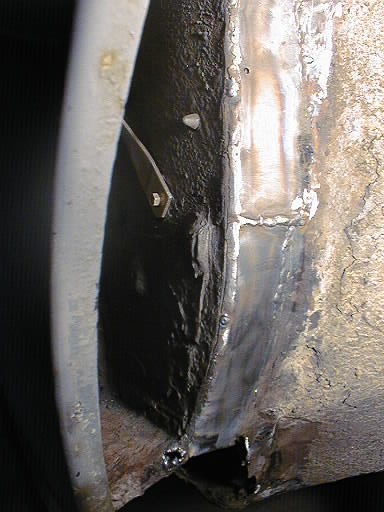
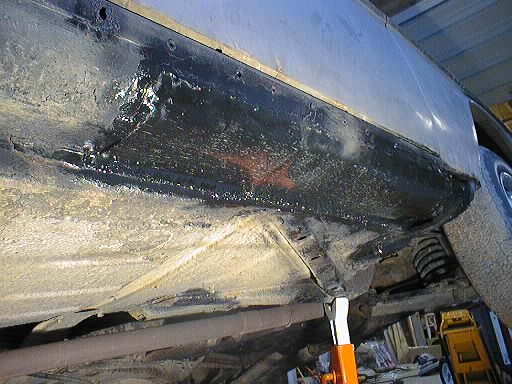
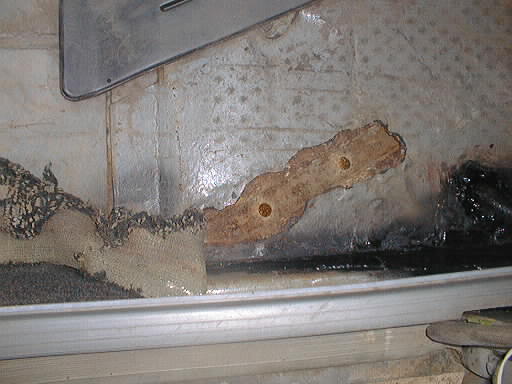
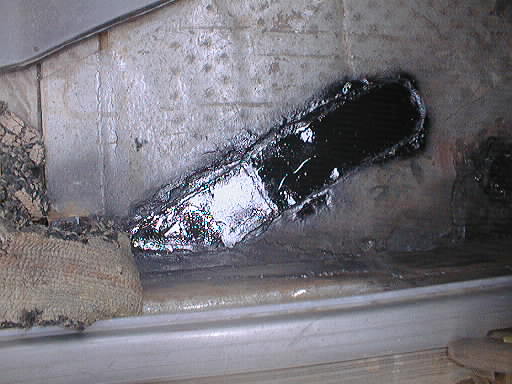
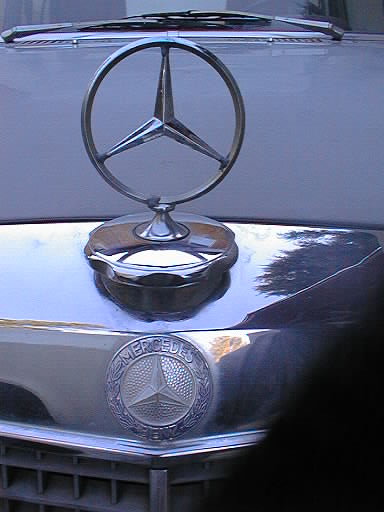
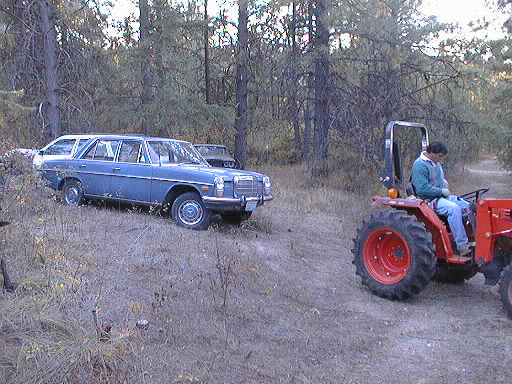
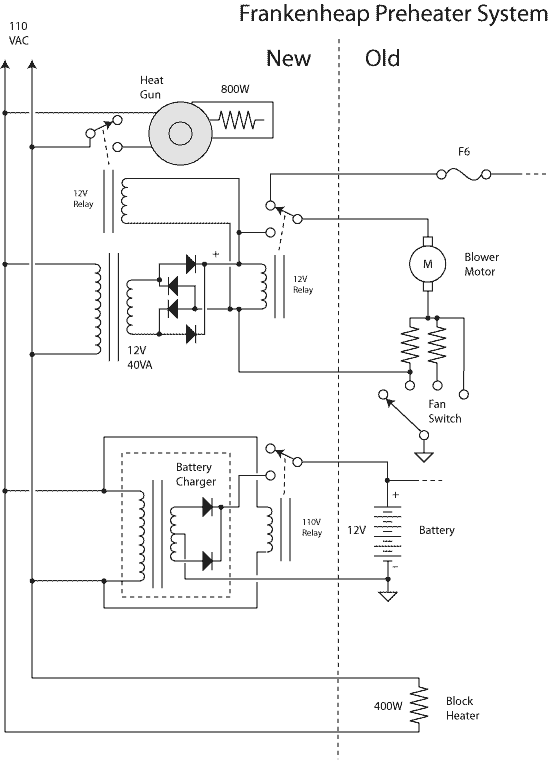