First, I pulled both trunk well skins out. I don't know why I thought the sunroof motor was on the right! (That's why both had to come out.) To get these loose, I had to remove the four bolts securing the panel behind the fuel tank and then remove the left panel. Be very careful not to bend or damage the sunroof teleflex tube that is in the vicinity.
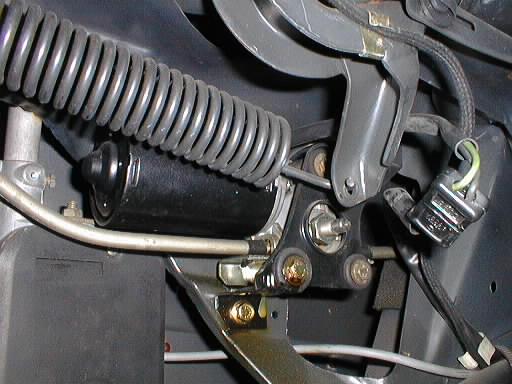
The plastic 'nut' that is on the sunroof motor was all chewed up. (It's for holding the position of the clutch adjustment nut, and for manual operation of the roof using the lug wrench.) I had to remove it, it just pries off. Once removed, I could get an 8 mm wrench onto the shaft flats. (Or was it 7 mm? Regardless, it was small.) Turning the wrench resulted in retraction of the sunroof. Hooray! It's not totally jammed up. But it was pretty stiff. If you are lucky, you won't have to remove the plastic cap and you'll be able to get it open with the tire iron. Here is the sunroof motor, showing the operating shaft coming through the clutch adjustment nut:
With the roof to the rear, I could see that the rails were a black, gummy mess. Saturated with dirt. Obviously the PO had used regular grease on the rails, which is, as I understand it, a bad idea. I used a kerosene-soaked rag to remove the surface goo.
At this point, I tried the switch. It would close the sunroof, but not open it. OK, another switch problem. I pried the switch out of the dash, and popped it open. It was clean inside (no Coke), but the contacts looked pretty dirty. I scraped these off. The secret to reassembling these switches, by the way, is a little dab of grease on the ball bearings. This gets them to stick to the springs in the rocker, which can then be pointed downwards as you press the rocker back in. I re-installed the switch, and then the sunroof would move in both directions. Slooooowly. Progress!
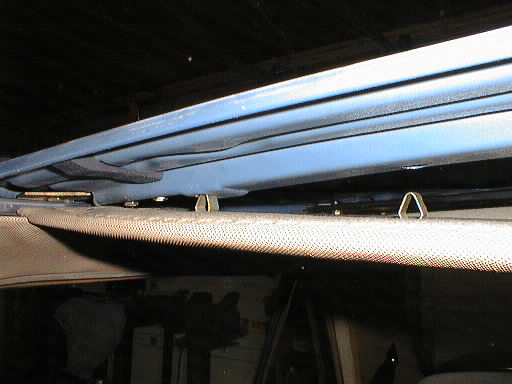
Time to take it apart! Following the directions for the SDL's sunroof (as I have the 126 manual but not the 123 manual), I open the roof 3/4 of the way. Then you pry the front edge of the sunroof headliner down. There are six spring clips holding this up:
Once these clips are popped out, the liner slides forward and up and out the hole. I set it aside, and ran the roof the rest of the way back.
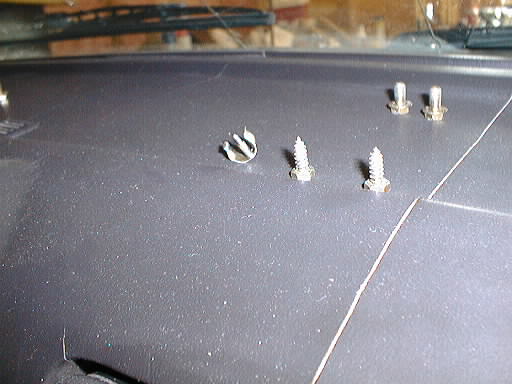
Next, the side rail covers are removed. These are held in place by five philips-head screws per side. The front screw is a machine screw, the rest are sheet-metal. (There is also a regular screwdriver head there that should not be removed.) Once removed, they expose the real slide track, which was gooey. I cleaned everything I could reach at this point, and ran the roof forward.
To remove the roof itself, you first have to remove a C-clip thingy that pins the end of the teleflex cable to the front of the roof:
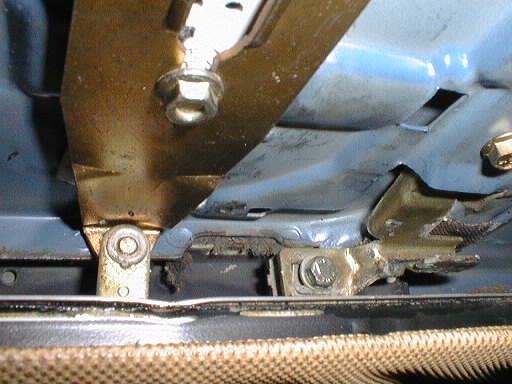
It is the one to the left. You also remove the two sheet metal screws that hold the bracket to the center-front of the roof (shown above), and the four machine screws that hold the center rail to the sliders. (Two of these screws are also shown above.) These brackets and rails are shown here:
and here:
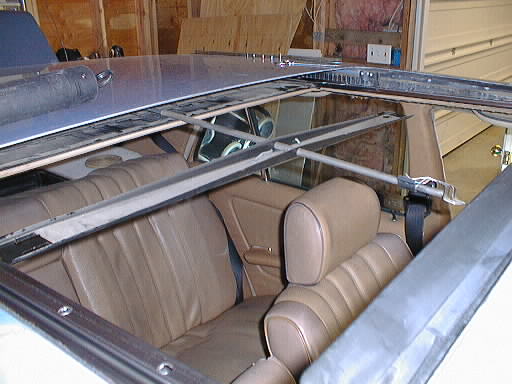
The two sheet metal screw holes are in the center, and two of the machine screw holes are over by the grab handle. This stuff is pretty obvious when you're actually there doing the job. What is not obvious is that you have to back out (but don't remove) the two retaining pins at the rear sides of the roof. You want them still captive in their nuts, but just barely. One of these is shown here (just above the track):
Once this is done, you run the sunroof cable all the way 'open'. The brackets should move back, but the roof will stay in place. Then, you can lift up the front of the roof itself and remove it upwards out of the hole. Set it aside for a moment. Don't scratch it! Now you can finish cleaning all the goo out of the tracks.
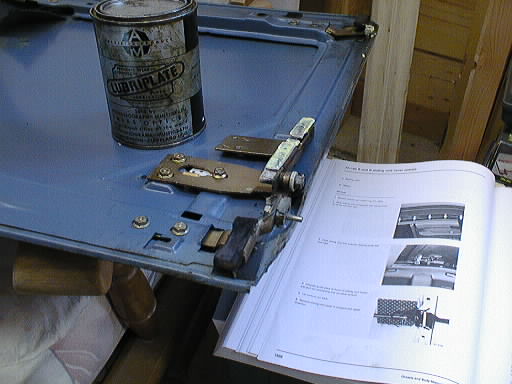
Finally you can address the sliding roof itself. It has plastic 'feet' that are probably all gooey. Clean these off well, as well as the felt-covered rubber bumpers that are on there. Now it's time to re-lubricate the sunroof sliders.
Later experience on another car shows that I missed a trick here. The sliding bracket that has the tube in it through which the cable runs also needs to be pulled forward and out of the car, because the inside of this sheath gets gummy and prevents the roof from sliding properly. Run the cable all the way back and the bracket comes forward and out easily. It should be cleaned out and lubricated as well. It made a world of difference on the other car.
You are supposed to use the special MB slide paste, and the fact that I had to do this job is proof enough. But, I don't have any of this stuff, and I don't believe that it is the only lubricant around with the desired characteristics. But, you don't want to use regular grease, you want something that's not going to attract dirt and that will stay slick over time. I used Lubriplate. I found this rather old can (when was the last time they painted labels on cans, anyway?) in the garage of my house when I bought it. Today I finally opened it, and found it half full. It looked like some of the oil had separated out, much like an oil paint does, but I stirred it up and it looked good. (That is, if something that looks like pus can be said to look good.) I applied some to the plastic sliding feet, both top and bottom, and wiped some on the track as well, both the (bottom) part still in the car and the (top) part that was removed earlier. Don't use too much!
Voila! We are (half) done! Now reverse the above procedures to re-assemble the roof. You should note that the hole in the end of the cable through which the C-clip thingy goes is asymmetrical, the post in the clip is stepped to match. If the clip won't go in try twisting the cable 180° in its sheath to see if that makes a difference.
Many have commented that they believe the switch to be 'backwards', that is, operating in a counterintuitive way. I must include myself in this group. I would have preferred to have the roof close when it is pressed upwards. So, I accomplished this change by popping apart the male connector to the sunroof motor (in the trunk). I then swapped the two leads, and put the connector shell back together. Now the switch operates backwards according to the icon printed on it, but correctly according to what I (and others) expect. Interestingly enough, the green and grey wires in both connectors are now connected together, whereas before they were crossed!
Today my wife and I went out for lunch in the Chicken Wagon, and even though the weather was overcast and cool I had to open the sunroof. It was nice.