Jill queried a mailing list, and got back:
The instrument was made in 1928. See http://www.woodwind.org/clarinet/Equipment/HowOld/Buffet.html. Instruments from that period can be excellent. My C clarinet is S/N 2525, and it's the best instrument I own.Crud is actually a good sign—it means the instrument hasn't been played. My C clarinet had all the holes crusted over, and I got a Buffet Bb/A pair from 1908 in the same condition which restored to play beautifully.
It's certainly worth a lot more than $30.
The barrel and bell should also have the Buffet logo [they do], and the bell should also be stamped "Carl Fischer Inc." [It's not.]
Before having restoration work done, make sure it isn't stamped "H.P." (high pitch), which would put it at A-460, making it unusable. [It's not.]
OK, though this indicates that such old clarinets aren't always the best, even if in perfect condition.
Regarding bore oiling, I found some interesting links:
http://www.naylors-woodwind-repair.com/lifeeverlasting.htm
http://www.shwoodwind.co.uk/HandyHints/oilingbore.htm
http://recorderhomepage.net/wood.htmlThese and other sources suggest that a non-drying vegetable oil (with some natural and miscible preservatives) would be best. My cursory research suggests that 'played-out' or long-neglected wooden horns can respond very favorably to a thorough re-oiling of the wood using non-drying plant oils, but the few suitable commercial oils in a quantity likely to be useful for resurrection are somewhat more expensive than the instrument was! So I bought some stuff at the grocery store: an $8 liter bottle of grape seed cooking oil, and from the nutritional supplements aisle some grapefruit seed extract (an anti-microbial, $11) and some Rosemary oil extract (antioxidant, $6). I'll mix up a small batch of this stuff and see how it goes. (I may not have needed the additives, as the base stock is also a seed oil and claims much vitamin E [antioxidant] and Omega 6. But I doubt that some extra will hurt any.) We shall see!
The next day (Saturday, August 29, 2009) I decided to begin. I mixed up some bore oil, using half a shot of grape oil mixed with about six generous drops of the grapefruit seed extract (very bitter tasting) and about the same of the Rosemary oil extract (very astringent smelling) to serve as preservatives. I stirred it up and then applied it generously, inside and out, with a cotton swab to the already-cracked barrel, paying particular attention to the exposed end-grain. I figured this would be a good starting place to see how it went, since the barrel was already sort-of 'ruined'. The oil smells 'mediciney', though not at all unpleasant, so with any luck it won't turn rancid. It went on nicely, and I then used my thumbnail to scrape off the green grunge from the rings and out of the gaps between the rings and the wood. A dental pick, gently applied, helped dig out a little more. One of the rings, the grottiest, could pull off, so I did so and scraped out the grunge. It looks like a gauze fabric of some sort was used to seat the ring on the tenon. (Silk is traditional.) A lot of green ended up on the paper towel. The barrel took on a very nice rich color, and was silky smooth. I rubbed the oil in thoroughly with my hands, then set the barrel aside.
Emboldened, I then oiled the bell. It wasn't all grotty, not being on the spitty end of the stick, and the white powdery substance had already been wiped out of it. It also got rubbed thoroughly with my hands, then set aside. That's where I'm going to stop for today, I think. Properly done, the re-oiling should take weeks.
...More research found an old published article of Naylor's where he gives some details:
When immersing an instrument, I will cycle the bath temperature from room temperature to about 130 °F for 48 hours (longer if the instrument is old or the wood is obviously damaged). I will let the instrument drip dry for one to two days, then blow excess oil off with compressed air and lightly wipe excess oil off with a paper towel. However, I do not want to remove all the oil at the surface. I then let the instrument sit in a work basket for two to three weeks, and periodically wipe off excess oil. This resting period is important because the wood will immediately begin to absorb moisture from the environment after the immersion. As moisture and oil are being absorbed, the wood fibers will begin the process of relaxing. Internal tensions and the overall dimensions of the wood will begin to change back to the original manufactured dimensions. It takes about three weeks before the wood does not appear to be sweating or absorbing oil. When this point is reached, I perform a final wipe-down of the instrument and bore, refit all keys, and add new pads.I'm wondering if maybe I shouldn't add some almond oil to my mix in order to pick up the lighter fractions? I could even attempt a bath of this stuff, the above procedure sounds very doable. I bought some almond oil ($6/4oz) and some pure vitamin E ($11). (At the same grocery store, the pharmacy had none of this stuff!) I also researched the gluing of oily woods, and a purpose-built epoxy looks like it could be the best bet. On the other hand, this implies that cyanoacrylate glue could be better. An advantage of that is that I already have some good gap-filling cyanoacrylate glue.
- 3 parts olive oil to
- 1 part pharmaceutical grade almond oil
- 1/10 of 1% (or more) pure vitamin E
I decided on the cyanoacrylate glue and got out an old syringe and 18-gauge needle, and the acetone. I slowly injected acetone into the crack, making sure that what came out would drip away freely and not pollute the rest of the joint, and what came out was light brown-colored. I don't think this was glued before, so this must be the oils that are already in the wood, either natural or from the manufacturing process, or possibly due to oiling in its prior life. I'm hoping that washing out the surface oils will help the glue to stick better. I used a total of about 6 ml of acetone, shaking it out and starting over periodically. When I was done I blew it out and pried open the chip with the loose needle to dry. I got out the gap-filling Hot Stuff cyanoacrylate glue and a small plastic spring clamp, which I trial-fit to make sure it would do the job. The clamping action seemed OK, so I dripped glue down into the pried-open chip from the tenon shoulder and then clamped it down. I used acetone to get off the worst of the oozage, and set it aside to cure. You don't want to disturb cyanoacrylate glue as it cures or it gets weak, so I'll give it 'til the evening. (I was out of time anyway.) I'll be able to use acetone and scraping to clean up the joint, carefully, with perhaps a mild sanding with very fine paper to finish up.
After the glue had cured I picked off the clamp, which naturally had gotten glued to the barrel, and started carefully scraping the excess glue off with a jackknife. It worked fairly well, and the end result looked pretty good. Slow and gentle were the watchwords. I then got out some bits of fine sandpapers, well-worn 150 and 240 grits, followed by 330, 600, and 1000. I used oil with the finer grits. It looked pretty good, though I think I need some even finer paper for absolute perfection in matching the surface texture of the rest of the joint. When first sanded the wood was pretty light in color, but oiling it caused the repair to nearly disappear. There was a little bit of a trench left along one of the cracks right at the shoulder, where the glue either didn't fill in or got chipped out during the scraping. For absolute perfection I cleaned off the surface oil in the flaw with acetone and sanded up a tiny bit of dust over it, then pushed it into the depression and hit it with a dab of cyanoacrylate glue, then repeated the finish repair steps. The chip has essentially disappeared, the only way to see where it was is to look at the end grain of the shoulder for the little crescent-shaped glue mark I didn't bother to sand out. It was a bit more work to repeat, but I really want Jill to think the chip repair was 'perfect'.
I plugged in the shop oven and set it on very low with a thermometer inside, I want to see if I can get a reliable 130 °F setting. I don't have lot of oil, so I'm going to need a small container in order to guarantee submersion. I may have to do it in shifts. The long joint is 10×1.25 inches, the bell is 3.25×4.5 inches. I checked the kitchen with little success; I tried the thrift shop, also nothing. I think I'll make some troughs and line them with plastic wrap and/or aluminum foil, or freezer baggies, something like that, and put them in a catch pan. That should work. The oven weighed in at 120–130 °F or so on the candy thermometer, I'll cross-check it before I put anything critical in it! When I checked a few days later in the morning the temperature was up to 150 °F, too high! I turned it down a smidgen.
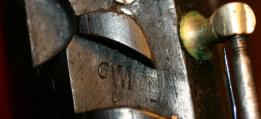
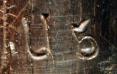
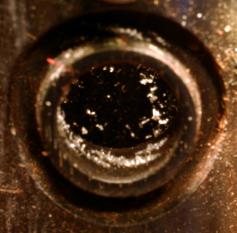
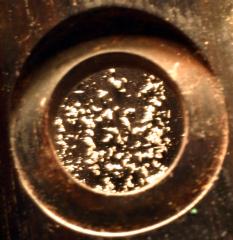
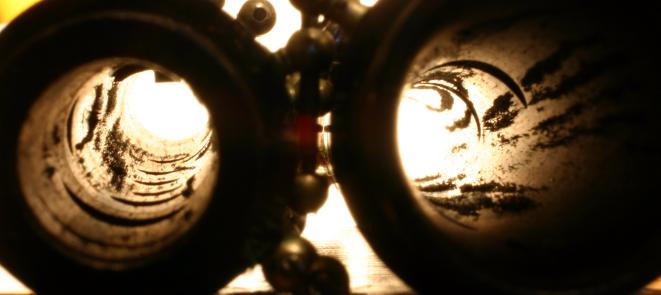
I removed all the keywork from the two joints. Most of the screws were very gummy, and many of the pads looked half eaten. One of the axle screws had a half-broken head, but I was able to get hemostats on the nub and turn it out. It'll need replacing. All the tone holes look good, no chipping that I can see, no obvious body cracks were exposed either. There's a lot of green grunge on the metalwork, and white powdery stuff inside the toneholes and bore. There appears to be the letters "GM" stamped into one of the recesses of the lower joint. The maker? The upper joint has "U5" stamped on it, obviously not the maker. Not sure what these stamps mean. (The 5 was obviously a digit, perhaps the G in GM is actually a 6? 'M' for middle joint, 'U' for upper? It's a mystery, regardless.). It's ready for dipping, I just need to rig the 'vats' and clean a bit of tape residue off the upper joint. The oven's temperature regulation has been too erratic, I think I need to find something else. Perhaps a crock-pot on low, with maybe a Variac powering it, or a Peltier travel cooler on its heat cycle? The latter should also be highly adjustable on a lab power supply. I tried the crock pot on Warm, with no liquid in it and the lid on, and the air temperature inside stabilized at 125 °F, just about perfect. If I can set pans inside of it it'll work. I took the tape residue off the upper joint with acetone, and then photographed the scale inside the joints and toneholes (upper, lower). This white powdery material appears as raised grain in the bore, and is one of scale, mold, or fungus. Let's hope it is the first on that list!
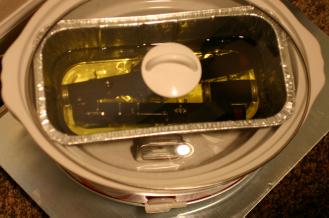
Finally ready to begin, I bought an aluminum 5# loaf pan (the discardable heavy foil type, $1.30) with an eye towards bending it to match the volume required. However, the joints (sans bell) covered the bottom as-is without too much wasted space. (Pan dimensions are 11-3/4×5-5/8×3-3/16".) It also dropped into the oval crock pot without touching anywhere except at the top corners so it was suspended away from the heated sides and the unheated bottom. This air buffer should help make for an even temperature in the oil bath and a slow approach to temperature equilibrium. I put in the barrel and joints, and poured in my 4 oz. of almond oil. I then refilled the almond oil container with grape seed oil and poured that in too. I repeated until the joints were just covered, which was 24 oz. of oils altogether. (A 5:1 ratio, not the 'optimal' 3:1 of the recipe.) I then poured in a healthy dollop of vitamin E, and some squirts of the grapefruit seed extract and quite a number of drops of the Rosemary extract (all as preservatives), and stirred it all up. (I would have preferred mixing up the batch thoroughly without the joints in, but I didn't want to dilute the almond oil any more than necessary to cover, and I didn't want to fish the joints out of the pan, dripping, to put somewhere else while I did so.) I suspended the pan in the cooker and put the lid on. 'Cooking' began Wednesday, September 9, 2009 at 3 AM. (I couldn't sleep.) I anticipated several days of soaking. The bell was to get its turn in a different container, one that could result in it being completely covered with the 24 oz. of oil. (A bean can, probably. I'll also use a wine bottle to store the oil in, afterwards.) Vaguely unhappy with the oil mixture, I bought another $6 4 oz. bottle of almond oil and added it to the mix. That made 20 oz. of grape seed oil to 8 oz. of almond oil, nearer the called-for 3:1 ratio. (Not that this ratio is likely to be of vital importance.) I added some more grapefruit seed extract, and some more Rosemary extract. (There was already plenty of vitamin E, and the new oil came with more in it.) After some time the temperature got a little high, so I slipped the lid a bit to the side for more venting.
After the parts had been in the bath for a day it occurred to me that I should have wiped out the bore scale before beginning. Better late than never, I lifted them out of the bath and let them drip a bit, then took them over to the sink and gently brushed out the bores under warm running water using my trumpet snake. (The saturated surface oil kept the water out of the wood grain.) I then blew out the bores and toneholes, and wiped down the joints with a paper towel to remove all the water, then slipped them back into the oil bath. After one week in the bath I turned off the heat to let it cool slowly to minimize stresses. With this much time a lot of Rosemary scent had boiled off, what remained reminded me of the smell of cedar. Perhaps it's approximately the same preservative chemical? After the bath had cooled a bit I removed the joints and let them drip-dry. They were a beautiful shiny black, with no sign of the dried-out red look they'd had before. I poured the oil into a bean can that fit the bell and immersed it, setting up the heat much as it was before. I poured the remainder of the oil into a clean wine bottle. There was some immiscible darker oil puddled in the bottom of the pan, I assumed this was mineral oil that came off the joints, either the wood or the metalwork, or both. (I discarded this residue.) With the joints somewhat less oil-covered I wiped them off.
Disaster! There was an obvious new crack in the socket on the upper end of the lower joint, all the way down to the first tonehole. This was very distressing. The wood is very thin there, I'm not sure it even could be pinned at that point. The ring on that socket was also very loose, and it wasn't before. There might also be a crack between the upper two toneholes (on the side) of the upper joint, although I'm not sure if that was there before or not. There was some suspicious grain marking that I'd noticed before.
This was not looking good. A relevant quote:
Now here is a trick I picked up from a clarinet repairman. Force the crack open slightly, and slip in a piece of cigarette paper. Then wick thin (watery) super glue along the edge where the paper enters the wood. You can get brands such as Jet or Hot Stuff from hobby shops which have a thin applicator tip.The glue will wick into the crack being carried there by soaking into the paper. Yes, it will stain the wood. When it is completely cured, sand off the excess paper, and refinish the wood, perhaps having to stain the wood and add oil.
I had an idea of using a hose clamp to secure the body below the tonehole, and prying open the crack ever so slightly, cleaning it out with acetone, gluing it with cyanoacrylate, and releasing the pressure holding open the crack. When cured, proceed to clean up and refinish the area. Could this work? Anyway, after a week in the oil bath I removed the bell. No sign of damage there, at least. Much goop dripped out of the lower ring, I suppose that's a good sign. I set it aside to drip-dry. The oil was more than enough to fill the wine bottle I'd selected for storage, but the excess went nicely into one of the Almond oil bottles. (The Rosemary antioxidant seems to have mostly evaporated, so I put some more in the bottles.) Once I wiped off the bell I found that it seemed to be decidedly non-circular as the bell ring was then loose, and more so on one axis than the other. (The bell ring itself was not perfectly circular, and seems to be eccentric by about 0.005", and it's loose on the wood by as much as 0.050", depending on orientation.) I thought the whole purpose of the oil treatment was to relieve stress and return the dimensions closer to as-manufactured, yet by appearance it seems perhaps the opposite had occurred and the wood had shrunk, and unevenly at that. (If the wood were to have shrunk significantly that would certainly explain the new crack in the middle joint.) Too much time in the oil? I was able to squeeze a lot of gunk out from behind the loose and freely-rotating bell ring, so I cleaned that up. (The ring had been tight originally.) I wiped down all of the wood, bell and joints, which smoothed and shined it right up. It looked fabulous, anyway.
When I went to clean out the crock pot I found that the spilled oil that had puddled in there had turned into a heavy and hard to remove sludge. Not particularly the action of a non-drying oil! It just gets better and better... I had to keep reminding myself that this was still only a $30 horn I was risking here. The horn was a bit gunky, so I used Q-tips and acetone to clean off/out all the toneholes, and around all the posts. I wiped down the bore and the outside with acetone as well, to remove the excess surface oil. It looked a lot better. I gently scraped the green crud out of the two metal toneholes on the upper joint, and removed and cleaned underneath the guide bracket and the thumbrest on the lower joint. The horned post on the lower joint was also getting loose, so I put a paper shim over the hole and ran in the post. It tightened up just about perfectly, but tearing off the paper left some fringe that I burned off with a match. The horn, when assembled, was a bit loose. It probably needs new tenon corks, but that's no surprise.
I bought a box of grenadilla cut-offs on eBay, $40 shipped. These are the reject pieces, too small or too misshapen to do much with. However, one can make plugs and pieces from them, small tool handles... and sanding dust for instrument repairs.
After a month of 'resting' the rings are getting tight again. Moisture going back into the wood? The joints still don't fit together any tighter, though, I guess I will need to re-cork the horn. I rubbed the wood down again, there wasn't much fresh oil residue this time. I should attempt the crack repairs soon; I'll need some more good thin cyanoacrylate glue, what I have is drying up.
I ordered an inexpensive ($5.20) clarinet pad set, from China's Zheng Hao, though it was labeled "Austin Music". I actually ordered two sets, one for this horn and one for my mother's old wooden clarinet, but as Jill took that one in for a professional repadding job I guess I won't need it. Maybe I can use them on her old metal clarinet? I also ordered a set of tenon cork strips, $5.44. A new tube of good thin cyanoacrylate glue was $8. The wood dimensions are stabilizing and oil is no longer weeping out of the horn. I have everything I need in order to begin repairs again, I just need to find time to work on it.
Two months is long enough to sit, stabilizing, so today (Friday, November 27, 2009) I sluiced out the crack with acetone, forced open the crack a bit with a tapered automotive bodywork tool, and slipped in a bit of cigarette paper. I couldn't get the paper in very far at all, but rather than risk further damage trying to open the crack more I just gave up at that point. I wicked thin cyanoacrylate glue into the crack and the paper, then removed the wedge and set it aside to cure after removing what excess I could while it was still easy to do so.
The next day the glue was as cured as it was going to be, so I scraped off the rest of the excess and wet-sanded (oil) the area with a succession of finer grades of paper, ending at 1000. It's really hard to tell where the crack was now, and I think it's adequately sealed up. The worst part was removing the excess glue. I need to get some black silk to put under the tenon ring, the old stuff is pretty far gone.
I bought some black silk. It was on sale so I bought a yard for $12, I figured I could use the excess for photographic purposes. I cut out a square big enough to cap the end and trial-fit the ring. It was a bit too loose, so I put on another strip that covered about half the circumference. The ring then would push on a little bit by hand, but no further. (Beveled side first.) I used a gentle tapping with a wooden mallet to drive it most of the way over the socket, then I used a razor blade to cut the excess off of both sides of the ring. The mallet then finished the job of seating the ring. This is the correct procedure, if my research was any good.
In the next session I removed the horned post that I'd used a paper shim on, and replaced the paper with a bit of black silk. Much less noticeable! I then cut the dead cork off of the tenon of the bottom joint with a razor blade. The surface under the cork was ridged, presumably for greater surface area for gluing. That was a bit tricky. I used a small wire brush to scrub out the cork caught in the ridges, then cleaned it off with acetone and a Q-tip. The cork was actually quite thin. I then got out the new cork kit and slit one of the strips to match the width of the channel. I painted contact cement on the mating surfaces and set it aside. While this was drying I used Hagerty's silver polish on the socket ring. I wasn't sure whether it was silver-plated or not, but it did shine up a bit. (If it's not silver-plated something more aggressive like Brasso, Flitz, or MAAS would be appropriate.) With the cement dry I applied the cork strip per the instructions that came with it. I then sanded the cork down evenly until the bell would go over the tenon. This was a tight dry fit. I then greased the cork. At that moment, at least, it seemed to fit perfectly and didn't wobble any longer. I polished the bell rings too, they look marginally better.
Next up was the lower joint keywork. I used a lighter to heat the pad sockets and dug out the gummy glue and the remains of the pads. I don't know if this was shellac or not, it had a texture, once hot, more like Liquid Nails or something like that. I then put the keys in the ultrasonic cleaner with some hot water and dish soap. As it only will run for 3 minutes at a time it was a bit of a PITA to get them clean. I bought some MAAS metal polish at the hardware store. $5. The MAAS is lavender-scented, and that's all they had. Apparently it's preferred that way for some common use. Not my preference... I started polishing keys. It worked!
It had been very cold here, 1–7 °F at night, so I put the empty case outside as a de-verminization step. Just in, ahem, case. (I also put out some other instruments, the ones that wouldn't be bothered by cold.)
It'd been slow going, but the next day in the morning I got the socket rings and the bell ring all polished. Shiny! In the evening I did three posts and the thumbrest. Only ten more posts to go on that joint!
The $10 (shipped) spirit lamp I ordered from Home Science Tools a few days ago came today, and it's far from the "best they've ever seen" one 'customer' claimed it to be, IMHO. The cap is a flimsy metal shot glass, and isn't even remotely vapor tight, it doesn't even reach to the glass body, the wick holds it up. Steaming pile, if you ask me. Maybe it'll work, though. The rest of it seems all right. My on-line review:
I am disappointed in the quality of construction. In particular the cap is, well, garbage. (The rest of the lamp is fine.)I would expect a cap that fit snugly and would both snuff the lamp and prevent evaporation while not in use (and perhaps even contain drips if the lamp were to be accidentally inverted), and while the catalog picture appears to be of such a cap my lamp came with a thing that looks like a flimsy metal shot glass. It's tapered and too short and just sits on the wick itself, mashing it, and contacts neither the screw neck nor the shoulder of the tank. It wobbles if you shake the lamp, like a drinking glass on a stick (which it resembles).
It bends when you squeeze it as you would have to if it were as tight fitting as it ought to be, but I guess that since it isn't actually tight-fitting its flimsiness is not much of an issue.
Unlike the picture the screw and the cap are not nickel-plated. The flimsy cap is some kind of stainless; the screw top appears galvanized, though chemically it may be nickel—it looks much coarser than the picture.
Not quite what the picture, or the other reviews, lead you to expect.
We'll see if they actually let it through or not. [Apparently not. But they did refund my money, and told me to keep the lamp.]
Two days later and I finally polished the remaining ten posts on the lower joint. Stabbed myself a whole bunch of times on those wretched needle springs; Grrrr. Do they really have to use actual needles for springs? I left plenty of blood on it, perhaps the wood sprites will be appeased.
The next day I polished two of the lower joint keys. About three more to go on that joint. The day after that I polished the rest, and dry-fit (sans pads) the keywork on the lower joint. One spring is loose, and I don't quite see how it's supposed to fit, but other than that it seems OK. It's about time for some padwork. I filled the alcohol lamp and got its wick trimmed and set to length for a minimal flame, and I hammered on the wretched shot glass cap to make it work better. Ready for some gluing, I guess.
In another session after the holidays I got two pads glued on. This is not easy to do! I used diagonal cutters to whack off a chunk of the end of a high-temperature hot glue stick, and set it in the pad cup and heated it over the alcohol lamp. I got it a bit too hot at first and it bubbled, and discolored the cup a bit. (This will polish back out.) It was also too full, and a lot oozed out when I set the pad, but it peeled right back off the side of the cup while it was still warm. With a little practice, though, I got better at quantity and temperature management. While the glue was still hot I got the pad leveled, at least roughly, and clamped it lightly in place to take a 'set'. Fifteen more to go! Jill's thinking about signing up for band as a mostly-clarinet player, to stretch her doubling chops, and will be using the Conn/Noblet clarinet unless I can whip this one into usable shape (assuming it's actually a better horn).
The next morning I got two more pads on, the last of the large ones. This is tedious! Mostly these large pads did not fit the cups well. (Cheap pad set, I'd say.) In the evening I got the last two pads in, and the pad cups re-polished and the keywork reinstalled. A slip with the lamp scorched the edge of one of the pads, but not where it contacts the hole so I think I'll be OK. If not, that pad can be replaced later. When I held all the pads down and corked the bottom end and sucked on the top end, however, it was obvious that there were plenty of leaks to address. Seating pads is tricky business! There was also one needle spring whose attachment I couldn't see, so the mechanism wasn't fully sprung.
The next day I got out the Conn clarinet and saw how the spring in question poked into the base of its associated post. Sneaky! The hole is nearly invisible, it's no wonder I couldn't figure it out. That spring was loose in its socket (contributing to the mystery of where it went) so I used a dot of cyanoacrylate glue to fix it in place, then put that lever back with the spring poking into its hole; after that the mechanism seemed properly sprung. There was also one visibly wonky pad that I re-heated and re-set. One of the side keys needed some more cork shim in order to cause two pads to close simultaneously, so I glued on a scrap of the tenon cork and sanded it down to fit. After that the joint seemed to seal when all the pads and holes were closed. (Tested via suction with the other end plugged with my palm.) I then oiled the pivots, using synthetic 90W automotive gear oil, which I am told works well for this. When I did the suction test on the recently professionally-repaired Conn it was obvious that my job was much leakier. I needed to do more reseating, I guess. I got out a strip of cigarette paper and tested the pads, two of them were a bit slippy on one edge. Reheating and reseating made them better, and made the joint more airtight. I'm thinking I'm going to call this joint done, at least for now.
I next made a token start on the upper joint by cutting (and scraping) off the lower tenon cork. Messy, just like the first one!
Two days later I removed the upper tenon cork, and that was no picnic. Somebody had obviously used an improper glue on this one, perhaps Duco cement or even cyanoacrylate glue, and while the cork cut off easily enough the glue grooves in the tenon were filled with a hard substance that didn't want to budge. I used acetone and a sharp chisel point soldering tool to try to scrape it out of there, along with the small wire brush that's all I'd needed on the others. I had moderate success, but the wood got somewhat chewed up. It shouldn't show, though, and I doubt will do any harm. Annoying, nonetheless.
The next day I glued on the new lower tenon cork and began sanding it. A word to the wise: let the new glue set up fully (after applying the cork) before beginning the sanding. At first it's not too firmly attached, results will be poor if you don't wait. In the evening I sanded more, and the cork started to come a bit loose. I think I got too much glue on and it didn't set up right. I'll think about what to do for awhile, maybe let it dry some more overnight with the other one. This piece of cork needs to be sanded quite thin so it needs to be attached well or it'll just come loose and wad up when you try to assemble the horn. I then glued on the upper tenon cork, using less glue this time. I cut off the excess cork and then set it all aside to dry overnight.
...No, the loose piece never did set up any better. The next day it was still not completely bonded, so I peeled it off. I rolled the glue off of the tenon with my thumb and cleaned it with acetone, no problems there. I tried to roll the excess glue off of the now-thin cork, but the cork tore in two. Disgusted, I got out the last piece of new cork, intended for the mouthpiece, and applied it to the tenon instead. (With only the proper amount of glue this time!) With more care I finished rolling the glue off of the two torn cork pieces, it's possible I can still use them for the mouthpiece. (Or if not I'll have to get another cork strip somewhere.) The strip of sanding cloth is wearing out, I might have to get a substitute.
I was able to get back on it after a few days to sand the new tenon corks. The corks were firmly attached, no sign of looseness this time. The sanding cloth that came with the cork was wearing out and working very slowly, so I got a more aggressive strip of sanding cloth to use. I nearly blew it: it was so rough that it really dug into the cork and chewed it up fast, making it look like suede. I caught it in time, however, and used the original stuff to smooth it back out. The aggressive cloth really did make the job go faster, but next time I'll want either a finer grit, or cloth used enough to tame it down some. I greased the corks and assembled the instrument (sans the poached mouthpiece, which Jill had taken to use on the Conn), there's now no sign of wobble. It's starting to look a bit like a clarinet!
The next day I was able to polish one of the keys for the top joint. I used the alcohol lamp and a bit of paper towel to first remove all the old glue from the cup.
A week later I got back onto it and polished four more keys. I just need to keep at it steadily and it will get done, otherwise not. (Seven keys to go, all the posts, then the soldering of the broken bridge. After that then it's just upper joint pads, the filling of the surface cracks of the barrel, and finally the mouthpiece cork. I'm getting tired just thinking about it all!)
Two days later I polished the remaining upper joint keys, and cleaned them all in the ultrasonic tank. I also removed some of the excess solder on the broken bridge, with heat and a Q-tip. The keys all look pretty good now. Unfortunately the cleaning in the tank loosened all the cork bumpers, we'll see if they're ruined or not. I had to glue three of them back already.
Time to spank this puppy out of here! The next day saw all eighteen posts, the metal toneholes, and the upper key guide on the upper joint polished. Other than any potential touch-up, the polishing is done. I think it's going to look pretty nice.
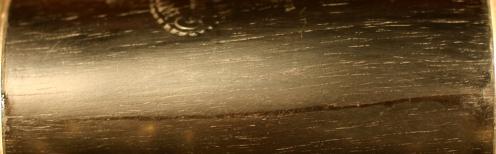
I decided to take a bit of a detour so I repaired the two large (end-to-end) surface cracks in the barrel. I sluiced the cracks out with acetone and ran down them with a razor blade. With them nice and gappy and clean I sanded up some dust using a piece from the box of scraps and pushed the dust down into the cracks. I then used a needle to dot cyanoacrylate glue along the cracks, which wicked down into the dust, solidly filling them. When that had set up I scraped and sanded them down flush. I used oiled wet and dry sandpaper in a succession of grits down to 1500, and at the end the cracks had essentially disappeared. (Crack one, crack two. They're far more visible to the camera than to the eye.) A final buff with the cotton from the end of a Q-tip restored an even sheen to the whole barrel. (Cotton is mildly abrasive, which is why you never use it on camera lenses.) Even Jill was impressed.
On a roll today, I installed the first pad in the register key, and installed it. I oiled the key using the synthetic 90W automotive gear oil.
The next day I managed to get four keys padded and on, and the thumb ring on, before breakfast. That's about half the work, excluding the bridge key. (I had to use the Conn for reference in order to see which keys should go on first.) After breakfast I got the remaining keys on, except for the broken bridge key. When I corked off the joint (including the uninstalled pad) and sucked on it there were obvious leaks. I enlisted Jill's help, and we were able to identify the two leaking pads, which I re-seated.
I then carved the nasty dead cork off the mouthpiece (which I had stolen back from Jill) and cleaned it up with a wire brush, the chisel point soldering tool, and acetone. (More Duco cement to deal with, it seemed.) I painted on contact cement and applied the torn tenon cork that I'd saved. It was, fortunately, long enough to go around, and not too thin. After it had set up awhile I trimmed off the excess and sanded it. After a bit of fitting it worked with both this barrel and the Noblet barrel on the Conn. Done? I just have to do the soldering and the last pad. Then we can try it out.
A couple of days later I took it to the neighbor's, and he told a rather disturbing tale: It's really too bad that somebody tried soft-soldering it before! The lead acts as a contaminant and may totally ruin the piece as it alloys with the base metal under the high heat required for silver soldering, causing slumpage or worse as it eats into the base metal. He'll get a chance to fiddle with it in a week or two... I wasn't expecting that, somehow I thought we'd be done right away. Oh well!
...The weekend rolled around, and there I was just looking at that thing sitting here. I oiled the case hardware (hinges and latches) using the synthetic 90W automotive gear oil, that made me feel slightly better.
The next day I got the call, and trotted down to the neighbor's studio. He'd prepared the piece by filing off what he could of the solder, and pickling the rest. He fluxed it (borax, and something else) and used something called EZ-Solder, which is the coldest of the high-temperature silver solders. (The concern was that really high heat would metastasize the lead cancer, and/or cause the other levers to drop off the tube.) An air-acetylene torch was used for heat; he brought the broken-off piece up to temperature and pre-tinned the joint end. Then he lashed the pieces to ceramic firebricks (using black iron wire) and got them positioned. After that it was time for heat, and he used a steel probe to drop tiny snips of the solder into the joint. Solder was used to do some gap-filling due to the extra filing, though he doesn't normally like to do this. Once it was done he dropped the piece in the sulfuric acid pickle and then rinsed it off. Looked great! Seemed strong, too. We trial-fit it to the clarinet and bent the arm a bit for better clearance. (More of this will need to be done, I think.) The metal is all discolored from the heat, I'll need to do some cleaning and polishing. But for right now I'm quite happy.
Jill thought the lowest key had a clack or something in it that didn't belong. Something else to look into.
In my next session I had a look at the lowest pad key, and it was clunky and hyperextended. I removed the obscuring keys and found that the axle was loose, the screw couldn't go in far enough to take the radial slop out of the joint. There was also excess axial play in that tube. I had to swage, it looked like. Not having swaging pliers I used a regular set of pliers to hold it, and tapped with a small hammer to swage in the end of the tube. This simultaneously shrank the hole on the end and lengthened the tube, although somewhat irregularly. A few trial fits showed that it was then tight, and a small amount of filing restored a bit of clearance axially. The hyperextension was cured with a small bumper of cork that I glued to the bottom of the stop. I had to trim that a few times to get it operating properly. (It may need more trimming, if the extension is not enough. This won't be known until the play testing.)
I then used fine sandpaper (the well-used stuff from the woodwork) to take off the copper flash that had gotten onto the bridge key when in the pickling bath, and to smooth off the scale and marks from the soldering. With a nice dull shine on it I then used the polish to bring it up to match the rest of the metalwork. Ready for the pad! But I was out of time.
On the last (?) day I installed the final pad, and finished polishing the bridge key. With the clarinet assembled I could see that the pinky key on the top joint was bent so that it didn't sit well with the rest of its group (from the lower joint), so I bent it around to the point where I thought it should be. (I used the Conn as a reference.) Its pad was leaking a bit, especially after the bending, so I re-seated it. It was also hyperextending and the pad cup was running into a post, so I glued some more cork under the key to extend the stop. This pad's hole is a straight bore into the body of the clarinet, it's not cut and beveled like most pad holes, or like the comparable hole on the Conn. As a result it has a curved sealing surface, which makes it difficult to get a perfect seal with a flat pad. If this hole is a persistent leaker I may file the face of it flat or even have a proper tonehole face cut on it, we'll see. After a final once-over I took it up to Jill for a play test.
...Which she didn't seem to want to do. Three days later she still hadn't tried it. Talk about frustrating! I couldn't test it myself as she'd again stolen the mouthpiece, so I got out the metal clarinet and fixed the chip in its mouthpiece and used it for testing. It actually seemed to work, sort of, but the bridge key is not adjusted properly: you can't actually depress the lower joint's rings. With the joints misaligned to relieve this condition I was able to play down the horn, at least somewhat, so I'm guessing that I'm close to done.
The next day I worked on the bridge key, I removed it and used needlenose pliers and a small hammer to tap it to make more clearance. Once I had enough I glued a small piece of cork in there then trimmed it to thickness with a razor blade. I got the linkage set to what seemed right, and tried playing it. That went fairly poorly, but at least I could cross the bridge. Back to Jill, I think.
She tried it out, and reports numerous leaks and problems. Great... The main problem is that the upper joint upper tenon leaks. She used cigarette paper to bolster the cork, and said that it helped (and that I'd sanded it too thin). That lowest vent key is also acting up again, and there seems to be a persistent (and slight) leak that I can't identify; the upper joint doesn't hold air as well as the Conn does, and pressing on pads doesn't seem to affect this. (Let us hope it's not something truly evil like body porosity!) She also said the lowest key on the lower joint was still sticking a bit. I found that one of the upper joint's palm (?) keys was bent into its neighbor, so I pulled that out a bit for clearance. Probably done in the same incident that broke off the bridge.
No, I'm not done. The next day I picked up some more 1/16" cork at the local repair place ($3, enough for three tenons), and consulted with him about tonehole cutting. No, he doesn't do it, nor does he know of anybody in town who does. He suggested that the metal tonehole inserts could be leaking around their outsides, I'll look into that.
The next session was a week later. I removed all the keywork from the upper joint. I filed the problematic bottom tonehole flat using a fine flat file. I used fine sandpaper and a block of wood to smooth it again. That should let the key seal easier. Next for the leak checks. I'll need 15 small corks to plug the holes if I want to pressure-test the wood body in a water tank.
The next day I measured the tenon and tonehole diameters, for plugs.
Rubber stoppers come in these sizes (courtesy WidgetCo):
| Size | Min Dia. | Max Dia. | Size | Min Dia. | Max Dia. | |
| #0000000 | 1.5 mm | 5 mm | #2 | 16 mm | 20 mm | |
| #000000 | 3 mm | 6 mm | #3 | 18 mm | 24 mm | |
| #00000 | 6 mm | 10 mm | #4 | 20 mm | 26 mm | |
| #0000 | 6 mm | 11 mm | #5 | 23 mm | 27 mm | |
| #000 | 8 mm | 13 mm | #6 | 26 mm | 32 mm | |
| #00 | 10 mm | 15 mm | #7 | 30 mm | 37 mm | |
| #0 | 13 mm | 17 mm | #8 | 33 mm | 41 mm | |
| #1 | 13 mm | 19 mm | #9 | 37 mm | 45 mm | |
| #10 | 42 mm | 50 mm |
(The 'distance' is from the edge of the top tenon to the approximate center of each hole, for reference.)
| Hole | Dist. | Dia. | Size | Hole | Dist. | Dia. | Size | |
| Top | — | 14.9 mm | 1 | #9 | 134 mm | 5.1 mm | 000000 | |
| #1 | 37 mm | 3.1 mm | 0000000 | #10 | 151 mm | 5.1 mm | 000000 | |
| #2 | 50 mm | 5.1 mm | 000000 | #11 | 166 mm | 6.7 mm | 00000 | |
| #3 | 75 mm | 5.8 mm | 000000 | #12 | 169 mm | 5.7 mm | 000000 | |
| #4 | 84 mm | 5.8 mm | 000000 | #13 | 170 mm | 6.3 mm | 00000 | |
| #5 | 95 mm | 5.3 mm | 000000 | #14 | 189 mm | 7.6 mm | 00000 | |
| #6 | 112 mm | 5.3 mm | 000000 | #15 | 200 mm | 5.3 mm | 000000 | |
| #7 | 121 mm | 7.9 mm | 00000 | |||||
| #8 | 122 mm | 5.1 mm | 000000 | Bot | 221 mm | 14.7 mm | 1 |
I decided the bottom joint needed the same documentation, though because the pads are still on the measurements are more approximate:
| Hole | Dist. | Dia. | Size | Hole | Dist. | Dia. | Size | |
| Top | — | 14.9 mm | 1 | #20 | 118 mm | 10 mm | 000 | |
| #16 | 24 mm | 8 mm | 00000 | #21 | 146 mm | 12 mm | 00 | |
| #17 | 37 mm | 7.8 mm | 00000 | #22 | 177 mm | 12 mm | 00 | |
| #18 | 44 mm | 8 mm | 00000 | #23 | 215 mm | 12 mm | 00 | |
| #19 | 64 mm | 7.5 mm | 00000 | Bot | 255 mm | 22 mm | 3 |
The barrel length is 67.8 mm end-to-end. (Since I had the calipers out.) That makes it one of the longer barrels out there.
The tally for a full set of stoppers for the joints is:
| Size | Qty | Holes |
| 0000000 | 1 | 1 |
| 000000 | 10 | 2, 3, 4, 5, 6, 8, 9, 10, 12, 15 |
| 00000 | 8 | 7, 11, 13, 14, 16, 17, 18, 19 |
| 000 | 1 | 20 |
| 00 | 3 | 21, 22, 23 |
| 1 | 3 | Tenons |
| 3 | 1 | Tenon |
I broke down and ordered the full set of stoppers from Widgetco. $17.35. They were somewhat expensive at 50¢ each, but I couldn't readily find any other source that had the smaller sizes.
While I waited for the stoppers I checked the lower joint. The lower pad mechanism on it was a bit sticky, as Jill had reported. Turns out that the pad was too large and was dragging on the side of the tonehole recess. I bent the cup slightly to relieve some of the drag. We'll see if that is enough, but I think I have to re-seat it too as it now takes more than slight finger pressure to fully seal.
After a few days the stoppers came, and I tried them out. I plugged up the upper joint and blew into it. There was some air leakage, though it seemed fairly minor to me. I showed it to Jill and she said that it was not good, especially in an upper joint. I'll have to chase that down. That evening I tried further, and it seemed that if I blew into it hard enough I could feel/hear some leaking. I got out a rubber balloon and put it on one end of the joint, blew it up through the body, then pinched the neck of the balloon to hold in the air while I replaced the stopper in the open end. I then submerged the now 'pressurized' joint in a pot of lukewarm water, and about fainted at all the streams of bubbles! Further research showed that it was all just the stoppers not sealing well; once they were wetted and pushed in harder all the leaks stopped. The joint would then even hang from my lip by the vacuum I could suck into it. The wood seals well enough, there are no leaks due to cracks or porosity to worry about. I removed the stoppers and blew the joint dry. (I wasn't worried about waterlogging the joint, since it had been so thoroughly oiled earlier. The inside also stayed dry during this procedure.)
Heartened by this success I then used a little bit of contact cement to secure the upper vent tube, which had come loose early on in the rebuild process. With that in place and the excess glue removed I applied a few drops of the bore oil to the outside, which had gotten a bit lighter due to the water bath. I worked the oil in thoroughly with my hands.
The next session I re-plugged the upper joint (making sure to wet the plugs first this time) and attached it to the barrel, then repeated the balloon and the pan of water trick. Bubbles came out around the barrel band, and a few came out the corked mouthpiece end. Leaks, for sure. I'm not convinced that it's the cork job just yet, as there are cracks in the banded socket, and the cork looks and feels about right to me. I cleaned this area with acetone and scraped it out with a screwdriver tip (especially the butt end down inside where gunk had accumulated) and then dabbed cyanoacrylate glue into the cracks. I then ran a light 'wash' of cyanoacrylate glue over the entire interior of the socket, butt end and all, and spread it around with the screwdriver. I sanded it smooth inside and repeated the leak test. No more bubbles. I repeated the procedure with the mouthpiece end of the barrel.
To perform the final leak test I cut a 6" length of bicycle inner tube and slipped it like a sock over the beak of the mouthpiece. I took an old dead reed and clamped it to the mouthpiece with the ligature, then assembled mouthpiece, barrel, and upper joint, along with all the plugs and the balloon. I filled the balloon by blowing through the open end of the inner tube, then rolled up the tube and clamped it to the reed using a paper binder clamp. (The reed stuck out quite a bit due to the thickness of the rubber keeping the ligature from going on as far as normal, making plenty of room for the clamp's purchase without putting pressure on the beak.) When plunged into the water there was no sign of leaks from anywhere at all, even when left in there for several minutes. I'd say that the corks are sealing well, now. I dried and re-oiled the wood.
I then used the dial caliper to measure the depth of the barrel's mouthpiece socket, and got 17.3 mm. The mouthpiece tenon, though, is only 16.5 mm long, leaving a gap at the mouthpiece end of 0.8 mm. I don't know if this is significant, but washers can be inserted to fill this gap if need be. Similarly, the barrel's socket for the upper joint is 18.7 mm deep, and the mating tenon is 18.4 mm long, for a 0.3 mm gap. The socket between the joints is 15.5 mm deep, the tenon is 16.0 mm long, for a 0.5 mm gap; the bell socket is 20.1 mm, its tenon is 19.9 mm long for a 0.1 mm gap. Significance? Perhaps none.
In the evening I took a few minutes to put two of the bottom keys back on, and plugged the rest of the holes. (One key was the 'troublemaker'.) It didn't seal, and significant force on the two pads was required to seal them. Time to adjust! I re-heated the two pad cups (in turn) until the pads were free-floating again and sucked them against their seats, then lifted and lowered the pad cups against the held-in-place pads, then let them cool. The resultant seal was much tighter, I think it will be satisfactory. The flattening of that one barreled seat seems to have done the trick, as it is no longer 'sensitive'. It also seems that the trick of sucking the pad level against the seat while lowering the heated cup onto the pad might be a good one, it was easy to do and worked well.
The next (last?) day I reinstalled the rest of the keys. Most of the pads got the heat and vacuum pad leveling trick, it seemed to help. I was then able to play up and down the horn, and at least get notes. It's beyond my competence, however, to determine if indeed it really is done, and the fact that I was using the metal clarinet's repaired mouthpiece couldn't have helped. Time for a more expert assessment!
It was something like two weeks (!) before Jill tried it out (on Saturday, March 20, 2010), and she said that, except for a few too-large pads on the bottom holes that she thought made it sound a bit 'off' when they were open, it seemed (to her) as good as the Conn. She said that I was done with it. Most emphatically.
With more exposure she was convinced that some notes were out of tune, and that the likely cause was pad clearance on the too-large pads, so Tuesday, April 6, 2010 she took it in to the shop for final sort-out.
Sidebar:
Jill asked me if I could make a clarinet peg for her oboe/english horn stand. It's Forrest's cruciform stand, and can have up to five pegs on it. (She had two.) I started in early April (2010), I took a piece of walnut limb and cut a peg piece and a disk piece and turned them both on the lathe, centering the pith. She could have just bought a peg, of course, but this was much cooler, and saved us some $20–25. The only troublesome part was that the stand was tapped for M5 threads, whereas the only wood/machine screw dowel pin I could find was #10-24. I drilled (#25) and tapped a 10-24 hole right next to one of the stock holes. I spent about $2 on hardware, the biggest cost was replacement metric wingnuts for ones the stand was missing. (The SAE wingnut for the new peg was much cheaper.) The new hanger bolt is about 3" long and screws far into the peg. The base disk is threaded 10-24 and screws onto the machine screw part of the hanger bolt, leaving about a half inch to go through the stand's base and catch the wingnut. The disk's threads don't need to be strong as it's clamped between the base of the peg and the metal part of the stand. Seven coats of Tung oil, and it never really looked finished. I theorized that as the oil came from a half-dried container perhaps the lighter fractions were all that were left, which might never do the job. I found a can of Daly's SeaFin Ship-N-Shore sealer and put on two coats of that. I also found some dark walnut stain and used it to darken the sapwood of the disk. That and a final coat of oil, and a ring of black felt, and it was done. It took about a week of casual effort. The extra peg is easily removable, and since the stand doesn't fold up so small with more than two pegs on it I suspect she may leave it off when she doesn't actually need it. Her choice.
Friday, April 16, 2010 it came back from the shop all tuned up: $91.85. He replaced the three too-big pads at the bottom end (effectively they didn't open far enough, my Buffet pad kit was probably appropriate for a newer horn, they've tinkered with the hole size and placement over the decades), made a new axle rod (#2-64, not metric, and he re-tapped the post to match) for the one key that had a half-missing axle head, and gave it a complete adjustment, which included some new key cork bumpers. After play-testing it he thought it was a "pretty good horn, especially considering its age" and that it "sounded very nice." He thought Jill would like it, and he thought it was very tight-sealing (as it should be). So I guess I did a good job, except for those wrong pads. (I never did expect to be able to put it into final adjustment myself.)
She tells me that the case (obviously non-original) just doesn't fit the joints right, and that I have her permission to do something about that. She prefers a smaller (than the Conn's) case and so won't switch cases around, so I guess I have a last little bit of work still to do.
I pulled the tray out of the case and peeled back the velour. It's all cardboard and (s)crap wood underneath, though there's nothing wrong with that, so it's easy to work in such crude surroundings. The wooden tray divider pieces all looked freehand cut on a bandsaw, and the one for the lower joint (which is what never did fit right) looked malformed to me at the lower end—much too narrow, it was shaped more like it was for an oboe joint than a clarinet. (I did check that, and it wasn't right for an oboe, either.) The wood practically fell off the cardboard, so I took it to the bandsaw and cut away a bunch at the narrow end. One of the side keys was kind of a tight fit into the tray area, so I notched the wood on the top of that side to make more of a pocket for it. I then glued the two wooden pieces back to the cardboard, I used gap-filling cyanoacrylate so that it would dry quickly. I checked the fit (which was OK) and then used some contact cement to re-secure the velour to the tray. (I didn't put it back as well as it had been secured originally, but I didn't see the need.) The nest for the upper joint was too loose, so I peeled the velour away from it and glued a couple of wood blocks into there to narrow it so that the joint wouldn't slide around. The pocket in the corner for miscellana was too shallow, as it didn't go through the cardboard mid-layer, so I cut away the cardboard to make it deeper. I then used the contact cement to re-secure the velour on that side of the tray. The tray tucked back down into the case, and the joints now fit much better into the case than they did originally, and there's more room in the case for reeds, a swab, and the cork grease.
| Item | Price |
| Clarinet, raw | $30 |
| Grape seed oil | $8 |
| Grapefruit seed extract | $11 |
| Rosemary extract | $6 |
| Almond oil | $12 |
| Vitamin E | $11 |
| Foil pan | $1.30 |
| Pads | $5.20 |
| Cork strips | $5.44 |
| Subtotal: | $89.94 |
| Shop tune-up | $91.85 |
| Total: | $181.79 |
Not too bad, really. There were other items purchased for the restoration that were in no way consumed by the process: they'll be usable in many projects over the years. But I should tote it up that way too for completeness' sake:
| Clarinet, restored: | $181.79 |
| Grenadilla scraps | $40 |
| Cyanoacrylate glue | $8 |
| Black silk | $12 |
| MAAS polish | $5 |
| Alcohol lamp | $10 |
| Rubber stoppers | $17.35 |
| Grand Total: | $274.14 |
Even counting all this stuff as throwaway (which I do not) it's still not too bad. This clarinet should be worth something like $800–900 retail (a sum that I could never get in a private sale), and one could reasonably expect to sell it without too much trouble for half that. So, I could readily get 2–3× what I have into it, depending on which figure you like to start with. That's not so bad—unless you count the hours! (I don't, really, as this was a labor of love for my wife.) I don't plan to ever do another one, but if I should I've learned enough that it wouldn't be so painful, and the skills should be transferrable to our other woodwind instruments if need be.