I started cleaning it Wednesday, July 21, 2010. I figured if I removed and cleaned one or two keys a day it wouldn't take long to be finished. I got out the Dremel and a cloth wheel to get into the keys' crannies with the MAAS, and had four done by the next morning. I had to glue some of the cork bits back on, the glue (and cork) is brittle with age. I then silver-soldered the torn-out flap of the lyre holder box back into place. (Not that this'll ever get used, not to mention that it's missing the lyre retaining screw.) I oiled the case latches and hinges, using 90W gear oil. I also found a place that has replacement handles, in leather, and ordered the black SCH-201. The D rings are 5" apart on this case, it looked like it would fit. $15, shipped. (They have a lot of vintage case handles and hardware, it's worth keeping them in mind for such things.)
So far I've found only one internet reference to a similar horn:
Toussaint St. Negritude Orson Gregory Titus: I have a lovely wooden H. Bettoney Bass Clarinet, marked with the Bettoney logo and SOMC, that I've had for many years, and have regularly enjoyed in performance. It was purchased from a vendor in San Antonio. Would anyone have any idea of its age, and what the SOMC stands for? The vendor thought perhaps it's from the 1920's... the serial # on my Bettoney b cl is 6089.
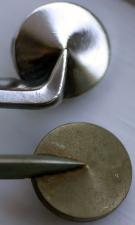
Thursday I did a couple more keys. One of the pads popped out of its cup. Friday morning, three more and the neck strap eye on the body. (Six more keys left to do on the upper joint, including all the long ones, plus the posts and such that are part of the joint, and the cleaning and polishing of the joint's body itself.) After work I did three more keys. The pointed screws that hold in one of the keys were buggered, and one of the posts that holds on the shortest of the long keys was loose. I believe this joint had been dropped at one point, as this key is the one that protrudes farthest over the next joint and it was obviously bent in a bit and interfering with the next key in. The post probably took the brunt of the force, and tore body material loose. (I'll probably epoxy the post into place to fix it.) I used a wooden mallet and a small anvil to bend the key back more-or-less into its correct shape. This Saturday morning I did the last three keys, the long ones. This photograph shows the before and after effects of the polish. Once the keywork was all off I had the spit-stinky body in hand and could take a good close look, and I could see that most of the toneholes were undercut. Nice. There was a lot of grungy dirt lining the toneholes, not so nice.
I'm not sure whether the horn body is hard rubber or not, since it doesn't exhibit any of the oxidation effects to which hard rubber is supposed to be prone. I found one on-line reference to their "Bettonite" compound, supposedly introduced in 1920:
...a Xerox of an advertising flyer from some time in the 1930's (I can't fix the exact date), for the related H. Bettoney company. The ad is for the H. Bettoney top model, the Silva-Bet, but the flyer also promotes the company generally, including a plastic the company called "Bettonite." This may be the material used in the Cundy-Bettoney clarinet the original inquirer asked about. The punctuation and grammar are sic:"BETTONITE", this new material, has all of the
good properties without the poor properties of
wood. It is stronger, will not crack, shrink, warp,
or change its color, can be frozen, baked or
boiled and will not change in dimensions,
character or substance: it looks like ebony,
can be highly polished, its parts readily replaced,
and produces a UNIFORM and WONDERFUL tone.
The "BETTONEY-BETTONITE CLARINET" weighs
but one half-ounce more than the ordinary wood
Clarinet. When the substitute hard rubber has
been used for the main body of Clarinets, it has
been found to be brittle, easily broken, hard to
mend, and under certain conditions warps and
turns green. There is no rubber in "BETTONITE".
The bore in most Clarinets enlarges after use:
this sharpens the instrument and makes it out of
tune, not so with the "BETTONEY-BETTONITE".
Bettonite is a wonderful substitute for wood
in replacing cracked wood joints, parts, etc.; we
have been using it for several years with great
success.
The next session (at lunchtime) I polished the ring and a dozen of the posts at that end. I only got stabbed half a dozen times by those wretched needle springs! I tried some of the bore oil on the outside of the barrel, and it did make it look richer and blacker, we may go that way for the whole thing. The replacement case handle came today, and while it doesn't look OEM and is a tiny bit long it's plenty good enough for the purpose, and is much better than something I could jerry-rig out of shoelaces...
The next morning (Sunday, July 25, 2010) I polished the rest of the posts on the upper joint and collected a few more stabs, and found that there were a total of three loose posts, one of them barely so. I washed the joint in the sink using body-temperature water and dish soap, and a bottle brush. The trumpet snake's small brush ends cleaned out the toneholes, and a small scrub brush did for the outside. I blew it dry and set it aside to finish drying. The old spitty smell and the grunge are gone; the 'Bettonite' body appears to be some sort of phenolic compound, and has a faint mediciney smell. I don't think it's hard rubber, in part because of the lack of discoloration and in part because when the buffing wheel hit the body I never got any of that burned rubber smell coming off of it. It has some vaguely wood-grain-like striations in it, and when the joints are tapped together it rings like wood. I then removed the two loose posts and mixed up some black epoxy and dabbed it into the holes, then threaded the posts down slowly. I put their keys back temporarily, sans springs, to make sure they were in position while the glue cured. Sadly, I broke off one needle spring while doing this. The third loose post wasn't really loose, it just came unscrewed easily. I left it alone, rather than risk breaking off another needle spring since the post couldn't be removed without either removing, or seriously displacing, its spring.
The same day eBay bidding ended on a neck ("diameter of the metal, not including the cork, is 26 mm") that might even have been the right one. It bid out of my price range, and before I could consider raising my bid (which maybe I should have done though it would have galled me to pay more for a mystery neck than the rest of the horn) I got distracted and it ended on me. That might have been a mistake...
Monday the epoxy was cured, so I wiped the body with bore oil (a mixture of almond and grape seed oil, and Rosemary extract as a preservative) that I'd mixed up for the Buffet clarinet. It took on a nice rich black color instead of the dull matte black it had been after the cleaning. Friday, July 30, 2010 I wiped off the excess oil, paying special care to the toneholes. I used a lot of Q-tips! It still had a nice rich dark color. Saturday I put back all but four keys, two of which had loose pads. The order, as you might imagine, is somewhat important. The Bundy mouthpiece kit I ordered came too, about $44 for mouthpiece, cap, and metal ligature. (She won't like any of it, but I need something to start working with.) OD of the mouthpiece is 29.05 mm, ID is 23.5 mm (0.925", matches the ID of the horn body), OD of the cork is 30.5 mm, seating depth is 17 mm. This, in conjunction with the body socket measurements (26.7 mm, and 20.8 mm deep), tells me what kind of neck I need to make— everything except the length and size/location of the register vent! (I sure hope I don't have to do this!) It looks like 1" copper water pipe would be the basis. (About 25 mm ID, 28 mm OD for the common stuff.)
Monday, August 2, 2010 I put back the last four keys. I used hot glue to re-seat the two loose pads, cleaned the axles, lubricated them (90W gear oil) and reinstalled. There is still one broken needle spring, but that doesn't need to be replaced right away. A vacuum test showed that the lowest (large) pad seems to be leaking a bit, the leak lessened considerably with additional pressure placed on that pad cup, though visually it looked good. I used some Leatherique rejuvenation oil on it. If that doesn't help any I'll have to try re-seating the pad. But even with all this the top joint looks pretty good, and is 'done' for now. I'm sure the cork strips used for regulation need at least some attention, in addition to the above. Tuesday I re-seated the leaking large pad, using additional hot glue to bolster the existing shellac. That got it sealing much better, then I put a bit of cork shim on its stop to regulate its lift height. It was looking a lot better, anyway and is surely no longer the weakest link. I also swapped two axle rods that were in the wrong places, they fit better in the correct spots! The joint seemed to seal decently now, but I'm sure the cork regulating bits need adjustment, and of course the broken spring needs replacing. I think, though, that it's time to move on to the bottom joint. The clock is ticking!
After we got back from vacation I removed two keys from the lower joint and started polishing them. Not much time left! I also bought a piece of 1" PVC to start playing with. $3. The next day I finished polishing the two keys I'd removed, but ran out of time to do more. Saturday I removed all the remaining keys. Three of the longer posts were loose, the worst one was (I think) installed 180° out of alignment. As a through-hole post this is entirely possible, if its needle spring was inserted on the wrong side. I'll have to have a look at that later. I then began cleaning the keys. I got the five big keys polished, and the loose tenon ring. There were six small keys left to do. Later that day I chipped off the shellac-impregnated silk (?) that was under the loose tenon ring, I'll replace it with new silk later. I had another look at the loosest post and I was able to turn it another 180° without damaging anything, though it was scary tight. It's very snug, now, at one full turn further in than when I found it. Sunday I polished the remaining keys, then removed the two key guards and the thumb hook and cleaned and polished them. As before I washed the joint in the sink using body-temperature water and dish soap, and a bottle brush. A small scrub brush did the outside. I blew it dry and set it aside to finish drying. As before, the old spitty smell and the grunge were gone, and the phenolic (?) body was clean and mediciney smelling. Once it had dried I put bore oil on the inside and the outside, and left it to soak in. Only nine days left, and still lots to do!
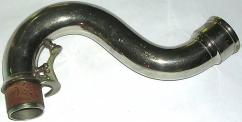
Monday, August 16, 2010 I wiped off the excess oil, both inside and out, with a paper towel. I scraped off the one rusty needle spring. I removed the two almost-loose posts and inserted splinters of grenadilla wood into the sockets, and reinstalled the posts. That seemed to tighten them up just enough. I then polished the five axle rods and all the posts, collecting three solid stabs along the way and several pokes. (Blood being the distinction.) The polishing dulled the body, so I reapplied a little more bore oil with a Q-tip and wiped it down again, restoring the luster. I also found another picture of a Bettoney neck on eBay, that should help if I have to get to fabrication. (They wanted some $932 for the pictured [refurbished] horn, which sold pretty quickly, before I could get the seller to give me a detailed picture of the neck.) I later saw another one that sold on November 6, 2010, for $202.50, similar condition to ours, but with neck. It was no doubt a much better deal than ours!
Tuesday I folded a triple thickness of the black silk over the end of the top joint and drove the loose tenon ring over it using a mallet. (It took that many layers to make it tight enough.) I used the one long axle rod as a guide to get it in the right orientation as I drove it on. As before, a razor blade removed the excess silk. We'll see if it holds well enough without any kind of glue in the silk; the end of the joint is slightly tapered, as is the ring, but the ring is knurled on the inside for better grip. If it pops off I'll re-do it, but with some kind of mild glue. I noticed that the cleaned joints were starting to pick up that old musty scent from the case, so I made a 'sachet' using a Q-tip and some of the Rosemary extract I'd used as a preservative for the bore oil. I dropped it into the case, we'll see if it helps. I really should re-line the case, but that's a separate project!
Wednesday I put back some keywork, and the guards and thumbhook. I managed to lose two of the screws, and it took some hunting through the carpet with a magnet to find them, and I broke off a needle spring. Not doing so well! The needle was a double, and I was able to get the other side out of the post, so it should be replaceable. One of the guard screwholes was stripped out, so I put in a sliver of grenadilla wood and hammered it down, then I dabbed cyanoacrylate glue into it. After it set up I drilled a new hole with the pin vise and put in the screw. Much better.
Thursday I put back the rest of the keywork. I had to bend one of the rods back straight, it looks like an attempt to move a LH pinky key was done carelessly. That key needs serious bending now, but I'll try to do it right later. A rough check of the joint's sealing showed it not to be hopeless, but I'm sure it's all badly out of whack. Still, it might be good enough to play a bit, before it goes into the shop for the real adjustment. The sachet has been working aggressively, the case (and horn) smell very strongly of Rosemary now. Calling around town yielded no conveniently-available piano wire, so I dropped by my favorite repair guy's shop and bought two blue-steel needle springs. $2 for the pokey little bastards. When I got home I installed them, they were slightly smaller in diameter than the originals so I used little dabs of cyanoacrylate glue to hold them in place. We'll see how long they hold up. I also cleaned the bell socket with alcohol and greased the cork tenons. The horn assembles easily, though the center joint's cork should probably be replaced as it's a bit loose when assembled. I used padded vise-grips to hold the LH pinky key in place at the pivot while I bent the key part out to be closer to where it belongs. That wasn't entirely successful but it'll probably do for now. I put the mouthpiece together and tried holding it in place with the PVC pipe, and got many painful shrieks for my trouble. Gonna have to do something else there, perhaps duct tape? Late in the evening I found some electrical tape and hooked up the 1"×1' pipe, together with the mouthpiece and the junction. The pipe alone registers as a G♯ on the tuner (when set to the key of B♭), so it's much too long. The horn itself, open, should register a G♮. I could only reach the keys on the top section, but it seemed like it wanted to play a scale of some sort.
Friday I soldered back the low E pad cup. I released the spring pressure on the pivot and arm, lashed the cup to the tonehole with copper wire, and got the jagged edges of the broken metal meshed together. I then draped a wet rag over the pad cup (to protect the pad from the heat) and dripped acid flux over the joint. Then I heated it with an 80W (hot) soldering iron until I got solder starting to melt on it. Then I dripped more flux over the joint, heated again, and got the solder to flow onto the base metals. I built up a bit of a blob on top then let it cool. I don't know how well the joint 'took' down inside the break where it was all corroded, so I left the blob unmolested on top for strength. It doesn't look all that bad, really, and it'll be stronger if I don't remove any excess metal. I then removed the key from the bell, washed the acid residue off of it (and the bell), polished it in the now-routine manner, used the Leatherique cleaner and oil on it since it had gotten wet during the repair, and put it back. The pad still didn't seat perfectly, so I heated the pad cup over the alcohol flame to melt the shellac and pulled the pad out from the cup a bit, then levered it gently into place over the tonehole to seat. Once cooled the seal was much better. With the bell on the lower joint it was apparent that the low E key wasn't actuating the pad enough to close it, and I surmise that attempts to adjust it by bending were what broke it off in the first place. I glued a piece of cork onto the key's ear instead, the key seems to operate more normally now.
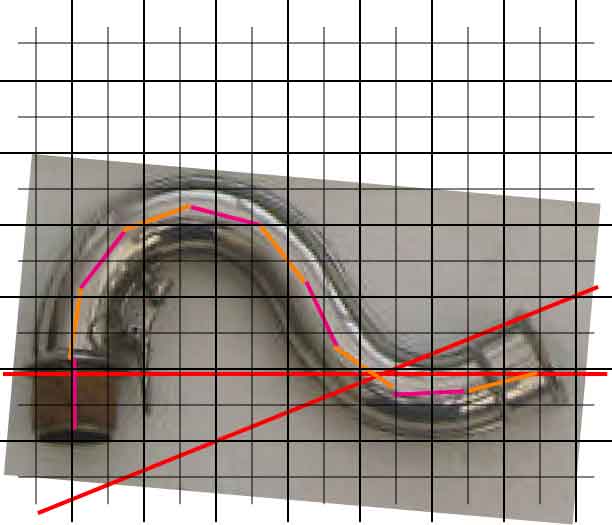
To get better neck dimensions I used Photoshop to extract the neck from the best photograph I had and pasted it into Illustrator. There I rotated it 5° so that the thing was oriented vertically, as it would fit into the horn, then I scaled it until the approximately 1" that is the ID of the neck matched the 1" grid in Illustrator. I then laid 1" line segments end-to-end along the centerline of the neck, like a trail of ants, and came out with an overall length of approximately 10". The top of the horn's upper joint should be just below the centerline of the neck's receiver for the mouthpiece. The mouthpiece socket looks like it should be canted upwards at about 22.5°, with the center of its opening about 6.5" from the center of the horn's bore. I put a 1" grid over the picture, with this result.
The current 'best idea' for making a metal neck is to take a 2" thick piece of tough timber, like old Douglas fir or oak, and trace the neck centerline path on it. Cut down the path with a bandsaw and then groove a semicircular channel into the middle of the edge along the exposed mating profiles. Place the annealed (softened) sand-filled and plugged copper pipe between these pieces and put pipe clamps all over it. Then start drawing down the pipe clamps, using the wood form as a mold to force the pipe into the right shape. That sounds like it ought to work, and could be readily repeated in case of accident or error, but the necessary 1.125" fluting bit (a.k.a. convex radius cutter) is hard to find. Woodline? The problem with this is that the tubing needs to stretch a bit as it bends, and constrained in a form like that it might not work as well as a single bend point in a die bender. The second-best idea is to use some of the same wood chucked in the lathe and turned into bending dies for the cheapo Harbor Freight bending machine I already have. Basically appropriately-sized wheels with the same 1.125" groove turned in the edge, but that can be accomplished with a regular lathe tool. Then it's just some careful bending of the pipe. Maybe.
Monday, August 23, 2010 (a day early) turned out to be gift day. I wasn't happy giving it without even a prototype neck, but tick tock... She seemed guardedly happy about it, though skeptical I could tell. In the evening I got out the PVC parts and packed the 12" tube full of dirt and capped it tightly. I used the heat gun to soften one 4" length and bent a curve in it by hand, then ran it under cold water to set in position. I repeated this down the pipe until it roughly matched the curve I wanted. Sadly, the dirt wasn't adequate to the task of keeping the cross-section round, there is some degree of crimping. Probably due to my not heating thoroughly enough before attempting the bend. What the heck, this is just the first prototype. I then emptied out the dirt and cut off the ends to length. I then used the 1" belt sander to sand down the tenon end. I ran out of time before I got it thin enough to go into the horn, but I'm definitely making progress.
Wednesday I finished the sanding on the neck tenon using the Dremel, which worked very well. The PVC tenon is very thin, probably too thin to be durable assuming the plastic neck was the final product, which it is not. I then cut off a ring from the coupler piece and taped it to the neck, and sealed the neck into the upper joint with tape. I then used foam to fill the gap between the mouthpiece and ring, and taped it all tight, and assembled the horn. So far as fit goes, the neck size and angle seems good. Doesn't play, though. Sounds like a squeaky saxophone, with no low note potential. Leaks? Crimps in the neck ruining the accoustics? Foam too accoustically leaky to do the sealing job? All of the above? I think I'm going to have to be a lot more careful, and plastic probably won't cut it. Lewis copper and brass has tubing. Their 1-1/16"×0.062" (wall) brass tubing is about 23.8mm ID, which is as close to correct as you're likely to get. Filling it with frozen soapy water (slushier than pure water and less expansive) or Cerrobend (Wood's) metal should work to keep it from crimping while bending. And I've seen hardwood dies for cheap benders (like my Harbor Freight unit) shown on the Internet. I think I can do this. (Jill tells me that it's leaking air badly at the mouthpiece, that's probably its biggest problem right now, and I might be overly pessimistic about the poor quality of my prototype neck.) I called Lewis, and they have no brass in stock in that diameter, and no clue when they might get more. Not soon, anyway. http://www.h-htube.com?
Thursday I cleaned the tape residue off of the case, especially the one that said "HS Band". Sort of: that stuff was rock-hard. Besides Goo Gone I used a razor blade and some coarse sandpaper applied with a light touch. I also used some cyanoacrylate glue to secure the cracks in the lid, especially where splinters might peel away, and some of the loose flaps of covering material. I measured the slot in the case that's for the neck, and it appears to be about 1" only. I used some of the grenadilla wood scraps, and one that's 1.050" is about as big as would tuck easily into that place. So I think that thick-walled 1-1/16" tubing (1.0625") might be a bit much, though a scrap that size could also be tucked into there with a bit more pushing. Certainly no more than that, to be sure.
Saturday Jill borrowed a Selmer from a friend. This looks like a basic one-piece plastic one, their low end (a Bundy in all but name?) I presume. Of note is that it has the now-common non-corked neck tenon that fits into a metal socket that's part of the top of the horn, making it rather unlike the missing neck. No key on the neck itself, but there's one on the metal part of the socket. Still, measurements can be taken. The soldered-on socket for the mouthpiece is 30mm in diameter, about 18mm deep. The OD of the center of the neck is 25.5mm, or 1.005". We'll call it 1" for all practical purposes. The OD of the tenon is 26mm, and one can feel (inside) that it is a piece separate from the main part of the neck. A little thicker for strength? The collar between these two pieces is more than a depth stop, it's also supporting the joint. The ID of the tenon is 23.5mm, or 0.925". The tenon metal is 1.2mm thickness, or 0.045". Even if thinner than the tenon, the neck metal seems plenty thick enough to me. When laid upon the life-sized (?) photograph of the missing neck it is definitely smaller, both in height and total length. It rises perhaps 1/2" less, and is perhaps 1"–1-1/2" shorter overall. (It did fit nicely into the neck pocket in the case, so it may be that my photograph is wrong. I'm afraid that only play-testing will find the correct length.)
There are also differences in the keywork, and the bell is smaller. The bore appears to be 25.4mm at the bell, my best guess is that it's purely cylindrical. There is a half-hole in #1, which also has a side-touch on it. These are definitely different horns!
I also examined the 'automatic' mechanism surrounding the two register touches versus the four associated holes. On both horns the thumb pad closes the two lower holes. With the automatic one can have either the upper or the center hole open, but never both. Thumb down: the register key opens the upper hole, thumb up: it opens the lower. The three touches of the Bettoney, of course, give you independent control of the two upper holes.
Monday, August 30, 2010, I cheated. While looking at other bass clarinet goodies on eBay I spied a keyed corked neck in a miscellaneous pile in one photograph, and called on it. It was available. I asked Jill, and she said to just do it. $185 (shipped) later, it's on its way. Disappointment and relief combined, I guess. We'll see how this goes.
Friday, September 10, 2010, I reclaimed one of my less-successful thrift-shop finds: a $4 music stand that had been converted into some kind of shorter stand for something-or-other. (It'd been in our donation pile since its music holding top didn't really fit anymore, and it was too short. Jill hated it.) It, however, looks to be nearly perfect as the basis for an instrument stand much like a $140 commercial one that I've seen. All it needs is a cup at the bottom and a bracket at the top. I took a $2 made-in-India thrift-shop brass decorative basket and tried to hammer it into a cup shape to form the bottom receptacle of a stand. (The brass bail handle was going to be the bracket.) It wasn't very successful. I'm thinking that a 4" hard plastic ball, cut in half on the bandsaw, might work better.
Monday, September 13, 2010, the neck came! Nice looking, but of course the neck key doesn't mate properly with the horn's mechanism. The ID of the neck is 0.900", or 22.8 mm, somewhat smaller than I'd thought was required. The neck tube's OD is 0.950" or 24.5 mm. The tenon's OD is 1.040", or 26.4 mm, and is 21.3 mm deep, so it won't seat fully. There's obviously a collar over the neck tube to bring up the tenon diameter. Laid over my paper template the neck's profile is pretty close, though the mouthpiece angle is a bit flatter and the overall length is maybe 1/2" shorter. It's well within the margin of error for the making of the drawing, I'd say. Jill played it today, and says that the horn sounds pretty good, and is in tune with itself, though it's a bit tight on the neck cork. She told me I don't get to touch it anymore! (More research is required, and I'll take that opinion under advisement.) The neck was too tight so I sanded the neck cork a bit and used a fine file to relieve the sharp edge of the tenon so that it won't gouge up the socket, and I lubed the pivot of the neck's key. I checked the upper joint for leaks, and it appears to be tight, even including the neck key. It still seems to me that the neck key was originally intended to be pushed down/open by the body lever's bottom edge, rather than let down by its top edge, and that the two springs involved shouldn't be counteracting as they are now, but it does seem to be working in spite of the mismatch.
I also looked in the toy section at Fred Meyer but didn't see any suitable balls. However I did purchase a sports drink that came in a spherical polycarbonate bottle nearly 4" across. 50¢. This has intriguing possibilities as to the stand. In the evening after consuming the unremarkable beverage I cut the bottle in half around its waist with a razor blade and used the Dremel burr to cut a rectangular hole through the neck for one of the stand legs to slip into tightly. That made an upwards-facing soft but strong polycarbonate cup perched securely on one of the legs of the stand. I drilled a tight-fitting hole down the center of the other hemisphere and slipped it over the center post, cup facing up. I then used the heat gun to soften one side and push it in, making a rough crescent moon profile when facing down at the cup's rim. The top ended up more crinkled and deformed than in my vision, but I still think it'll work. I then glued the top cup in place, using Shoe Goo, so that it couldn't rotate around the shaft. I slid the rubber ring that was originally on the post up from the bottom to hold the glued top up against the washer that was on the top of the post, and set it aside to dry. We'll call it a $5 stand.
In the morning I put the horn on the stand and placed it where Jill could find it. I also took the case and sanded it lightly, especially removing the rust on the steel strip that rims the lid, and spray-painted it (hardware and all) using a black vinyl and fabric paint. It's not beautiful by any means, but it looks better than it did. I used some contact cement to reattach some loose bits inside of the case, especially the hatch for the mouthpiece compartment where the cloth hinge had come loose. I used neatsfoot oil on the leather tab on the hatch.
Friday, September 17, 2010, Jill took it into the shop for final sort-out. She's been practicing with it for a week or so, and finds it adequate to the task, though she's not happy with the non-automatic register key mechanism.
Friday, September 24, 2010, it was ready. $81 to go through it, adjusting and replacing maybe a pad or two. We picked it up, and Jill play-tested it. He said, and Jill confirmed, that there were a couple of particularly stuffy notes with no apparent cause, and that it wouldn't play too high. The latter, especially, could perhaps be laid at the feet of the neck. That's the bad. The bottom end notes, though, sound magnificent, and it plays in tune with itself. That's the good. I think I need to replace the center joint cork, it's just a bit too loose and wobbly there. Jill wound some string around it, which helps.
It turns out that Jill got the West Side Story gig, and has been practicing with the horn. It's not great, quite probably due to the incorrect neck and/or mouthpiece, but it may be adequate to the task. We'll see... No, she had another lesson from Schoepflin, and the conclusion is that the horn is (currently) a steaming POS, and Jill will be renting a different one. Sigh.
Tuesday, October 5, 2010, onward! Research indicates that bass clarinets are particularly sensitive to leaks in that not much is required to really pollute a horn's response. All of the symptoms Jill is experiencing can be can be caused by leaks, though that isn't proof that in this particular case they are. Some horns are even plagued by leaks, if they're not sufficiently solidly constructed. (The long rods, etc.) I'm still going under the assumption that this was at one time a fairly decent horn, and that it could never have been sold if the design of the horn was inherently as bad as this one's been behaving. (The mismatched neck, however, is a major potential problem with this theory.) I need to do a much more thorough leak-test, I think. I began by measuring the diameters of rubber plugs I'll need to do leak testing, in the manner of the Buffet clarinet, though as I have no suspicion of body porosity (due to the material) I don't need to remove all the pads and plug all the holes and so didn't take all the measurements at first:
Rubber stopper sizes:
| Size | Min Dia. | Max Dia. | Size | Min Dia. | Max Dia. | |
| #0000000 | 1.5 mm | 5 mm | #2 | 16 mm | 20 mm | |
| #000000 | 3 mm | 6 mm | #3 | 18 mm | 24 mm | |
| #00000 | 6 mm | 10 mm | #4 | 20 mm | 26 mm | |
| #0000 | 6 mm | 11 mm | #5 | 23 mm | 27 mm | |
| #000 | 8 mm | 13 mm | #6 | 26 mm | 32 mm | |
| #00 | 10 mm | 15 mm | #7 | 30 mm | 37 mm | |
| #0 | 13 mm | 17 mm | #8 | 33 mm | 41 mm | |
| #1 | 13 mm | 19 mm | #9 | 37 mm | 45 mm | |
| #10 | 42 mm | 50 mm |
Neck measurements:
| Hole | Dist. | Dia. | Size |
| Bottom | — | 22.9 mm | #4 |
| Vent | 57 mm | 2.4 mm | #0000000 |
| Top | 30 mm | #6 |
Upper joint measurements (upper hole at socket diameter, not bore):
| Hole | Dist. | Dia. | Size | Hole | Dist. | Dia. | Size | |
| Top | — | 26.7 mm | 6 | #9 | ||||
| #1 | #10 | |||||||
| #2 | #11 | |||||||
| #3 | #12 | |||||||
| #4 | #13 | |||||||
| #5 | #14 | |||||||
| #6 | #15 | |||||||
| #7 | ||||||||
| #8 | Bot | 401.6 mm | 23.5 mm | 5 |
Lower joint measurements (upper hole at socket diameter, not bore):
| Hole | Dist. | Dia. | Size | Hole | Dist. | Dia. | Size | |
| Top | — | 31.5 mm | 7 | #20 | 184 mm | 25.7 mm | 5 | |
| #16 | 36 mm | 14.9 mm | 1 | #21 | 228 mm | 20.5 mm | 3 | |
| #17 | 75 mm | 16.1 mm | 1 | #22 | 281 mm | 22.1 mm | 4 | |
| #18 | 76 mm | 14.5 mm | 1 | #23 | 336 mm | 19.8 mm | 3 | |
| #19 | 117 mm | 13.8 mm | 1 | Bot | 379.4 mm | 23.5 mm | 5 |
Looks like I need one each of sizes 4, 5, 6, & 7. $5.16 at the local hardware store—outrageous, but immediately accessible. Also, even with the string the center tenon cork is inadequate, so I will re-cork that. (I have leftovers from the Buffet project.) My next session, Thursday, October 7, 2010, I checked the lower joint for leaks. It was approximately as leaky as the top joint. That is: nothing grotesque, but not really all that good, either. I couldn't identify a particular leak, and pressing on pads didn't really affect anything. I removed all the keywork from the lower joint and measured the holes to fill in the table above. I then treated the eight leather pads with the expensive Leatherique Rejuvenator Oil I use on leather car seats. The next morning I used the associated Pristine Clean cleaning agent and a paper towel to float off any dirt, and then re-treated them with the oil. The next day I reassembled it, but a cursory leak test showed no apparent change from before. No amount of pad squeezing seemed to make any difference.
| Item | Price |
| Clarinet, raw | $125 |
| Case handle | $15 |
| Mouthpiece kit | $44 |
| Needle springs | $2 |
| Neck | $185 |
| Adjustment | $81 |
| Subtotal: | $452 |
Jill, however, has come to the opinion that it's a complete POS, and won't touch it. Ever. She may have a point, but I'm not convinced that the horn couldn't be made to work. She, however, has no interest (now) in any horn that doesn't go down to C, which means a pretty new one is required.
In September 2012 one of these Bettoneys sold on eBay for $400, complete and ready to play.