Log of the 380 SL's life with us.
Sunday–Friday, July 22–27, 2007
I kept seeing this car on Craig's
List. The price started low at $3500, and dropped to $2200 because
it had stopped running. At the first price it was an interesting
possibility for someone who was looking for such a car; at the second it
was an interesting possibility for someone who wasn't looking
for such a car! I found myself continually being drawn back to it.
Most SL's are nowhere near this price, the few that are tend to be
extremely nasty. Prices (eBay) on 380 SL's are a bit soft, but if
this can be made to run inexpensively...
Saturday, July 28, 2007
...I gave it plenty of time to go away on me: it didn't. I called and
went to see the car. A bit of a beater and no longer running, but not
nasty. Interesting, compelling even, because of the low price. I
offered $2000, and they accepted. I left $100 deposit, and will
complete the deal on Tuesday.
Monday, July 30, 2007
I picked up the funds at the bank, and printed out the Washington Declaration
of Buyer and Seller Regarding Value of Used Vehicle Sold
(Dept. of Revenue) form to fill out. I do not want to be taxed
as if it sold for high Blue Book value! According to the DMV trolls,
a Bill of Sale is not good enough to establish the taxable
value from a private seller. As it's an out-of-State car I'm also
going to be on the hook for an additional inspection fee.
Tuesday, July 31, 2007
Pick-up day! I assembled my tool kit and a tow strap, and I made
arrangements to fetch my neighbor along for a lunchtime run to Post
Falls. I'm also bringing my electrical troubleshooting manual, I may
try to get the fuel pump running. I won't do this in front of the
seller, though, that's just rude. (In case of success.) I'll bring
my electric vacuum pump too, I may
be able to rig it to run the power brakes even if we can't get the car
started. (It's a converted door lock pump from an early 126.)
...And the noontime pickup was fairly uneventful. I got the electric
vacuum pump hooked up and it worked well, according to my test pilot. I
used a spare main vacuum line from some diesel (115?) that had a check
valve and an accessory tap on it, I hooked it to the booster and fed the
pump to the tap, and just corked the end that normally goes to the
vacuum pump. (Pilot also reports that the CD player works nicely, and
that the PO forgot to remove a disc from the player.) We stopped a few
blocks away and I tried bypassing the fuel pump relay, but it was not
the problem. It is apparently the (expensive!) pump itself, further
diagnosis will probably confirm this.
The tow car (Chicken Wagon) was unable to drag
the dead weight up the graveled hill near the house (inadequate
traction). I had to detach and quickly go get the 4wd Chevy pickup. But otherwise the trip, though
slow and on back roads, was uneventful: just the way I like them!
When I got home after work I put the car on a charger to replenish the
battery from its episode with the hazard lights and the vacuum pump.
Let the games begin!
Wednesday, August 1, 2007
When I got out to the car this morning I found that the hood pad had
peeled loose from the hood and was draped over the engine. Though
decomposing, it's not completely rotted yet, so I used my spray can of
3M Super Trim Adhesive (official hood pad glue) to put it back up.
It won't last forever, but it's good enough for awhile.
I restored the vacuum system to normality from yesterday's
jury-rigging. I jacked up the rear of the car and removed the plastic
shield for the fuel pump assembly. The rubber boots for the
electrical connections are bad; the connections, though packed with
dirt, were still good. I checked, and power was not getting back to
there, even with the fuel pump relay bypassed. The ground line had
good continuity to the car's frame, it's a power feed problem. I
disconnected the cable and clipped the battery charger directly onto
the fuel pump. It ran, drawing about 5 A. With it running I
tried the key. The car started instantly. When I turned off the fuel
pump the car died instantly. Looks like it could be a wiring problem.
That's much better than a bad $200–250 fuel pump, though it
could be a bit labor-intensive. The engine 'ticks' when running.
Lifter noise?
I could tell, just by smell, that the catastrophic converter is
working properly. That's good.
I also note that the car's got one of those wretched 85 MPH
speedometers. I remember those! I wonder if I have a spare that
I could swap out? Maybe someday.
This car's a day or two from being drivable. I need to get it
licensed and insured!
Thursday, August 2, 2007
Well, fool that I am, it turns out that in the haste of the on-the-road
repair attempt I had jumpered the wrong two pins on the fuel
pump/kickdown relay. (Pin 87k is not the same as pin 87.) When I
jumpered the correct two pins the pump ran. (That would have made
getting it home a lot easier!) On the plus side, this mistake did
cause me to take apart the connections on the fuel pump, for which the
protective boots were all torn up. I taped up the boots and potted
them in Shoe Goo, this should help keep the water out of these
connections.
Anyway, I put the relay on the bench and it didn't feed power to the
pump output unless the start pin was asserted. It might be supposed
to give it a burp of a second or so at key-on as well, though I only
infer this from the 560 SLs' behaviors. (And obviously it also
didn't feed power when the engine was running.) I opened it up to
find the usual sort of vintage circuit: two CMOS 4013 dual-D
flip-flops, two 555 timers, four transistors, nine diodes, two
electrolytic capacitors, two trim pots, one thermistor, two relays,
and the usual handful of resistors and capacitors. Highly repairable,
in other words. The solder was starting to look a little oxidized, I
suspect that this thing will succumb to a resoldering. The relay box
is labeled with "5300/min 8Zyl.12V", a Bosch logo and "896377",
"Kickdown", and has what looks like a date code on it: 27-02-1997. If
so this certainly isn't the original! And, if so, isn't much of an
advertisement for Bosch electrical part longevity.
Prominently missing is its supposed Mercedes part number:
000 545 36 05, listed in the EPC for '82 only. (Other
part numbers might also work, 06 05 and 15 05 substitute for
each other through '81, and 53 05 is listed for '83+. The relay
was hard to find in the EPC, for future reference it's callout 107 in
section 54, subgroup 045.)
So I resoldered it, first giving it a good wire-brushing with the
Dremel to remove oxidation. When reinstalled in the car, it started
and ran. That's $155 I don't need to spend! There was still no
key-on burp, so I guess that's a feature of later cars.
I then cleaned off the differential fill plug and removed it. (It has
a non-factory gasket on it, and the plug has been chiseled, though the
hex socket is still in good shape.) The oil was low, but not
dangerously so. I put in 1/2 quart and put the plug back in, lowered
the car, and took it for a little test drive.
It drove well, the engine and transmission seemed as it should, the
brakes worked well. (Perhaps not perfectly, it did pull a bit.) It
seemed to have the requisite amount of power for the 3.8l motor,
though I've no prior experience with them. There was some rattling
from the RF corner of the car on the gravel washboard, there may be
some loose suspension. I'll have a look at that sometime.
I tried the cruise and it didn't work, though I recall the PO saying
something about that it should be disconnected because he thought it
could self-destruct trying to use it when it was flakey. It may be
unplugged somewhere. [It is.]
...At lunch I went to get it licensed. I expected there to be some
sort of impediment, but there was not. $252 later I had plates in
hand, title to be mailed in a few weeks. No inspections were
required, which was surprising.
...After work we used the car to drive up the hill to the neighbors'
place for dinner. We took the top off, by hand. The car worked well.
It was a bit reluctant to start, like it doesn't want to fire at
first. We'll keep an eye on that.
Friday, August 3, 2007
We left the top off the car, and in the wee hours I awakened to the
sound of a cloudburst! No harm done, however. I did run outside and
flip up the soft top but I doubt that did much good, what with it not
fastened and with the windows down.
Since the soft top was 'up', I spent some time playing with the
release handle linkages to get them adjusted better, and I oiled all
the joints. I did find that there is a broken pivot bolt in the soft
top bow mechanism, that explains why it doesn't feel right to put up
and down. After that I washed the car and bolted on the license
plates. The paint sure is a weird mix of very good and very bad.
I drove the car to work, it drove well. Having had to start it a few
times today, it seems that the cold-start idle speed is too low.
That's its reluctant starting. Will need to look into what it's got
for a cold-start system.
Saturday, August 4, 2007
The missing passenger-side hood bumper bolt (and captive nut) was
responsible for quite a bit of paint chipping in the area, much of it
visible, so I fabricated a new one. I went to the parts car in the
woods and got a hood bumper bolt, sans rubber bumper; from the parts
pile came a mating shouldered nut (from a window regulator or some
such) and a torn fragment of rubber bumper. I ground the nut so that
it would wedge tightly into the hole in the hood and then tapped it
into place with a small hammer. It seems very secure. I then cut and
reamed the rubber bumper end so that it would fit over the end of the
bumper bolt and glued it into place. While time-consuming it didn't
cost anything and I don't have to wait for a parts order, I can move
on.
I pulled the under-dash panel and the steering wheel. The latter was
a big PITA as the Allen head in the big retaining bolt started to
strip, as usual. I was able to remove the horn pad and get a big cold
chisel in there, then used the BFH to break it loose from the edge.
Stupid design, the earlier big nut was better IMHO. One surprise was
that I found a keyless entry system under the dash, a Crimestopper
CS-845RKE complete with two relays. That probably
explains the problems with the door! If the mechanism in the door
turns out to be salvageable I may replace the CS-845 with a unit to
which I have a remote, I've wanted to try adding keyless entry to one
of these vacuum-only lock systems. (Replacement remotes for these
things are usually quite expensive.) Anyway, with the steering wheel
off the instrument cluster could be removed. I note that this car has
an electronic speedometer, the only mechanical connection to the
instrument cluster is the vacuum line to the Economy gauge. That
being so, there's no way my spare 107 instrument cluster's
non-85 MPH speedometer, actually from a 116 sedan, will work, as
it is mechanical and not electronic. I also note that there is no
lamp in the O2-sensor indicator socket. That's ominous.
...Later in the day I got a chance to replace the electrolytic
capacitors in the clock. As always, the parts are cheap and easy to
replace. Easy, that is, after you dig the instrument cluster
out of the car and the clock mechanism out of the instrument cluster!
(This time, at least, I didn't break off the tachometer needle.)
Reassembled, the clock is ticking again on the bench. During
reassembly I cleaned the dust off the inside of the window and off the
instrument faces, it looks nice. (I'll probably reinstall it tomorrow.)
Sunday, August 5, 2007
The clock ran and kept good time all night. Success!
I pulled the trunk lamp assembly and found its guts all deformed from
heat. I cut up a pop can to make a narrow nozzle for the heat gun and
heated the center spring-holding post to soften it up, then I bent it
back into position. After some trimming of plastic spurs and
miscellaneous adjustment and lubrication I reassembled the thing and
found that it was working again. Due to the application of heat I had
to glue the center contact back in to the assembly, its little plastic
snap-in slot got melted. Back in the car the lamp works again, though
its switch is a little flakey (as so many are). A little jiggling
gets it turned on, though. I think that's acceptable. I may work on
it more later.
Since I was under the dash I pulled out the cruise control amplifier.
It was unplugged, no surprise.
When reinstalling the instrument cluster I found that when the missing
O2-sensor lamp was replaced it was on all the time. More
fun! When I started the car I also tried unplugging the idle actuator
motor, and there was no effect on the car's idle. So that system is
defunct too. I'm thinking I'll try a resoldering of the idle speed
controller first, I don't see how it can hurt even if it doesn't help.
As church-time was looming I got the car buttoned up enough to be
drivable again.
...When I got home again the car was fully warmed up and I again tried
unplugging the idle actuator. RPM soared, so the idle system is
intermittent.
I popped off the fuel tank connector (under a plug beneath the stowed
soft top) and jumpered the two connections to ground. The needle
pegged and the light came on, so the bulb is good. OK, I've seen this
before, this cluster doesn't have a lamp-test for the
fuel-out lamp! (The only lamp, of those you can't turn on at will,
that's missing a lamp test feature.) I added one, it only takes
adding a diode and a resistor to the instrument cluster, to the back
side of the big connector inside the cluster. A generic diode such as
a 1N4001 and an 18-ohm resistor are in series and connected between
pins 8 and 1, anode (bar) towards pin 8. This replicates
the circuit of the (for example) brake warning lamp. I pioneered this
on the 240D I sold a while ago, I believe it's
a nice enhancement.
Next I addressed the cruise control amplifier. It is a 14-pin VDO
servo unit with a black connector, marked:
11.81
12V
412 205/1/2
001 545 76 32
Mercedes-Benz
When I opened it up I found that one pair of the H-bridge motor driver
was cooked! A first for me, though I have heard of this. (The two
transistors may or may not be dead, further testing will be required.)
It has three trimmed resistors in it, and one of those failure-prone
Frako electrolytic capacitors. I used the paint stripper to remove
the coating on the circuit side. While that was working I pulled the
idle regulator [Not! I later found that it's the blower regulator]
out from behind the glove box. It is labeled:
Bosch
Geblaserregler 12V
1 147 328 026
Made in Germany
000 822 11 03
Opened, it revealed no less than six relays, a CMOS 4040 12-bit
counter, a 4070 quad XOR gate, a LM2901 quad comparator, a ULN2004
×7 Darlington transistor (relay-)driver array, thirteen
diodes, two electrolytic capacitors, and the usual handful of
resistors and capacitors. This circuit was also varnish-coated, so I
hit it with the paint stripper too. This was very nerve-wracking,
because if any stripper gets on an open relay coil the relay will be
ruined.
Once the stripper had done its job I washed it off of both units and
dried them with compressed air. The cruise amplifier exhibited the
expected signs of degraded solder joints, but the idle [blower!]
controller looked pretty good. There may have been some signs of
cracking at the big connector or perhaps it was just scratches, it's
hard to tell. Regardless, I resoldered it.
With the idle [blower!] controller reinstalled the car started just as
before. [That's what I would expect given that I was actually messing
with the heater fan!] It did respond normally to unplugging the idle
actuator, but the engine was also still hot. I will try this
experiment again in the morning. It could be that the idle is low
even with the actuator fully in the open position, so that while
unplugging it has no apparent effect it's not a sign of a problem with
the idle control system. Its cold-start reluctance may be the warm-up
regulator, or the cold start injector. It's also possible that it is
fuel pressure leaking down. More diagnosis to follow.
In the evening I resoldered the cruise control amplifier and put it in
the bench test harness. It tried to work, but it seemed sensitive to
flexure so obviously I'm not done resoldering yet. It also only
seemed capable of driving the motor one direction, so I pulled the two
cooked transistors and threw them on my old Heathkit IT-121 transistor
tester. The NPN was still OK but the PNP was toast. (That's
unfortunate, because I'm sure I could come up with a power NPN from
the junk box, PNP's are a lot rarer. I may need to order some parts.)
I think, however, that given the opportunity I will replace both
transistors. It depends on what, if anything, surfaces in the junk
box. I theorize that the cooking was caused by bad solder joints in
the two inverter transistors that run the H-bridge such that the top
and bottom legs ended up on simultaneously (at least part of the
time).
Monday, August 6, 2007
And what should I find in my parts pile? A 2N4918 PNP power
transistor, in exactly the same case style (TO-126) as the dead one,
and another one on another board that's part of the same assembly.
And right next to that one a 2N5190 NPN power transistor, also in the
same case style. (I was worrying that I'd have to make TO-220's fit,
they're a lot larger.) It's fate! (I'm still going to order some
parts at some convenient time, the junkbox is quite unreliable on the
whole.)
Swapping these in was a bit of a pain, and upon closer examination the
NPN transistor didn't look cooked, it was just coated in cooked
varnish from the other side of the (shared) heat sink. So I only
installed a new PNP, using new heat sink grease. With it installed
the amplifier behaved properly on the bench, there was no sign of
sensitivity to vibration or flexure. So I installed it in the car.
Under the hood I found that not only was the cruise actuator
unplugged, but the car-side connector shell was also missing. I dug a
replacement connector shell out of the junk box and installed it back
into the car. The car's schematic was indispensable to get the
color-coded wires back into the correct holes.
...On the way to work today the cruise control operated properly.
Good.
Tuesday, August 7, 2007
I didn't have much time this morning, but I managed to remove the
ashtray, console cover, and ACC panel. Four of the five lamps behind
the panel were burned out. The ashtray frame retention screw holes
were stripped so I smeared some Shoe Goo into them, I'll redrill pilot
holes when it dries. One of the screws was missing, I had to dig a
replacement out of the junk box. The retaining pin for the console
cover is broken off and missing, it was (at one time) stuck down at
the rear with a wad of double-sided foam tape. I'll have to fabricate
a new pin. The rubber shift bezel was starting to crack in the
corners so I began gluing it using black weatherstrip cement. The
console cover itself needs sanding and refinishing, the finish has
started flaking off and the wood has gotten wet and swelled some. The
wood cover for the ACC panel got its screw retaining blocks broken off
somewhere along the line so I glued them back on.
As I remove panels and trim the car's starting to not look so good,
and it's only going to get worse before it gets better!
...I opened up the ACC pushbutton array, and the solder joints are
indeed bad inside. In the evening I did some poring over the car's
schematic and augmented the diagnostic
checklist to have some test information for the ACC system used
in these cars. (We currently have five cars using this particular
system, it's about time I made up a checklist for them.)
Wednesday, August 8, 2007
I resoldered the ACC pushbutton array. The secret here is to use a
very hot iron on the internal relay pins themselves, these are the
ones that tend to oxidize, break loose, and make bad contact. The
edge joints that attach the two side boards are also problematic, but
they're easy to resolder with a regular iron. I sluiced the switches
themselves with contact cleaner and cycled them many times. I then
liberated a spare high-fan blower button from the junkbox and
installed it in place of the missing button. I replaced the four
burned-out 2721 bulbs with new ones. I then ran the appropriate diagnostic checklist in the car,
and discovered that the blower system was not working. Nor did it
work with the ACC panel installed, helping to validate the checklist.
I also found that the foam hose to the cabin temperature sensor was
indeed rotted, but that the sensor itself measured good. The AC
compressor, as expected, also did not run.
I then reinstalled the repaired ACC panel. Finally some positive
cosmetic treatment!
On the way to work it became apparent that the heater blower
was working properly, and that the checklist was faulty, as
was my quick functional test. (I'd forgotten the effect of the cold
engine lockout sensor.) However the vent control wasn't right, all
vents operated all the time. Could be a vacuum supply problem.
(Let's hope so!) Bad actuators are no fun to replace in this car.
...At lunch I stopped at McParts and bought some replacement 2721 lamps,
and two cans of "Toreador Red" touch-up paint, $3 on clearance. The
cap was a surprisingly close match, we'll see how it looks in real life.
Thursday, August 9, 2007
I hooked up the vacuum pump to the feed under the hood and pulled out
the ACC panel again. Using a test light to power the actuators
(built-in current limiting) I found that the defrost actuator is the
only one that is obviously leaking. I pulled the instrument cluster
and unhooked the vacuum lines to the defrost actuator and capped them
off. It looks like it might be possible to replace this actuator
without removing the dash, I may try doing this sometime. (It won't
be easy, regardless.)
The center vent actuator (a nightmare to replace) actually seemed to
be working properly once the defrost leak was stemmed, but when I
looked down in the center vent I could see that something was wrong.
I pulled off the rubber vent manifold and could then see that the ring
on the flap that the actuator end snaps to had broken and the actuator
was no longer connected. I cleaned the remains, fabricated a
folded-over piece of thin sheet metal with appropriately-sized holes
drilled in it, and glued this over the stub using Shoe Goo. I'll let
that set up and then try reattaching the actuator.
Even though the center vent control line is referenced to power and
not ground, if you're doing the testing key-off (as I was) you can
feed positive voltage to it to make it go: the unpowered car circuitry
acts as a virtual ground. While I was there I figured out what was
wrong with my blower test checklist item. (You have to
jumper two pins, not just one.) This time it passed!
With all that to the stopping point I got out the rattle-can of
touch-up paint and sprayed some onto a couple of the big missing
chunks. This was a color test, and it didn't look too bad in the
morning light (shade). It's a tiny bit redder than it ought to be,
but I think it's going to work out well enough. I sprayed a bunch
into the cap and used a small strip of sheet metal to dab it onto the
rock chips and etc. I also dabbed some clear spray onto the scratch
in the clear coat that some kind parking lot-mate gave me recently.
It's lumped up, but less visible than it was. I'll block-sand it down
flush later once it's dry.
...When I got home from work I popped the cluster out again and
attached the now-dry center vent tab to its actuator using a short
screw and a nut that I dabbed paint into the threads to serve as a
lock. To improve visibility I removed the center vent eyeballs, that
really eased the job. When I tested it the tab bound a bit, but a few
licks with a file took off the high corner that was catching on the
air horn. Works great! With the eyeballs out I was able to
thoroughly clean the grime and dust off of them, I did the inside of
the center vent air horn too.
I then managed to get the defrost actuator speed nuts off (two of the
three broke) and found that the actuator seems to have come unclipped
from the flaps inside the ductwork! The original plan was to see if I
could swap the actuator guts with a good used one that I have that has
a twist-lock mount, and failing that I was going to temporarily lock
the flap in the closed position, but there's no point in doing the
former and no way to do the latter. There's nothing for it except to
pull the dash and open up the heater box. That is not going to be
fun, I'm not sure when I'll do that. Not soon.
The rotted foam hose was very exposed at this point, I cut a length of
foam pipe insulation and put it on. Then I reinstalled the center
vent parts and buttoned up the car. We're going to be gone for a week
so I enlisted some aid to put the hard top back on. It doesn't go on
very easily, it seems that either it or the car itself is deformed.
Probably the top got dropped at some point, its 'chrome' trim
is a bit dinged. It's manageable, just not as easy as
the other three SL's I have experience with. Once it's locked down
it's fine.
Friday, August 10, 2007
Cleaned, lubed, and adjusted the throttle linkage. That takes awhile!
While I was there I noticed that the cruise control actuator rocked on
its two mounting bolts. Two bolts? Aren't there supposed to be
three? Turns out the bracket on the bottom for the third bolt was
missing, and I think that could possibly result in it having
difficulty regulating the speed, depending on the axes of pull versus
unintended rotation. I fabricated a new bracket out of some scrap
metal, and I even welded a captive nut to it so that it was more like
the missing original. That actually didn't take that long to do.
Sunday, August 19, 2007
We just got back from a week's coastal vacation, and one of the things
we talked about was how nice it would have been to have a 'Toad' over
there. A convertible would have been particularly nice, the weather
was gorgeous most of the time. Our truck is more than capable of
handling a toad in addition to hauling the camper, if the car's brakes
can be utilized.
However that's not something you'd ordinarily do to a nice car, but a
cheap SL isn't so much that you'd worry about it. And an SL is as
small as you'd want to go for a practical toad for a family of three,
plus some crap. It would also be highly unusual, which is good for
me.
There are difficulties, largely that the car has an automatic
transmission. Though vintage MB's can be towed, it's not fast or far,
the rear pump is apparently not up to the task of keeping things
lubricated. I am very much against having to take a wrench to the
flex disks in order to rig for towing. My wife would not be amused.
It would really have to be simple to attach and detach, wrenching
and/or trailers/dollies are right out. I do not want to leave
the car idling while towing it.
Two ideas:
- Replace the transmission with a manual. Not easy, the parts
probably don't even all exist.
- Hook up an auxiliary electric hydraulic pump. It oughtn't need
much flow. This would keep the guts of the transmission
lubricated during the long haul. I'm assuming that something
could be plumbed in at the cooler lines, and/or the test gauge
ports.
An auxiliary electric vacuum pump could also take care of running the
brake booster for when a brake servosystem was fitted. The umbilical
cord business for the lights, etc., doesn't scare me at all. I relish
that kind of challenge, in fact!
Interesting food for thought.
Monday, August 20, 2007
The car started instantly this morning after sitting more than a week.
I also found out that a "Geblaserregler" is a blower speed controller,
not an idle speed regulator. I was wondering why it had so many
relays inside it, and of course that's what I would expect inside the
blower controller. It's also easy to tell if you just try a German to
English translation! What a maroon. I'm going to have to go looking
for the idle regulator, that's one that needs some attention.
It was just cool enough today that I'd have expected some small amount
of heat from the ACC, though while it seemed to operate normally
enough I wasn't getting any heat. I'll need to check out the
monovalve, it wouldn't surprise me if it was torn. It's also possible
that it wasn't quite cold enough to try to heat, I didn't try messing
with the thermostat dial.
Tuesday, August 21, 2007
Ah, there it is! The idle controller, though behind the
glovebox as advertised, is tucked to the left sideways against the
HVAC plenum and not forward against the firewall as shown in
the manual. (Those are the blower and temperature controllers for the
ACC system, and the fuel pump relay.) It's marked:
002 545 33 32
Leerlaufdrehzahrlregelung
Idle Speed Control 8Zyl.
412.202/010 /001 12V
It is, I might add, a VDO unit and not Bosch. I've come to expect
soldering trouble from VDO's electronics, whereas Bosch's don't seem
to have nearly as much trouble.
Opened, it revealed a LM2901 quad comparator, two LM2902 quad op-amps,
three signal transistors, one power transistor, sixteen diodes, six
electrolytic capacitors, and the usual handful of resistors and
capacitors. Two of the resistors were mounted on stakes and looked
like tunable items. (Idle speed being one, I presume.) This circuit
was also varnish-coated, so I hit it with the paint stripper too. The
soldering didn't really look that bad, but it doesn't take all that
long to redo. There were a few spots that looked questionable.
I also pulled the monovalve and had a look at it. It looked good, the
diaphragm was not torn. I cleaned the screen off with a bristle brush
and put it back together. The coil continuity was good, the plunger
was not hydrolocked.
The stupid hood pad fell down again, so I had to glue it back up.
What a pain!
The car started easily, and idled normally. We'll see how it behaves.
...Some have suggested I check into Remco's towing products. They
have a driveshaft disconnector, and a transmission lube pump system!
(As well as tow bars, etc.) That lube pump system looks very
interesting, I bet one of them can be adapted to this car even if they
don't officially offer it. Unfortunately it's $600! The tow bar is
also $575, plus some $200+ for the part that permanently attaches to
the car. A braking unit for the toad is more than $800. The
driveline disconnect, if applicable, is more than $650. This is not a
cheap hobby!
Driving the car today the idle seemed as before: nothing really wrong
with it. Still seems a touch high, if it bothers me enough I could
try tuning the resistors inside the controller. Maybe someday. The
ACC was definitely heating today, it might even have been overdoing
it. On MIN it switched to cooling (vent only), so mostly it seems to
be behaving itself. The foam tube kept coming off, I think it's about
1/2" too short. I'll glue on the offending end when I get home, that
may have been its only problem.
Once home I had some free time, so I glued on the loose end of the
foam tube. I then pulled out the idle speed actuator and cleaned it
out with carb cleaner. A lot of black gunk came out. Tested on the
bench it seemed to behave properly, so I reinstalled it. The rubber
mounting hoses are a bit loose, but I don't think they're leaking yet.
They're still flexible, so I don't think I have to replace them. With
the engine running a spray of carb cleaner around the valve didn't
result in an RPM change, proof of sorts. I note that the vacuum
advance line to the distributor is purposely disconnected, I'm going
to have to go through the engine vacuum plumbing some time to put it
all right. There was a missing screw on one of the exhaust manifold
heat shields so I dug up a suitable 10 mm screw and installed it.
That should help prevent nasty rattling noises, which I hate.
Next up was the AC system. I pulled off the R134a conversion
fittings, there was only a residual puff of pressure. I moved the
Schrader valves from the conversion fittings back to the R12 fittings,
then connected up the vacuum pump and put a quick vacuum on it. It
seemed to hold vacuum, so I then put about 60 PSI of propane into
the system, that didn't leak down either (not that I gave it much
time, but I was only looking for profound leakage) and the ACC system
was able to engage the compressor with that little bit of pressure.
With the preliminaries out of the way I vacuumed the system for more
than 1/2 hour. It took some minutes before the vacuum pump started
making the rattling noise that indicates that a deep vacuum has been
pulled. I don't know if there was moisture or not, but vacuuming
can't hurt, and a half hour is about the minimum that'll do any real
good removing moisture. Once vacuumed I then charged the system with
the test refrigerant: 8 oz. of Isobutane/Propane (R600a/R290)
mix, followed by a propane charge until the system seemed to be
operating correctly. (This takes some time to sneak up on, it's not
like you just put in 3 cans of R12 and call it good.) Unfortunately
evening was approaching and it wasn't really all that hot, not good
conditions for charging a system this way. I did see 39 °F
vent temperatures, but that's no great feat under these conditions.
Still, it did seem to be working, though it was short cycling due to
low evaporator temperatures. Time will tell if I have it charged
right, and if the system works correctly and doesn't leak.
The lights were next. I've been afraid that I might be caught out in
the dark with them messed up as they are. I pulled the offending
bucket assembly out of the car and found that the 6-pin connector was
shifted by one position, completely explaining why it wasn't working
correctly. The exposed pins were tarnished, suggesting that this has
been wrong for more than a little time. Plugged in correctly, the
lights all worked right. One fog light was still out, but I found
that it was missing a spade connector inside its shell. I replaced
that and then all the lights worked as they should. One of the
mounting screws for the bucket assembly has a broken clip in the car's
sheet metal, it doesn't grab too well but seems to work well enough.
It was time to quit for the night, but I was really having trouble
putting the air cleaner back on. I rerouted the offending fuel line,
which cured the problem. While in the area I note that this car does
not have the same E.H.A. valve as the later SL's, I think it still
uses the same warmup regulator as the 450 SL did. It has an
O2 sensor, so there must be some electronic
control of mixture possible.
Wednesday, August 22, 2007
Both clips were broken off on one end of the fuse box cover, and
missing, so I cut a strip of sheet metal and curled the ends to match
the profile of the intact end of the cover. I cleaned the plastic and
the metal with acetone (which attacks the plastic, I might add, so
great care is called for) and glued the strip on with Shoe Goo. Once
dry I can bend the metal tabs so that they fit snugly inside the fiber
panel. I dabbed on a little black paint and now it's not even that
obvious that it's been patched.
Since I'm driving it I also outfitted the car with a calculator,
notebook, and pen. I filled it for the first time yesterday, and if
the trip odometer was cleared at the last fillup the car got
13.8 MPG. Not great, but long spells of sitting
are not good for mileage. Also, if the O2 sensor system
isn't working the car should be running rich, which won't help.
I called the PO, and he's going to look for the receipts for the
engine work. He left a couple of CD's in the car, we'll swap at
some convenient time.
We've had rain lately and the trunk is damp. That'll have to be
addressed soon before real trouble starts. The car was garaged at its
PO's; sadly, that can't happen here.
Going to work, the car started with great reluctance. I need to look
at the cold-start system soon.
...At lunch I picked up some more carb and brake cleaner, and a piece
of 1" foam pipe insulation to perhaps replace the missing insulation
on the AC/fuel heat exchanger. (We'll see if it fits.)
Thursday, August 23, 2007
I didn't have much time, but I was able to test the car's cold
starting a bit. I bypassed the fuel pump relay to be sure the fuel
rail was good and pressurized. No change. I tested the cold-start
injector and it was getting power, plus I could hear it squirt when I
fed it power externally. The car also stumbled severely if it was
running and I goosed the cold-start injector, which is what I expected
it to do. I cleaned the connector anyway and bent the fingers a
little closer to tighten up the connection.
When cold, unplugging the idle actuator still results in no change.
(It's probably open all the way already.) Timing? Cold injection
boost?
I cut a length of 1" foam pipe insulation and put it on the AC/fuel
heat exchanger. It fits close enough. There is a clamp missing that
holds the heat exchanger to the retaining bracket on the fender.
...At lunch I found that the U-Pull had a 1982 380 SEL, so
I grabbed a few tools from the lab and headed on out. I found that it
was still fairly complete but, like this SL, does not have the
E.H.A. valve I need for the 560 SL though it
does have a lot of engine parts for this car. (It also still used the
old-style thermostatic idle valve system, not the electronic system.)
Disappointed, I did manage to scrounge around and get some AC valve
caps and brake bleeder covers to replenish my stock. I did grab the
four unusual relays from the SE's fuse box, including what looks like
the identical fuel pump relay to this car, and a wiper blade for the
300 SDL. $10. I also got a piece of grille
plastic that I may be able to use for patching the missing chunk, and
some bracket bits and screws for miscellaneous fabrication purposes.
It was moderately warm today, and the AC was functional on my errand.
It did cycle on and off a bit more than it probably should, I may have
it overcharged. With the defrost vent stuck open it's hard to tell
just how well it's working as most of the cold air ends up going to a
moderately useless place.
I also found a link to a servicing document on the 722
automatic transmission. Not exactly for this car, but I bet it's
close. I might be able to glean some toad information out of it.
Friday, August 24, 2007
Not much time to do anything today, I put on the brake bleeder and AC
valve caps I salvaged yesterday and put away the rest of the booty.
I replaced the one missing spark plug wire clip and glued down the
one that was still there (its legs were broken off). I began gluing
the vinyl back onto the fuse box kick panel. I cleaned the dust off
of both surfaces and smeared weatherstrip cement behind one peeled off
section and worked it down. Once it had started to set up and was
mostly smooth I clamped it between boards to let it dry flat. If it
does, it'll take a few sessions to do the whole thing. I've had poor
luck in the past with this job, it always ends up wrinkly. We'll see
if this piecemeal clamping approach works.
The weather's getting nicer again, so I took the top back off the car.
With the top rail exposed I was able to install the extra turn lock
gasket that I had laying around. Still need another, though.
...At lunch I bought a cheap towel to shove over one of the defroster
ducts. That kicked up the AC output a bit. I'm thinking of cutting
the towel into strips and sewing it into narrow tubes that I can put
pea gravel in. Those would lay down in the defroster duct grilles to
block them off. They'd be heavy enough to not blow around, and small
enough to not be too obtrusive. It's that or pull the dash, and I'm
not ready to do that yet.
Saturday, August 25, 2007
I went out and replaced the missing fog light bolt, now they both hang
straight. While under there I found that the mysterious and pesky
squeak seemed to come from the air dam. Looking at it and comparing
it with the 560 SL (which is supposedly
changed in just that area so comparisons are not definitive) I think
there is a missing black plastic grille that's between the bumper
mounts and the air dam. (There was a broken-off plastic mounting ear
screwed to the top of the air dam.) This was letting the air dam
wobble, and I think it was squeaking on some hard piping that's behind
there. (Which is not good.) I fabricated a small sheet metal bracket
to hold the air dam up, at least until the missing grille (?) is
replaced. (If it ever is.) That seemed to cure the squeak, anyway.
The front license plate always looked funny to me, too high, and I
decided that its mounting bracket was upside down. When I pulled it
off I found that it was pretty mangled, so I welded up the cracks and
holes in it. I did a ratty job (dirty thin sheet metal is no picnic
to weld on) but it's now solid again, if not beautiful. The crummy
welding will not show. I refreshed the black paint and hung it back
on the car, right-side up this time. I then put back the license
plate. Looks a lot better!
I had another session of gluing the vinyl back onto the fuse box kick
panel. The first section has a couple of small wrinkles, but nothing
too bad. I'm sure it'll be just fine.
...At lunch time I was out on errands and ran across a yard sale that
supplied me a black sweatshirt to wedge into the other defroster duct.
Free! The AC blows nice and strong now. I don't know who I'm kidding
about sewing up something nice for temporary use, I bet this crap
stays wedged over the dash until I fix it properly.
...In the evening we drove up to the neighbors', and the headlight
alignment is all wonky. One side is lighting up trees, the other
is for finding lost contact lenses...
Sunday, August 26, 2007
I adjusted the headlights based on my best recollection of last
night's flaws. Dialing them in this way takes awhile, some night
I'll probably take the headlight bezels off and take it out for
an interactive session.
I have noticed that the kickdown switch doesn't seem to work. (One
test is when I leave the house I usually hold the transmission in L
(first gear) going down the hill. If I momentarily shift to S and
then back to L it'll shift to second and stay there. If I put my toe
under the pedal and poke the switch it should drop back to first but
it doesn't, unlike our other cars with the four speed automatic
transmission.) I pulled the fuel pump/kickdown relay again and
checked continuity from the kickdown pin to ground. The switch and
solenoid, when operated, measures 15Ω, which
seems right to me. Either the relay's not supplying power or the
solenoid just isn't working mechanically.
Who pop-rivets in place of screws? I pulled the driver's door panel
off to see what kind of mess was in there. That, of course, required
a drill. (I'm missing five of the seven little chromed trim screws
that hold on the two chromed cover plates. The pop-riveted hole is,
of course, ruined for the proper-sized screw.) With the door apart I
found that the keyless entry installation in fact wasn't all that bad,
I think it can be used as-is. But there were other problems. The
roll pin for the interior door release handle was working out of
place, and was too short anyway. The handle was only being held by
one of its two ears, that's why it felt so sloppy. I drove out the
roll pin and replaced it with a longer chunk of galvanized framing
nail that was close in diameter. Though a tiny bit looser than the
roll pin the net effect is much better since it makes contact
full-length along all bearing surfaces. The actuation ear on the
handle was starting to wear where the rod attaches so I put a small
brass washer over the worn spot. There were some gouges in the
handle's paint so I touched them up. When I reinstalled the handle
assembly I found that it was adjustable in position and when shifted
all the way forward the door no longer stuck shut, and would open
easily. With that adjusted I found that the vacuum valve for the
locks also needed some adjustment to operate in both directions
without leaking. (It wouldn't always lock before.) I then put some
weatherstrip glue in the cracked A-pillar seal and ran the window up
to clamp it in place. I tightened the front window channel mounting
screws. (They've been stripped, unfortunately, though I could still
get a bit of a grip on them.) With that tight the mirror doesn't
wobble anymore. With the window up I found a loose chunk of plastic
and a metal spring clip in the bottom of the door. Not sure what
they're for, will investigate further. The plastic looks like a drip
shield or something. If I can't figure it out on my own or with the
help of the manuals there's always the other door to compare it to.
(It's due for surgery too.) It is obvious that the window glass needs
a bit of adjustment in order to operate correctly, I believe its
misalignment is responsible for most of the damage to the window seals
on the A-pillar and the hard and soft tops. (The major chewage on the
top seal of the passenger side is due to the broken bow bolt that lets
the center of that seal drop down.)
...In the evening I had a final (?) session of gluing the vinyl back
on the fuse box surround panel. It isn't perfectly smooth, but it has
come out better so far than any of my earlier attempts. The full-face
clamping in the wood vise helps.
Monday, August 27, 2007
The vinyl gluing came out OK. Not great, but acceptable. I bent the
metal ears of the new piece on the fuse box cover so that it fit as
snugly as possible without binding when installing the cover.
I then tackled the driver's-side window adjustment, etc. I printed
out the instructions and then put up the soft top. I had to do some
more gluing of torn window seals, and the adjustments are fiddly. I
don't think they're quite right but they're better than they were,
insofar as ripping up the seals is concerned. I imagine that there
will be plenty of wind leaks, but to fix that would be a
whole 'nother level of commitment! (Mostly monetary: new seals all
around.) The stripped bolts in the front window guide/mirror mount
are bothering me. Helicoil? Will need to think about it.
The broken bolt in the passenger side soft top mechanism is
troublesome. I couldn't get it loose, so I soaked it in Kroil. There
was torn rubber on that side too that I started to glue up, and I
replaced a missing screw. I also glued down a couple of flaps of the
soft top itself.
No clue yet as to the identity of the plastic piece or the metal clip
found in the door.
Setback! I tried to go to work and it wouldn't start. I smelled gas,
it wasn't a recurrence of the fuel pump problem. I tried to test for
spark and got nothing. Though the coil was getting power, the
ignition module didn't seem to be grounding the other side. That's
a disappointment. I ended up taking the Chicken
Wagon, I threw my tools into the trunk.
...At lunch I swung by the U-Pull to have another look at
that 1982 380 SEL. The engine was gone already, but the ignition
module was still there! I also nabbed the coil, a coil cover (which
my car is missing), and the sunvisors. (Those aren't at all a good
fit, but who knows, I may be able to do something with them. The
lighted mirrors are in perfect condition, and we have four cars that
use them. At the very least they'll be spares.) I also got some tiny
chromed (?) trim screws from the long strips that cover the door
openings and from the foam pieces at the rears of the side windows,
perhaps they will stand in for the missing screws on the chromed door
covers. And I got a few other things like an idle control relay (that
the car couldn't have been using) and a door lock pump. $12 total,
$14 with admission.
...Home again after work, I couldn't wait to see if the ignition
module worked. I plugged it in place of the original and grounded the
case with a clip lead (just in case it needed that). It started! I'm
going to investigate more tomorrow, but right now it looks like maybe
I dodged a bullet. (New ignition modules aren't particularly cheap.)
Perhaps the module died due to the extended key-on session with the
windows this morning. It shouldn't have, but who knows. If it is bad
and I can get it open I may try fixing it as an experiment.
Tuesday, August 28, 2007
Yes, the ignition module was definitely bad. I pulled it out and got
the car started with the replacement, then swapped in the original and
it wouldn't start. The replacement was exactly the same part number:
Bosch 0 227 100 042,
Mercedes-Benz 002 545 26 32. There's also a part
number molded into the plastic connector panel: 09 9649 00,
and what appears to be a date code stamped into it: 37 81.
So I opened up the bad one, it has a cover held on with four screws.
Inside were some beefy old-school electronics: a possibly TO-3 power
transistor embedded in the aluminum case, looks like it's riveted in
behind a heavy plate, a 16-pin TO-3 IC on the board with a Bosch logo
and labeled 0086 and 62S, what appears to be a potted thing that may
or may not be an 8-pin SIP IC, two power diodes, a zener (?) diode,
two signal diodes, a 32Ω 10W power resistor
mounted to the case, a 0Ω 2W (?) wire-wound
(actually ribbon) emitter degeneration resistor thermally clipped to
the case near the power transistor, and a handful of resistors and
capacitors. Two of the resistors are up on stakes, probably tunable
components. It all smells a bit funny, and it's a bit cooked on the
transistor/emitter resistor end of things. I got out the Fluke on its
diode test function and while the B-C and B-E forward junction
voltages measured 0.5 V, OK for a NPN silicon transistor, the B-E
reverse voltage was 1 V and the B-C reverse was about 2.3 V.
Not good, I'd say.
Throwing caution to the winds, I opened the good one. Its date code
is 49 91, much newer. (Am I surprised?) Inside it was much the
same, minus the cooked look and smell. It had the same 20086 IC in
it, with additional marks of 1492 (date?) and B879828.1, but the
mystery potted item looks like it was a resistor network that was
blown out onto the board in the newer design. (Using smaller
components.) I pulled two of the wires off the power transistor legs
and measured it with the Fluke. The only difference was that the B-C
reverse connection measured open. The B-E reverse voltage was the
same 1V, which is odd but I guess OK. (I read something somewhere
that indicated there were B-E anomalies when the transistor has a
built-in E-C clamping diode.) Obviously the power transistor in the
bad ignition module has suffered some damage.
I put the good one back together and put it in the car. It works.
As a side-benefit I found the missing piece of the front grille, so I
should be able to glue it back.
The lesson? Don't leave the key on for hours at a time! (Or unplug
the ignition module first.)
...After work I used a cold chisel, BFH, and anvil to chisel the rivet
bumps off of the transistor chamber cover plate. Released from its
prison, revealed was a TO-3 package (but with three pins, not the
usual two) riveted to the plate. It was marked 1022 and 1/128. It
has a Bosch logo on it, so no doubt there's zero chance of looking up
an official replacement part. Its collector is connected to the case,
which is normal for TO-3. I think that I could try
substituting a suitable NPN power transistor intended for ignition
use, provided I could find one with the E-C clamp diode included.
(NTE2302? NTE2331? These are $10 items.) It couldn't hurt, except
for the cost, and might be instructive. It could also smoke instantly
or only after awhile, in which case one had better not travel without
carrying the other unit in the car!
Reading shows that the module's case is intended to have a good
thermal mount to the car's fender, but mine does not. I should look
into that. Some have suggested that this was the root cause of my
problem, not leaving the ignition on.
Wednesday, August 29, 2007
I pulled the ignition module back out, cleaned behind it, and put
thermal grease between it and the fender wall. I put it back, and
replaced the missing third mounting screw with one from the donor car
so that it would be clamped down securely for good thermal contact.
That took an hour that I didn't account for, I should have done it
right the first time.
I then pulled the ignition coil out and repaired its mount. One of
the captive nuts was pulling through the fender wall so I hammered it
back down. While I was there I rerouted the wiring to the coil so
that I could put on the plastic coil cover from the donor car. (All
wires exit the cover from the same side, and none of the ring
terminals can hang over the side.)
The AC/fuel heat exchanger is supposed to clamp to this same mount,
but the clamping strap was gone. I fabricated a new one from the
AC/fuel heat exchanger mount from the donor car, using the grinder,
BFH, pliers, and the anvil. It clamps nicely around the new foam
insulation, and doesn't even look too bad. With all this done
everything is much more solidly mounted than before.
Unfortunately during all this I managed to break a nipple off of the
vacuum valve on the vapor tank, so I had to pull that off and repair
it. I used cyanoacrylate glue to tack it back into place, then potted
it in Shoe Goo for strength. We'll see if it holds up once it has
set, it may not be strong enough.
...Surfing, I'm having nearly zero luck coming up with a transistor
selection guide that will help me find a suitable replacement
transistor. Stupid internet. The few electronic ignition transistors
I've managed to run across are all Darlington pairs, and usually in
TO-220 cases.
Thursday, August 30, 2007
I checked, and the glued vacuum valve seems intact. Good.
I began gluing up the driver's door skin and pocket. I peeled back
the door skin at the bottom, first removing some staples, and then
slid a sheet of mylar (floppy disk) coated with weatherstrip cement
behind it. That should close up the small tears that are in the lower
rear corner. I then washed the shattered door pocket plastic with
acetone and glued a large sheet of thin sheet metal (from a tin can
that was in the trash fire) to the inside with Shoe Goo. This metal
was thin and malleable enough to conform to the curve, yet not quite
so thin and weak as beer can material would have been. It spans from
just below the ribbed top edge to partway past the curve at the
bottom, over about 1/3 of the length. It has a compound curve because
of its size and location (the break was extensive). Clamps were used
to force it to conform more-or-less to the correct shape imposed by
the pocket's plastic. Several sessions will be required in order to
restore this pocket to good condition, there is also a chunk out of
the corner where the (missing) attachment screw should go.
I then removed the door panel on the passenger side. As expected, the
missing lock knob piece is not to be found. However, inside the
bottom of the door was what looks like a window channel slider, and
the roller from the broken door check. The spring-loaded lock
coupling is bent, and the springs (typically) are broken. I should be
able to come up with something from the junk box to fix this.
Neither door had any of the vapor barrier left. Fools.
I then removed the broken door check. That was, as is often the case,
very difficult as the pin in the door frame was frozen. Much work
with the BFH and prybars was required. Some more work with touch-up
paint will now also be required. The check assembly itself was held
in the door with only two 5 mm Allen screws, unlike everything else
I've seen which uses three 10 mm hex bolts.
Oooh, I like the 107 door check! It's steel, with real coil
springs and two rollers that roll over the thick shaped metal arm
that's attached to the door frame. Eminently repairable, in other
words, no wonder it's so expensive! The axle pin, a long rivet, for
one of the rollers has disappeared. I should be able to replace it
with a bolt or something and it'll be good as new.
...I was out late, and used the headlights. Still off, I think the
left side lows are low and outside, and the right are a bit to the
outside. The right high is a bit low, but I'm not sure if it's the
dual lamp or the high-only. More dialing in required, naturally.
I also noticed that the key doesn't operate the central locking, it
doesn't seem to push the lever quite far enough. The driver's door
locks and unlocks fine. Needs some kind of adjustment!
More surfing has led me to the conclusion that you can't get an
ignition transistor these days that is not a Darlington pair.
Even if you could it would probably not be cheap. I wonder if the
existing driver IC would be happy pushing into a Darlington pair?
Might be worth a buck or two to try. BU941 is one such transistor,
something like $2.50. I may even have an igniter (driver transistor)
from some Japanese car laying around that I could try out.
Just as I had gotten into bed it started to rain, so I ran out and did
my putting-up-top-naked-in-the-rain dance.
Friday, August 31, 2007
Yesterday's gluing of the door pocket came out well, it looks good and
seems nice and strong. Time for round two. I cut two thin strips of
metal (stiffening spines from a wiper blade) to nestle into the ribs
at the top of the pocket and glued them in place over the break there.
(Shoe Goo, of course.) I also ran a bead over the few remaining minor
cracks not covered by the metal sheet, and beaded over the metal's
edge anywhere it was still exposed. This was set aside to dry. The
vinyl repair on the door panel looked good too, so I used weatherstrip
cement and a bunch of tiny spring clamps to put back the edge I'd
peeled loose.
I then fixed the door check. I found a 1.5" bolt with M8×1.25
threads that fit the roller perfectly. When in position half the
roller would be on the non-threaded part, so that was good too. I
threaded one of the two rivet holes in the spring-loaded arm in the
check and drilled the other hole out to fit the non-threaded shank. I
then greased the roller and assembled it, using a lock nut to secure
it in place. (You can't tighten it into the check because the roller
wouldn't spin if you do.) Then I greased up the other roller and the
hinge joints and assembled it with the arm extended, as you do for the
other cars' door checks. There, that's $170 I don't have to spend!
OK, what I don't like about the 107 door check is getting it
into and out of the door. What a PITA. It came out with only
moderate difficulty yesterday because it was in two pieces, but
today... I had to take the check back apart and assemble it with the
arm retracted, then dismount and shift the window lift mechanism in
order to get enough room to twist the thing through the tiny maze of
access holes to get it into place. Then I had to he-man the arm back
out in order to get it into the frame hinge. However, once it was all
installed it worked well. It took longer to install the check than it
did to fix it.
Inside the door bottom I found another one of those plastic shields,
to go along with the window slider I'd already found. So much for
using this door as a pattern for the other!
I put another dab of weatherstrip glue on the torn passenger-side soft
top window seal, since it was up, and took another stab at headlight
adjustment. Some fool had managed to get some kind of plastic
material gooped into the screw heads at the top of one of the
headlights, I had to take them apart and use a propane torch to soften
it up enough to dig it out. Sheesh! I left the headlight bezels off
until I can finish the dialing-in. (And I really need to do some
paint touch-up under there too, both sides.)
...At lunch I swung by my favorite RV place to pick up a trailer light
connector for the boat, and found they've sold
out and were blowing things out at half price to empty the shelves. I
couldn't resist, and bought one of Blue
Ox's Aladdin aluminum tow bars for half price. If I don't end up
using it to toad-ify something (this car?) I could probably turn it
over without losing too much. There are no stock baseplates (the
car-side mating piece) for cars this old. I'm going to have to get
one for something else and cut it up to make one if I want to make a
middle-aged MB toad.
There were several cloudbursts today. The soft top, though not in
great condition, nonetheless seems to work pretty well at shedding
water. (It is tricky to put up and down with that broken bolt.) The
rear window is intact, but is very cloudy. Really quite hard to see
out of. Coming home in the dark, the headlight aim is getting better.
I think the right low beam is still aimed out a bit, and the left high
beam is also aimed out. We'll get there!
Saturday, September 1, 2007
Didn't do much on the car today, it was a rest day. But I did manage
to finish (?) the gluing on the driver's door panel. (Not the pocket,
though.)
Sunday, September 2, 2007
The driver's door panel still wasn't quite done, so I did a little
more gluing on it. While it was drying, and I was looking for some
suitable donor plastic to repair the door pocket, I ran across a vent
knob that looked like it could be made to fit. Its hole was a bit
wide, but I cut a little piece of wood to fill in, then glued it onto
the left-hand lever. (I used weatherstrip cement, which isn't really
permanent, nor does that knob ever really need to come off for any
reason.) Flushed with success, and knowing I had a leftover knob from
the 450 SL somewhere, I rummaged around
until I found it. It was even for the other side of the car! (That's
why I had an extra, they're 'handed' and I'd once ordered the wrong
one.) In place, they look good.
I also dug out the extra broken and rust-covered 107 hinge cover that
I'd found under the seat of the 450 SL, which I cleaned off and
glued (using gap-filling cyanoacrylate glue). It isn't good enough
ever to be used on one of the nice 560 SL's, not that either
needs it, but it's plenty good enough for this car, for now. It
installed nicely on the passenger side of the car, and in spite of its
ratty condition really helps improve the door-open view. (Most of the
hinge covers are still missing, but those top covers are the most
prominent.)
I pulled the passenger-side door pocket off its panel to use as a
model. The door panel looks good, I shouldn't need to do anything.
The pocket is cracked, but not shattered like the other one. A single
Shoe Goo session should do for it. (Both pockets need some
weatherstrip cementing to reattach the skins along the tops.) I
cleaned the break area with acetone, cut two more stiffening strips
for the ribs, and glued it back together. (I didn't use a backing
metal plate for the pocket itself this time.) While it was setting up
I scrounged up a chunk of black ABS plastic to stand in for the
missing chunk and roughly trimmed one end of it to fit the broken
edge. Then I Shoe-Gooed it into place. When it dries I'll trim the
other end to size, and probably fill in one more small chunk before
calling the structural repairs good.
...Later in the day I did some more reconstruction work on the
pocket's corner. A trimming and one more Shoe-Gooing should mean it's
ready for vinyl gluing.
Monday, September 3, 2007
I did some weatherstrip gluing on the RH door pocket, I repaired the
torn upper lip area and started gluing it back to the plastic. On the
LH pocket I glued down one corner of the covering too. It will take a
few sessions, I don't have enough clamps to do it all at once, nor
does it seem like a good idea to try.
I pulled the driver's door handle off in order to adjust it as it
wouldn't lock and unlock the central locking properly. The paint
under the handle was weird, it had slumped off the body of the car
into a ripple that broke off when the handle came off. It's like the
original paint didn't stick to the primer, and was free to shift
around a bit while it was still soft. (And perhaps that's exactly
what has happened.)
Anyway, I got sidetracked a bit and did a bunch of touch-up painting
since I had to treat under the door handle anyway. I took off the
rust over the front headlight bucket with the Dremel and painted over
that, and dotted over any other paint chips I could find in the
under-light area. There were missing screws in the over-lamp trim on
one side, that took a bit of time to deal with. I also did some
miscellaneous touch-up in the door frame area, and along one edge of
the trunk lid.
Back at the door, the operating 'ear' on the handle didn't seem overly
worn, so I pulled the latch and squeezed the steel of the lock's
mating channel together a little closer and put it back. (That
results in a little more lock travel for any given key travel.) With
the handle reinstalled the door would then lock and unlock fully with
the key.
I had some thought of us all taking this car out today so I thought
I'd dig out one of the Kangol lap belts to put in this car for tethering
Daniel's seat in the back. Not! I don't have another Kangol
lap belt. All this time I thought I had a full set on the shelf, but
all I had left was the fronts. I'm going to have to go back to the
yard to see what's left there, I guess.
...Out today (family in two cars) the door still was hesitant, once,
to open from the exterior handle. Will try lubing it first, it
doesn't seem like there's an adjustment problem. Had a pleasant
little drive over to Cd'A today on the back roads.
Tuesday, September 4, 2007
Daniel's first day of school. (Kindergarten.) Unfortunately it's
going to fall to me to take him in the mornings and he has to be at
'work' much earlier than I do, which means that my morning car time is
going to be substantially impacted. I'm not too happy about that, but
I am happy that he's going to a good school. I may have reduced time
in the mornings, but that's not the same as no time!
For starters I glued down another section of door pocket skin. One or
two more sessions for this pocket, then it's on to the other one.
I put the passenger-side door central locking slider back together.
I'd thought the overcentering springs were broken as this is often the
case, but they seem only to have come out of their holes. I did some
bending of the slider's metal to tighten it up where it had gotten
deformed, and then lubricated it so that it wouldn't bind and bend
again and reattached the springs. Some experimentation found how it
was supposed to be configured. Looking at a potential donor mechanism
from my parts pile was also helpful. After all this, and a
lubrication of the latch mechanism, it seems to be working correctly.
I also tightened the loose driver's-side window mechanism's mounting
bolts, and lubricated the door latch some more to see if that'll help
its intermittent stickiness.
...I noticed on the U-Pull web
site that they'd just gotten in a 108 body car, a 280 SE as it
turns out. I found that it had a complete set of Kangol (KL-2, 1968)
rear seat belts, which are my favorites for tying down child seats.
Two of them had BW-100 Roll-a-belt retractors on them. I got the
whole set of three, but one of the bolts had frozen up and I couldn't
get it out. My usual trick of using the BFH and cold chisel to cut
out the captive nut didn't work, the metal brace they used was much
too thick. I cut the stitches instead and pulled the belt out of the
bracket. It may be I'll never be able to use it for anything, but the
buckle was in nice shape and I did want that for a spare. $6
(including admission) for the belting this car needs.
On a side note, the 108's engine does indeed use an injection pump that
looks almost exactly like a diesel pump. Supposedly only the governor
(on the end) is actually different.
I found a spec. for a Motorola chip that might be usable for replacing
the entire guts of the ignition module:
| MC79076 |
Reluctance or Hall Sensor input, high energy ignition control circuit
used in 12 V battery systems; drives external Darlington used to
control coil current, internal zener for flyback protection of
external Darlington, spark advance, RPM detect, coil current dwell,
and coil current limiting.
|
From the looks of it, that chip and a relatively common Darlington
ignition transistor, plus a few discrete components will replace all
of what's there normally. I'll consider that in extremis.
...In the evening I glued down another section of door pocket skin.
Last one on this side?
Wednesday, September 5, 2007
I put the finished pocket back on the passenger door panel, then I
started gluing the skin back onto the other pocket. I found a
matching screw in the junk box for the pocket that was missing one.
I then glued the loose window glide back onto the glass in the
passenger door, I used vinyl caulking. I hope that it will stick well
enough to work, but not too well!
I selected a pair of seat belt segments from yesterday's booty and
washed them in a bucket of soapy water. The water came out filthy!
Several rinses later the water was coming out clean, the belts looked
clean, and they were nice and supple. I hung them outside to dry.
It's amazing how much dirt can get caked into a seat belt.
...And why am I doing all this part rebuilding anyway? A new door
pocket is $200. A new door panel is $250. A new door handle is $70.
That's why!
And no, the vinyl caulking didn't hold when I tried it after work.
Plan B? Will probably need to pull the glass to do that. But
first...
Sick of the persistent rattle in the driver's door, and worried about
the continually-loosening mirror, I pulled the window lift, glass, and
guides out of the door. (Pulling the window lift completely exposes
the door check, that's what I should have done on the other side.)
The secret to removing the guides is to turn them sideways first. One
of the big rivets in the window lift mechanism had a little play in
it, so I took it to the anvil and peened it tighter. That should
eliminate the rattle. Once the glass and guides were out the problem
with the mirror became evident: Some fool had put in too-short bolts,
which promptly stripped the pot metal when tightened. I re-tapped the
holes M6×1.0 (same as before) and found some longer bolts. If
they don't hold I'll get the next-larger size bolt, possibly in US
threads, and re-tap for that. (I should be able to do that without
taking it back apart, now that I know what everything looks like.)
The hidden screws that held the window channel to the mirror body were
also loose, that didn't help either. The mysterious black plastic
shield found inside the door is now obviously something that goes over
the trailing bottom edge of the glass. It looks like it just clips in
place, so that's what I did. I'm still not sure what it's for, it's
obviously a drip guide, but why?
The top lip of the door where the outside belt clips on had a lot of
paint chipping off and minor surface rust starting, and not just due
to the clips' teeth. Rather than leave this rust magnet open I
scraped it off, masked the door with tape, and used the rattle can of
touch-up paint on it. Two coats, we'll let it dry until morning.
That's when I'll start putting the door back together. The paint
shouldn't show at all once it's back together.
Thursday, September 6, 2007
I pulled the door check to grease it (since I could reach it so
easily) and found that one of the knurled brass rollers was heavily
worn and one of the tensioning springs was missing. One of the
retaining screws was also loose. Can't do much about the roller,
which looks like it has done a lot of sliding lately rather than
rolling, but I'll see if I can get a suitable spring at the hardware
store. I put it in the solvent tank and cleaned it off, then greased
it as best as I could. I also cleaned the old grease off of the
window lift and the window guide tracks.
Because of the missing spring the original plan of reassembling the
door was off. I temporarily put the mirror back on the car and put
everything away so I could drive it again. (Sans window.) The
window's mounting flange was starting to rust at one end, so I
wire-brushed it off and gave it some primer and paint. That'll only
slow it down, I doubt it'll stop it. (To do that I'd have to remove
it from the glass and do some welding as well as more involved
painting. Not gonna happen!)
I also did the last (?) gluing of the skin back onto the door pocket.
...At lunch I bought a near-perfect match for the missing spring.
$1.50.
...After work, wanting to get the window back in quickly in case of
bad weather, I reassembled the door check with its new spring. The
check had always been missing its two plastic washers at the hinge, I
was able to find one in the junk box but not a second. I made another
one out of a piece of thick plastic.
I noticed that the lips of the window opening on the door still had a
bit of surface rust, so I sanded and rattle-canned them with gray
paint. There was another chip or two in the color coat, so I cleaned
them off and rattle-canned that too. I then greased the window guides
and tried to put the window back, but that is not easy. It is very
fiddly, and the order in which you put things back matters a lot. I
had to remove the mirror from the forward window guide in order to get
things assembled in the right order, that aluminum trim strip doesn't
go back otherwise. (Memo to self: next time remove the mirror first.
It's easy to do and really eases the job.) I didn't really
reach a good stopping point by the time I ran out of light, nothing is
bolted down and the door doesn't even close fully because the trim
strip is on too far forward. I believe that I'll be able to get the
window back in before going to work tomorrow, though perhaps not the
window lift mechanism. This stuff is very time-consuming!
Friday, September 7, 2007
Bright and early I'm out there again, and as I start to put the window
back in place I realize that the chrome squared end cap on the rear
window guide is supposed to be glued to the guide, and that the glue
had failed. Nuts! I want to get this back together this morning, and
the only glue that is likely to be useful on this kind of time scale
is 5-minute epoxy. So I mixed some up, applied it, and put it under a
lamp to cure. (Otherwise I'd have probably used Shoe Goo, I'm sure it
would have done the job adequately.)
While the glue cured I went back out and put the reconstructed door
pocket back on its panel.
After that the glue had set enough that I could resume reassembling
the door. It went together straightforwardly enough, but it is very
time-consuming to get everything lined up right. There's a lot of
tucking while assembling that is required on the door seals front and
back. I was even able to get the window lift greased and back in, the
secret there is to remove the motor first and reinstall it once the
lift is inside the door. The window moves correctly now, but it is
very dirty and greasy, and it needs to be adjusted again. I ran out
of time to do this.
...The door and window work well, the rattles are gone. (Though the
refurbished door catch strap 'grunches' a bit due to the worn roller.
That's too bad, but a better repair would have been either much more
difficult, or much more expensive.) The window is smoother than
before, the new grease helped I'm sure. It just needs a window
adjustment again and it could be buttoned up. That would be nice.
Oh, and I need to test the keyless actuator first to make sure it
works. Sigh. It never ends!
I must say that on the whole the door hardware (such as the window
regulator and the check strap) in the 107 is of significantly higher
quality than the stuff found in, for example, the 123.
Saturday, September 8, 2007
Window adjustment! (And yes, I unplugged the ignition module for the
job.) I used Shoe Goo to bolster the plastic coating on the bottom
window stop that was tearing off. That should help keep it quiet and
from scratching the paint which could allow rust to start in the door.
I got the window adjusted again so that it doesn't tear up the
weatherstrip. As before, it's a loose fit and I imagine that there
will be plenty of wind leaks. Oh well.
When I lifted the soft top while making the window adjustments I
noticed a fair amount of rust getting started under the soft top cover
and on the body channel for its seal. I wire-brushed it all off and
painted over it with black paint. That should stop it, or at least
slow it down considerably. The seal was torn in one place, I used
weatherstrip cement to glue it back together.
The combined trunk/horse collar hinge was stiff, so I sprayed a bunch
of PB Blaster and oil into there. I made quite a mess, but you just
can't quite get at the hinge. It's now looser than it was, but not
yet what it should be.
Rust! I pulled up the trunk seal above the left taillight and found
that the channel was holed. I pulled the taillight and the interior
trim and hit everything with a wire brush. The corner above the light
is rotted away, the rest was only surface rust. I painted the surface
rusted areas, including the cover for the vacuum trunk lock. They'll
all be fine, but what to do about the missing metal... I really
should weld it up, but that's not a small job! And it is a bit risky,
too. Let us not mention that the welder is trapped inside the garage
right now, I'm not sure the cables could reach far enough to do the
job.
Contemplating the welding-ness of it all, I pulled the other taillight
and found a bit of rust starting there too, but nothing too bad yet.
I wire-brushed it off and painted over it. I had to remove the chrome
trim strip that the trunk knob pokes through in order to finish
brushing off the rust on the bad side. (And to do that
requires that the trunk latch be removed. Everything cascades, it
seems.)
Since I was in the area I removed the broken battery cover strap and
welded it back together. At least that was easy! I think I can do
some welding to restore the holed channel to watertightness. I'll
probably not attempt to do more on the inside where the material is
eaten away. I don't think it is significant, except cosmetically.
I freed up my afternoon, backed the car up to the garage, and had at
it! I welded some narrow strips of heavy-gauge sheet metal over the
holes, and then ground them to more-or-less conform to the profile it
should have. (On the outside, at least.) Weld and grind, weld and
grind. Repeat until done. It took a couple of hours to put back what
was at most a couple of square inches of metal. Water-soaked towels
draped over the entire area contained the welding spatter, and kept
the heat from getting into the paint at the trunk opening. I did a
lot of scraping and poking around to ensure there weren't additional
holes coming through. I found a couple, in fact, which I welded over
and ground down. I then painted the outside with black spray paint.
I scraped out the rust flakes that were 'inside' using my finger,
compressed air, and a magnet. I then saturated this inside area with
the spray paint, shooting into the wall interior through the holes
that shouldn't be there. I hope this will cut down on the rust's
progress.
After a late lunch I put a color coat on the outside where it needed
it and reassembled everything. That took a long time. I glued the
trunk seal back in place with a bead of weatherstrip cement. I
replaced a couple of dead lamps while I was there and patched the
reverse lamp lens that had a piece out of it. What I did was to take
a ruined taillight assembly and knock out a few chunks of the clear,
which I then ground roughly to shape and glued in place with
cyanoacrylate glue. I then ground the bottom edge flat and potted it
in Shoe Goo where it meets the gasket. While it's very obvious that
this has been patched, if you're not looking for it you might not see
it. The damage was in the lower inside corner, and was not large,
about 2×0.5 inch.
Sunday, September 9, 2007
I removed the passenger-side window. I only had to remove the rear
guide and the inner brush strip. I also had to pry up the rear end of
the outside trim strip a bit in order to release the door seal at the
top. The glass can then be teased rearwards out of the exposed access
hole. Having done this I figured out what went wrong with the other
door: the too-short Allen bolts that were in the mirror were supposed
to be on the rear channel. I went around to the other side and
corrected the situation. At least I still knew where those two Allen
bolts were!
The rear of the metal channel clamped over the window was rusting on
this side too, so I did the same brushing and painting trick to it.
With luck it'll slow things down.
I then cleaned off the glass where the glide had fallen off and cut a
piece of inner tube to serve in place of the decomposed fabric that
had helped wedge the glass into the slider. The slider couldn't be
forced over the rubber onto the glass without an excessive amount of
force, I was afraid of breaking the window. I lubed the rubber with
Xylene and put it in place on the glass and forced the slider over it.
It slipped right on with only moderate force, and once the Xylene had
evaporated the slider was attached solidly to the glass. I expect it
to hold for a long time. I trimmed off the excess rubber, then
cleaned the sliders and rails with solvent and lubed them with grease.
I also smeared some more grease on the window lift's moving parts.
The window went back into the door almost as easily as it came out.
Getting it adjusted took a bit of work, but eventually I got it set
more-or-less right. I couldn't adjust the up/down travel too
accurately because of the broken pivot bolt in the soft top, but I
think I got it close. (You can't run the window all the way up when
the soft top is up, because the center of the top rail sags down.)
The rest was just buttoning it back up. On the whole, it went a lot
faster than the other side. Experience counts! I did a bit of
touch-up painting while I was there. Naturally. That funny bit of
plastic drip channel didn't really want to go on like it did on the
other side, I suppose it'll fall off by itself pretty quickly. Oh
well.
The peeling-apart molding over the passenger sunvisor was dealt with
by putting Shoe Goo into the split and clamping it back in place. We
had to drive off before the glue had fully set, so I took off the clamp
and replaced it with duct tape.
Monday, September 10, 2007
I had a few minutes today while the oil was sucking out of Jill's 560 SL, so I decided to tackle adding the rear
Kangol seat belt. The rear deck is held down with spring clips, when
I pulled it up I found that there was a bit of surface rust starting
on the seat pocket bottoms where water could puddle. The clips were
also getting a bit rusty, they didn't want to release. I vacuumed,
wire-brushed the rust, vacuumed again, and rattle-canned the rusted
spots. The gray paint I used actually matches pretty well, it's not
easy to tell I was there. I greased the spring clips too.
The plastic plugs for the bolt holes unscrewed easily, and the two
belt segments bolted down with no trouble. I put a dab of oil on the
bolt threads first. The deck snapped back down easily, the belts
sneak up nicely along the back wall. I wound up the Roll-a-belt and
put it on the hook end.
I even found $0.25 during the procedure!
...I (re-)filled up for the first time today, it got exactly
16 MPG. Not great, but not awful either. About
normal for these, based on my recollection of a sample of one! At
lunch I stopped at Harbor Freight and bought a cheap Pitman arm
puller, I'm hoping I can adapt it to press out the broken-off soft top
bow pivot bolt head. (I have no idea if this will even come close to
working.)
It's been three weeks since I charged the AC and it's still working.
Though warm today it's cooled off enough, however, that you no longer
want AC. Mostly.
Tuesday, September 11, 2007
I'm getting real tired of the door panels being off, as a result the
car looks pretty crappy inside and my wife isn't all that interested
in riding in it that way. (My five-year-old son doesn't much care.)
They've been off for more than two weeks and the only thing keeping
them off now is the missing door lock knob. It looks like another
knob assembly will run at least $70, which is pretty steep just to get
another 50-cent piece of plastic, I think it's time to start
fabricating.
I went to the car and liberated the good locking handle to serve as a
pattern. I then got out a scrap of thick-wall 3" muffler pipe and
cut out a strip, longer and wider than necessary, to become the finger
pull. The material is thinner than the plastic, but it's a lot
stronger! The curve of the pipe gives an approximation of the shaped
plastic finger pull. I got a piece of thick strapping, extra long,
and welded it to the inside of the pull to make the lever part. It
made a nice big T. The strap wasn't quite thick enough so I ran a
bead across one side for the length of the lever-to-be then ground it
flat(-ish). The extra length of strap makes a nice handle for use
while working on the piece. I drilled the two holes in the lever,
then started grinding away the excess strap to shape the lever. Once
that was approximately right I started shaping the finger pull,
grinding off the excess, etc. I went slow, and held it up often to
compare with the pattern by eye. Once it was the right size I started
shaping the edges and taking off the sharp and rough patches. When
'done' I cut off the excess strap and smoothed the back end of the
lever. The final result wasn't an exact match to the original, the
finger pull ended up a little bit short, but I believe it is good
enough. I'm actually quite pleased.
I then went to the car and liberated the bad locking handle to see if
the new one fit. I needed to do a bit more grinding on the lever part
to get it to fit into the handle assembly and have the correct range
of motion, I also made sure the finger pull fit through the trim
piece. I then painted it with primer and black paint; I used the shop
oven at 200 °F to speed drying. Putting the roll pin back I
managed to drop the whole thing into the dirt, so I had to wipe it off
and paint it again.
I then put the handles back into the car. Finally! It looks good,
and works great.
All that's left is to put the doors back together. They need new
plastic moisture barriers. Oh, and I also need to test the keyless
actuator to make sure it's OK. However, there's no time left to do
any of that this morning.
Wednesday, September 12, 2007
Gonna get those doors done, baby! First I need to make moisture
barriers. I got one of the empty salt bags that I've used before, and
found that the 107 doors are too long for this to work. I couldn't
find the roll of plastic sheeting I'd bought for this purpose, but I
did find a plastic dropcloth I'd used to contain brick dust during the
fireplace insert install, and there were still some large undamaged
areas. I got out the 3M spray 77 glue and sprayed the interior of the
passenger door, I then draped the plastic sheet over the door and
started sticking it down. When it was taut I used scissors to cut out
around the door. (That worked well enough that I did the other door
just the same way.) I retrieved the door panel from the garage, dug
the mounting hardware out of the trunk, and put the door back
together. I had to get four replacement plastic panel clips from the
junk pile. One of the little chrome trim screws was gone, so I used
one from the 126 junkyard raid. Though not exactly the same it worked
well enough as a replacement.
The door looks good, works well, shuts solidly with no rattles, and
has a lock knob that both looks good and works. Success!
I went to finish the other side, but first I wanted to test the
keyless door lock solenoid. I used the new Harbor Freight multimeter
I bought yesterday to keep in this car, $2.88, and found that the
solenoid has no continuity. When power is applied, either polarity,
nothing happens. Oh well! I can fix this later if I wish to install
keyless entry.
I put the driver's door back together. I had to replace five of the
plastic panel clips on this side. I used a chrome armrest trim piece
from a 123 to substitute for the missing one, it isn't exactly right
but it looks pretty good. The riveted hole for the rear chrome door
jamb trim piece had been drilled out so the correct small screw didn't
fit anymore. I suppose I should weld it over and re-drill, but I think
I'll wait on that! The screw is just sitting in that hole right now. I
had to use four more of the 126 trim screws on this side.
This door also looks good, works well, and shuts solidly with no
rattles. More success! Both doors now shut like they ought to, with
that nice solid Mercedes 'thunk'.
...After work, given that I need to do some other things in the
mornings for awhile, I tackled the front grille. I pulled it off and
found a bit of rust starting against the hood, so I brushed that off
and rattle-canned it with the color paint. The car looks pretty sad
without the grille on it, I'm hoping to get it back on before I have
to drive it to work tomorrow.
The plastic finned grille had a chunk off one end of a fin, which I
had found inside the fender, and a half-out chunk from the inside of
the big front star. I removed these from the chrome surround, cleaned
them off, and used cyanoacrylate glue to tack them back together. I
used Shoe Goo to back the repairs up, this is applied where it won't
show and is responsible for the strength of the repair. I cut some
chunks of scrap gray Mercedes grille material to serve as backing
pieces. Acetone was used to clean everything before gluing.
The chromed grille surround was getting some visible rust starting on
its inner surfaces, so I put it in a bucket to try the electric
rust-removal trick. We'll see how it goes, it takes time to
operate. I'm not sure how it will interact with the chrome. As of
course I can't paint the result I may try some clear spray to protect
the reclaimed spots from moisture and air. I checked the bucket after
an hour or so and preliminary results are good: the water's getting
nasty looking, the orange rust is gone from the metal and has been
replaced by black, and the chrome appears unaffected. I rearranged
the sacrificial anode to 'see' more of the rust and resumed the
process. We'll let it run overnight.
Thursday, September 13, 2007
Of course, if it's still dark outside I can't do those other tasks, so
if I'm up at 4AM I can justify working on the car,
right? Time to check the Bucket-O-Death.
It's done a fine job on the part that fit
into the bucket. But the grille is large and looks like it needs about
four treatments. The other end can go into the bucket and won't need
long to treat, but there is some rust inside along the top and bottom.
I think I can just lay the grille on its face and fill the channels with
electrolyte and suspend sacrificial anode wire in them. We'll see. I
put the other end of the grille into the bucket for now, we'll deal with
the middle parts later.
I put some metallic gray paint on the glued cracks in the plastic
grille pieces. That disguises them a bit.
Still dark outside. I went to the car and tested the kickdown
solenoid (using the handy new Harbor Freight meter), which can be
diagnosed from the (still-exposed) fuel pump relay socket. When
actuated it measures about 15 Ω from pin 87k
to 31 and infinity when not actuated, which sounds about right, and
when the meter is connected on the 10 A scale between pins 87k
and 30 it records 870 mA when actuated and you can hear a quiet
'click' from the transmission. If the fuel pump relay is enabling the
87k output and the kickdown switch isn't working there's nothing to
blame except the transmission itself. (The handy new cheap meter is
very slow to react, unlike the decidedly not-cheap Fluke that I
usually use.)
So I got some phone wire and lassoed pins 31 and 87k of the fuel pump
relay and plugged it back in. I hooked the voltmeter to the wires and
started the car. There was power, and when I poked the kickdown
switch with my toe I could see the voltage drop a few hundred
millivolts indicating that the solenoid was drawing current. Well, if
it's not doing what I expect (forcing a downshift from 2–1 when
I poke the switch with my toe) either the tranny is ill or it's not
supposed to do that. (This trick does work on everything
else I've tried it on, but MB has incorporated a lot of minor
variations into their various transmissions.) I'll test it again on
the road this morning, but most likely I'm done with this.
Oh look, it's light. Time to do something else.
...After work on the way home I tried out the kickdown switch.
It does work, in that when driving along up a gentle hill at
about 38 MPH in fourth gear I can poke the switch with my toe and
get it to switch to third. Let up and it switches back to fourth, etc.
But it doesn't seem to want to force a second-to-first shift like
everything else I've tried, including our 560 SL's.
At home I checked the grille, and the other side cleaned up nicely. I
then laid it on its face on the floor and propped it up so one side was
level then filled the trough with electrolyte. I clamped a wire to
two pieces of wood down in the trough and hooked it up. Done this way
it'll take four sessions to clean it out, I can't get the trough full
enough to span the rust end-to-end.
...After three hours in the soup I decided that it'd been long enough
to do some good on the one side, so I rocked it to the other and moved
the wire. The other side will get the treatment overnight.
I found an interesting link involving slipping shifts for these
transmissions:
Here In case the link disappears, here is the text:
Mercedes Benz 380SL Transmission Slip

Q. I have a 1983 Mercedes Benz 380SL.  V-8 and automatic transmission
   and 107,000 miles.  The original transmission was rebuilt due to a
   3–4 slip.  This occurred when it was cold and as the day went on,
   the slip went away.  But when cold, it was very pronounced.  After
   the rebuild, things were the same.  The modulator was changed and
   adjusted.  Now the shifts were too hard and slippage was still
   there when cold.

   I went to another shop and they did not want to use the old
   transmission so we purchased a used transmission with 80,000 miles.
   This one had slippage in 2–3 range.  The supplier sent a third one
   and still have 2–3 slip, but only when it heats up.  When cold, all
   shifts are fine.  When heated up, 2–3 slip is very pronounce, about
   500–700 RPM slip.

   When I really get on the car and wind out the shifts, all are fine.
   Under normal driving, all shifts are perfect except 2–3.  How can
   three transmissions continue with problems?  What interfaces with
   the transmission and engine that may be causing this?  HELP!!!

   Bob

A. There is a Technical Service Bulletin issued for this problem.
   Your transmission shop can easily check and repair it.

BULLETIN No.: 268
DATE: 1995
TRANSMISSION: 722.3, .4, .5
SUBJECT: Slipping or Soft Shifts
APPLICATION: Mercedes Benz, Porsche

Slipping or Soft Shifts

If a test of modulator pressure shows zero pressure at an idle in
drive, try adjusting the modulator. If there is still no pressure, it
may be due to excessive clearance between the end of the modulator and
the modulator valve assembly.

To inspect for this condition, remove the modulator. Start the engine
and press in on the modulator valve assembly (Figure One). If there is
now pressure showing on the pressure gauge, make a shim and install it
into the modulator valve (Figure Two).

Inspect the assembly to make certain that all clearance has been
removed.  With the shim installed in the modulator valve, reattach the
modulator to the case.  Remove the valve body and carefully push the
modulator valve assembly against the modulator.  Make certain that you
use the exact location as shown in Figure Three.  There should be no
clearance and zero preload.
Friday, September 14, 2007
I moved the wire to the other trough. I used WD-40 on the one just
cleared up to try to keep it from rusting again until it can be
coated. (I'll need to re-treat one side that's got an orange skim
back on it.)
...I came home at lunch, bringing home the new
generator and a swamp cooler in the back of the
truck, and put the re-rusting end back into the bucket. I took
the convertible back to work, and I installed the junkyard fuel-pump
relay in to test it and see if it helps the starting. (It worked, no
change.)
I have noticed that the smog pump doesn't run at idle, perhaps it
is not supposed to?
...After seeing Seussical with the family this evening I
was coming home in the dark. The right low headlight is still aimed
down and out, as is the left high headlight. I really need to take a
screwdriver out at night sometime and finish this.
Saturday, September 15, 2007
I pulled the grille out of the bucket and cleaned it off, then used
brake cleaner to rinse off the oily protectant and set it aside to dry
before painting/coating. I also took another stab at headlight
adjustment.
Once the grille had dried, I masked the chrome parts and then
rattle-canned gray primer on the inside, then gray metallic paint.
After that had dried I sprayed clear enamel over the corroded (but now
rust-free) shiny exterior parts and put the grille back together and
onto the car. It looks good! The grille rib repair was weak and it
cracked during reassembly, so I put a little Shoe Goo on top of the
joint too, towards the back where it won't show much.
While I was there at the front of the car it is obvious the AC system
is leaking. There's oil all over the receiver/drier, and when I
looked closely I could see little bubbles coming from the center of
the safety plug that's screwed into it. More to do there!
In the evening we took this car to our event, and I tweaked the
low-beam headlights again. Still probably not done.
Sunday, September 16, 2007
Cosmetically speaking the car's getting a bit on the done side. The
missing shift console cover is probably the worst-looking thing
remaining. My wife certainly didn't like it, so I guess it's about
time to tackle that.
I sanded the wood surround and then hit it with paint stripper. That
peeled off whatever nasty non-factory finish had been slopped over the
top, leaving the smooth original factory finish wherever it hadn't
started chipping off. I cleaned it, sanded it lightly, and set it
aside to dry. I then found a ruined bolt of about the right diameter
and ground it into a smooth bullet shape. I glued (Shoe Goo,
naturally!) this in place of the broken-off plastic retaining pin.
This evening I enlisted Jill's help to put the lid on, the weather's
turning. (Yesterday was magnificent but today was iffy, much colder
and windier. Rain is predicted over the next few days.) It went
easier this time, we're getting used to the trick twist required to
get all the pegs in the holes. (Something's tweaked.) I checked the
windows and they seem to be aligned correctly. Good.
The console wood was dry, so I sprayed on a coat of clear enamel.
Shines right up!
Monday, September 17, 2007
I put too much enamel on yesterday, it was bumpy. I sanded it back
down and put on a very light mist, then put it in the oven to avoid
dust and to dry. (I preheated it a bit to take the chill off.)
...After work I put on a couple more light coats, same procedure.
Tuesday, September 18, 2007
The panel was dry, and looks good enough. (Far from perfect, but
better than it was.) I trial-fit it in the car and it was good, the
new locating pin worked. I then cleaned out the holes for the
switches, mixed up some 5-minute epoxy, and glued a small automotive
relay next to the flasher switch. (I didn't want to wait for Shoe
Goo, my preferred glue for such projects, to dry.) I made wire lassos
for the L & R flasher switch terminals and put spade lugs on the
other ends to mate to the relay. (Refer to this and its matching photograph for a similar installation.
[The wires are shown going to the wrong switch terminals, the correct
two are on the end closest to the camera.]) While the epoxy was
setting up I put a little black paint on the steel 'bullet' I'd made
as a new locating pin; I didn't want it to rust and lock the panel in
place. I put the panel under a heat lamp to cure.
Once it was done I installed it into the car. It went smoothly, and
the extra clacker even worked. I used a drill to re-open the
hogged-out ashtray retention screw holes that I'd filled with Shoe Goo
much earlier. The ashtray frame then tightened down properly. Looks
good! It rained last night so I even washed the car and squeegeed off
the glass. I checked the trunk and it didn't seem wet, though because
of all the junk in it I wasn't able to dig down to the bottoms of
things to be absolutely sure.
It was kind of chilly this morning, and the car really didn't want to
start. It kept dying until I manually held it at high idle for a
short while. I know the cold-start valve works, the problem is
probably the warm-up regulator, the timing, or a vacuum leak. (Things
I haven't tested yet.)
On the way to work there was water dripping down onto the console
wood. Gee, I wonder how that got water-damaged in the first place?
Obviously the front hardtop seal is sub-optimal, I'm going to have to
deal with that.
...After work we were driving home a bit late and I got to use the
headlights again. I decided the left high beam was still pointed a
bit outwards, so I cranked it in some more after we got home. Someday
I'll get there!
Wednesday, September 19, 2007
I tested the rear window defogger and it's shorted, it pegged the
battery charger needle (15 A) when I powered it as a test. I
measured its resistance at about 0.1 Ω.
(The glass was fogged this morning, I was going to test the grid to
see if it all worked.) The glass itself can't short, so it's possibly
repairable if I take the trim off and find the short. (It's not the
plug end, I checked that.) I'll have to get the lid off again before
I can really chase that.
Sunday, September 23, 2007
Since Jill was away this morning I used her hardtop hoist to lift the
top back off the car so I could work on it. The hoist makes working
on the top easy, you can raise and lower it for access to screws, etc.
I took off the interior trim to see if I could expose the wires to the
glass, and found that you can't. What I did find was that the glass
was mis-installed! The entire top edge was not sealed, and there was
up to 1/8" of air gap. The glass was installed too low in the
opening. Either that or it shifted down over time, but it looks to me
like it never was in the right place. The top seal material is pretty
virginal, and there doesn't seem to be any butyl stuck to the top edge
of the glass.
I pulled the exterior trim and started trying to work the glass loose
using the heat gun, a putty knife, and wooden wedges. I need to
remove the glass, clean up the butyl seal material as best I can,
repair the defroster wiring, and reinstall everything correctly. Big
job! Before I had to break for breakfast I was able to get one side
edge freed. (If I next do the other edge I should then be able to
lever the glass off the bottom edge. Carefully!)
After breakfast I finished removing the glass. It wasn't all that
hard, just heat the outside of the glass with the heat gun where the
butyl made contact, evenly. After a couple of minutes of heating the
putty knife could be forced between the glass and the butyl, from the
inside. Once enough was released the glass could be gently pried from
its place and wooden wedges slipped in. Repeat until done.
Once the glass was completely loose I could pull the cable through the
hardtop enough to expose the wiring. The wires that are soldered to
the glass's contacts are bare, the fool that had installed it last
time didn't use sufficient electrical tape to keep them from touching.
(Both wires come off the lower right-hand corner of the glass and were
twisted against each other.) With the short cured I was able to hook
up the battery charger and measure 4.3 A of current. That may or
may not be the full amount, but it's certainly enough to indicate that
at least some of the glass will clear.
While the glass was out I could easily reach the surface rust that was
starting in the corners beneath the molding, presumably due to water
leaking in past the glass. It wasn't bad, I scraped and wiped it off,
then brush-painted black over it.
I then used Xylene on a rag to clean and soften the butyl rubber a
bit, then used the heat gun to warm things up. I then pressed the
glass back into place, pulling the cable back into the channel in the
hardtop as I went. I pressed down and used heat all around the glass,
but it didn't really seem to seal all that well. We may end up using
a little RTV on it later, we'll see. I then put all the trim back,
inside and outside. I greased up the turn locks since they were very
stiff.
Flush with success I then tackled the soft top. With the top halfway
up I was able to flex the soft top mechanism sufficiently to gain
access to the broken-off end of the bolt by bringing it forward past
the vertical weatherstrip. That put a lot of stress on the bows, but
nothing broke. I got out the Harbor Freight Pittman arm puller I'd
bought earlier and cut a chunk of 3/4" square steel to span across
its opening, making a miniature machine press. I then got a socket that
fit over the bolt head, center-punched the broken off bolt so the
point of the press's screw wouldn't slip out of place, assembled the
puller, bar, and socket over the broken bolt, sluiced it with Kroil,
and cranked the screw down on the center of the broken-off bolt,
pushing it into the hollow of the socket. CRACK! The rust let loose
and I was able to push the bolt out a little bit. I had to take it
back apart and find a small nut to use as a spacer in order to push
some more as the puller's bolt wouldn't fit into the bolt hole in the
arm. With that in there I was able to push the broken bolt head out
all the way. Hallelujah! (No way that thing would have come out any
other way. I could have ground off the head and drilled out the
remains, but that would have been very difficult to do without messing
something up.)
I was worried that the thread end lodged in the other arm was going to
be jammed, but when I was messing with it it just screwed out with my
fingers. More good luck (and Kroil). I looked around for a suitable
bolt to hold things together temporarily, but didn't have any luck. A
proper new bolt is available, but is $10 and I'd have to order it, and
wait for it. (That had been part of the plan, but so was finding a
temporary bolt.) I wonder...
I used the wire brush to clean off the rusted shoulder of the head
end. I got out the drill set and found that an "X" drill size was
just about perfect to ream out the hole in the arm. With everything
cleaned and reamed the head went smoothly back into the arm. I then
ground off the threaded end of the broken bolt at a 'V' angle and
welded the threaded shank back onto the head. The grinder and the
cutoff saw (used as a narrow grinder) were used to put the rough
profile back onto the shoulder and neck areas, then I used the
M8×1 die to repair the threads. I greased the bolt and put it
back. (This was working out nicely.) The soft top then operated
properly and didn't hang up anymore. I tightened down the tension
wire with the nut on the back of the repaired bolt. After that the
soft top could be put up and down normally. The right side now was
flat across the top of the window opening, no more drooping center,
and the tension wire was taut so that the canvas over the window
wouldn't flap. Even better!
Hey, I just saved $10! (Way more than that, since nobody else would
probably attempt to repair the bow mechanism.)
In celebration my son and I went out for ice cream. In the
convertible. While it had been beautiful all day it was getting cold
and windy, and there were threatening rain clouds. We went anyway.
It sprinkled a bit, but we had the windows up and I had borrowed
Jill's rear windscreen, so it was actually quite nice. When we got
back I put the hardtop back on. I did some touch-up painting on the
chips along the leading edge and re-adjusted the rear turn locks that
I had removed. Cleaned, greased, and adjusted, they worked a lot
better than before.
Monday, September 24, 2007
It was another dewy morning, so I got out the battery charger and
plugged the rear window into it.
As suspected it doesn't all work, less than half seems to be clearing.
However, if I can't have it all what does work is not badly distributed;
there are big 3" and 4" swaths right down the middle that work,
and that's where you most need it. Of the rest, most of it is on the
passenger's side which is where you need it more than on the driver's
side.
The steering wheel squeaks as you turn it, there's a lip on the back
that sticks out and rubs on the face of the dash. It's very irritating,
and has worn a big stripe into the dash material. (Not a problem, as
it's hidden behind the wheel.) I took off the steering wheel and used
the grinder to shave down the plastic where it protruded. Plastic dust
got everywhere, but it cleaned up all right. I then put the wheel back.
We'll see if that takes care of the problem.
On the way to work the squeak was entirely gone. Good.
...Band started again today so I was (finally!) out after dark, and
this time I had a screwdriver. On the way home I stopped and did a
final dialing in of the headlights. The rest of the way home the lights
seemed nearly perfect. No hot spots, no lit trees, no wonky
off-and-up-to-the-side. Just a nice even lighting field, in front of
the car. I think I can finally reinstall the light bezels.
Also on the way home, after a nice long freeway drive, the 3–4
shifts were very smooth. They're often a bit rough when driving to
and from work. It may be that it needs 'running out', or it may be
that there's a thermal switch (usually responsible for softening cold
shifts) that isn't right. Anyway, it was shifting perfectly once I
got off the freeway.
The temperature regulation of the ACC is not really very good. Always
overshooting and ending up too hot or too cold, it seems. I wonder if
there is good airflow over the sensor? Perhaps I need to resolder the
ACC brain box? I'll have to check into that.
Tuesday, September 25, 2007
I reinstalled the light bezels. Piece of cake. I then pulled the ACC
brain. [(B) is a Bosch logo, (M) is a mercedes logo.]
BOSCH
TEMPERATURREGLER
(B) 1 147 328 025
12V
made in Germany
(M) 000 822 10 03
Inside were two LM2902 quad op-amps with 1981 date codes, one 3-terminal
78L08 voltage regulator, four DU45 power transistors with heat sinks, 23
diodes, eight electrolytic capacitors, and the usual handful of
resistors and capacitors, all on a coated circuit board. I got out the
paint stripper.
With the coating stripped I resoldered the board. I took out the big
electrolytic, which had a suspect peeling-loose plastic cover, and
tested it on the bridge. It checked out OK. I put it back together,
and back into the car.
One should always check the obvious first. I'd checked the foam end of
the ACC hose and it was OK, but while lying underneath the dash putting
the ACC brain back it seemed to me that there was an awful lot of hose
hanging down anyway. When I looked I found that the other end
had fallen off of its fitting, so of course there would have been
little/no airflow across the sensor. What a fool. I put it back. With
any luck I didn't damage the ACC brain by operating on it unnecessarily.
...On the way to work, and again afterwards on the way home, the ACC
temperature regulation was correct. I may have gotten there the hard
way, but get there I did.
Wednesday, September 26, 2007
At the thrift shop I found a $3 power inverter. Extruded metal case,
decent construction quality. Screw-down three-way binding posts, not
pigtails. I've thought about throwing something like this into the
trunk with a plug on it for the rear-window defroster jack like the
travel cooler has, just for fun. I have no particular identified need.
MODEL: PI 375
INPUT: 11–15 VDC
OUTPUT: 115 VAC +/– 10%
MADE IN CHINA
DATE CODE: 0213
SCHUMACHER ELECTRIC CORP.
MOUNT PROSPECT, IL 60056 USA
Originally a $50 item, clearance priced at $25, currently on eBay at
about $20 own-it-now, and has been sold at $2–5 in a regular auction.
New equivalents are $25 on sale. So I guess I paid the going rate! I
powered it up, and at first it wasn't happy. It's sensitive to
getting enough startup current, but I was eventually able to get it
powering a C7 bulb. (I don't have enough benchtop 12 V to do
much more.) It should work out well enough. No-load it draws about
500 mA at 12 V, or 180 mA at 14 V. (Now that's a
strange behavior.) Powering the C7 bulb it settled down and drew
about 1 A. It has a 40 A fuse, which is pretty stout. Fed
from the car it'll get maybe 10 A before blowing the car's fuse,
which translates to about 100 W usable output (versus 375 W
rated, 700 W 'peak' [whatever that means]). The fan's a
bit loud, but usually in a car that's irrelevant. The intent was to
support various toy chargers like for laptops, etc.
I need to dig up another defogger power connector, and complete the
modifications to the defogger relay to allow untimed operation.
Thursday, September 27, 2007
I removed the driver's seat, exposing quite a sea of crap that had
accumulated under it. Lots of wrappers, etc. I also found 52 cents, a
pair of tweezers, another hazard light switch, and the broken-off lock
handle that I had fabricated a replacement for! I wish I'd found that
earlier, I think I could probably have glued it back. (With drilling
for a metal spine to stiffen the repair.) The hazard switch is probably
a water-damaged one that got replaced.
The seat jack mechanism was filthy, full of gritty dirt and hair, but
the reason it wouldn't move was that there were a couple of empty .223
shell casings jammed under it. I removed all the crap and vacuumed it
out, then I disassembled the jack mechanism to clean it. I put it back
together with fresh grease. I oiled the lift bar's pivots too, but I
didn't remove it from the car to do a better cleaning and greasing.
I've fought that heavy spring before, and no thanks!
There was a little surface rust on the sidewall where the seat's past
up and down motion had scuffed the paint off. I scraped and wiped
that off and put on a little black paint.
The seat tracks came off with no problems, though they were full of
crud. None of the sliding feet were broken or missing, so I just
scraped out the tracks and wiped things down, then re-lubricated with
vintage Lubriplate. After that the tracks moved easily.
I ran out of time to address the seatback adjustment, but I think that
can be done while the seat is still installed. Reinstalling the seat
was awkward, getting the seat slotted onto the lift bar is always
difficult for me. With it finally on I then used the Lubriplate on the
sliding guides at the rear and reinstalled all the bolts.
The seat now works much better.
Friday, September 28, 2007
Not much time this morning, I overslept, but I was able to pull the back
off the driver's seat and found that the square drive rod had slipped
out of the inside gearbox. I detached the seat back and drove both
pivots separately, no problem. I put it partially back together with
the rod engaging both sides so the car can be driven. It's possible
that the seat back has spread a little so that the rod is a bit short.
We'll see. It's so stiff that I also want to attempt a mild lubrication
of the gearboxes. Not too good, I've found that the back tips
on its own then!
Sunday, September 30, 2007
The seat back is wider than it ought to be! The stamped metal
rail that ties the seat back sides together along the lower back broke
off. The seat back spreads under weight and the adjustment rod pops
out. I peeled back the leather from the area and draped a wet towel
around everything, clamped the sides together to take out all the slack,
used a Vise-grip C-clamp to pull the rail into place, wire-brushed the
joint, then welded the rail back to the side. I also did the other side
because it was starting to come loose. Clean metal welds so
nicely; I had the 'glue gun' experience today. "Watch out Honey, I've
been welding and you know how that makes me all manly!"
Anyway, with that stitched back together I put on a little black paint
for rust protection, lubed the adjusters, and reassembled the seat. A
little Simple Green was used to lube the seat back panel, that really
helps in putting it back. The seat works great now.
Monday, October 1, 2007
The newly-mobile seat back is much better for napping. The car is
still, of course, extremely cramped for that purpose, but when you need
to nap you need to nap! I got in an hour before band, that got rid of
the 'janglies'.
The front hardtop seal is still leaking, it drips in the rain. There
are no obvious problems that can be seen.
Tuesday, October 2, 2007
The driver's A-pillar seal leaks air, and is quite noisy. I can't run
the window up any tighter or the glass starts chewing up the top seal,
and the outer lip of the A-pillar seal. I think I can shim the A-pillar
seal with strips of inner tube rubber behind it on the inside, I've done
that before. Will try it when I can. I can pull the seal against the
glass with my fingers and it quiets substantially.
The black sweatshirt plugging the passenger's defrost vent has gotten
wet. That's not good, I hope it's just drips from the known leak on
top. The towel on the driver's side is dry. I have hopes that
inner-tube rubber shims behind the top seal will help there.
Wednesday, October 3, 2007
I cut a long strip of bicycle inner-tube rubber and tucked it behind the
inside of the driver's A-pillar seal using a putty knife. I hope this
will cure the air leaks, or at least tame them.
...No, that didn't do it. I looked closer, and it's apparent that the
window does need to go up a little further, but the top rubber
seal's outer lip may need to be shaved in order to not interfere with
the glass. More thought required!
Thursday, October 4, 2007
While fooling with the small diesel generator I
came across a transistor that might be a substitute for the Bosch '1022'
used in the dead ignition module. It's a Sanyo T2142.
A non-Darlington high-voltage high-current driver with a clamping diode.
Physically not a match at all, but electrically?
Tuesday, October 9, 2007
It looks like a Sanyo
2SD2645 might be a better match to the ignition module. Cheaper,
and more current capacity. It's used in high-end TV's, and is the next
step up from the TT2142 in Sanyo's product line guide. Still not a
physical match.
Wednesday, October 10, 2007
The local U-Pull had recently
gotten in a 115.117-10 (240D w/stickshift) and a 126.032-12 (380SE),
so I went to have a look, first dropping by the pawnshop to assemble a
small set of tools to keep in the car. (Pliers, 8, 9, 10, 13, 15,
& 17 mm wrenches, a multi-bit screwdriver with some bits and
an 8 mm socket, and a 1/4" wrench [for the screwdriver bits].
All for $7.50, not too bad.) The 115 had already been harvested of
most of the stickshift goodies, I met the Russian (?) kid who had
already gotten the tranny and was seriously thinking of converting his
dog of a 123 240D automatic to manual. (We chatted a bit about such
things, I have owned just such a dog, yet our
smaller-engined 200D stickshift car is
very drivable.) The tranny is the same, but the rest of the parts are
unlikely to fit.
None of this was relevant to my purpose there, I got the cigar
lighter and a male two-pin plug to use in making this car's rear bucket
auxiliary power adapter. I also got its push-pull rear window defroster
switch and timer, for miscellaneous fabrication purposes.
The 126 was a Euro model that had been imported. (Manual seats, no
sunroof, dual-zone manual HVAC.) It didn't have the EHA valve I was
hoping to snag, it was too early for that, nor was the ignition module
the same. (I should probably have a spare.) However it did have the
vacuum switch for adjusting headlights, so I got that and its bezel.
The headlights themselves were USDOT, and of no interest. The purple
vacuum lines from the switch were capped off, and too deeply embedded in
the car to nab in the time that I had.
Thursday, October 11, 2007
I had an old metal box, small, that I had found someplace that was the
perfect size for the tools. [Now that I think about it, it was free
at a thrift shop at Long Beach when we went there in August.] I put
all the tools in it, along with a clean shop rag (for hand cleaning
and rattle-reduction) and the little LED flashlight from the trunk.
The screwdriver handle's screw cap was all hammered in so I used Shoe
Goo to fix it. The handle only holds four bits inside, so I left the
P3 and the big flat blade loose in the box, the 8 mm socket is in
the business end of the screwdriver. It's a nice little package.
I filled up the car again today. Again, just shy of
16 MPG. Seems to be pretty repeatable, and about
right for the model. The folding solar calculator I'd procured for
the car was non-functional. I don't know what happened to it, the
display was insane and wouldn't react to the keyboard. Good thing I
had a backup or I'd have had to wait to get home to figure out the
mileage. Horrors!
Friday, October 12, 2007
I found a link to a decent-looking ignition circuit. Here.
It uses a Motorola MC3334 driving the MJ10012 transistor from the
diesel generator's regulator. If the original
ignition box isn't susceptible to repair using the 2SD2645, going this
way looks like a very viable alternative. (Again, if I shouldn't find a
spare working unit to lay in.)
I stopped at Harbor Freight and bought their on-sale 12 V liquids
pump. Toad parts for the transmission? $30. If it's not full of
toady goodness I can always use it for something, someday.
50 PSI, 240 GPH. It's not rated for continuous duty, but if
it works at all for the proposed purpose I suspect I'd be running it
at reduced power, which will help immensely with the longevity.
Sunday, October 14, 2007
I found my last piece of scrap canvas and glued it over the biggest tear
in the soft top. (On the inside, of course.) Doesn't look too bad from
the inside, but the outside needs something black put into the open
slits. Black canvas? RTV? Lots more to do in this line, but I need
more supplies first.
Keeping the "Tear Mender" fabric glue bottle in a sealed glass jar
(peaches) was a good idea. It's not that cheap, and my last bottle
dried out. When I opened the jar it reeked of ammonia, so plenty had
tried to get out of the glue but didn't get far. It worked just fine,
no sign of drying out. (It's an emulsified rubber glue that goes on
like thick milk.)
Monday, October 15, 2007
I had extreme trouble getting the car started this morning.
This car has always been hard to start, cold-blooded, but nothing as bad
as today. It was chill, and very dewy, but nothing really worse than
before. It just cranked and cranked and cranked. It fired once, but
wouldn't stay running after I let it go to idle. After that it wouldn't
start. I had to put it on the charger a bit and feed it some ether. I
did some surfing, and one possibility is that if the overvoltage
protection relay fails this can happen, so I'll check into that
tomorrow. Otherwise...
I stopped by the upholstery shop and got some more canvas. It's a
little lighter than the last stuff, but it's what they had. I forgot to
pick up a snippet of black, maybe tomorrow.
Tuesday, October 16, 2007
Raining. Hard. Good thing I flipped up the soft top last night for
some dew protection. When I awoke I went out and fastened it properly.
I then pulled the overvoltage protection relay and brought it inside for
a look-see.
(B) 89 71 24
10 M 81
(M) 126 540 47 45
12V
10A
Made in W-Germany
It's cleverly put together: the red fuse cover snaps off, then the red
fuse cover base slides out from under the prongs. That unlocks the
shell from the body and it slides right off. Inside, I found the
expected relay, a heat-sinked power Zener diode, and a resistor. There
were PCB holes for considerably more components, unstuffed. The board
didn't look bad. The solder flux was all crusty, but that's irrelevant.
I put it on the bench power supply and found that it 'popped' at
25 V. The Zener gets warm when it trips.
Anyway, I brushed it off, resoldered the joints, and burnished the pins.
It reassembled easily, and continued to work on the bench. I put it
back in the car. I don't expect anything to come of this,
unfortunately.
The car started what I would call 'normally', which is to say somewhat
reluctantly but not with extreme difficulty. Didn't want to idle worth
beans.
...At lunch I picked up a square of black canvas. I also cut a piece of
the beige canvas to cover the other big tear at the back. That fabric
glue works great.
...After work, in the parking lot, I cut some more patches for the
little holes. Easy-squeezy. Good thing, too, as it had started raining
by the time I got home. (I wasn't worried about getting wet, but if it's
wet I can't glue on patches.)
One oddity was that as I pulled out of the parking lot at work I heard a
bunch of relay chatter from over by the fuse box. Could be a lot of
possibilities, perhaps I should yank any non-critical relays and see if
it goes away? If it was the fuel pump or OVP relay it could be part of
my problem.
Wednesday, October 17, 2007
From the mailing list:
Distributor cap is dirty—soggy from condensation, or the sensor that
tells the cold start valve to squirt is bad or has a bad connection?
I cleaned out and off the distributor cap, which had some small amounts
of smut in it. I used WD-40 and a clean rag, and used the Dremel wire
brush to clean up the interior contacts. No difference, it still
started evilly, requiring ether. The cold-start valve is plugged in and
I know it's functional, but I don't know if it gets told to fire.
Btw, even with ether it doesn't roar to life, it's a slow onset of
firing. Once running it's a lumpy, low idle that gradually gets better
as the car warms up. Once warm, it runs well.
I found a bolt missing (stripped) that holds down the air horn, but
plugging the hole with a big sheet metal screw made no difference to
starting or idle speed.
Spark plug wires? Often an issue when things are "dewy".
Will need to look at that. I've heard that an eyeballing in the dark
while it's running can be instructive. Should pull the plugs and have
a look at them, too. Another opinion:
When my M117 started getting hard to start, then progressed to refusing
to start—I found what I assume to be the cause to be loose intake
manifold bolts (to the head) on one side (finger loose) and ALL the
rubber seals, tubes, etc. in the intake system were rock hard and
loose. This started the rebuild of another engine with the best parts
from both that is now in the car (after 18 months of off-and-on
work/play).
And another:
An easy way to check the spark plug wires is to go out on a soggy night
and have SWMBO crank the car while you look under the hood in the dark.
A miniature lightning display says you need new plug wires. In my
experience, which is all with pre-1980 gassers, in the no start in soggy
weather conditions it has been plug wires probably 95% of the time. The
newer MB wires seem to last longer. coil ignition wires seemed to last
a max of about 5 years. The 1980-something MB gassers I have had to
deal with have had OK plug wires for the time I have had them. I think
3 years is the max so for.
I went outside after full dark (or as full dark as it gets around here),
started the engine, and popped the hood. Even though it had dried off
some and the engine was still quite warm I could see spidery violet
glows here and there, especially on the coil wire and the other wires on
that side of the engine. It's time!
Thursday, October 18, 2007
OK, so the plug wires are shot and I need to get new ones. But what can
I do today? I need to be driving this car, if at all possible.
So, I pulled the coil wire, wiped it down, and put it in the shop oven
to dry. While drying, I cleaned the dirt out of the coil cover and
put it in the oven too. Corona dope is lacquer, right? So when the
wire was warm, and presumably dry, I then dipped the wire part in a
can of lacquer, let it drip off a bit, then put it back in the oven.
After a few minutes it wasn't tacky anymore but was still flexible, so
I put it back in the car. (Bold? Perhaps, but what am I going to do,
ruin it? It's crap already.) Where it had been arcing to the valve
cover I wound electrical tape around it, then dipped that part again.
After a bit of drying, I took it back to the car, cut a length of
bicycle inner tube (mountain-bike size so as to fit over the cap end)
and slipped the wire through it. (Belt and suspenders!) The
two worst offenders from last night, #5 and #7, also got the lacquer
treatment. The bundle of spark wires (#'s 5–8) were tubed as
well. (That tube had to be slit open and tie-wrapped back together,
so I used the smaller size tube that I have more of.) The other four
spark wires were routed much better, but I still tubed them too,
through the point where they went through a plastic-lined metal
bracket on the way to the plugs. I then cut some more rubber and
draped it over the idle solenoid, as one of the wires goes close to
that. I put the valve cover back on, and cut some rubber to go
between it and any spark wiring that wasn't already well-protected.
This entire procedure added at least one extra layer of insulation
anyplace the wires were touching metal, and as many as three.
For grins I pulled plugs 1–4, and they didn't look too bad.
They could use a good cleaning, but I didn't have time this morning.
The plug sockets were all Beru, as were the cap ends that I checked.
The car started much easier than on most mornings (although it
was dry out), and it idled at a more reasonable RPM. I think I'm on to
something here! Now I just have to remember to actually replace the
wires. (Out of sight, out of mind...) Time will tell if I've really
improved the situation.
It seems reasonable to conclude that it might not have been the ether
that helped with starting those two times so much as removing the air
cleaner, which cut down on the shorting. (Ether sprayed in the snorkel
did no good, but spraying it down past the metering plate helped.)
Friday, October 19, 2007
Windy and wet this morning yet the car started relatively easily, with
only a few seconds of cranking. After work it was a bit more reluctant,
but nothing too bad.
Saturday, October 20, 2007
I cut some strips of black canvas to go into the 'gill slits' on the
passenger side of the soft top. They glued in OK, but they are still
very visible because of the glue that seeped around the edges. I will
need to hit the edges with some black paint, or perhaps a Sharpie, to
tone them down. (I still have the big patched slit in the back to
disguise, too.)
I then removed the top window molding and the sunvisors. This will, I
hope, expose where the water leak is. I suspect the passenger-side
front corner joint.
...Later in the day it was raining again. The leak is definitely
through the black butyl (sticky) rubber window glass seal all along the
top, no question. I guess it's time to break out the runny RTV window
sealant, I'm not going to pull the glass in order to replace the butyl.
To sop up the water over the console I draped the black towel over it.
That may save the switches an unnecessary shower or two.
Sunday, October 21, 2007
I removed the trim from around the windshield. Not that easy,
especially under cold, dark, and wet conditions. There was a lot of
muck and dead leaves behind the trim, especially at the bottom. Fertile
ground for rust, but I don't think it'd gotten started yet. Since the
hard part was already done I also removed the air intake grilles, the
aluminum screens need repainting. Their plastic retaining pins were all
destroyed during this operation. (Half of them were already gone, and
some sheet metal screws substituted, with new holes. I'll want to
attend to these to make sure rust can't get started.)
I then hosed out the channels to remove the glop. I'll need to wait for
dry conditions before I can use the sealer. I washed off the grilles
and put them in the oven to dry. They don't need to wait for drier
weather, at least. When dry I painted the screens black, and sprayed
the red touch-up paint upwards from below to catch the sides of the
grille slits on the aluminum cover pieces that had started to lose their
paint. This refreshed paint will help the appearance a lot.
When I moved the car to the lawn for washing it really had trouble
staying running. It started fairly easily, but once it had died it
didn't want to re-start. I think I should spring for the 'tune-up' kit,
rotor through plugs. I left it idling to recharge while I washed off
the muck.
...After church things had dried enough that I was able to wipe down and
rattle-can some black on the air intakes underneath where the screens
sit. I then wiped down the top of the windshield glass area and blew it
off/out with compressed air. (There was a definite breeze through the
seal about where the rear view mirror is located.) I put what I had of
the runny windshield sealer RTV all along the top edge of the glass to
spill over and run down the failing seal, puddling against the metal,
and I wiped a small bead on from below as well. I didn't have quite
enough RTV to do what I wanted (saturation overkill), but I think I got
it anyway. We'll see. I had a little problem with dripping on the
underside, but I believe I got it all wiped up in time.
Monday, October 22, 2007
I cut the excess RTV off the glass with a razor blade so the trim would
go back flush, and then put back the exterior trim. Painful! Even
following the official instructions it takes forever. It was cold and
dewy so the duct tape you use to hold back the rubber seal strip didn't
want to stick, that didn't help. I used sheet metal screws to secure
both air intake grilles. A small amount of touch-up paint was required
due to chipping, etc. The refreshed air intake grilles look a lot
better.
Tuesday, October 23, 2007
I finally ordered some parts! $604.69, split between Rusty and
Performance Products. Unfortunately that won't be all, there's more
to come.
It promised to be a beautiful day, so I put the top down. It was still
pretty chilly, and as I was pushing the top down into place I heard a
surprisingly loud 'POP'. Yep, one of the rear quarter windows split
completely across. Crap.
After work I stopped by the upholstery shop. They sold me a scrap of
vinyl side-curtain material for $5 (the material's priced at about $18 a
yard), it should be enough to do two or three of those windows. My
current idea is to cut out the old material leaving about a 1/4" rim,
and glue a new piece to that. Not beautiful, but it might not be too
bad, either. I guess we'll see. Or not. I do know that a tape job
really looks bad, and doesn't hold up all that long.
Thursday, October 25, 2007
Another tear has opened up in the soft-top fabric, this time on the
other side of the rear window. This poor fragile thing is not
liking all the action it's getting these days! The (stiffening) vinyl
windows are putting unbearable stress on the (weakening) cloth,
especially in the cold.
Still undecided as to the glue to try for a window patch. A fellow
lister suggested using magnets to clamp the vinyl together. Not a
bad idea!
Friday, October 26, 2007
At lunch it was fairly warm, so before I went back into work I put the
top up and glued some fabric patches over the remaining tears, including
the new one in back. I put some big patches over the worn/torn areas by
the hinges. The fabric there was getting powdery.
We got boxes of parts delivered today. Looks like the ignition parts,
and some of the parts for the 190D. I got the
vacuum pod too, but not the dash cover. The sunvisors came, they're
nice looking, and soft. I wonder how they'll hold up?
Saturday, October 27, 2007
I installed the new ignition parts. That took longer than expected,
partly because the new wires were longer than the old, partly to remove
the band-aids I'd installed before, partly because the plug wire clamp
to the passenger side was falling apart, and partly just because I'm
slow. I kept the sleeve over the coil wire, I figured that one can't
hurt.
I found a too-short bolt holding the air horn down, it stripped out the
one thread it had 'bitten', so I found a longer screw to replace it
with. (I was checking to see that it wasn't loose.)
Though cold, the car started with less than a second of cranking.
Serious improvement! During a few errands today it started a bit more
normally, that is, after a few seconds of cranking, so it's still
cold-blooded. We'll see over the next few days if its extreme starting
difficulty has been cured or not.
Sunday, October 28, 2007
Yesterday we put the hard top back on the car, mostly to get it out of
the way for my son's birthday party. (Sixth.) Today we stopped by the
furniture store and bought a sofa table. It's small, so I lashed it on
top of the car's roof, winding the twine around the top's mounting
posts. Worked well enough, the roof was protected with a blanket.
Tuesday, October 30, 2007
Apparently the dash cap came today. The box is the right size, anyway!
When to begin the install? I don't think I'm waiting for anything more
except time. The dash needs to come out to repair the defrost
mechanism, that should make the cap easier to install.
The U-Pull has a 116 there that
still has its front bumper. The front bumper end pieces, those black
rubber wraparound things, look to be the same on the 116 and 107, and
the ones in the yard are a lot nicer than this car's. I wonder if I
should go get them?
Wednesday, October 31, 2007
In keeping with the holiday it was time to do some scary stuff. I
pulled the console, which is not all that easy. It was made harder
because the radio was stuck in place. I had to pull off the side
carpets in order to get it out with the radio still in place. When I
removed the armrest (per instructions) the adjustment wheel disconnected
again, so I've got a job to do there, too.
I got some of the dash impedimenta pulled off, the A-pillar covers, the
support struts, and two of the three retaining bolts are off. I checked
the big box that came yesterday, and yes, it is the dash cap.
Since I was there, I pulled apart the old corroded flasher switch and
brushed off all the internal and external corrosion. I installed it in
place of the real switch so that I wouldn't have to disrupt the
auxiliary clacker wires, and it works fine. A spare!
I put the window switches and the ACC panel back in place so that the
car can be driven.
All this took about an hour. Somehow it seemed longer.
I next need to remove the steering wheel and instrument cluster, the
remaining bolt, and then disconnect the heating ducts and cables. Then
the dashboard should be able to be removed. I believe the car can continue
to be driven even with it out, though it will not look so good. It doesn't
look so good now!
Regarding the kickdown switch, I now believe that it does
work, but it doesn't respond instantly, nor at all at higher RPM's
when trying to force a 2–1 downshift. I'm guessing it's
supposed to be this way.
Thursday, November 1, 2007
Another session with the car got the dash out. Per the instructions,
you have to remove the HVAC mechanical connections, and lower the
steering column a bit. That was the worst part, it didn't want to
lower enough to let the dash out. I had to loosen the turn signal
switch assembly too, and it was still tight. Going back in will
be harder, no doubt.
With the dash out I then rigged the car for running again. The
instrument cluster is resting on the towel that formerly plugged the
defroster vents. (The seasoned traveler should never go anywhere
without his towel!) Ugly as sin, but it ought to work just fine.
Ah yes, the defroster vents. The ring on the flap that the actuator
hooks to is broken off. The flap pivots easily enough, I was able to
close it by hand so I won't need that towel anymore. I will have
to fabricate a new attachment for the actuator, no doubt using sheet
metal and Shoe Goo.
All this took about another hour. Somehow it seemed longer. Have I
said that lately? :-)
...Somehow during the dash removal the grounding for the instrument
cluster has gone bad. There are some very weird interactions of the
lights and gauges, especially with the turn signals. Normally I might
suspect the cluster itself, but using the turn signals causes the seat
belt light timer to cycle again. That indicates that wherever it's
picking up ground is probably the problem spot. I'll look into that,
the major ground clump on the car frame above the fuse box (G102) is
the most likely suspect.
There is a loud rattle on bumps, which turns out to be the bottom
center of the windshield glass slapping against its dead butyl seal.
I'll need to get some more of the RTV sealer to put along there. With
the dash out it can now be accessed. (It's also a heck of a lot
louder out in the open, and I think the dash itself was restricting
the glass's motion before.)
Friday, November 2, 2007
The Fluke showed that there was no good ground to the metal back of
the instrument cluster, as expected. I loosened and tightened the
G102 screws, but that didn't help. The ground pin to the cluster
seemed OK, but not great. I pulled the cluster and had a look inside,
and found nothing wrong. When I used an alligator clip to ground the
metal back of the cluster to the frame everything started working
well, so I've got some more sleuthing to do. While I was there I
glued the clock power shield back together.
Some of the rag padding that's glued to the firewall had come loose,
so I got out the contact cement and glued it back up. That neatened
the area somewhat.
...At lunch I picked up some more runny RTV. Tomorrow?
After work I filled it up, and got my worst-ever mileage:
14.4 MPG, I wonder why it's so low?
Regarding the O2-Sensor warning light, the little light in
my head finally lit. This car drives that light based on
mileage, and not feedback from the engine computer. That
explains the weird connection to the speedometer, and why the light
was stuck on, and why there was no bulb in the socket. I'd heard
about this sort of thing once upon a time, but it never occurred to me
that that was the situation here. The official servicing for this
warning is to replace the sensor, and to remove the light bulb. I
found a weird Hall-effect (?) sensor at the end of the odometer wheel
stick. That's probably it. It can probably be moved so as to turn
off the light, but what's the point? It'd just turn back on again
some random number of miles from now. Far better is to measure the
duty cycle of the sensor itself, or to check the average current at
the feedback actuator. (Which, of course, is how all modern systems
drive the light.) I'll be removing this 'problem' from the list.
Saturday, November 3, 2007
I did some more poring over the schematic (which is for a 1983 model,
and thus not entirely accurate) and came to the conclusion that
the only ground for the instrument cluster comes through the
speedometer plug, and not through the round connector that the earlier
cars use for everything. I pulled the cluster from the car and
measured, and there was no continuity between the ground pin of the
speedometer and the metal shell, so I pulled the speedometer out of
the cluster and removed its back plastic cover. And there it was: a
blown trace on the PCB going to the ground strap that contacts the
left and right side clusters. That was easily bridged with solder and
a little piece of wire.
Now that I was there I decided to have a closer look at the
O2-Sensor warning light driver output that is clearly
marked on the PCB. I powered up the speedometer and verified that it
reacted to being fed an input, my signal generator would drive it
nicely. So it's OK. The lamp output was being driven high at all
times. What was very interesting was that there was a
100 mA fuse (shaped like a small radial electrolytic capacitor)
plugged into the rear of the board, with a plastic access plug in the
shell covering it. This fuse was blown. Don't tell me...
Yes, the fuse is part of the O2-Sensor system. I replaced
the fuse with an LED/resistor pair so that I could see when it was
sinking current. When I spun the little magnet wheel on the end of
the odometer stick I could make the light go on and off. I turned it
so that the light was off and replaced the fuse with a short piece of
wire. Then the lamp output was off. (It stayed on with the LED in
place, the voltage drop was too high to turn off the light.) How
sophisticated! When enough miles had clocked by the sensor caused the
fuse to blow, which turns the lamp on, more-or-less permanently. One
could spin the little wheel to the right place and replace the fuse to
restore the system to its original state, but it seems to me it's a
hell of a lot easier to just forget the light, note the mileage, and
replace the sensor as needed. Better yet, only replace it when it
fails. I removed the wire and put the dead fuse back before
reassembling the instrument cluster.
Moving on, I cleaned the window seal off with alcohol and a clean rag,
I used a butter knife to work the cloth into the gap. I then used the
runny RTV on the bottom edge, and worked some up the sides too for
good measure. I made sure to push up on the glass to let a good bead
get down into there, and I ran my finger down the bead to spread the
excess over the entire butyl seal down to the metal frame. That used
up most of a new tube of the stuff.
Sunday, November 4, 2007
I ground off the rivet that held the arm onto the dead vacuum pod as
the new pod didn't come with an arm. I then found a suitable screw
and attached the arm to the new pod. (For fun I opened up the old
pod, and it was in really bad shape: there were many cracks in both
diaphragms.) I then got a piece of sheet metal and made a right-angle
bracket which I screwed to the defrost flap next to the broken-off
ear. I drilled a hole in the perpendicular part to line up with the
broken ear's original hole, then I Shoe-Gooed and screwed the bracket
into place. I used acetone to first clean off the plastic and the
bracket. I've been using the drill bit to keep the arm mounting hole
open, as the glue does tend to slump at first. I gave the bit a twist
now and then to keep the glue from sticking to it. I used a piece of
duct tape to keep things from falling into the defroster.
The heater box was cracking where the center vent pod attaches, this is
very common and if left unchecked can result in the pod pulling loose
from the box and thus failure of the center vent to operate. I cut a
piece of sheet metal to go over the weak area, then I scratched it up,
cleaned it (and the heater box) with acetone, then Shoe-Gooed it into
place over the cracks. With any luck this will grip strong enough to
stop further damage.
Monday, November 5, 2007
I put the new vacuum pod into the car. No speed nuts (yet), it's just
kind of hanging on with a little bit of duct tape for help. I need to
get more nuts at the hardware store, the old ones all broke during
removal of the old pod. (Nothing unusual, there.) I couldn't
remember which colored hose went to which port and the hoses had lost
their 'set', but the service manual revealed all. (Red/white goes to
the rear. I had guessed wrong, initially.)
It was icy out, I put the little space heater in the car to thaw the
glass the easy way.
...Out shopping at lunch I found an interesting piece of craft foam
sheet, thin stuff like some kids' toys (masks, etc.) are made of,
about as rigid as manilla folder material. It might be a suitable
replacement for the foam seals of the defrost vent flap that are
decomposing.
I also got some speed nuts at the hardware store and installed them in
place of the duct tape. Now that it's all hooked up it's kind of fun
to watch the vent flaps do their little dance as you drive.
...On the way home after band I kept hearing an intermittent clicking
from behind the left side of the dash. I've heard it before, but this
time it was a lot easier to track as the dash is out. There's not
much there on the left side, not when compared to the right. Turns
out that it was the keyless entry unit. It kept clicking after I shut
off the car. Alarm function? That wasn't even hooked up, so it must
have gone insane. Now it's unplugged!
Tuesday, November 6, 2007
I've been having an idea about the nighttime marker lights. (A very
cool feature that I never use, personally.) If one were to install a
green LED into each turn signal indicator space in the instrument
cluster they could be connected (with suitable dropping resistors)
between the 58L (or 58R) and K terminals of the light switch. The
correct indicator would then light when the left/right parking
function was used, but not when all parking lights were on. LED's
don't draw enough current to matter much, not when compared to the
marker lights themselves. The K switch terminal (powering the
remainder of the parking lights) serves as a virtual ground for the
LED's, and is already in the instrument cluster as the cluster
illumination source. Only two wires from the light switch would be
required, and two-pin connectors are easy enough to come by. Somehow
I doubt I'll pursue it, but it's fun to think about. (If you like
that sort of thing.) Thinking about this kind of stuff keeps me from
going out in the cold and dark to do something more useful.
Friday, November 9, 2007
The seat back recliner has been jammed again since I took off the
armrest to remove the console, so at lunch I fixed it in the parking
lot. I had to take the seat back cover off to get the rod back into
its sockets and then properly tighten the loose hinge screws that had
let it pop out in the first place. Then I could take a little nap.
(The motivation!)
Tuesday, November 13, 2007
Somebody has suggested that a Bosch 3 340 522 025, available online
from Rock Auto, is a good repair
for the oft-leaking boot on the oblong vacuum actuators. They're
$1.85 each and come in bags of 5. Nothing to do with this car (yet),
I just wanted to get it logged somewhere.
Monday, November 26, 2007
The car sat nearly a week without being driven and the morning was one
of the colder we've had, yet it started up nearly instantly, better
than any other time I can recall. Go figure!
Tuesday, November 27, 2007
Snow! We got three inches in the night, time to put this car away.
Deployed the Frankenheap instead.
Monday, December 3, 2007
The U-Pull got in another gasser 190E, so I raced down there to see if
I could get an E.H.A valve for the SL. Skunked!
It was pretty picked-over. I did get a replacement steering wheel
bolt for this car, however. (The original is badly deformed, and
required a chisel to get out.) I also got an auxiliary fuse holder
for the junk box.
Tuesday, December 11, 2007
Tonight Jill showed me a torn-up (and empty) UPS package she found in
the yard. Apparently the hardtop grab handle came yesterday or today,
and the dog found it first. The handle's probably a chew toy now,
assuming it could even be found.
Crap. This sort of behavior is getting very old.
Wednesday, December 12, 2007
Snowed in the night, obliterating any traces of where the damned dog
might have taken the handle.
Saturday, December 15, 2007
A miracle! I was burning the trash, and saw a bit of plastic bag
sticking out of the snow. Thinking it was escaped trash, I pulled on
it only to find the missing handle, completely intact. Only a tooth hole
or two in the bag. Apparently she was much more interested in chewing
on the padded mailer that it came in than the goodies inside.
We're having a party today, the 20th (or so) annual
Wicked Wodka. I moved the car off the pad to make room for guests.
It started instantly, in less than half a second of cranking. It
didn't want to run much thereafter, so it's got a choke (equivalent)
problem. Warm-up regulator?
Sunday, December 16, 2007
I was putting the car back in its usual place, and while it started
once fairly easily, after it died (per usual) I could not get
it started again. I had to crank for something like a minute with it
half-firing before it would run enough on its own. I revved it for
awhile and then put it away, let it run while I got the battery
charger out, then put it on charge. What a pain!
Tuesday, March 18, 2008
I put the car on the charger again. It didn't need much, and after a
bit I turned the key. It started within about a second of cranking.
Whatever its cold-start problem is, it's definitely intermittent. I
prepped the car for duty, it's time to stop driving the Frankenheap.
The car drove to and from work with no problems. A lot to do, though!
Wednesday, March 19, 2008
I installed the hardtop grab-handle (a.k.a. dog chew-toy). Whee.
Enough time has passed since the dog stole it that I was able to pet
the dog without feeling too much resentment.
Thursday, March 27, 2008
While crabbing sideways down the hill on the way to work today in the
two inches of snow we had on the ground I was wondering if I was
perhaps a bit hasty in pulling the plug on the snow cars? Daniel
seemed a bit concerned. This was the third significant snowstorm
since I got this car out, and more is predicted. At least (so far) it
has always melted by evening.
Friday, March 28, 2008
The ignition lock has been getting sticky, so I lubed it today. Did
all the rest of them, too.
Tonight, after work, the snow started again. Getting old!
Saturday, March 29, 2008
No reason to log anything about this car today, as there's no way I'll
be driving it in the 8" of snow that we just got!
Sunday, March 30, 2008
More snow today, am I trapped? (Only if the wife takes the truck.)
Monday, March 31, 2008
Drove car to work, had some difficulty getting out of the driveway but
eventually did. The roads themselves were perfectly passable. Stupid
snow.
Saturday, April 5, 2008
Another 2" of snow blew in this morning. Will Winter never end?
As it melted this afternoon I swept it off the car.
Thursday, April 10, 2008
A warming trend, it looks like the 24 °F overnight temperatures
are departing. Maybe I'll get to take the lid off the car soon?
Saturday, April 12, 2008
A week after our last significant snowstorm and Spring is in full
force, it hit 65 °F today, blue skies and sunny; most of the
snow is all gone. (There's still a bit in the woods and along the
driveway.) What a dramatic difference!
It was so nice that I took the lid off of Jill's
560 SL. I could use the hoist for hers, but I also wanted to
go topless today. She, however, was getting ready for a concert and
couldn't help me. That's OK. I got the top off by myself, it's not
that hard if you crouch inside under the center and then stand up.
Then you just walk very carefully out of the car while balancing it on
your head and neck. Putting the lid down on the ground without
dinging it is much harder than getting it off the car (it's so short),
but I was able to do it. I don't think one would be able to put it
back on the car this way without hurting anything, but I don't need to
do that. I don't think I'd try this on a car with nicer paint!
Sunday, April 13, 2008
It was quite warm out today, I think it hit 75 °F! Wasn't it
just a week ago we had a full-on winter snowstorm? Weird. Such
sudden heat seems to have sucked in storm weather as usual, it's not
going to be this nice again soon. Or so the talking heads on TV
proclaim. I went out after the news and put up the soft top. It's
supposed to rain tomorrow morning, I don't want to risk that it'll be
before I get up.
Monday, April 14, 2008
Good idea with the top. While it wasn't raining when I got up, it
certainly was before I got outside. (I was preoccupied with the
taxes.)
In fact it rained pretty heavily today, but the top did its job. I
had a lot of errands to do and filled up the car a fair amount doing
them. Not much like yesterday, that's for sure. A tiny bit of water
slopped onto me on a couple of corners, out of the top lock holes.
The window glass was still dry along the top edge, so this is likely
the main top seals at (not) work.
Tuesday, April 15, 2008
Fer cryin' out loud, it's snowing again! At least the top's still up.
Wednesday, April 16, 2008
A bit chilly but sunny after work, so the top came back down again.
Sunday, April 20, 2008
Snow fell yesterday and today, and tonight they predict 2–4"
of accumulation, with other bad behavior for the next week. Enough,
already! I put the hardtop back on the car. Better luck next time.
(Before putting down the soft top I brushed the dirt off with a soft
bristle bench brush. There was a lot.)
Saturday, April 26, 2008
It was a beautiful day. I washed the car, and used some rubbing
compound on the whitish scratches. They toned down nicely. The same
compound seems to do a lot for the dull blotchy areas of the paint,
I'll have to do a thorough job on the car sometime before selling it.
(If I do it sooner rather than later I can enjoy the results myself.)
Daniel actually helped, he manned the hose. I had to leave the doors
cracked afterwards to let the puddles dry. (He's pretty aggressive
around the windows, which weren't quite all the way up.)
Sunday, April 27, 2008
Another beautiful day. Today's plan to drive Jill's (topless)
SL to rendezvous for dinner fell through as the
battery was dead, so to preserve the plan I had to again remove this
car's top by myself. It's not that hard to do, really, but I wouldn't
want to on a car with really nice paint. We were late, due to the
changeover and the fact that this car was running on fumes so I had to
stop for gas too.
Tonight I noticed that the brake warning light wasn't illuminating at
all, 'cause it let me drive off with the parking brake on. (Not far,
no damage done.)
Monday, April 28, 2008
As it's nice and exposed right now I played with the brake warning
light, by twisting it a bit I got it to light up again. Bad contact.
A bit disturbing was that it began flashing intermittently on its
own after that. Low brake fluid?
Lying in bed, after a really nice day driving around with the top
down, the weather guys mentioned that it was raining already. So I
had to get up and go out to put the top up. (Hey, it is
sprinkling!) Not sure how wet it would have gotten, the rain was very
light.
Wednesday, April 30, 2008
Finally got a chance to check the brake fluid, it was low. So I
topped it off.
Jill called mid-day to tell me that it was snowing heavily at our
house, she wanted to make sure I had my top up. I looked out the
window at the sunny parking lot, and marveled at the fun weather we've
been having this year.
Thursday, May 1, 2008
A sunny morning, but cold. I might have put the top down, but it was
icy. (Not good for it to be flexed under those conditions.) Perhaps
now that it's May it'll stop snowing and freezing at night? We're
still burning firewood!
Coming home after work it was lovely, so I put the top down.
It was dry by then.
Sunday, May 4, 2008
Out at lunch today who should come over to our table, but the PO of
the car! He recognized the car parked outside. He said he'd lost my
phone number, and had found the records I wanted in a box in the
garage. I gave him my number. (I've still got his, so I should give
him a call soon if I don't hear from him.)
Tuesday, May 6, 2008
In the evening it threatened rain, so up went the top again.
Thursday, May 8, 2008
I mistakenly brushed off the soft top a few days ago using the dust
mop, and it left little yellow threads all over. Oops. I used a soft
bristle brush to get the dust off, and a ball of tape to lift off the
threads this morning.
Friday, May 9, 2008
At noon it was pretty nice, finally, so I put the top down while I ran
errands. Nice.
Saturday, May 10, 2008
At dark it started raining while we were at the neighbors having a
S'mores party. Naturally the car's top was still down, at home where
we were not. Oops. I'd tried to talk Jill into taking the
convertible, in which case I could have put the top up when it started
raining, but I wasn't about to go home to do that. It's been wet
before. Anyway, when I got home I mopped out the interior with a
towel and put the top up, and left the windows cracked so that it
could dry some. I don't think anything was harmed, the rain wasn't
really all that heavy.
Monday, May 12, 2008
Finally nice enough after work to put the top down again. I was
digging under the seat, and what should I find but the once-missing
button from the ACC panel, already replaced last
August.
Wednesday, May 28, 2008
15 PSI in the LR tire today . That is too low, I'm
going to have to keep an eye on it.
Thursday, May 29, 2008
Oil pressure's dropping on turns, it looks like it's time to check
(change!) the oil. I've been putting it off...
Friday, May 30, 2008
I changed the oil. Due to the wretched oil filter design there's
little point to using the sucker, so I jacked it up for the first
time. Since I was there it was time to check out the suspension. Not
one, but both upper ball joints are loose. Great.
Everything else looks fine upon cursory examination. I wonder how
hard/expensive those are to change out?
The oil drain plug came out easily, and is still in good shape. I
found not one, but two copper crush washers on it. Dumb. I
dug one of my OEM Knecht/Mahle filters out of storage, they come with
new washers and O-rings. I cleaned the plug off and put a new crush
washer on and put it back. Then I moved the pan over to the filter
housing and dropped that. What a mess! The housing was pretty dirty,
so I put it in the solvent tank and cleaned it out/off. (The housing
was made by Knecht too.) I pulled the bolt out and replaced its
sealing washer with a new one from the filter kit. I scraped out the
bottom of the housing, there was dirt collected in it. I then put it
all back together with the new filter and O-ring, and put in 1.5
gallons of Delo and started it. Once the pressure came up I stopped
it and lowered the car, then checked the level. I added oil until it
came up to level. The manual claims 8 liters, so 2 gallons is just
about right.
The stinking hood pad was falling down again, so I got a rubber glove
and the gallon of non-solvent contact cement I got at the liquidator's
and slathered it all over the place. What a mess! That stuff is very
runny and dries slowly, it wasn't sticking even by the time I was
ready to go to work. I just dropped the hood carefully so's not to
smear glue all over the place.
...After I dropped Daniel off at school I tried pressing the pad up
again. With the engine heat it had dried enough that it stuck this
time. Mostly.
At work I checked Rusty's prices, it looks like around $52 in parts,
and a grinder to take out the old rivets. (The new joints affix with
bolts.) The official repair is to shell out about $280 for parts
because the dealer only offers new upper control arms (with ball
joints included). Nah!
...Because of Jill's road trip today I also had to pick up Daniel
after school, and bring him back to work with me. I was nearly late,
but I wanted to drop the top as it had gotten quite nice outside and
was in fact uncomfortably warm inside with the top up. In too much of
a hurry, I neglected to manually push back that bow that has elastic
bands (shot, on this car as on so many) to pull it back, and as a
result I put too much stress on it and it started to tear loose from
the aging soft top. I'm not sure just how much damage was done, I
won't know that until I next put up the top. Chances are I can just
glue it back again. Carefully.
...After work I pushed it up again to catch the remaining loose spots.
Saturday, May 31, 2008
I had a look at the front top turn lock seals, which have been binding
up. They're obviously getting wadded up, and were starting to tear.
I pulled them out and opened up the space for them between the trim
fascia and the frame rail so they'd not be squeezed out into the
mechanism area, cut off the knots, and put them back in in a fresh
orientation. I greased the area to help alleviate the binding.
Maybe.
Later in the evening the sky looked threatening and I heard thunder,
so I put up the top. The work on the turn lock seals helped a lot.
The tearing of the bow from the canvas isn't that bad, I think it can
be ignored for now.
Tuesday, June 10, 2008
Since I'd finished up the boat trailer,
yesterday I moved the picnic canopy I'd been hiding under from the
rain over to where this car parks; I figured I'd use it for this bit
of bad weather we've been having to keep some of the rain off the soft
top, which hasn't come down yet this month. Well, rain
and snow! This morning it was 36 °F outside with a
rain and snow mix falling. I love June!
Sunday, June 15, 2008
The AC is not working again, and I'm out of secret sauce. I bought
four more 8 oz cans today, they're still $5 each.
Monday, June 16, 2008
At lunch I came home and recharged the AC. It was nice and warm out,
80 °F. (Less than a week ago it was snowing!) Not much more
than a residual charge left in it. I put it on vacuum (to start over
with a clean slate) while I rounded up lunch. I then charged it with
one can of secret sauce, and enough propane to start cycling the
clutch while the car sat at 2000 RPM with no water spray on the
condenser. The propane cylinder was empty at that time, though the
pressures still a bit low and I'd probably have put more in if I'd had
it. I was getting 48 °F vent temperatures. Good enough, for
now. (On the road, still only 48 °F vent temperatures.
Usually it gets a bit better, but it was cycling at that point.)
...After work, since Jill and Daniel are away for the week I parked in
Jill's garage spot and put away the picnic canopy. Might as well
enjoy the amenities of an empty house!
Tuesday, July 1, 2008
We went off for a parade (marching band) rehearsal, and while we were
gone a big thunderstorm blew in. We got home to puddles in the
driveway, and the top down on this car... Great. Probably didn't
really hurt anything, but will need some drying out. Put the top
up anyway, it was still sprinkling a bit but the skies were clearing.
Wednesday, July 2, 2008
It actually rained a lot in the night, it's good thing I did put the
top up. I opened up the car to start drying out. I had to mop
out everything! There were puddles on all horizontal
surfaces except the front footwells. Carpets and pads soaked. Even
the rear deck speakers had puddles in them. Everything's now out,
tipped up to drip dry, etc. I should get several hours of drying in
before I have to go to work.
I decided to check the spark plugs as it's been running rough lately.
Six looked good, with mild dry white ashy deposits, but #2 was wet,
and #7 was oil-fouled. I cleaned those two in the Handy-Sandy, I
guess I'll have to keep an eye on them. I checked the manual, and
it's rather interesting that the firing order is 1-5-4-8-6-3-7-2,
which makes the two dirty plugs electrical neighbors. I checked the
plug wires, and there was nothing wrong there. The plug gap is rated
0.8 mm, which makes it .031". The plug gaps were a little large,
around 0.9 mm, so I brought them in a little. The plugs were all
out for awhile, and after I put it back together the engine started
instantly. Perhaps I've got leaky injectors that are dribbling and
causing a touch of cold flooding? Something to think about.
...Yes, the car runs fine now. Will keep an eye on this. The rain
shrank all the torn seat leather so that now there are large gaps at
the tears, and pokey bits to jab you where edges curled up. Crap.
Thursday, July 3, 2008
The car was sufficiently dried out that I could put it back together.
I first brushed off the rust that had again started in the butt
pockets in back, then primed and painted them. After that dried a bit
everything went back in uneventfully.
I then used contact cement to reattach some of the front firewall
sound insulation. I also replaced the foam tube for the ACC cabin
temperature sensor: the first replacement was falling apart, and it
was actually an inch too short anyway.
Someday I'd really like to put this car back together.
Thursday, July 10, 2008
I pulled the #7 spark plug again, and it was again oily. I cleaned it
off. Again. Wonder what's up with that? Valve stem seal damaged?
Those are easy enough to replace, and in theory I even have three
sets around here somewhere.
After work I dug around in the piles of crap and found the partial
valve stem seal kit. (I'd used one set of the four on Jill's 450 SL eight years ago.) A minor miracle! (I
also found a complete good set of rear Textar brake pads, and a bunch
of dead monovalve inserts.) I put the seals in the trunk of the car,
with all the other parts in waiting.
Thursday, July 24, 2008
After work today I noticed that the driver's-side front turn signal
lens was broken. Probably hit it on the pile of rocks that was in the
tight parking space at our rental lake place last week. Oops. At
least it was all still there. I got out the isopropyl alcohol and the
5-minute (clear) epoxy. A Q-tip and alcohol cleaned off all the dirt,
then I mixed up some epoxy and glued it back together. Not beautiful,
but good enough. When the glue had partially set I used a razor blade
to remove the excess, especially in the gasket channel. (I also glued
Jill's watch band back together using what glue was left.) I would
have liked to use cyanoacrylate glue, especially as the lens plastic
is itself an acrylic, but I've never had good luck with that holding
up long-term in that use. (It gets white and powdery and lets loose,
whereas the epoxy's tendency to yellow will not be a problem
here!)
Friday, July 25, 2008
I installed the repaired lens. Looks OK.
Out on errands today it was quite warm. The car was running better
than usual lately, I wonder what's up with that? The plug fouling
problem seems to be variable.
Wednesday, July 30, 2008
The LR tire was flat this morning. It had a nail in it. (It might
have had for some time as there has been a slow leak. Not slow
anymore, I could hear it hissing! Of note: the center hub was
chromed metal! The first such I think I've ever seen, all
the rest have been plastic with a circular spring tensioning the
clips. This had individual metal spring clips.) I put on a spare
wheel and took the leaker to Les Schwab.
They fixed it before lunch, no charge.
Thursday, July 31, 2008
I put the repaired wheel back on.
Sunday, August 17, 2008
It's very hot out and when I returned to the car from lunch I smelled
gas. I wanted to verify that it wasn't me, so I popped the hood.
Whereupon the hood bumper I'd wedged into place finally dropped out.
(No, the gas smell wasn't this car.) As an experiment I also
disconnected the electric connection to the cold-start valve, we'll
see if that has anything to do with the intermittent plug fouling and
bad gas mileage. When I got home I used a bit of Shoe Goo to secure
the wedged-into-place nut for the hood bumper. I also used
weatherstrip cement to reattach the rubber part to the post.
Monday, August 25, 2008
It started raining on my way to work in Jill's 560
SL, so I called home to ask Jill to put the top up on this car. I
also bought a Harbor Freight bench brush for removing rain-borne dirt
and dust from the soft top. $2, on sale.
Tuesday, August 26, 2008
This morning I see that she not only put the top up, but she left the
key in the ignition and on! However, no harm seems to have
been done. (A year ago when the ignition was
on a long time it killed the ignition module, and it certainly could
have done in the battery.) I put the car on the charger for a couple
of hours anyway.
I noticed that the coolant level is down substantially. Not a good
sign: fouling plugs and consumption of both oil and coolant! I
checked the tightness of some of the exposed head bolts and didn't
notice anything wrong there, but that doesn't mean much. (I sure wish
I knew what top-end work was done, and by whom.)
Thursday, August 28, 2008
Somehow I find that I have an extra day to play with. Jill's 560 SL might be 'done' for the nonce, but until I
know that it is and get her officially switched over I won't dive into
the 190D, so that leaves me free to work on
something else today.
So, what small thing can I do on this car that won't screw anything
up? I suppose I should look at the foam flap tips on the defroster
vents, since that's really the only thing besides the lack of time
keeping the dash off. (OK, I also want to do the rear fog light
modification at this point, and it is easier to glue the dash
cap on when the dash is out. But still...)
I refilled the reservoir with some of the 560's used green coolant, at
least the color matches! That'll do until I service the system
properly. I also tightened the two exhaust manifold bolts on #4, they
had worked completely loose. I put the battery charger on, it was
still thirsty.
But is the foam flap the most pressing and worrisome thing?
No! Instead I removed plug #7, again, to find it, again,
very oily. I cleaned it, and checked #'s 6 & 8: they were fine.
I checked #2 and it was a bit wet, just as before. I then removed the
valve cover, which required removing the fuel lines in the area and
the brake booster vacuum line. I unplugged the ignition module and
the fuel pump relay, then cranked the engine over 'til #7 was roughly
near TDC. I removed the cam oiler tube to make room for the spring
compressor. I compressed the springs a bit and removed the cam
followers, that was pretty easy. I tried to remove the valve springs,
but the KD spring compresser (that I'd bought for using on Jill's
now-sold 450 SL) was itself too springy and
the forks kept deforming under the heavy stress required. (I had this
problem the other time I used it.)
KDT-3087 K-D TOOLS VALVE SPRING COMPRESSOR—$56.06 Tool compresses
valve springs on most overhead valve engines including GM, Ford,
Chrysler, Nissan and Toyota. Jaws adjust to fit over spring retaining
washer. An adjustable handle allows easy clearance in tight areas.
GM adapter included. use no. 3269 Fulcrum Rail if overhead cam is not
available.
This time I took it over to the welder and ran a heavy bead down the
outsides of the forks to try to stiffen them, then hammered the
weld-induced bow back out of them. Once they cooled I tried again,
but it didn't really help as the fork steel was too soft and was
visibly bending. I ran more heavy beads down to make them red-hot
again and dropped them into a bucket of water to quench. That
stiffened the forks again, but it wasn't enough, there was still
enough springiness in the entire tool to cause the forks to spread and
pop off the spring cap. In desperation I welded a nut near the bottom
of one fork and a washer to the other, then ran a bolt between the
forks. That worked! (There wouldn't necessarily be room for
this in every possible situation, but it worked here. There was
nothing really wrong with the KD compressor's design except that the
forks needed to be made out of thicker tool steel.) I could then
lever over the handle which rammed the valve into the piston, which
popped the keepers loose from the spring cap. Then I could pick the
keepers out. In fact, I was able to prop a 15 mm wrench between
the tool's handle and the exhaust manifold so that I didn't even have
to hold the heavy springs down manually while I picked the keepers
out. (Using a small screwdriver and a magnet.) So much
easier than last time! With the keepers out I could remove the caps
and springs, exposing the valve stems.
The stem seals are not visibly damaged, nor are the valve guides
sloppy or loose. I'll replace these seals anyway, but I suspect that
there's either a head gasket or ring problem causing the fouling. The
coolant loss suggests head gasket. Damn.
I was out of time this morning, but I don't need to drive the car
until tomorrow. I'm sure I can get it back together before I need it.
Friday, August 29, 2008
Though working on Jill's 560 SL this morning
took a lot longer than I'd intended, rather than drive the 190D I dove right in and removed the two stem
seals. They looked good, and I didn't even deform them too much.
Which is good, because the 450's leftover seals I'd saved, part number
116 050 01 67, Elring 523.712, do not fit!
Oops. I straightened out the old seals as best I could and put them
back. (They're brass lined with rubber, and have a little coil spring
collar to tighten the rubber neck [with its single V-profiled wiper
ridge] around the valve. The new [and wrong] seals are all rubber,
with a brass ring like a box staple around the bottom and multiple
V-profiled wiper ridges.) Putting it all back together was quite
painful, it's just plain hard work to get those wretched valve keepers
in and out. The spring compressor is barely adequate, and you really
need to get the piston at TDC to help keep the valve up so you don't
have to compress the spring so much. (Which I had not done.) I
dropped parts a lot.
Once the springs were back in the rest of the engine reassembly went
quickly. It started instantly and didn't leak gas, so that's good. I
drove it to work (unfortunately rather late), it ran fine. Especially
so since I'd cleaned off the spark plug again.
Head gasket? Rings? I guess something's wrong.
Saturday, August 30, 2008
I checked Rusty's site, and the
valve stem seals I have are indeed not the ones I need. There are two
different kits for a 1982 380 SL, the correct one depends on the
engine serial number, and neither is the kit that I have. Stupid.
I'm told that it still could have been the seals, but that if they
weren't leaking before they will be now, and that I shouldn't deduce
anything until I actually replace the suspect seals properly. Well,
doing so was on my list...
Friday, September 5, 2008
I cleaned plug #7 again today, and disconnected the cold-start valve
again. When I put the plug back I tried one of the old anti-fouler
(spark plug extender) devices I'd bought for the
Chevy pickup at one time. We'll see if that helps any.
Thursday, September 11, 2008
Ordered parts today: upper ball joints (115 333 08 27),
alternator belt (10×1005), and valve stem seal kit
(117 050 01 67). Around $90. Rusty says the VIN
(WDB BA45A4CB 011721) doesn't come up, but he was able to
call MB and dig up the engine number anyway
(116.962 12 002271). Weird. The total invoice was $407.26
(I ordered other things too).
Thursday, September 18, 2008
The radiator is leaking somewhere, so the slow coolant loss isn't
necessarily a head gasket. I think it's leaking progressively worse,
I'll have to keep a close eye on it.
Sunday, September 21, 2008
The rains have come. I put the top up last night, but driving today I
still had water dripping onto my left foot. It's not coming from the
windshield, though, that's totally dry. (Being completely exposed as
it is does have at least one advantage.) I suspect that it's seeping
through the canvas top and down into the top rail via the turn locks,
thence down the inside of the A-pillar until it finds an exit.
...Jill went off to rehearse for the Opera tonight, so I took
advantage of her newly-freed hardtop hoist and the temporarily open
bay. I he-manned the top into the bay and set it down under the lift,
then lifted it. I used compressed air to blow out all the grit that
had settled over the summer on the interior horizontal surfaces. I
then moved the car inside out of the rain; its top is thoroughly wet,
much too wet to furl so I got out the big fan and pointed it at the
top. Maybe a few hours will suffice to dry it enough to put away,
then I can drop the top onto it and get back out of Jill's way. We'll
see. In the worst case I leave the top hanging there until I can make
the switch.
...Before bedtime it was dry enough to put on the hard top.
Done. There was some rain water in the storage well, but I mopped
that up first.
Monday, September 22, 2008
Another day of rain pissing down, but this time no sign of leaks from
the windshield frame. I think it's just the Scotch Gard (?) on the
soft top that's failing.
Tuesday, September 23, 2008
The car's got innumerable issues to deal with, but one that's most
in-your-face irritating is the seatbelt warning light that cycles with
nearly every bump. So I pulled the warning module (next to the cruise
control amplifier hanging from the brake pedal support) and resoldered
it. It's labeled:
89 5065
12 Volt
10 81
001 545 52 32
Made in W-Germany
The warning module contains two transistors, two electrolytic
capacitors, a relay, and adjustment potentiometer, and the usual
handful of resistors, capacitors, and diodes. Nothing special,
nothing hard to replace if necessary. (Modulo finding a relay that
would physically fit.) The bulk of the circuitry is the timer for the
seat belt lamp.
I also retightened the ground cluster over by the fuse box. That is
also part of the warning circuitry. (Ground is always part of
everything, and a loose ground can trigger timers, etc.)
OK, this is weird. I've wondered why opening the right-hand door
causes the warning buzzer to sound on this car, but not on our later
SL's nor on our now-sold 450 SL, and I can
see from the car's schematic (page 117) that although they wired the
two door switches separately to the warning module they also tied the
two switches together, negating the diode that's in the warning module
to isolate them! Later SL's have them separated. I wonder...
I pulled the two door switches, and the wiring found there matched the
schematic, as did the wiring to the courtesy lights themselves. (It's
always good to check.) It looked like one of the two brown/blue wires
that comes off each switch is just a tie between the two switches, one
that isn't necessary and that was eliminated for the 1983 model.
(It's probably a transitional step in the design between a single door
circuit and the two circuits of later years.) Gambling, I cut one
loose from the driver's switch and beat the odds! It was the
inter-switch tie and after that the warning module only buzzed when
the driver's door was opened, yet the courtesy lights still functioned
as they should. I taped up the loose wire and put the car back
together.
...The drive to and from work proved that the flakey light behavior
was cured.
Wednesday, September 24, 2008
I did some research on the rattly side glass, looks like Jobs 68-570, 68-420, 68-425, 77-430, and 67-300. Messy: officially you
have to pretty much pull the entire hardtop apart. It looks like the
glass comes out from the outside, so maybe I don't have to do it all
given that it is already loose. Job 68-570 covers removal of the outer
trim.
...After Daniel went to bed I pulled the car into Jill's empty bay
(lights!) and loosened the hardtop. I followed the directions in 68-570, minimal though they were,
and got the outer trim removed. (For the record first you peel out
the weatherstrip, then remove the nine (9) screws, some of which hide
under a flat strip. The trim face then pulls outwards from clips in
the rear of the hardtop, slowly as the butyl seals let loose.) With
the trim removed the glass was sitting loosely in its frame. All the
butyl (?) rubber had come loose from the glass, there was no need for
further disassembly. I cleaned the glass and scraped the surface dirt
off the butyl, then ran a thin bead of runny windshield RTV (leftover
from the windhield sealing job) around the butyl, then laid the glass
back on. I clamped it against this new bead as best I could, using
spring clamps and weighted boards leaned against the glass. I left it
alone to set up.
Thursday, September 25, 2008
I scraped the excess RTV off the glass and reassembled the hardtop.
Easier said than done! We'll see if the weatherstrip still seals, and
if the butyl goo reformed enough to keep water from the gutter out of
the inside. I did use the heat gun to soften the butyl some before
reassembly.
...The rattling is gone and the wind noise is much reduced. Sehr gut.
Monday, September 29, 2008
...No, the flashing light isn't cured. It's better, but not
cured yet. Heavy bumps will still set it off. I'll tackle that
ground joint again when I get a chance, it's exposed and easy to work
on with the dash out. I mistakenly salvaged a bottle of urethane
paint reducer at the waste transfer station today, and its nasty smell
permeated everything. I left the car open all night, trunk
too, to air out. (Most solvents don't bother me particularly, but
this stuff is gut-churning and smells like ass. Ugh.)
Tuesday, September 30, 2008
Backing up today there was an ominous grunching 'pop' from the front
end. Need to get on those upper ball joints soon! The weather was
magnificent, too bad the hardtop is still on.
Wednesday, October 1, 2008
Ah, I see there is a puddle on the concrete now beneath that wretched
solvent bottle. That explains the smell in the car! I moved the car
into the garage preparatory to surgery. Still all opened up.
Thursday, October 2, 2008
Surgery begins. I got the car jacked up and one front wheel off. I
used the wire brush to clean off the top of the upper control arm
(UCA), PB Blaster and the 19 mm wrench to remove the ball joint's
retaining nut, and I then ground off all of one rivet and most of the
other two. (Trying real hard not to gouge up the UCA itself.) I used
a hammer and punch to pound on the one rivet's core and got it to sink
microscopically, so I'm on the right track. I was then out of time,
however.
Friday, October 3, 2008
More grinding and pounding. I couldn't really get in there any
further with the 4" grinder without damaging the UCA, so I got out
the Dremel with the carbide burr and chewed off the rest of the rivet
heads. After that some pounding with the punch sank the rivets (and
the ball joint) through the UCA. No problem. The UCA then swung up
and out of the way easily. I wire-brushed the chewed area of the UCA
and primed it.
Oops. Now that the steering knuckle is loose, however, it becomes
much harder to remove bolts! The brake hose was in the way of
using a pusher on the ball joint's post, and the steering arm had to
be removed to get the hose brace loose. I got the steering arm off
and I think I can get the pusher in there without removing the brake
caliper, but next time I'll just take off the caliper and the steering
arm first.
I can't find the 'pusher' (Pittman arm remover) that I modified by
narrowing the jaws using the torch, but I do have the unmodified one
that I used on the soft top bow. Perhaps I can
get that one to do the job, though its jaws are too wide to grip the
top of the steering knuckle.
I notice that the fucking dog has at some time done a cat-chasing
dance all over the hood of the car, the paint is all gouged up. (Will
that dog survive much longer?)
Saturday, October 4, 2008
I put black paint over the primer on the UCA and got it started
drying. I then removed the brake caliper and hung it out of the way,
there's just no way to work effectively around it. I fooled around
for awhile with the wide-jawed pusher, but couldn't get it to press
effectively against the ball joint post. (I was using the pickle fork
to fill the gap and give it something to pull against.) Disgusted, I
looked harder for the modified pusher and found it, exactly where it
was supposed to be. Sheesh. It fit perfectly, and I was able to put
a lot of pressure on the loosened retaining nut. I tried banging on
the joint's socket, but it didn't let loose. I got out the propane
torch and heated the socket. Thwip! That released the joint from the
socket. Home free! I then removed the nut (I had to use small
vise-grips to grip the post in order to allow the now-distressed nut
to be removed) and lifted out the ball joint.
The new joint, TRW, looked good. It has a 5 mm Allen socket in
the end for easing installation, unlike the original. I put it in the
steering knuckle first, then bolted the UCA to it. Very clever,
except that I'd trapped the brake caliper on the wrong side! Crap. I
had to remove the joint from the steering knuckle and reinstall the
brake caliper. Fortunately the socket hadn't fully gripped the ball
joint's post yet, and some mild tapping with the hammer released it.
While I was there I found that the insulation on the brake wear sensor
cable was decomposing, so I cleaned it off with a wet rag. Hungry, and
waiting for the cable to dry, I broke for breakfast.
...Back on the job I taped up the wire using about half a roll of
electrical tape, once down and then back up. I did everything exposed
in the wheel well. I then reinstalled the ball joint, and then the
steering arm. The hub was then nice and solid, so I put on the wheel,
using wax on the lug bolts. Even with the greater leverage the wheel
felt nice and solid, not like before. (No more 'chunka-chunka'.) I
let the car down, I'm ready to do the other side now. It should go
much faster, this side took about four hours total.
Sunday, October 5, 2008
Enough procrastination! I jacked up the other side of the car and
removed the wheel. This ball joint was a lot worse than the other,
but not yet near failure. I loosened the brake caliper and the
steering linkage while it was still easy to apply torque. I then
wire-brushed off the rivets and ground them off as best I could. As
before, I used the Dremel to finish the job so that I didn't gouge the
UCA too much. This ball joint just pounded right out of the UCA with
little difficulty. With the knuckle half-loosened I swung the caliper
over and out of the way, and the steering arm. The nut for the ball
joint loosened easily, and I tried pounding on it directly. Poink!
It just drove right out, no pusher required, so I removed the nut the
rest of the way and removed the joint. So far this was all easy, and
hadn't even taken an hour yet. I used the grinder at this point to
cut down the ridges on the brake disc, for ease of reassembly. Very
rusty/dusty! I then wire-brushed the UCA again and primed it. After
a few minutes the primer was dry and I applied a coat of black paint.
I had found that the cable to the brake wear sensor was ripped loose
at the sensor block, and several inches were missing. While the paint
was drying I cut into the tiny 1/4" wire stub that remained on the
sensor block and got the bare wires exposed. I scraped them with a
razor blade, then soldered new 18-gauge wire onto the nubs. I used
heat-shrink tubing to protect the joints, then potted the end with a
bit of Shoe Goo. A large piece of heat-shrink then went over the
entire thing, bedding into the blob of glue. I heated the whole thing
with the heat gun and tightened the outer sheath over the glue. I
then smeared the expressed glue around the end of the joint and the
block itself, hopefully providing some mechanical strength as well as
waterproofing. This was set aside to dry for the moment.
With the paint now dried enough I installed the new ball joint in the
UCA, then put on another coat of paint to cover the scuffs. I put the
brake caliper back on loosely, the ridge-ectomy helped considerably,
then installed the ball joint into the steering knuckle. It tightened
down easily, I didn't need the Allen wrench for the center. There is
a chunk out of one of the brake pads, but I don't think it's
particularly significant. I then tightened down the brake caliper.
During all this it became apparent that the boot for the lower ball
joint had a small crack in it, but was otherwise intact and in good
shape. With the steering knuckle mounted again I wiped off the
expressed grease (clean looking) and used brake cleaner to clean off
the boot. A bit of Shoe Goo served to pot the small tear, I think it
had been torn during this job by the weight of the half-supported
steering knuckle pinching the boot at that point.
To give the glue a bit of time to set up I came in and updated the log
up to this point.
I then went back out and finished the job in about 45 minutes, much of
that was spent repairing the brake pad sensor cable. The insulation
on what was left was decomposing, so I wiped it down like I did the
other side, then trial-fit the wire to get the length of the new piece
right and cut off the excess. I soldered it together and used
heat-shrink to cover the solder joints while the cable dried. I then
wrapped electrical tape from the top down and then back up (just like
the other side), giving it a nice solid covering, and installed it. I
then put the wheel back on, using wax on the lug bolts, lowered the
car, and drove off in it taking Daniel to meet Jill and some friends
for lunch. Just about two and a half hours were spent this morning on
this job.
If nothing else was wrong, and having done them before, I bet that
you could get down to about an hour a side for this job. Not that bad!
Monday, October 6, 2008
Rusty's having a sale on soft
tops: $450 for the real deal. Hmmm...
Wednesday, October 8, 2008
Topped off the low power steering fluid.
Thursday, October 9, 2008
Just had to mention that it snowed today, a little bit. It
wasn't even (quite) four months ago that it last snowed here. Global
warming, my ass!
Friday, October 10, 2008
Rusty, you bastard, how dare you also offer a sale on seat covers too!
I have the Tex seat covers on sale too!...$415.20 plus shipping for a
set of 2 MB Tex seat covers. Head rest covers $63.00 per set (2).
Armrest cover $42.60.
I believe the head rests and the armrest are still salvageable via the
Leatherique route. OTOH, new covers all around would probably be
cheaper than replenishing my Leatherique stocks!
Quite cold outside this morning, and the car hasn't been driven in
several days. It started instantly. Seems to like sitting for
awhile, same-day restarts can be a bit difficult.
Thursday, October 16, 2008
I had a look at the headrests, they really could use replacing too.
(Weather damage. Not torn yet, but very rough.) The armrest is
already new vinyl of some sort, no need to replace it at all. (It's
not installed very well, but will do.)
Rusty sez:
It is a great price. GAHH is dying right now, no one is buying
anything, so they are giving it away. These prices are 25% off the
regular prices.
So I ordered it all! Soft top (it'll be good practice), seat covers,
headrests, and hinge covers. Along with a steering idler bushing kit.
Something like $1200 for it all. I did not order the black
plastic backing pieces (4) for the lower chromed hinge covers as
they're now about $420 each! There goes the promise of any profit on
this car.
Tuesday, October 21, 2008
I opened the box that came yesterday, and found the seat hinge covers
and the idler bushing kit. Now I need to schedule some time to do
this. Today the seat covers and the soft top came. Great, more work!
Thursday, October 23, 2008
I opened the seat cover box, and the headrests (on top) looked nice.
I'm not sure about the headrest cover attachment method, but it looks
like cardbord ridges that slip into plastic S-channels. OK, that
promises to be fun!
Tuesday, November 4, 2008
My wife called me at work asking if the trunk was supposed to be open.
In the rain. "No." It's soaked. Somehow it popped back open after I
put the oil jug back into it that I used to top off the oil in her 560 SL.
Wednesday, November 5, 2008
The trunk is totally soaked. No real harm done, probably, except that
my checkbook got soaked, and the check register has run and is now
largely illegible. Crap. I opened the trunk to dry, and told Jill to
keep an eye on the weather.
...Definitely colder, tonight after being open most of the day
the trunk isn't yet dry.
Thursday, November 6, 2008
Another day spent with the trunk open. Still not entirely dry inside.
Friday, November 7, 2008
Before work I moved the 190D outside, into the
rain, and put this inside in its place. I opened up the trunk and
pointed a box fan forwards at the slanted trunk lid, making a nice
swirly windstorm inside the trunk for the day. I wanted to get it
thoroughly dried before anything could rust/rot.
Wednesday, November 19, 2008
The trunk's dry indeed by now, but since the car is still inside I
decided it was time to tackle the valve stem seals on #7 again, now
that I have the new ones in hand. I removed the spark plug and its
extender. The plug was oily, but not hugely fouled, so I guess the
extender is working. I got the obtruding fuel and vacuum lines
removed, then removed the valve cover and oiling tube. As the belts
need attention anyway I removed the fan, then I was able to use the
front crank nut to bar the engine over until #7 was at TDC, determined
with a probe in the spark plug hole. The spring compressor then made
short work of removing the cam followers and springs. (One of the
valve keepers was a real pain, but the other three came out easily.)
I'm ready to remove the old stem seals and put on the new, but I was
out of time.
Thursday, November 20, 2008
I replaced the two valve stem seals on #7, that only took 10 more
minutes. Getting the valve keepers back in was much more difficult, I
hate those things. It seems to me that the valve guides are
not as good as I had thought last time. (If the guides are a
bit worn and replacing the seals does 'fix' the problem, the new seals
won't last like they should.) One of the two hydraulic lifters had
collapsed so its cam follower was very loose, I trust it will pump
right back up. I checked the condition of the spark plugs on #5, #6,
& #8, they were dirty but not totally fouled. I sandblasted all
four clean. I then put the engine back together except for the
removed fan, since I still need to replace the alternator belt. Ready
for a test start.
Saturday, November 22, 2008
I pulled the other four plugs. #2 was particularly gassy, and all
were a bit dirty, which is fitting because it has been
running so poorly of late. I cleaned all the plugs and put them back.
I noticed that the injectors for #3 and #4 were very wet looking, so I
removed them. (My first ever injector removal!) I cleaned them off
and checked the tightness of the fittings, after I did this I
concluded that the wetness was just oil dripping from the
badly-fitting breather hose that's directly overhead. In a mood to
experiment, and since the injectors were already out, I got out the
clean grease gun and found that its threads matched those of the fuel
distributor ends of the injector pipes: they threaded right in.
However, there was no cup at the bottom to pinch the pipe's button
against so it leaked. Regardless, I pumped some bad gasoline through
#3 and saw that it puffed clouds of atomized fuel, and seemed to have
the requisite non-dribble-ness. #4 behaved exactly the same. Because
of the gassy state of plug #2 I pulled #2 injector as well and tested
it, finding no difference from the other two. I put them all back and
test-started the engine. No leaks that I could see, and brake cleaner
sprayed around the injectors indicated that there were no significant
leaks. It appears that I got it reassembled adequately.
As it was idling rather lumpily I started pulling spark plug wires.
They all made it worse except #6 and #7! Pulling either of them had
no significant effect on idle. I double-checked the wiring order to
the distributor cap and it was correct according to the firing order
stamped on the valve cover. Well, there are only a limited number of
other things that it could be. I decided to think about it for a bit,
and came in for breakfast. The list of potential culprits is rather
short:
- no spark
- no fuel
- no compression
I'm hoping it's not the latter!
When I got back to it I checked the spark on #7 by putting in one of
the old spark plugs and laying the newer one on the valve cover,
connected. Started, the engine idled as usual with a nice bright
spark. That's not it. I then pulled half the plugs, the ignition
module's input, and the fuel pump relay and tested the compression,
six strokes per reading. I repeated it twice:
| Plug | Bar | (PSI) |
|---|
| #5 | 10 | (150) |
| #6 | 8 | (120) |
| #7 | 9.5 | (140) |
| #8 | 8 | (120) |
No joy, but #6 and #8 are kind of low. Still, it's #7 that's been
trouble, so what does that mean? I don't know. Low compression on
this side, but very oily rings in #7 boost it? I put all the plugs
back. I looked at getting the injectors out, and they're really
buried on this side. It's not going to be easy to get them out.
Maybe later. Some suggestions from the mailing list:
Are the plugs in #6 and #7 normal (that is, do they have evidence of
combustion)? If not, and you have gasoline fouling, it's time to
replace the boot between the air horn of the fuel distributor and the
throttle body, the throttle body to intake seal, and the seals between
the two halves of the intake manifold (especially the latter). A leak
there will give you idle fits while working pretty much as normal at
speed—the mixture on those cylinders will be too lean with a leak
there.
My followup question:
Would the manifold seals fail like that, so quickly? I'd expect more
trouble from the rubber boot, I'll try to have a look at that...
This stuff hard to get to?
Replies:
Except for the boot between the air meter horn and the throttle body,
yes. Naturally, you have to remove the fuel distributor to replace
the boot.
You have to pull the manifold to get to the throttle body seal and the
manifold seals. Sadly, there is no reason to think that whoever
pulled the heads took the manifold apart to replace the seals (it's in
two parts, bolted together, with a rubber ring between the halves at
all 8 runners).
Also check for a leaking brake booster line or bad booster or other
serious vacuum leak on that line—IIRC, it screws into the rear of
the manifold, and if there is a major leak there, it will cause the
back two cylinders to run very lean.
and
My 450SLC went from running very nicely to idling very rough, then to
won't start in about two weeks. The only things I could find wrong
with the engine were the dried out and leaking rubber bits in the
intake manifold.
Monday, November 24, 2008
Intake system rubber-ectomy? I had a look at job 14-450, it looks messy.
Also relevant might be Jobs 14-455, 07.3-215, and 07.3-225. It looks
like there are potentially a lot of parts that one could replace.
Upon reflection, I think I'll put the car together and run it for a
few days in order to see if the oil fouling is improved. There's
little advantage to tearing into the intake manifold right now,
there's almost nothing 'saved' by doing so except removal of the air
cleaner. I have other, more pressing projects.
Saturday, December 13, 2008
...Well, that was a surprisingly long hiatus. I removed the
alternator, since I couldn't see how to loosen the smog pump belt,
which is in the way and must be removed before the alternator belt can
be replaced. (As is the air conditioning belt.) While it was out I
checked the brushes, one of them is getting short and its slip ring is
pretty deeply grooved. Not too many miles left on it. Anyway, with
all the belts out of the way I was able to get the crappy old
nearly-broken alternator belt out and replaced with the new one. I
had a bit of a panic putting the alternator back, as I neglected to
notice that there were two sets of holes in the swing bracket, and I
had used the wrong set. That made the belt seem too long. Once
the alternator was correctly installed the new belt was fine.
Given the lack of real utility of the smog pump system (it only runs
for maybe 30 seconds when the car is first started) I just left its
belt off. That'll make the car quieter at startup. I put the belt in
the trunk, it'd be fairly easy to put back (it is the
frontmost belt in the stack). The air conditioner belt is also
starting to fray, so I pulled and cut off the loose bits. It could
use replacement, but it's not critical nor do I have a replacement on
hand.
The cruise control cable's rubber sheath was decomposing at the
actuator end, lots was gone. The wires under it were still in good
shape, but they wouldn't last long without more protection than that.
I used window cleaner to clean off the cable, and once it dried I
wrapped the full length with electrical tape. Two thicknesses where
there was still rubber, four at the one end where it had all fallen
off. Not great, but better than it was.
The washer tank was leaky at the pump grommet. It needs a new one,
but I didn't have one on hand. I cut a square of bicycle inner tube
rubber, nipped a too-small hole in the middle, and then jammed the
pump into it. It slipped into the hole with some force, finally, but
I don't know if the hole opened up enough or not. Doesn't really
matter, right now. I'll get a proper new grommet at some time.
I then reassembled the car. I didn't even forget to plug the ignition
module and fuel pump relays back in. It started easily. I checked
manifold area with brake cleaner, no real signs of leakage, so I put
the air cleaner back on and shut the hood. I moved it outside into
the snow so Jill can park the Chicken Wagon,
her winter wheels, inside. Maybe that'll shut her up? I don't know
when I'll get a few days of weather suitable for test-drives to see if
the oil fouling is cured. Maybe in the Spring!
I forgot to re-tighten the smog pump mounting hardware; I must not
forget to tighten it later before driving so that the hardware doesn't
work loose and get lost.
Wednesday, March 4, 2009
Soaked again. Yesterday I noticed that the windows were fogging a bit
inside as it cooled down in the evening, so I opened the doors to air
out. And forgot all about it. Later that evening was a hellacious
thunderstorm, complete with 1/2" of hail. This morning I found the
seats and floors covered with hail and rain. Oops. Again. I scooped
it out and put in a space heater to help dry it out.
Tuesday, April 7, 2009
Time to start driving this one again! It started right up, no
problem. Maybe we'll see if the oil-fouling is any better now.
Today Jill and I had lunch, and did a bit of shopping. The car
behaved itself, but Jill was not pleased with its state of
discombobulation. After work I romped on it on the way home a few
times and blew out a bunch of smoke. Once cleaned out it seemed to
stay that way. It's not running materially worse than it did this
morning, the next several days should prove out whether or not the
valve stem seal replacement did any lasting good.
Wednesday, April 8, 2009
On some bumps I could hear (and feel through the steering wheel) some
minor clunking in the front end. Now that the bad ball joints have
been replaced, I guess the more subtle problems can be detected. Will
have to look at it.
Thursday, April 9, 2009
Car's still running OK, I don't think #7 is fouling like it was
before. Will continue to monitor the situation, and after a week or
so I'll pull the plug and have a look.
Tuesday, April 14, 2009
Snowing again. Not enough to be an issue on the roads, but what a
drag. The car's running rough at times, and then better. Still
smells gassy. Starting to think it really needs the full rubber
treatment on the engine. (Haven't checked plug #7 yet for fouling.)
...I brought some more paper boxes home. I was able to carry three
(perhaps I could have managed five), as contrasted to
the twenty-seven I was able to put in the 560 SEL!
Tuesday, April 21, 2009
Yesterday it was around 75 °F, today more like
80 °F. Quite a change from a week ago! I took the top off
yesterday, it has really been quite nice. Due to get much colder
soon, though.
Wednesday, April 22, 2009
I pulled plugs 5–7. #7 was wet and a bit oily, the others were
dry and looked good. #7 also had oil in its well, I suppose it's
leaking down from above. I'm not sure what to think of this, but I
don't think the fouling is as bad as it has been.
Thursday, April 23, 2009
I lengthened the linkage to the transmission's operating cable by
2.7 mm, the idea is to match the transmission shift points to the
engine's output. (It's always shifted like you are more energetic on
the throttle than you actually are, delaying upshifts that you'd
expect until you either go faster than normal, or release the throttle
some.) I also plugged the disconnected, and apparently open, vacuum
hose that should go to the warm-up regulator. I sucked on it and
could draw gassy air through it, so it implies that this was a vacuum
leak.
...It snowed again today (but it didn't stick). This is something of
a drag. The car does seem to be running and shifting better than it
did before, so I think I'm on the right track.
Friday, April 24, 2009
I printed out the engine vacuum diagram, I'll need to check this out
better. I pulled plug #7 and found it wet and a bit oily, so I
sandblasted it clean. I didn't have much time but I did pull #'s
5, 6, 8, and 2, and they all looked OK. While looking around I found
another open vacuum port, this one on a thermovalve that goes to the
idle air pipe, so it was a potential vacuum leak. I plugged it.
There was a heavy frost last night, it was cold, Jill said
26 °F. I had to put the space heater in the car to thaw the
glass.
...Sure does run better on all 8 cylinders!
Thursday, April 30, 2009
...And it's running crappy again. I pulled #7, and it was oil-fouled.
So I cleaned it (again) and put the anti-fouler (spark plug extender)
back on it.
Monday, May 4, 2009
The oil has been very low lately so I checked the records, and the oil
was only changed about 3000 miles ago; my change-out schedule is about
5000 miles. So I put in more oil: a gallon!
Friday, May 15, 2009
Today at the U-Pull I found a factory sparkplug wrench, which I think
I'll put in this car. (Since it currently has need.) I also grabbed
all that car's spark plugs, at $0.25 each I can cycle them through the
fouling hole for awhile.
Saturday, May 16, 2009
I pulled good old #7 and found it oil-fouled again. At least it took
a lot longer with the anti-fouler on. I put in one of the $0.25
salvaged ones from yesterday, and put the (good?) one in the toolbox.
I can run through all seven clean plugs, plus the old ones I pulled
from the car, before I have to sandblast again.
Friday, May 22, 2009
Finally a warm day, so I tried out the AC. I could detect no cooling
of the air. Time for another charge, looks like it's to be an annual
event. I put in another sparkplug, too. Sure runs better with those!
Saturday, May 23, 2009
It was warm again, so I charged the AC. It took the usual 1 can of
secret sauce, plus quant. suf. of the top-off material in order to get
the compressor to start cycling while there was a water spray on the
condensor. (See the June 16, 2008 entry.) On
the test drive vent temperatures got to 48 °F, which seems to
be normal for this car. (I really hate where the service fittings are
on this car, it's hard not to burn yourself.)
While working in the area I managed to snap off the vacuum control
line (purple) from the charcoal cannister vacuum valve. Again, just
like on August 29, 2007.
Wednesday, June 3, 2009
I re-glued the nipple back onto the charcoal canister vacuum valve. I
used cyanoacrylate glue and accelerant to secure it back in its Shoe
Goo 'socket'.
I then unplugged the ignition module (having learned my lesson before)
got out a small tack hammer, and turned on the ignition. I tapped on
the warning module, they key lock, and the dash ground cluster.
(Having the dashboard out has some advantages!) Nothing made the seat
belt warning light cycle back on, which it has been doing on bumps for
some time now. Time to hit the schematic! ...Near as I can tell,
however, the only thing besides parts inside the warning
module itself (which has been resoldered) that could retrigger the
timer is the power (via Fuse F7), or the ground cluster G102. (Given
the original symptoms [where the turn signal also caused the light to
cycle] it's most likely G102 at fault.) Near as I can tell, if there
is a problem with the ignition switch (or other upstream power) that
causes a short interruption in power to F7, then this will also
disrupt power to F10 as well, which should cause the rear-window
defogger circuit to drop out. So, since the heated glass isn't even
there these days I can just turn 'on' the defogger and see if it drops
out at the same time the warning light comes back on. (It has an
indicator light in the switch that'll be easy to monitor.) If it does
then I know the problem is upstream. If not, then it's F7 or the
aforementioned bits that have to be the problem. (I can't really
definitively deduce quite so much, since I don't know the relative
sensitivities to power loss of the two timers, but you've got to
make some assumptions in order to get anywhere.) I'll try
that test next, after checking F7 itself.
Failing that, I have an old logic probe (Global Specialties' LP-2)
which I can use to trap glitches on the warning module's power or
ground lines. It'll take some wiring up, however, so I don't really
want to do that unless I have to.
...The test drive today showed that the cycling seatbelt light is now
'cured'. Perhaps I banged too hard with the hammer, hard enough to
jar whatever was wrong into a better state rather than just provoking
its misbehavior as I'd intended? If so such a 'cure' is, no doubt,
temporary, but I'm not going to wait around for it to come
back—I'll just deal with it later if/when it comes back.
I did pick up an auto power adapter at Goodwill for feeding +5 V
to the logic probe should I need to pursue that later. (It'll need
some work to get it connected to the probe.) I threw it on the
project pile for safekeeping. :-)
Thursday, June 4, 2009
I dug out the dashboard and its new cap and mated them. It's long
past time to get this put back in, it came out back on November 1, 2007, a year and a half ago! I'm sick
of looking at that mess. I used glass cleaner (per the instructions)
to clean off the old dash. (I'd forgotten just how bad its condition
was: chunks of dead vinyl were falling off.) The new Coverlay cap was
mildly deformed in a couple of spots, I don't think I did it in
storage, it may have come that way. Much too late now to do anything
about it, though, I'll just have to deal with it. I used the heat gun
to soften it and mold it back more like it belonged, then I used the
tube of RTV it came with and beaded the edges according to the
instructions and put it on. I used all my spring clamps around the
back edges, and put rubber mats on the top/face edge and used oil jugs
to weight them down. I could have used many more spring clamps, but
what I've always thought would be even better for this would be a
large vacuum bag. (Which I don't have.) We'll see how it turns out.
I then decided to take another stab at G102 so I removed the two bolts
and pulled out all seven ring terminals. I used the Dremel wire brush
to clean up most of them, but one was pretty gunky with some sort of
varnish. I used a penknife to scrape it off, and the bulkhead where
the Dremel just smeared the varnish (?) into opacity. That gunk can't
have been good. The ring terminal solder joints themselves all looked
good. Once cleaned I put it all back together. (While this is
possible to do with the dash out it sure was a lot easier to do it
this way. Better light, too.)
...More test driving over bumps, and no sign of the seatbelt light
coming on spuriously anymore. I'm going to call it fixed.
Friday, June 5, 2009
The gluing yesterday went well enough, but there were some loose edges
around the back where there wasn't enough glue or it wasn't clamped
well enough. Since there was some RTV left I used it to re-do those
parts I could. I think it'll work out well enough.
Saturday, June 6, 2009
I used a bit of dark blue velvet (that I'd bought to do some repairs
on the Frumpet case) to glue along the
leading edge of the dashboard to replace the sun-rotted cotton hem
that had been stitched there. (In fact, the bulk of the minimum amount
I had to purchase, a 2" strip, went to this dashboard, so I 'billed'
this project for it rather than the frumpet.) I used regular contact
cement to hold it on. This cloth strip is a major anti-creak
component. I also rubbed off the excess RTV smears, it should be
ready to install.
Sunday, June 7, 2009
Dash installation! But first I had to drill a 3/4" hole in it for
the cabin temperature sensor, and notch it on one side with a knife for
the locating slot. That was scary, but uneventful, using a Silver
& Deming twist drill (à la Harbor Freight). Putting the
dash back is a real pain to do, the hard part is getting it bowed and
in over the steering column according to the instructions, yet without
damaging anything. Once in, and with the sun beating down on it, the
new dash cap bowed up enough at the sensor hole that I glued it with
RTV and weighed it down with a lead ingot. (The sensor retaining clip
doesn't hold all that strongly and I don't want any extra stress from
the dash cap's motion to pop it loose.) I ran out of time to finish,
but I got the car driveable again, with the dash in but nothing in it
hooked up (except for the instrument cluster, temporarily). What a
difference it made driving, it looks like a real car again! I should
have done this ages ago. Really.
Tuesday, June 9, 2009
It was a bit chilly this morning and the top was still up (and wet)
from the rain yesterday and the dew in the night, and I needed to go
to an off-site work meeting early, so I hooked up the cabin
temperature sensor to allow the heater to work correctly. (It should
be a beautiful top-down drive back to work around noon.) I used duct
tape to wrap the new foam insulation to keep it from splitting open
along its glue seam, and I used weatherstrip cement to attach it to
the two hoses. I put the sensor's retaining collar on upside-down
because it goes on a little better that way now that the dash is
thicker than designed. Getting it secured and plugged in again was
awkward and I ended up having to remove the rubber center air manifold
again for access. Getting that back on again via fingertip
through the remaining access holes (now that the instrument cluster is
in) was tricky, but not impossible. I also connected up the side
ductwork, so it should be ready to use.
Wednesday, June 10, 2009
I hooked up the driver's-side vent control. Halfway. That's a big
PITA. It's fairly easy to push the Bowden cable's loop on the post
using regular needlenose pliers, but I think I'm going to fabricate a
set of offset jawed pliers for putting on that wretched snap clip that
holds the body of the cable to the ductwork!
Thursday, June 11, 2009
Yesterday I bought a cheap set of sacrificial 10" pliers at Harbor
Freight, today I welded four pieces of 1/8" square stock to the jaws,
as two stacks of two and offset so that it has serious 'overbite'.
That made relatively short work of snapping on the vent cable
retaining clips. (Part of my problem was that I'd managed to deform
one of the clips by flailing around yesterday with regular pliers.) I
should have made these pliers years ago, those stupid clips have
always given me massive trouble. These hack pliers are I'm sure
nowhere near as good as the proper tool, but they will do. Being
larger than normal they can operate from the back, reaching over the
body of the bracket. There really isn't room to do it from the front.
The steering wheel had been making some flapping noises when turning,
so I pulled the combination switch back out and re-routed the horn
wires away from the center column. That should do it. [It did.]
I swapped spark plugs again. It's been running fairly well, but #7 is
still oily. [It runs amazingly better with that one plug working
right. Quieter, smoother, and much more powerful and responsive.]
Friday, June 12, 2009
I hooked up the dash switches and put back the console, including
screwing down the side carpets. There were a couple of bulbs out of
the ACC panel's string, one had melted its way into the soundproofing
and unplugged itself! (I heat-gunned it out, cleaned it off, and put
it back.) The radio went back in pretty easily, though the antenna
had gotten sticky/dirty and wasn't moving again. I used Kroil to
loosen it back up. Turns out that my copy of Wicked was
still in the CD player, I was kind of wondering where that had got to.
I put back the console's panels and got it all buttoned up; it looks
pretty good. (I'm short one good screw for the shifter surround, one
of the two had a ruined head.) This thing almost looks like a car
again.
On the way to school (for his last day of first grade) Daniel
requested Loathing and Popular. No
problem, happy to comply!
...At lunch I went downtown (to 'Felony Flats') to see Darrell, a friend of a friend of a friend that paints in his
garage when he feels like it. He said to call him 2 weeks from today,
he could patch up the paint for less than $300. (I also offered a
case of beer as a gratuity.) He thought it would take a week or less,
and I need to get the official paint code for him so that he can get
(cross-referenced) matching paint. If this works out it should be an
excellent deal. Most prospective customers just wouldn't be able to
get past the patchy paint even if the car was otherwise pleasing. If
they then wanted it to look really nice, paint it properly
later.
Monday, June 15, 2009
I put the A-pillar trim back. Before I could do that I had to use
weatherstrip cement to put back the little fuzzy buffer strips that
were peeling off and let them dry. While I waited I disassembled the
driver's sunvisor and transferred the hardware to the new visor I got
from Performance Products. That was less smooth than I would have
hoped, the advertised 'openings' in the vinyl for the rod weren't
there and I had to bodily jam the rod through the vinyl. Scary. I
got that one on, however, and got the entire side reassembled. For
the passenger side I couldn't find the 'new' clips that are really the
old clips liberated from Jill's 560 SL that I'd intended to use on this car,
(in my defense the trunk of the car is quite cluttered and they're
probably in there somewhere), so I couldn't do the new sunvisor on
that side. Instead I put back the old visor, complete with the hose
clamp on standoffs gripping a plastic cylinder that's in the place of
the proper clip. When the correct pieces turn up I'll be able to
install the new visor. At least the passenger's visor was in better
condition than the driver's, it doesn't look too bad except for the
weird mounting hardware.
The right-side speaker grille had come loose at the top, so I removed
it and put it back on. One of the two clips is missing, but that
doesn't really show. I used my usual thin butter knife trick to help
slip the clip on top into place, then screwed it down on the bottom.
I then cleaned up a bit and glued the metal insert back into the
broken parking brake release knob. That isn't turning out so well,
but it'll probably do.
Tuesday, June 16, 2009
I tried looking up the paint code by the VIN, and no joy. The VIN on
the car doesn't decode on the Russian VIN decoder,
which corroborates statements made by Rusty. I went to the car and
checked again, and the VIN on the door plate matches that on the
windshield. Interestingly, WA State apparently assigned its own VIN
on a label on the door frame, and it matches the VIN that doesn't
decode. Obviously some sort of factory database failure is at work
here. Undaunted, I took down the data plate information (on the
radiator support):
      70 1715205 71
 107045 12 08148  2
      172G 172G M -
531 587 592 639 802
    440 467 494 519
It should be one of those numbers starting on the third line. I
checked paintscratch.com, and the closest color they had was "Maroon",
paint code DB-501, which isn't on the list. However, for 1986 (I was
checking the migration of whites) I find "Cabernet Red Metallic
Clearcoat" (pajettrot), DB-587, which is on the list and
sounds pretty plausible. On the other hand, option code 587 has
decoded as options 581 & 583, which are Automatic Climate Control
and Electric Window Lifts for Front Doors, both of which this car has.
Let's run some of the other options on the Code
List:
| 531: | automatic antenna with radio
|
| 587: | 581 & 583
|
| 581: | automatic climate control
|
| 583: | electric window lifts for front doors
|
| 592: | heat-insulating glass with windshield band filter and rear window pane laminated glass
|
| 639: | 634 & 636
|
| 634: | elimination of first aid box
|
| 636: | elimination of warning triangle
|
| 802: | change of modelyear last figure [2] shows new modelyear
|
| 440: | bumper guards OR tempomat/cruise control
|
| 467: |
|
| 494: | California version
|
| 519: |
|
This sort of checks out, but there are missing codes and this
car has the first-aid box mount on the rear deck. The disturbing
thing is that the 'paint code' also matches options the car has. But
if all these are options, where are the paint and leather color codes?
Running the codes on the Russian site gives:
| 531: | automatic antenna (from 01.01.1963)
|
| 587: | automatic climate control and electric window lifters (front doors) (from 01.01.1977)
|
| 592: | heat-insulating glass, all-around, heated rear window pane (laminated glass), band filter
|
| 639: | elimination of first-aid box and warning triangle (from 01.08.1977)
|
| 802: | Change of year of model, last figure [2] shows new model year
|
| 440: | tempomat (cruise control) (from 01.09.1975)
|
| 467: | central locking system and instruments with english lettering (from 01.04.1970 up to 31.10.1993)
|
| 494: | California version
|
| 519: | Becker radio Grand Prix electronic cassette - USA (from 01.08.1980 up to 30.11.1990)
|
Those also match the car pretty well. So where are the color
codes? 172 as a paint code is anthracite grey, even if the G could
stand for Glasurit. No part of the car is/was ever grey that I can
tell. As an interior color it's blue MB-Tex. Also not a match.
Another paint-code site
offers up this
car as a sample of 587 pajettrot, the only halfway-close red
metallic paint in the list. Looks pretty close, but supposedly wasn't
available until 1984.
Checking Glasurit
Color Online however, shows that Pajettrot (their code #3587) was
available from 1981–1995. They say they only ever offered 9
metallic reds to Mercedes, but all of them were available in 1981.
Pajettrot was available in their Line 90 and Line 55 paints. (Not in
22 or 68, whatever that means.)
Black leather has a code of 201 (101 for MB-Tex), but I don't see one
of those codes anywhere either.
Too bad the MB database isn't accessible by the chassis number, which
I do have!
The mailing list guys all say it's 172G (Glasurit #172, Anthracite
Grey Metallic), but that's not what the car actually is. (I'd thought
172G was the paint code too, originally.) A repaint then? If so it's
very thorough, I've seen no sign of gray, and I've been all
over this car. The bad overpainting in red I'd always though was
cheap repairs on top of the original paint, but maybe it's cheap
repairs on top of an expensive color-changing repaint?
If this isn't the factory original paint, then all bets are off as to
what it actually is, so no code-matched paint is likely trustworthy.
Probably gotta do it the hard way.
Anyway, disgusted with all this frustration I went out and vacuumed
out the car and put back the carpets. I used the heat gun to soften
and bend back the driver's footwell firewall coating that had peeled
loose and flopped down over itself. It cracked into pieces during the
process, but seems to be in position now. I may need to glue it down
later if it doesn't stay put. I also located the under-dash panels
and the extra soft top seals I had in reserve. I put a good rubber
floor mat down too, but that won't go with the car, especially since
Costco no longer sells them.
...In the evening I took a piece of pop can and glued it around the
torn-open snap-clip hole of the passenger-side cardboard (forward)
under-dash kick panel and clamped it into place. (Shoe Goo, of
course.) I also dug up three of the metal button snaps that hold the
cardboard to the main plastic panel. (I know I need two on the
passenger side, I'm just not sure if there's any cardboard that needs
it on this car on the driver's side. If there isn't, the extra can go
back in the spares bin. It probably should have a cardboard piece,
but it's missing.)
Wednesday, June 17, 2009
With the glue dried I could then reassemble the passenger-side
footwell panels. I first brushed and painted (black) the screw and
big washer that holds the side carpet onto the console, it was pretty
ugly. I had trouble finding the courtesy light in the trunk and
scaring up sufficient screws for the job. I washed the very dirty
courtesy light in the sink, a scrub brush and soap helped remove a lot
of the dimming grime. This particular panel set has always really
been a slow job for me, I think I spent two hours putting it all back
together. (Not too impressive for two bolts, three sheet-metal
screws, and a snap button.) But I think I got everything fastened
that's supposed to be, including the cardboard (forward) panel. I
only needed one of the metal snap buttons, the other hole is captured
by a screw to one of the metal brackets.
I mucked out the trunk (billions of old receipts, and some U-Pull
booty), and uncovered the old sunvisor clips I'd saved for this car.
I'll be able to do that next.
I took a closer look at the 'primer' exposed where the paint is failing.
Hmm, this is the first time I've ever seen metal-flake primer! OK,
the car is just a crappy repaint. (Decent paint, poor preparation.)
The original color is much lighter than I'd thought it would be, hence
my thinking it was just primer all along.
...After work I pulled out the shifter surround again and tightened up
the wire lassos for the auxiliary clicker to make it work again. (It
had stopped recently.) I dug up another screw for the surround to
replace the missing one.
Thursday, June 18, 2009
I installed the new passenger-side sunvisor, and I didn't have to
paint a 'new' window frame socket because I found the other black one
in the glove box, and it was intact enough to use. Installation was
moderately difficult because of the necessity of poking the rod bodily
through the new visor, though I was able to do it without removing the
visor assembly from the car. I received one setback when I'd gotten
the new male clip (part of the visor kit) in backwards and tried to
remove the rod so that I could flip it around, and the rod came apart
in the middle! There is an inner rod that's pinned to the outer, and
the pin failed somehow. That left the rod trapped inside the visor,
but I was able to deform the visor enough that I could pull it out the
other way using the new clip as a handle. I used a suitably-sized
piece of box staple as a new pin: I cut it to length and mashed it
into place with pliers, then I peened it flat between two hammers.
What a pain. I then put the visor back on where I again found that
I'd gotten the male clip in backwards. This time it pulled back apart
easily enough to flip it around. All that messing around loosened one
of the not-quite-right screws holding the visor to the window frame,
so I had to hit the junkbox to find a bigger screw. That all took
about an hour.
I then installed the driver's-side footwell panel, and I also had to
locate replacement screws for it. Like yesterday, I washed the very
dirty courtesy light to remove a lot of dimming grime. This only took
15 minutes, much better than the other side! I then removed the
steering wheel and instrument cluster to reattach the key-in buzzer
connector that came dislodged during replacement of the dashboard. This,
however, didn't provide me sufficient access so I removed the steering
lock from the car (Job 46-640),
which allowed me to see what I was doing. (The switch connections had
gotten bent somehow so I was screwed from the start and definitely
needed to take this out to fix it.) While I had the steering lock out
I lubed it, but that seems to be a mistake since it no longer defers
locking until the key is removed, it now locks immediately once the
key is turned fully off; I think there's a broken spring inside. (And
the buzzer doesn't sound if the door is open with the key off, which
is not normal unless you've removed the key once to release the lock.)
Lubing it probably loosened things up enough that something fell out of
place. Oh well. It can always be fixed with a new locking mechanism,
but those aren't cheap and you'd need a key in order to get one intact
from the U-Pull, which is unusal to find there. I brushed and painted
the ignition switch collar so it looks better. I took apart the
instrument cluster and cured the ringing buzz it had on bumps that was
caused by a loose 7mm nut at the top. I taped over the melting face
of its black styrofoam plug for the unused gear selection window and
painted it black, blew the dust off the dials with compressed air, and
then I put it all back together with a new bulb for the missing brake
pad lamp.
This pretty much completes the reassembly of the car. (I left out the
steering wheel emblem until I'm sure that I'm done pulling the
instrument cluster.) All that's left now is to install the new
upholstery and ragtop. And to deal with the paint. Then, I think,
perhaps we put the for-sale signs on. The car's running a lot better
since all the vacuum lines were reconnected and the frame ground for
all the electronics was dealt with, we'll see if this has any effect
on the plug fouling problem. (Bad fuel/air mixture was suggested as a
possible contributing factor that could keep rings from sealing
properly, and both those problems could cause bad mixture.)
...The new bulb for the brake pad lamp was perhaps a mistake: it's
always lit. I'll chase the under-hood wiring first, since there are
some suspicious taped-up knots.
Friday, June 19, 2009
I tore open the taped-up brake wear sensor connectors (in the engine
compartment) to find that neither one was actually hooked up, which is
not too surprising considering the original state of the cabling down
to the brakes. There must be a short in the wiring keeping the light
on. I checked the schematic, and
there is nothing there to speak of, only wires. Great. I took apart
the two harness connectors to check for internal shorts, nothing. I
then pulled the instrument cluster and found my problem: I'd managed
to populate the O2 lamp and stick it in the wrong hole.
Idiot! Of course it is always lit: as I determined earlier that system is no longer working nor is it
worthy of repair. I removed the bulb again and put the sockets back
in their correct holes. That's what I get for rushing.
An interesting sideline I found in the car's schematic is that the
dome light switch shows an independent ground, and that it can be
switched on directly or go on with the doors, yet that's not how it
acts. (It acts a basic ON/OFF switch
only.) I checked the surrounding model year schematics and found no
differences until the three-way switch and timed relay of 1983, which
this car definitely doesn't have. Supposedly the switch has a BR/GY
wire and another one, unspecified but possibly also BR/GY, as well as
a ground through the switch body. Well, that's not even how these
cars are generally designed, everything has its own ground wire going
to a well-defined ground point, which here would be the big G102
cluster behind the dash. And in reality it is not as drawn. The
switch in the car has two wires: a RD/GY one that's hot, and a RD one
that goes to the lamps (and thence presumably to ground). There is no
continuity to the switch's mounting clips, the only potential source
of the ground shown on the schematic, nor would that do much good
anyway as they don't necessarily contact a good ground in the car, not
to mention this is switched power and not switched ground, so
a ground at the switch is worse than useless. In other words,
nothing like any of the supposedly relevant schematics. In
fact, it looks like the car has the wiring shown in (only) the 1978
schematic! Oh well.
I then tested the brake wear sensors and found them working, as near
as I could tell. (No shorts, anyway.) I taped up the one damaged
sheath and then put the connections back together, making sure the
brown wires (ground) mated in the connectors. The warning lamp
behaved as it should with only the key-on lamp-test function lighting
it, so I reinstalled the instrument cluster.
Not much left of reassembly, really, so I got the glove box out of the
trunk and reinstalled it, and hooked up its light. (That'll be nice
to have again.) I sorted through what was in it and put away extra
parts and threw away the trash. I left the steering wheel emblem in
there, it'll be the last thing to do.
Saturday, June 20, 2009
Seat day! (Longest days of the year here, I think I might need
them.) I removed the passenger-side seat from the car and removed
the back from the seat assembly, and then removed the lower cushion
from its frame. That all took 45 minutes, the hog rings were a real
pain to get off without tearing up the pad, which itself is in good
shape.
I moved the metal reinforcement rod from the old cover to the new one.
The new cover went on without too much trouble, but the hog rings were
tough to deal with using regular pliers. I only put on the minimum
number of rings necessary, the ones around the rod at the rear. I
didn't tie the shroud (around the sides and front) to the pad with the
rest of the rings. Not yet, anyway. I used an office stapler to
replace the four staples on the rear sides where the cover material
wraps around the frame and staples to itself through slots, and a
gasket cutter set to cut the four round holes in the rear sides for
the mounts.
I then moved on to the back; its cover came off pretty easily. There
was a bit of glue to peel loose from the frame, I'm not sure if this
was stock or not but I'm not intending to glue the new cover. The
back pad was also in good shape. The new back cover slipped on easily
enough, but there were no holes for the backrest. Removing the
plastic grommets from the backrest holes in the old cover was tough,
those things are tight. I was scared to just mark and cut,
but I didn't see any real alternative.
Procrastinating, I pulled apart the old headrest, that was
surprisingly easy. The new cover slipped on without too much
difficulty, and after fighting it for awhile I got the slip channels
closed on the bottom. Thus was finished the first of the six pieces,
and after only three hours! (This is going to be slow.)
That headrest went so well I did the driver's side too. That only
took 15 minutes. If only the rest of the job was so easy!
Refreshed, I tackled the back again. I slipped the cover onto the
frame and eyeballed where the holes for the headrest needed to go,
also referring to the old cover. Throwing caution to the winds, I
grabbed a Sharpie and one of the nylon bushing clamp rings and traced
ovals onto the seat cover where I thought they best went. I used the
utility knife to cut out the MB-Tex, and down through the foam layer,
removing both from the hole, then I flipped the cover over and pushed
one of the plastic bushings into the cut and pinched it against my leg
with my fingers. I could then feel its outline through the padding,
and used the utility knife to cut down to the bushing and chop away
the padding. With the bushing pushed through the resultant hole I
pushed on the nylon clamping ring and it was done! Then I did it
again for the other hole. With bushings in place I slipped the cover
onto the frame again and started putting the cardboard edges into the
channels. Once I had the cover fully in place I slit and cut out the
round and oval holes on the sides, and installed the plastic bushings
for the oval slots. I then installed the hinges, making sure I didn't
shift their gears so that the seat back would end up straight. The
old seat covers make nice ground cover to protect the new upholstery
from getting scuffed. Installing the back panel was tricky as it's
very gummy from tape, and tight because of the new upholstery sharing
the channel. I lubed everything with Simple Green and wedged and
hammered it (with hands) back into position, and put in the screw.
Running out of time, I got the two seat sections bolted together again
on the hinges and got the track adjustment lever installed, except for
the springs. I threw the tracks into the solvent tank to soak and
then cleaned up the work area. This is taking forever, but so far
it's coming out well. More than five hours into it and I'm not even
halfway done. I'm hoping the other side goes quicker now that I (sort
of) know what I'm doing.
Sunday, June 21, 2009
Day two of the seat siege. I got the tracks cleaned out in the
solvent tank and relubricated with spray lithium grease and installed
on the seat base. The eight plastic sliding feet that go in the
tracks were not all the same; the two wide black sliding feet go on
the bottoms of the track on one side (I used the outside), they are
the side-to-side locaters. The four rubber-bumper white sliding feet
I put on the tops, because they're springy and will fill the gaps in
the tracks to prevent rattling. The two un-bumpered white feet went
on the other side's bottom. The four new chrome hinge covers went on
fairly easily, but you want to be very careful to get the two plastic
mounting posts properly centered into the spring clips so that they
don't deform or break. If you get it lined up right they slide on
firmly, and without excessive pressure. (It's too bad the four
missing inner black plastic pieces are so expensive, $420 each,
because they hide the seatback lock mechanism well. It would have
been nice to have them too, but not at anywhere near that price!) I
then vacuumed and put the seat back in the car. I found that the rear
carpets had been swapped, which didn't help them fit any better. Only
then did I put the headrest back on again, as handling the seat was
much easier with it off. Done! (One side, that is.) The seat looks
great, and works well. It only took about another hour this morning,
making it about six hours total for the one side. Time for breakfast.
...Nourished and refreshed, I removed the other seat. The clock's
started now, as I can't drive the car without it! Turns out the seat
jack has to be all the way up to remove the seat from the car, I
wasted a few minutes figuring that out. With the seat out I vacuumed
under it, it was filthy again. Lots of leaves. I removed the tracks,
and found the wide part of the two bottom black slides pointed towards
the inside of the seat, and that they were on the inside of
the car, away from the seatback adjustment handle. I'm not sure if
this is significant. I threw the tracks and the feet into the solvent
tank.
I removed the seat bottom cover, I didn't bother removing the hog
rings that held the seat cover shroud in place as the shroud was
rotting so I just tore it off. Faster than removing hog rings!
(Though I did have to remove the ones at the rear of the cover where
the reinforcement rod is.) With the cover removed I found that there
was a split down the middle of the underlying pad. This was due to
stress allowed by the split cover, the pad material itself was still
in pretty good shape other than this. I poured contact cement down
into the crack from both sides and massaged the edges back together.
I put a pice of heavy gasket paper on the underside, then I wedged the
crack together with some concrete chunks and set it aside to dry. All
this and the new cover should help hold it together pretty well.
While waiting for the glue I took apart the seat back. It came apart
easily enough, practice helps, and I noticed that the two outside
panels (face and side) had been replaced with regular automotive
foam-backed vinyl. That explains a lot of the earlier seat butchery!
One of the oval plastic grommets, the one in the replacement panel in
fact, is missing, but I think we can do without it. (I'm certainly
not going to wait for a parts order for something like this!) Total
disassembly accomplished, at about one hour into the project.
I then slipped the back cover on and, like before, marked the cutouts
with a Sharpie. The knife made short work of cutting, as before. (It
really helps to go through the vinyl, foam, and jute web from the top
before you turn it over and start chopping through the felt padding.)
Seat reassembly went just as before, and at about two and one half
hours in the seat back was fully assembled, including the back panel.
It was time to see how the glue was setting up on the bottom pad.
The glue was fine, so I started putting the seat cover on. The
slowest part was putting the hog rings back on the reinforcement rod.
I also had some trouble fitting the stapler in there to staple the two
flaps around the support. Then I cut the holes and put the hardware
back. The solvent tank loosened the dirt and goo on the rails, so I
washed them out and then put the slide feet back on in the same
pattern they came off. A little lithium lube and the track was ready
to go, so I put the hinge covers on. This is tricky, the alignment is
crucial or you'll break your new cover. I glued back the chunk of
torn-off backing foam on the rear carpet using contact cement. I then
put the seat into the car, the tunnel-side forward bolt is the first
one you need to put back if you want the job to go quickly. I then
put on the headrest. Voila! Done, and at just about four hours, a
notable improvement from yesterday. The bottom-right chrome cover on
the driver's seat is running into the hump and getting pushed out of
place when you drop the seat height, I'm going to have to look into
that so the new cover doesn't get ruined.
I then used contact cement to glue back all the felt strips in the
soft top storage bay, the glue on them was all powdery and failing.
After I cleaned up the work area I called it good for the day, just as
it started to rain. Nap time!
I'm going to wait to do the new soft top until we have a long stretch
of good weather, because I have no idea just how long it'll take me.
Monday, June 22, 2009
The car looks good! But today I noticed that the speedometer
is cutting out on bumps. Whacking the dash brings it back. I'll have
to pull it out to examine for poor connections. Oh, and guess who
forgot to put on the armrest when he had the driver's seat
apart...
Thursday, June 25, 2009
While I waited for the paint stripper to work on the SEL's cruise control amplifier I applied some paint
polish to the trunk lid. It didn't do all that much, I think it needs
a lot more elbow grease than I used. Yuck, when this dried it looked
like a badly-applied wax job, all white and streaky. Obviously it
needs more elbow grease than I had applied...
Friday, June 26, 2009
Per arrangement I called Darrell about the paint today. He eventually
called back, and we decided there wasn't going to be sufficient time
before the holiday to get it done, and he didn't want it in his shop
over the holiday while he was away. So we're going to reschedule
after that.
Saturday, June 27, 2009
I started reading up on Job
77-305 so that I know what to expect. Looks messy. Lots of glue.
I wonder if standard Weldwood contact cement (solvent-based) would be
good for this?
Tuesday, June 30, 2009
I pulled out the instrument cluster and had a look for loose
speedometer connections that might induce cutouts on bumps. The big
four-pin plug on the speedometer wasn't fully seated, which is
certainly enough to take the blame, so I rectified that and put it
back together. That's all the time I had, anyway. Didn't even take
long enough to bother logging it.
Wednesday, July 1, 2009
We are going to be away for a long weekend starting tomorrow, and
rumor has it that it's going to rain. Since the soft top leaks a bit
through the fabric and I possibly won't be here to dry it out
immediately I put on the hard top, after first blowing it out with
compressed air. Jill wasn't feeling up to helping, so I'll get it on
record here how to do it by one's self:
-
Open the rear soft top latch by rotating both handles rearwards.
-
Flip both sunvisors down out of harm's way, and lower the windows.
-
Open the doors of the car and flip both seats forwards, making sure
the seat belts won't trip you as you step in. Clean out the rear
seating area so that you have maximum maneuvering room, both walking
and sitting.
-
Put a soft board under the rear of the hardtop glass by the peg so
that when you tip it up the chrome trim will rest on the board.
-
Tip up the top vertically onto the board, and back into it.
-
Crouch down and walk the top onto your back, grasping the handles to
keep it from falling.
-
Stand up, balancing the top on your shoulders. You'll be leaning
forwards and craning your neck. Get comfortable, and get the top
level with the ground before proceeding. Make sure you're not
off-balance. (If you like, you can pretend you are Atlas carrying the
world.)
-
Walk into the rear of the car, being very careful not to trip
or bang anything on anything else. This is paint-killing time if
you're not careful. If you get in the driver's side the defroster
cable will naturally drape to the inside of the car and not get
pinched under the top.
-
Get centered on the car and slowly crouch down, watching to make sure
the rear peg goes into its hole first. This is the critical step to
avoid damage, and the most difficult.
-
With the rear peg socketed wiggle the top around as required to get
the other four locks engaged.
-
Tighten the top down as per usual.
Removal is pretty much the converse of above: get all the car's other
bits out of the way as best you can and loosen the latches, then while
facing forwards put one knee on the back deck for better control, grab
the handles, and then stand up with the top on your shoulders. Walk
out of the car and slide the top down your back onto the board.
Tuesday, July 7, 2009
I removed the hardtop again as the rains are over (?) for a bit. I'd
filled up yesterday so I pulled out #7 plug to have a look at it after
a full tank's worth of fuel. Sooty, but not oily wet; it was
obviously better but still not great. I'll continue to keep an eye on
it and I'll leave the anti-fouler in for now. Before using the
Handy-Sandy to clean the plug again I cut a new inner window for it
from the vinyl I'd procured for repairing the soft top, the old window
(from a plastic jerky jar) was badly scratched and clouded. I cut a
circle of fiberglass screen to hopefully serve as an additional
buffer, we'll see how long this window treatment lasts. (Glass
didn't, nor did the polycarbonate.) It's sure a lot easier to use
when you can see the work! I need more sand for it, though.
The steering's been groaning a bit lately so I topped off the low
fluid. Leaking? It was filled only last
October.
Friday, July 17, 2009
We had a cold spell early this week, rainy, and the car started
running worse and fouling plugs again. Is this temperature-related?
Would that indicate head gasket? I cleaned plug #7 again, and cleaned
some spares for the trunk while I was at it.
Saturday, July 18, 2009
Hot again, car's running better on its clean plug. One opinion from
the mailing list:
Just a guess, but if you are satisfied there is no leak along the
stem then I'd guess a head gasket next for doing flaky things, like
leaking less when the ambient temp is warmer. Could be a crack in the
head too, but not likely.
Cracked head? I hope not! Wouldn't be too expensive to replace
via the U-Pull, but there's never one around when you want it.
Wednesday, August 5, 2009
Dad had reported that not all the brake lights were working, so today
after I put on the new license tab I checked it out. Only the center
light seemed to be out, and not seeing how it opened up I (mistakenly)
unbolted it from the trunk lid. Well, it turns out that the lens just
pries out from the housing, and that the bulb was fine. The corroded
wiring was the problem. However, the holes drilled in the trunk lid
are cracked and rusting, and it was apparent that water was getting
down in past the somewhat shoddy mounting job. I don't like those
stupid blind-me lights anyway, they weren't required until 1985 and
this one's case is cracked, so I think I'll take it back off! (Call
it restoration: restoring the classic clean lines of the car.) I'm
due to take the car in for paint repairs Friday,
so if I can weld up the holes by then I can get that fixed too. (The
estimate had included some paint repair to that area of the trunk lid
anyway.)
Thursday, August 6, 2009
Welding! I brushed off the paint and rust at the center brake light's
mounting holes and welded shut the four screw holes. I used some
scrap sheet metal to fill the larger center wiring hole. Wet towels
draped around the area contained the spatter and prevented unnecessary
paint damage. I then ground the filled holes flat with the surface of
the trunk lid and primed it. I painted the patches with the
rattle-can of vaguely-matching touch-up paint I have, just to protect
and hide it until proper paint repair can be made. It's been raining,
I don't want rust to start up again even though it's due at the paint
guy's place tomorrow.
Friday, August 7, 2009
I dropped the car off at the paint guy's place on our way out of
town for a coastal vacation.
Friday, August 14, 2009
Darrell called, the car was done. $295 ($65 of that was
custom-matched paint, since the paint code was no good.) We drove
there and I gave him three bills. The car looks pretty good! The
trunk is completely repainted, as is the horse collar. No sign of the
removed third brake light, or the hardtop pecks. Nice and shiny, the
color match looks good. The hood blister is gone, as is the driver's
door peeling. The rust blisters behind the fuel door are gone, he
said it had holed there and he backed it with fiberglass. While the
car still has plenty of paint flaws it's currently in very livable
shape. I'd have no qualms about selling it in this condition.
Darrell said that the car looked like it had two coats of the gray on
it, and two of the red. Lots of paint, in other words, and we just
added another coat in places. Oh well!
Sunday, August 16, 2009
The trunk light switch is acting up again.
Tuesday, August 18, 2009
Sick of this spark plug situation I called Fernando at Motortech, the local Independent
of note, and asked him to quote my 'head gasket' job. "It's not the
head gasket.", says he. I explained its sudden onset of #7 oil fouling
and oil usage, the fact that the head had been off before, the fact
that I'd replaced the stem seals on #7, etc. "It's not the head gasket.
It's got to be valve stem seals or guides, or the bottom end. And
it's probably not the bottom end, I've never seen a bad one." His
suggestion is that I replace the seals again, and take pliers and grab
the valve guides to see if they can be moved at all. He was very
confident. The correct fix for loose valve guides is to take off the
head and put in oversized ones, but sometimes something can be done
from the top.
Well, OK. I can try that.
Wednesday, August 19, 2009
I cleaned and lubed the trunk light switch, then washed the car.
Looks nice!
Friday, August 21, 2009
Rain in the night, again, the car got well-sprinkled before I could
get out and put the top up. So much for my car wash job. Again.
Tuesday, August 25, 2009
I ordered a seal kit for the steering box.
Thursday, August 27, 2009
More power steering fluid. It's leaking down fairly rapidly now.
Friday, August 28, 2009
Washed it again.
Saturday, August 29, 2009
Driving to an event there was a rattling thump, and then something
bouncing in the road behind me. Went back for it, and found the
toothed adjuster for the (disconnected) smog pump. I guess I didn't
tighten it back down after all!
Thursday, September 3, 2009
Last week we spilled chicken juice in the trunk, and now it's really
starting to stink. After work I emptied and washed out the trunk,
using soap and then bleach. Ugh. I left it all open to dry. I did
find two official touch-up paint containers, one in the matching red.
Looks like the repaint color was an official MB one, probably
Pajettrot, but the containers were so crudded up I couldn't get any
part numbers or color names off of them.
Friday, September 4, 2009
The floor of the tire well was rusty, so I wire-brushed it out and
sprayed on some black paint. When I aired up the tire I found that it
wouldn't really sit down in correctly. I eventually figured out that
somebody at some time had backed into something hard, perhaps a high
curb, that had evenly pushed in the entire back bottom of the tire
well. (It didn't really look damaged, but was obviously not working
right, so I compared it to one of the other cars. Yep, wrong!) I
used the BFH to pound it back into place, things fit together a lot
better after that.
Wednesday, September 9, 2009
The trunk was still stinking, so this afternoon I emptied it out again
and rinsed it thoroughly, then washed it successively with Simple
Green, white vinegar, and bleach, with a brush and rinses after each
solution. That ought to do it! I left the trunk open as I could
during the rest of the warm part of the day, and then put a fan in the
trunk for the evening.
Sunday, September 13, 2009
While out garage-saleing in the truck yesterday I apparently managed
to lose the loose car key. Probably on the street somewhere at one of
the dozen or more stops we made! Didn't notice until today when
Daniel and I went to go to the Fair. (Good thing I had a spare key,
but I'll have to order another one.)
The trunk is smelling fine now.
Monday, September 14, 2009
I tried to retrace my path of Saturday, but no sign of the key at any
place I remember parking. I checked the lost-and-founds of the
businesses we stopped at, also no luck.
Wednesday, September 23, 2009
We're having a last gasp of summer weather, really gorgeous, so I
washed the car after work. I also found a half-full bottle of Rain-X
at the thrift store for 99¢ today, so I bought that. Tonight I
put some on. It might help tame the sand pitting of the old glass, as
I drive into the sun going home. At least it ought to help with the
rain that's to come!
Tuesday, September 29, 2009
It's 20 °F cooler today, this year's run of good weather is
finally over. Rain is forecast for the next few days. So sad...
I called the dealership today and replacement code-cut keys are $25,
versus $29 through Rusty. So I'll be supporting the local dealer on
this one! (They moved, I need to find their new location anyway.)
Finally disgusted with the power-steering leak, and a bit panicked by
the fact that my dad might be taking this car to Arizona within the
week, I ran the car up on ramps after work and had a look-see. I
couldn't spot where it was coming from, and none of the usual suspects
looked bad. The bottom of the car was covered with oil on that side.
I started the car and rolled underneath, and got a big drip in the
eye. It was coming off the back/bottom of the pump, a healthy drip
every couple of seconds. I pulled the pump and found that there's a
big 2" round plug on the back held in with a circular spring wire.
I pulled the spring and worked out the plug, exposing a rather dead
O-ring that seals the plug. I need a new one, and it's not something
that can be found in my generic kit. The pump's numbers:
| Type | 7672900428 | ZF
|
| Fabr. | 1506302 | 1081
|
| MB | A126 460 00 80 | | 65 bar
|
Wednesday, September 30, 2009
I pulled the plugged windshield-washer nozzles and put them in
vinegar, and replaced the burned-up hoses. (They'd gotten onto the
exhaust manifold.) That took some fiddling, and I had to touch up the
paint that chipped in the nozzle holes. Once the nozzles had been
soaking in vinegar for awhile to soften up the goo I used the butt end
of a small drill bit to push into the hose barb, and on one of them a
bunch of green goo started squeezing out of the nozzle like toothpaste
from a tube. Ick. I used a dental pick to finish the cleaning. I
took apart and cleaned out the splitter/pressure-equalizer that was
part of the new (used) hose assembly I was using. It's an interesting
design, with a plastic core and a tight rubber sleeve that has to
balloon open under water pressure to allow fluid to pass around the
core and through the exit holes. We'll see if the existing pump can
drive it. If it can't I'll deploy the vacuum "Y" that had been
flanged into place before. I didn't finish putting it all back
together because I need a new pump grommet.
I also cleaned the hardtop off with compressed air and put it back on
the car. I'm getting better at doing this alone.
I ordered a spare key (from the dealer) today: P/N
201 760 03 06, $23. I also ordered a seal (kit) for
the ZF pump, P/N 000 586 84 46, $17. Won't get it
until next Monday, though, which is inconvenient. I got a grommet
too, which they had in stock. P/N 123 997 36 81, about
3.5 dollars—a bit dear if you ask me.
Thursday, October 1, 2009
Finished putting the windshield-washer system back together, and
tested it out. (Make sure you blow out the lines before hooking them
back up to the nozzles!) It worked well, I'll just need to re-aim the
nozzles once the hood can be closed completely.
Sunday, October 4, 2009
I pulled the valve cover back off and removed the valve stem seals on
#7 again. They looked good, and neither pliers nor vise-grips could
budge the valve guides. Whatever's wrong, I doubt it's this. I put
on new seals and put it back together again. Another two hours shot
to hell! (Those wretched valve keepers are really tough, mostly
because the springs don't get compressed perfectly axially, and the
POS spring compressor, though adequate, is no joy to use.)
Tuesday, October 6, 2009
I checked the front-end bits, and nothing seems loose. I don't think
I need to use the idler kit I bought. I also washed off the greasy
bits. The AC drier might be leaking a bit, as might be the brake
master cylinder grommets.
Wednesday, October 7, 2009
Yesterday the 000 586 84 46 gasket kit came. (It's for
the 126 460 00 80 pump, the fourth [and last] variation
in a 107 according to the chart in Job 46-700. Unfortunately it came a
day later than their estimate and thus a day too late for Dad to take
the car on a shakedown photography trip to the Grand Tetons, which had
been the original plan.) It's marked "Reparartursatz" with a ZF part
number of 7672 633 114, and contains two O-rings and a metal
sealing ring about 1.25" in diameter. I checked out Jobs 46-720 & 46-740, it looked fairly
straightforward. So I did it. The only real problem I had was
getting the pressure plate out, which vise grips and tapping with a
hammer accomplished. (I held the pressure plate with vise grips
gripping between the two hydraulic channels, and tapped on the body of
the pump, letting gravity and shock do the work.) It looked good
inside, no apparent problem other than the dead seals. Going back
together the pressure-plate O-ring got a bit pinched, but it'll have
to do. I used the drill press to push in the spring-loaded rear cover
and hold it while I manipulated the retaining circlip. I didn't
replace the metal sealing ring on the pressure valve, there was no
need. (The part's in the trunk, just in case.) I then reinstalled
the pump in the car and filled the tank, and took the car off the
jacks. I used the new key to start it, and it worked well. No
problems, I'll take it to work today.
Saturday, October 10, 2009
The car has worked just fine these last few days, so Dad took the car
back home on a trial run. (He left his truck here; we'll be swapping
back later this month, and if he does want to take the car
south to Arizona he'll come get it again on his way out. Such is the
current plan, anyhow.) Before he left we changed the oil and filter,
and then looked it over and emptied out all the crap. Looked good,
although the LF tire was a bit low. I washed it for him, too, no
sense driving off in a 'new' car that's dirty! I also aimed the
windshield-washer squirters, they had been watering the trunk. I made
sure the bag of spark plugs was in the freshly-watered trunk, along
with a freshly-derusted factory spark-plug wrench from the spare-parts
pile.
Sunday, October 11, 2009
Dad reported that the car behaved well on his trip home, and even
turned in 18.2 MPG on the first leg. That's
better than it's seen in a long time. The pitted windshield
was a bit disturbing as he drove into the setting sun, however.
Sadly, there's not much one can do about that except replace the
glass. He also thinks the tires are unbalanced, so he'll probably
take it in for that, I told him to mention the slow leak on the LF
tire as well.
Saturday, October 17, 2009
Dad reports unhappiness with the car's performance, and he'll not be
taking it to Arizona. I suggested he check and change the spark plug.
They'll be back through here sooner than originally expected, he'll
bring the car back then.
Tuesday, October 20, 2009
Car's back. Dad reported another 18 MPG
leg, and a 22 MPG leg! The (replaced)
fouling plug has most recently been a light chocolate color, and seems
to be very happy with long freeway trips, though it's still using oil.
He says it sure drives well. I think the plug issue is scaring him
away.
Tuesday, October 27, 2009
The front right turn signal again went out, so I opened it up. The
contacts were bent out of shape, looks like somebody rammed a bulb in
much too far at some point. I bent them back, and put the bulb back
in, carefully, after scraping its lead contacts. Worked fine thereafter.
Sunday, November 29, 2009
I was driving home after band and noticed zero oil pressure! I
stopped immediately and checked the oil level, nothing showed on the
dipstick. I put in my spare quart and it still didn't show on the
dipstick, nor did I see oil pressure when I started. I had Jill bring
me more oil and I put in plenty, enough to get well up the dipstick.
Still no pressure. I struck the underside of the dash and the gauge
popped back into life. Sheesh! Better safe than sorry, I guess.
Monday, December 7, 2009
Time to switch to the Frankenheap. Cold
outside, too: 7.5 °F this morning! This car's retired for the
winter, as of today.
Friday, December 25, 2009
'Santa' gave me a pair of fuzzy dice. I think I'll put them in this
car!
Sunday, January 10, 2010
Interesting information from the mailing list:
Testing of Oxygen Sensors (from a Bosch pdf)
The information here is a simple guide only and does not replace any
technical service procedures quoted by a vehicle manufacturer.
Testing of the oxygen sensor should be made after all basic system
checks have been carried out, including testing of the fuel system
pressure and performing all minor service adjustments and checks as
recommended by the vehicle manufacturer.
As previously mentioned the oxygen sensor will only operate correctly
once its temperature is above ~360 °C, so the engine should
be fully warmed up prior to testing.
Preferred method of testing is to utilise an automotive oscilloscope,
however a good quality Digital Multimeter (DMM) with an analog bar
graph function can indicate basic operation. Testing should be done in
conjunction with a good quality gas analyser capable of lambda or
air/fuel ratio measurement to accurately determine sensor calibration
as well as function.
Simplified Test Procedure (Digital Multimeter)
- Locate the oxygen sensor and determine the wiring layout. On
heated sensors check for heater element continuity, adequate 12 volt
supply to heater and correct ground when the engine is running.
NB: Many late model vehicles have the ground circuit of the oxygen
sensor heating element controlled by the engine management ECU for
sensor temperature control purposes. Do not supply direct voltage or
external ground to these circuits.
- With engine speed at ~2000 RPM the sensor voltage should be
seen to cycle smoothly between 100–900 mV
(0.1–0.9 Volts) approximately eight times every ten
seconds [as the engine cycles from lean to rich (and back again)].
- A contaminated or tired sensor will be slow to cycle between the
sensor voltage limits and may not generate the full potential of
900 mV. It may also be noticed that the lean swing may drop to
zero voltage.
This will definitely be worth doing, I think. The same source states
that the service life of a sensor is between 60,000 km and
160,000 km, depending on type. We're well over that and I bet
it's never been replaced.
Saturday, March 6, 2010
Today I prepped the car for its seasonal tour of duty. Mostly that
was putting the battery charger on and airing it out, and pumping up
the tires.
Monday, March 8, 2010
First use of the season. Car started right up, no problems. Runs stinky
rich, and rough. I definitely need to look into that, this has been
a problem for far too long.
Tuesday, March 9, 2010
I did some reading in Probst's book about how the Bosch K-lambda system
works. I need to get out the meter and check a few things. No excuses!
Wednesday, March 10, 2010
I hooked the Fluke 87 (true-RMS) to the lambda control valve.
(Kinda cold out, about 22 °F; not fun. Still a bit early to
be taking the lid off, I guess.) The connector's rubber boot was torn
a bit so I finished the job and then I could probe the contacts. With
the car warmed up I measured about 2.5 VAC, the frequency was all
over the map, from 250–550 Hz—very jumpy. The
critical value, the duty cycle, was likewise jumpy and varied from 39%
to about 60%, though spent most of its time in the 45–55% area.
When I unplugged the valve the engine nearly died, so the system is
not totally dysfunctional. I tried grounding the single-pin
temperature sensor, and didn't really get a reaction. Perhaps it's
the wrong one? The other sensor I found up there caused the auxiliary
fan to go on when I grounded it.
According to the book a grounded sensor is supposed to result in a
fixed 60% duty cycle for cold-start purposes. I saw no sign of that,
even though I started probing just after cold start. More research is
required. I would think that an analog computer, which I think this
might be, would have a smoother output than this seems to. Anyway, it
ran well on the way to work this morning. Was it the laying on of
hands? I may need to go through the engine computer, checking solder
joints and capacitor quality.
Thursday, March 11, 2010
I cleaned up the connector to the lambda control valve, using acetone
and a wire brush meant for PCB work. The copper blades of the valve
were kind of dark. I also glued the one torn air cleaner shock mount.
I cleaned the pieces, then use Shoe Goo and a collar of bicycle inner
tube. This may or may not hold up, based on my experience with the brake vacuum line
in the SEL.
I looked close, and found not the two of yesterday but five
different temperature sensors screwed into the top of the engine! The
two single-pinners from yesterday, a two-pinner near the idle valve,
and two more one-pinners at the back of the engine, one on each side.
Which one is my sensor? I consulted the ETM and found (on page 108) that the
appropriate wire is green, goes to the 'oil temperature sensor' and is
shared with the WOT/Idle switch. The Component Location Guide
puts the sensor 'beside the oil filter', and the WOT/Idle switch's
C144 connector (for diagnostic access) 'on washer reservoir'. This is
yet another sensor, on the bottom of the engine. I'll need to check
into this, as that sensor is really down in harm's way. I had a quick
peek, and C144 wasn't immediately visible.
Friday, March 12, 2010
Today it's a lot warmer outside, about 44 °F; somewhat more
pleasant. I looked for C144, and found it buried underneath the
washer reservoir. It's a big fat three-pin plastic barrel connector,
and the brittle alignment ears finished breaking off as I played with
it. With the ears missing it can be connected wrong if you're not
careful, so I aligned to the sites of the missing ears and used a
Sharpie to mark an arrow on the barrel that matches one molded into
the plug, which should help. I measured the switch continuity, and
found that both WOT and Idle settings worked correctly. On the engine
side the Common and Idle pins were grounded, as they should be. (One
hard ground, one grounded by the cold-oil sensor.) The resistance to
ground of the Idle pin was 23 kΩ, for
whatever that's worth.
I rigged a wire from Pin 3 of the engine diagnostic connector into
the passenger compartment so that I can watch the lambda valve duty
cycle as I drive. (This is the BR/GN wire [ground switched] from the
valve, not the BK/RD/WT [positive feed from the fuel pump relay].)
I put the Fluke 87 in the car, as it has a backlight.
On the way to work the Fluke 87 said 70% during warmup. While
driving it was 65–82%, mostly hovered around 70–75%.
Idling was 75–79%, I saw it get to 85% at the end. Idle RPM was
lower, down around where it ought to be. This is pretty rare on this
car, in my experience so far. I wonder if messing with the WOT/Idle
switch connector affected this?
On the way home I again saw high duty cycles. (Assuming that these
are to be measured against ground and not across the valve, which
would invert these numbers. [i.e. Wednesday's
numbers.]) I checked the other vital statistics, and the RMS voltage
(referenced to ground) was around 6.5–7.5 V, probably OK,
but the frequency was very suspect: usually around 4,400 Hz, but
ranging from 2,500–5,500 Hz! The waveform shown on http://www.systemsc.com/waveforms.htm
indicates that the 70 Hz range is more what it ought to be, but
the figure shows a fine chop that is gated on and off at a slower
rate, and I don't know which frequency was the given number.
(Probably the large-scale pattern.) I suspect that the Fluke would
react to the fine component, so that high frequency I'm reading may be
just fine. I definitely think that it's time to haul that engine
computer out of there and have a look at it.
Saturday, March 13, 2010
I spent 15 minutes liberating the Jetronic control unit from under the
passenger floorboard. It has a big, and expensive looking, shrouded
blade connector, of which 14 of 18 pin sites (actually 35, it can
support two rows) are occupied. (The car's schematic only identifies
8 of these connections.) Besides the big
painted-on JETRONIC label there's a green sticker
bearing Bosch part number 0 280 800 038 and Mercedes
part number 002 545 00 32. "Jun" is scrawled on the
box in Sharpie. Two pan-head screws hold the gasketed (but vented)
cover on. Inside is a conformally-coated PCB assembly. It's analog,
not digital. There is an LM2901 quad comparator and six signal
transistors, and two heat-sunk power transistors. There are sixteen
diodes and quite a number of resistors and high-quality capacitors,
along with one of the large troublesome Frako electrolytics. It's
apparently a 100 µF/40 V unit, its plastic shell has
some minute fracturing and the top looks slightly swollen. I'll check
that out first. There are two power resistors, six stake-mounted
tuning resistors, and one weird plastic-shrouded hybrid circuit board
mounted at right angles to the main board, and possibly containing an
IC. Its shroud is stamped 057BS, and 1/50/053.
Because of the conformal coating the solder joints look to be in good
shape, but also because of the conformal coating they could be bad and
not look like it. I did not have any more time today to pursue
diagnosis or repairs.
On the way to Jill's concert I saw about 75% during warmup. While
driving it was mostly hovering around 75% as well. I saw higher and
lower spikes at times. I had tried a real Dwell meter per Probst's
book, but I didn't get anything good out of it, however it always was
a POS so maybe that means little. I need to try a better Dwell meter,
and perhaps an oscilloscope.
Sunday, March 14, 2010
The pinout of the Lambda Electronic Control Module, according to the ETM (page 108) is:
| Pin | Function
|
|---|
| 2 | Oxygen Sensor
|
| 4 | Oxygen Sensor Shield
|
| 5 | Ground
|
| 6 | Idle switch (grounded at idle)
|
| 7 | Oil temperature switch, grounded when cold;
Also throttle switch, grounded at WOT;
(Labeled "Fixed 60/40 Ratio Input Signal")
|
| 8 | Power
|
| 9 | —
|
| 11 | —
|
| 12 | —
|
| 14 | Air injection relay control (grounds to enable)
|
| 15 | Lambda valve (switched to ground)
|
| 16 | Ground
|
| 17 | — (Duty Cycle Test Connector?)
|
| 18 | —
|
(Note that Pin 16 ground, obviously required from looking at the PCB,
came from the '83–'84 schematic. [I think the '82 schematic has
a fair number of errors and omissions in it; I noticed that its
alternator wiring just has to be wrong.] Pin 18, though present in
the connector, isn't hooked to anything on the PCB. Pins 9, 11, 12,
& 17 are connected on the PCB, but to what I don't know. Only the
nine labeled pins in the table have connections in the car's mating
plug, so the rest are obviously not used in normal operation.)
Some time ago a coworker gave me an old Tektronix 561A
oscilloscope (with 3A1 dual-trace and 3B4 sweep plug-ins) that was
otherwise on its way to the dump. I rescued it and put it in the
garage, mostly because I couldn't bear to see such a fine old piece of
equipment suffer such an ignominious fate. I justified it by saying
to myself that I could use a garage oscilloscope, at least until I can
find a Fluke Scopemeter at a decent price. (They're awfully proud of
those, even used. I've been looking halfheartedly for some time.)
Well, if this isn't a good time for a garage oscilloscope I don't know
what is. I got it out and fired it up. (An apt term, since
it is full of firebottles.) It had some trouble getting
going, all the switches and potentiometers are obviously rather dirty.
Unfortunately I couldn't get the horizontal sweep to work well enough
to use so I tried using spray cleaner on the switch contacts in the
3B4. Thereafter it stopped working altogether. Oops.
On to Plan B. I stripped the varnish off the back side of the
Jetronic. The oxygen sensor input goes through an L-C filter and into
the hybrid circuit. I removed and measured the Frako electrolytic,
and it had about half the rated capacitance and a very poor
Dissipation factor, so I replaced it. I resoldered a lot of the board
while I was there, focusing on the larger leads that are usually the
troublesome ones, and bought it back out to the car. I had left the
'scope on and cooking, and I pulled the 3B4 back out and looked it
over, and cycled the main timebase switch many times. I put it back
in and it started working, more-or-less properly. Good. I really
wanted to use a scope on this, but digging the Tektronix 2336 out
of its nest in the workbench seemed like too much trouble.
Time to get brave. I hooked up all the instrumentation and fired up
the car. It acted as usual. I could see on the scope that the
waveform to the valve is complex, like the picture.
There is a high-frequency chop over one half the 70 Hz major
cycle, so the Fluke's weird high-frequency reading is probably fine.
(The other Dwell meter was also useless, that was a disappointment.
The scope, though, was useful, and well worth the price I
paid for it!) I hooked the Fluke 83 up to the oxygen sensor
input to the Jetronic, and most of the time it hovered right at about
0.5 V. When I blipped the throttle I could see it go up to the
0.8–0.9 V range, and when it came down it went to maybe
0.3–0.4 V, before recovering. That the oxygen sensor can
reach those voltages indicated that it probably isn't bad. I could
watch the chopped versus flatline ratio of the valve waveform breathe
back and forth a couple of times a second as it adjusted the fuel
mixture. The by-eye duty cycle seemed much more like 50% than the
Fluke's reading, I think that the high-frequency chop is really
confusing the Fluke. Offhand it all seems to be working. But I was
out of time for today.
My next trick will probably be to connect test wires to Pins 2,
5, 6, 7, 8, 15, and 17 of the Jetronic for monitoring while I drive.
I also need to take a close listen to the valve, it's supposed to buzz
in operation. I haven't noticed this, but it's not exactly quiet
under the hood! I could also build a diode-capacitor-resistor filter
to remove the high-frequency chop from the lambda valve drive so that
I can use a regular dwell meter or the Fluke's own duty cycle and
frequency functions and get numbers I can trust. This might also
permit a Dwell meter to work right. I need to investigate Pin 17
(which one source identified as a duty-cycle testing connector) to see
if it's got anything interesting on it. I should also probably
complete the resoldering of the Jetronic.
Monday, March 15, 2010
I installed the test wire in the Jetronic, I used a length of Cat-3
phone wire, which gave me six conductors to play with. It slipped
neatly through one of the case cover's screw holes. I followed the
resistor color code for sequencing, counting solids as lower than
stripes, and assigned them in numerical order to the pins. Thus:
| PIN | COLOR | FUNCTION
|
|---|
| 2 | Orange | Oxygen Sensor
|
| 5 | Orange/White | Ground
|
| 6 | Green | Idle Switch
|
| 7 | Green/White | Oil Temp/WOT Switch
|
| 8 | Blue | Power
|
| 15 | Blue/White | Lambda Valve
|
At the free end of the cable I cut and stripped each wire to a
substantially different length, to help avoid shorts. I didn't have
time to resolder the rest of the unit (stupid Daylight Savings Time!),
so I installed it back in the car as-is. (I'll finish resoldering
later.)
...On my way to work the system behaved as I think it ought: the
initial cold-start O2 sensor voltage was 525 mV and
ranged up to somewhere around 750–800 mV before closed-loop
operation began. Thereafter the voltage swam back and forth across
500 mV a couple of times per second, as it ought to. (The
bargraph feature of the Fluke meters is invaluable there. There's
quite a swing, a good 500 mV on the freeway.) I saw voltage
extremes on throttle transients from around 800 mV down to near
0 V. At idle it was very good at holding a pretty steady
500 mV reading, it didn't need to 'swim'.
On the way to band and thence home the behavior was the same. On
deceleration I think I saw about 830 mV as the highest voltage,
15 mV as the lowest. The car is running well right now, little
sign of the logy feeling. Still a bit lumpy though, but if this is
indeed a fix it'll take some time to blow the gunk out of the engine.
I'm stoked!
Wednesday, March 17, 2010
This evening I had another shot at it, I first checked the power
quality (Pin 8) and found 13.1 V on it, with 96 mV of
5 kHz ripple. (This is its own internal chop frequency coming
out.) This is probably just fine. I then used the 'scope to probe
around the connector pins, Pin 17 has what looks like a
non-chopped low voltage frequency valve waveform on it, so I rewired
the test cable to:
| PIN | COLOR | FUNCTION
|
|---|
| 2 | Orange | Oxygen Sensor
|
| 5 | Orange/White | Ground
|
| 6 | Green | Idle Switch
|
| 7 | Green/White | Oil Temp/WOT Switch
|
| 15 | Blue | Lambda Valve
|
| 17 | Blue/White | Duty Cycle
|
...and then hooked up the meters and went for a drive. I put the
Fluke 83 on the Duty Cycle wire (since the 87's analog bargraph
is better suited to the O2 sensor voltage) and measured
about 3.5 VAC, which varied from 69–72 Hz somewhat
irregularly. That's probably fine. The Duty Cycle signal was
hovering around 50% at idle before the drive began. I had to invert
the meter plugs to get 60% at WOT (rather than 40%), but that was no
matter. (The duty cycle is obviously referenced to the other side of
the valve, which is at B+ and not ground. Reversing the meter leads
takes care of that difference.) While driving with a lot of throttle
extremes the duty cycle ranged widely, in the 30–82% range, but
under more steady-state conditions it looked like it was going to
stick to the 45–55% range where it belongs. Some further test
driving is called for. Grounding Pin 7 (WOT switch) results in
an instant jump to 60% duty cycle, exactly as specified. When parked
and idling, after the run back up the hill to the house, the duty
cycle was about 65%, though the O2 sensor voltage was
circling the 500 mV point normally. Interesting, but likely
insignificant.
Still looking good!
Thursday, March 18, 2010
I had a bit of time this morning, so I finished the resoldering.
I made a mistake, though. While reinstalling the unit and hooking the
metering back up I accidentally clipped the Fluke 87 onto the
O2 sensor wire while it was still set to Ohms. That is
forbidden to do, I hope I didn't fry it. It, at least, was
connected to the Jetronic at the time, so maybe that saved it? We
shall see soon. (It measured about 293 kΩ,
for what it's worth. And it really oughtn't fry it, the Jetronic
itself puts 500 mV on it when it's cold.)
...On the way to work the duty cycle looked good, 60% at first. At
idle would be anywhere from 65% down to 25%, depending on
circumstances, but usually closer to 50%. Steady-state on road
conditions looked like the 45–55% that it ought to be, but could
go higher and lower.
...At lunch I had a few moments, so I popped out #7 spark plug and
found it still oily. I replaced it with a clean one from the bag of
used but clean plugs in the trunk, we'll see if the new regimen will
cure that or not. I expect it to take awhile, if indeed it's a ring
seating problem. I also unplugged the idle actuator as a test, and
the RPM's shot up. So that system is working. To give the new plug a
shot at cleaning things out I drove downtown (freeway) to Dick's
drive-in for lunch, I had a burger and a malt. I saw 83% duty cycle
at the beginning of a long deceleration getting off the freeway, and
15% when getting back on the throttle, those were the extremes I
noted. All the numbers are looking pretty good, usually right in the
center of the nominal ranges. When restarted with the engine warm
(but the O2 sensor cold), the duty cycle was right on 50%
before the O2 sensor started generating voltage.
Saturday, March 20, 2010
I pulled the new plug to see how it was doing, and found it squeaky
clean, and with the electrodes bent together! I must have damaged it
upon installation. Considering the car must have been running on only
seven holes it ran pretty well, but I doubt that two days of running
like this did anything good for the ring seating issue, or for the
catastrophic converter. I sandblasted the oily NGK (from the new set)
and put it back in. (I also gapped the Autolite and put it back in
the trunk with the others.)
Monday, March 22, 2010
Oh yes, eight cylinders: smoother, stronger, probably gets
better mileage. I believe the O2 sensor voltage isn't
sweeping quite so violently now, we'll see how it goes.
Tuesday, March 23, 2010
Getting close to time! I washed the car, it needed it desperately. I
dug out the for-sale signs, just in case I get lucky, and I used the
Apple Sketch demo application to make text-box overlays for them.
(It's really bad, but I've used this tool/technique for all
the cars I've sold.) The plan was to have them up this week, but I'm
a week or so behind schedule.
...When I picked up Daniel from school I had a recurrence of the nasty
'clicking' noise from the fusebox area, just off idle. The air pump
(?) relay was going apeshit. I also noticed that the frequency of
the lambda valve drive was wildly erratic, and I was getting
abnormally high (150 Hz) and low frequencies too, though I
believe the duty cycle sample AC voltage was normal. The frequency
could jump from one end of the range to the other from one reading to
the next. Very weird. After it warmed up a bit the clicking went
away, as usual, and the lambda readings stabilized.
...On the way home after work it seemed to be running a touch rough so
I pulled #7 plug out again. Very sooty (except for the tip
of the electrode which was burned clear), but not oily. Interesting.
(I pulled #6 for comparison, and it was fine.) I swapped in a cleaned
plug from the trunk stash as it's 'date night' and I want it on its
best behavior. I filled it up again too today,
12.6 MPG. Not great! I've noticed some blue
smoke on acceleration, especially after a long deceleration, such as
at the bottom of our hill in the mornings. Sigh.
Wednesday, March 24, 2010
I pulled #7 again this morning, and with only 40 miles on it (and two
voyages) it looked oily again. (It had been running a bit rough last
night when we got home, and remember that this is with the
anti-fouler plug extender in place.) This is really getting
old. I cleaned the two plugs (again), reinstalled the NGK BP6ES
(again), and put the Autolite 66 in the trunk (again). For fun I shot
some PB blaster into the cylinder, I doubt it can hurt. I'm going to
try coasting down the hill this morning with it idling, using the
brakes rather than engine compression to keep the speed in check.
...After work I pulled the plug again, and it was again extremely
sooty. Only about 15 miles on it. I put more PB Blaster in the
cylinder, and unplugged the cold-start injector, which feeds the
manifold in that area. (I really should block it off mechanically, to
be certain that it's not dribbling.)
Thursday, March 25, 2010
I cleaned the plug and put it back in.
Friday, March 26, 2010
I checked the plug. A little sooty, but not like before. (With all
this plug in-and-out it's a good thing I'm using the steel plug
extender, it's taking the wear rather than the threads in the aluminum
head.) I washed it with brake cleaner and put it back. I removed the
pipe to the cold-start injector and used the Harbor Freight doming
block set and a piece of pop can to make a plug to block off the feed
to the injector. (A quick rap with the punch popped out a neat little
hemispherical cap that nestled into the
injector quite nicely.) I put it under the pipe end and put the flare
nut back on. That should ensure that the cold-start injector
cannot be leaking.
Saturday, March 27, 2010
I checked the plug again, and it was about like yesterday. I
sandblasted it, cleaned it, and put it back in. Lately it's been
looking a lot better than in the recent past, but I don't
know if this is just random chance or whether I'm on to something here
with the cold-start injector. I put some water in the radiator, too,
as it's been getting low.
Tuesday, March 30, 2010
I've been cleaning plugs a lot lately, and the Handy Sandy has been
crippled for some time due to lack of sand. I wasn't able to find
fine silica sand, apparently that stuff is now verboten. But I did
get 5# of 220 grit aluminum oxide blasting media at Harbor
Freight, on clearance at about $20. It looks a lot like the sand
that's in there already, that's one of the reasons I bought that stuff
even though it was more expensive than some of the other choices.
Friday, April 2, 2010
Road trip to Yakima today. I wanted to take this car to blow out the
cobwebs in the engine, so I jumped in to prep it. (Jill's none too
happy about the prospect, it's a rather small car after all. She also
seems to think that it's going to break down, and the fact that
it never has, nor is any more likely to than anything
else we have to drive, carries no weight.) The small back
seating area will be a bit of a trial for Daniel, but he's young and
flexible, and at eight years still not all that big.
Anyway, to that end I pulled the troublesome plug and found
it a bit oily, about the same as the other recent checks. I cleaned
it and put it back. I topped off the power steering fluid, it was a
touch low. Engine oil was fine, as was the coolant. Brake fluid is
dirty, but otherwise OK. Belts look OK. Seems to be ready!
The front speakers haven't been working lately, so I pulled out the
stereo and the glovebox. Poking around they came back to life, not
quite sure what was up with that. I put it all back together, parked
the car in the lawn (such as it is), and washed the car.
Ready!
Saturday, April 3, 2010
220 miles yesterday, and the car ran pretty well. Mileage seemed up,
but it did idle a bit rough once we were there. This morning (when I
checked) the plug was oily again, but no worse than any other time
lately. I put in a clean one. (There was oil puddled in the seat
area, and no obvious signs of having come down from the valve cover.
Not sure what, if anything, that means.) Mileage turned out to be
16.7 MPG: better, but not great, but that
was into a substantial headwind. (Vicious weather yesterday,
a lot of rain and blowing snow.)
Today the weather was better, though not perfect. Some more snow at
the outset, but not too much. We had a tailwind today on the return
trip, and got 20.6 MPG. At home it idled better
than it did after the first leg.
The rear window glass is starting to come loose again, and was
rattling much of the journey. It seems to be OK for awhile at first,
but continued vibration works it loose and then it rattles easily.
Let to rest it seals up again, until the next long trip. Or so it
seems, anyway.
Tuesday, April 6, 2010

You change it, of course.
This doesn't seem to be getting any better, but it is otherwise
running pretty well now. This isn't debilitating anymore—just
very annoying.
(I was having some fun with Lilypond, the 160-byte source code
for the above music snippet is here.)
Thursday, April 15, 2010
Running somewhat poorly again, and more than 200 miles since I last
checked the plug. It was pretty oily, I changed it. I'm thinking a
roughly 100-mile plug schedule might be necessary in short-service
duty, the problem seems worst while the engine is cold. (Bursts of
oil smoke while accelerating until the engine is warm.) Ugh. This
is, umm, taxing my patience!
Friday, April 16, 2010
Filled up today, 12.8 MPG. I swapped plugs while
I waited, even with only about 20 miles on it there was a lot of
fouling. Hot today, though, I tried the AC and it seemed to be
working. The center dash vents aren't coming on, that will need
looking into.
Sunday, April 18, 2010
I popped out the glove box and pulled off the hose to the center vent.
It operates correctly, when given direct vacuum. I double-checked the
HVAC manual's appropriate vacuum
diagram, and the splitter/orifice/check-valve assembly
(50a/44a/45a/49a connected to valve #13) was connected correctly. I
pulled out the sintered metal restrictor, and it wasn't dirty. I
cleaned it anyway, and put it back. According to the spare MityVac
($5 at Goodwill, I seem to have misplaced the good metal one), the
red/black line (to the actuator) has a slow leak. That's the center
vent actuator, and that's a problem! Replacing it is a major
nightmare, as it's located inside the heater box. I bypassed
the restrictor, which allows more vacuum flow to the actuator, at the
expense of eliminating the slow opening of the air flap. (I did this
by switching the check valve to the restrictor leg of the "Y".) The
AC then worked right again. This will work until the leak gets so bad
that either the vent stops opening, or the leak prevents other pods
from operating.
The glove box light kept popping out, so I glued a little strip of
plastic (a length of vinyl phone cable insulation, slitted) into the
hole to narrow it so that the light's tab would grip better. That
should keep it up.
Today was beautiful, and warm. We had to go to Cd'A, so off
came the top, and off we went! It was nice.
Monday, April 19, 2010
Running rough, but beautiful weather. Changed the oily plug, about 80
miles on it.
Wednesday, April 28, 2010
There's been a lot of rain lately, and the soft top is leaking through
the fabric. I guess the silicone (?) treatment it had when I got it
has worn off. (It doesn't bead anymore.) I ordered the RaggTopp kit
from http://www.properautocare.com,
it's supposed to be the best stuff. (I ordered their vinyl protectant
too, for the boat.) $50. I won't count this
towards the expenses on this car, as I intend it primarily for the
other SL's.
Thursday, April 29, 2010
Filled up, replaced plug. It was very sooty.
Monday, May 3, 2010
I talked to my brother this weekend, and he told me in no uncertain
terms to GET THAT PLUG EXTENDER OUT OF THERE!
Especially as this was a tapered-seat job intended for the Chevy pickup and thus didn't fit correctly. Lately
the gap seems to be closing up some while getting oily. The theory is
that it wouldn't seal right and would leak in air, which (along with
the oil) causes a 'blowtorch' effect that might have caused extra
heating that softened the ground electrode, letting the compression
blasts through the extender's hole blow the gap closed somewhat. He
also advised that the best/easiest way to clean plugs was with a very
small (inaudible) blue flame from the acetylene torch, and not sand,
as the risk of grit getting into the engine is too high. The flame
also burns out any oil that might have gone down inside the tip
insulator, which no other method can do. Wave the hot flame across
the tip to burn off the soot, but without cooking/melting the plug
itself. Finesse, in other words. So this morning I did that. I
removed the plug extender and cleaned out the seat area of the head,
which had a bunch of gook built up in there. I cleaned all of the
oily plugs that had piled up, and re-gapped them large, about 0.040".
The plugs go into the head much farther than the (incorrect) extender
had gone, the threads in the head were getting quite gunky down at the
bottom. (Another sign of mistake.) I'm re-using the old Autolites,
the 'new' NGK has threads damaged enough that I don't want to
even show it to the head much less put it in—even a
session with the 20 TPI thread file didn't really
help enough. It had been fine in the steel plug extender, but I don't
want to risk any head damage trying to save a couple of
bucks.
He also suggested a hotter plug with a extra-large gap, so I guess
I'll probably do that. We'll see how it goes now.
...The cloud of blue smoke at the bottom of the hill this morning on
my way to work was extra-large. Significance?
...At lunch I went to Schuck's to get a hotter spark plug. The car's
rated to take Autolite 64's, yet Autolite 66's were what I
found in car before I replaced them with the
(stock rating) NGK BP6ES's! Already not one but two
grades hotter? That's disturbing... I bought an Autolite Platinum 66
which is supposedly marginally hotter than their standard 66, which is
the hottest they had on the shelf. We'll try that. $3
Wednesday, May 5, 2010
You can tell it's Spring—not! 28 °F and an
icy windshield this morning, and I seem to have a cold.
Sometimes the weather around here boggles the mind... Had to use the
space heater in the car to thaw the windows, and we're still
heating with wood.
Anyway, I installed the new AP66 plug in #7, gapped to 0.044". (I've
seen some information that opening them up to 0.042–0.044" from
the stock 0.032" [0.8 mm] can be helpful.) The plug that came
out was already oily/gassy after 70 miles, though far from the worst
I've seen it.
While I was there I cleaned the gunk out of the crankcase ventilation
tube to the air cleaner. Very caked it was. I also note that the
ill-fitting rubber hose from the smog pump to the air cleaner has
finally fallen off and been lost. Oh well.
Thursday, May 6, 2010
Oil's a bit low, imagine that! I added two quarts, brought it up to
the middle of the dipstick's marked range.
Saturday, May 8, 2010
The RaggTopp sealer came a few days ago, and today I had a chance to
apply it. I washed the top with a scrub brush and the cleaner, let it
dry in the sun for an hour or so, and then applied several coats of
the sealer. (The wind didn't help with the application!) We'll see
if this stops the seepage into the window frame, assuming it ever
rains here again! :-)
Tuesday, May 11, 2010
For whatever reason, this morning at the bottom of the hill there was
no great cloud of oil smoke.
Wednesday, May 12, 2010
But today there was a cloud, though far from the worst I've seen.
Significance?
Saturday, May 15, 2010
200-odd miles, almost time for another fillup, and it's starting to
run a bit poorly again. I took out the fancy plug and it was pretty
fouled. I cleaned it with the torch (#0 tip) and put it back.
Friday, May 21, 2010
Only 82 miles on it, but the plug is badly oil-fouled. I cleaned it, with
flame first (which didn't work well this time) and then with sand. Sure
ran better afterwards!
Sunday, May 23, 2010
The RR brakes have been squeaking, so I jacked it up and removed the
pads, which were adequate. I cleaned things up and greased the pad
edges and the retaining rods, and put it back together. We'll see if
this helps...
Monday, May 24, 2010
...No, it didn't. There goes an hour of my life I won't get back!
Thursday, June 3, 2010
New tank of gas, 'new' spark plug. Sure runs better!
Saturday, June 5, 2010
The rains finally stopped, I opened up the trunk and took everything
out to dry, and put the top down. The trunk gasket's not sealed to
its channel, water spills over underneath the rubber, I'll need to
address that.
Wednesday, June 9, 2010
Raining again. Cleaned a batch of spark plugs, including the one in
it (at about half a tank on it). I'm not sure about using the torch,
apparently I've been overheating the porcelain, because three of the
plugs had fractured insulators. I went back to the sandblaster. I
use compressed air and WD-40 and a stiff wire to make sure all the
grit is out of them.
I also topped off the coolant, it's leaking down. The oil was down
too, but not quite ready to top off yet.
Sunday, June 13, 2010
I pulled the cover off of the gas tank (the front trunk wall) and had
a look at the trunk hinges. They look like fat nails going through
the two hinge arms and a pivot welded to the car body. It looks like
you are supposed to bend a retaining tab out of the way and then pound
them out, much like the door check hinge pins. Well, I suppose if
they're not all rusty and sticking that's what you do. I pounded a
lot while I swung the trunk back and forth, but only got it to move
(maybe) microscopically. There's not much room to swing a hammer in
there. I sprayed PB Blaster all over it, we'll see if it helps loosen
things up.
Monday, June 14, 2010
I checked the service manual and I'm on the right track but, according
to Job 75-110, to remove the
hinge pin you must first remove the trunk lid (75-100) and the torsion spring (75-130). I think, however, that
just unclipping one end of the spring to remove the tension on the
hinge ought to do it. It doesn't look easy, though.
I got one spring (of two) on the squeaky hinge unclipped using
vise-grips, with both trunk and horse collar up to relieve some spring
tension. With that undone (and I'm not sure how I'll get it back!) I
still couldn't pound out the hinge pin. I pried with a screwdriver at
the head end, and got it to ootch out a bit, but then I had no more
leverage with the screwdriver. I fabricated a fork from a piece of
1/8×3/4×3" steel, and ground a wedge shape into the
end, essentially making a custom-fit 'pickle fork' for the hinge pin.
Pounding it under the pin's head with the BFH got the pin to move a
bit more, and then I welded more thickness to the fork tines and
re-shaped it again, and drove the pin out a bit more. (It takes quite
a bit of pounding.) The hinge pin no longer protrudes from the other
end of the hinge, so I'm on the right track. I ran out of time this
morning, however, and the fork isn't thick enough to go further as-is.
Tuesday, June 15, 2010
I slit a washer to fit over the pin to serve as a spacer and used the
fork to drive the pin out further. That worked, though reluctantly,
and so I repeated it: three more times! (The stack of four loose
washers is quite unwieldy.) I also disconnected the hinges from the
trunk and the horse collar, the whole assembly was fairly loose after
the pin came out of the chassis support on one end. The pin's out
maybe 1/2" now, but still stuck tight. If the pin would just come
out then both hinge arms would come out of the car for cleaning and
re-lubrication, but more work will be required to get to that point.
I reattached the hinges temporarily to protect the paint, since I'm
not done and still need to use the car.
Wednesday, June 16, 2010
More of the same. (This is getting old!) I cut a nut to serve as a
thicker one-piece spacer, and used it in conjunction with one of the
washers. I'm not sure if I shifted the pin any today or not. I
started trying to use the propane torch to heat the trunk hinge arm
where the pin goes through, that's the tight bore. I ran out of time
to pursue it very far, however. Five hours on this little project so
far, and not much to show for it. This is very frustrating. With a
crowbar fork and room to swing the BFH that thing would be right out
of there instanter, but there just isn't space. Ditto a pin punch on
the other end.
Friday, June 18, 2010
It rained fairly heavily yesterday morning, so I didn't work on the
car. Today it was better, so I tackled it again, this time using a
small pair of vise-grips in place of the slotted nut. (They stayed
put a lot better!) I worked on it for an hour, I don't think I made
any progress. This just isn't working anymore, time to try something
else. I bought a cheap claw hammer at the thrift shop yesterday, I
was thinking maybe I could make a pry lever using it. I cut the claw
side off of it and welded it to a concrete form stake, making a long
clawed prybar. I used the cutoff grinder to open up the claws a bit
to fit over the pin. I have another stake I had flattened one end as
a tire spoon, I'll cut a similar notch in that and then perhaps
together I can use them to pry the pin out, prying against the spoon
with the clawed bar as I squeeze the handles together. I ran out of
time to try it, though, so maybe we'll see the results tomorrow.
Saturday, June 19, 2010
Finished the tools, tried them. Success? Not even close! The stupid
hammer-oid was cast iron, and shattered even before any real force got
put on it, while I was still pushing it around trying to fit it into
place. Purest crap. The bar itself was steel, though, so I cut the
hammer piece off and got out the acetylene torch and the anvil and
BFH. It's blacksmith time! Once the end of the rod was red-hot I
flattened a curved claw-like shape onto the end then cut a notch with
the grinder and ground off the worst of the lumpiness. With a similar
notch cut into the now-former tire spoon I tried to fit it in place,
but there was too much crap in the way and the handles were too long.
I emptied the trunk, including battery, box, and spare tire. With
that all out of the way I could lay in there and see what I was doing,
and still fit the prybars in place with a little room to move them.
Putting all my negligible strength onto them, forcing the 1.5' handles
together, POP-CREEEAK-CREEEEEEEEEEEEAK, I got the pin out about
another 1/4" or so. I'm on my way! No way it would have worked
with shorter handles on the prybars. I sprayed some more penetrant all
over the place and went inside to take a break. I need to rig things
so there's no paint damage once the pin comes all the way out, so a
bit more thought is required.
...I put a towel under the trunk and horse collar, so that when they
come off the hinge they'll land on it. Then I removed the pin.
Easily, now that I'd gotten it moving? Hell, no! It fought me
equally hard every step of the way, even with strong tools.
I can't believe how tight that thing was in there. My tire spoon
prybar started bending at the tip, so I cut it off to get down to a
thicker part of the bar and reground the notch. Once the prybars were
out of travel I found that I could stack a succession of large nuts on
the pin. They fit over the pin's head yet bottomed against the hinge
bracket, then I could pry anew against the nut stack. I ended up
using my leg to push against one prybar while the other was wedged
against the battery well. It was still extremely difficult, and took
a couple of hours to get it all the way out. The pin ended up bent
pretty badly, I doubt that it can be reused.
The hinge bores are nylon-lined, I'm really surprised at how this
thing was acting. The hinge pin didn't really look rusty either,
though it could have been scrubbed off. It's possible the hinge pin
was defective all along. In spite of my care I picked up a small
paint chip or two, but they should repair pretty well.
Halfway there!
Things to deal with while I'm there: There is a bit of rust under the
battery box, and a bit more starting up in the spare tire well again,
and the cause of all this is (I think) glue failure on the trunk
weatherstripping where it goes around the problematic hinge. The
brittle plastic battery box (107 843 00 05) also has
some chunks off of it that can probably be glued back.
Sunday, June 20, 2010
It rained all morning, but in the afternoon it cleared up so I opened
up the car and had at it. I used the wire brush to remove the rust on
the battery compartment floor, exposing a crack. I welded new sheet
metal over the crack, I did a pretty crappy job but it's better than
it was. (The undercoating kept catching on fire!) I wire-brushed the
result and painted it black, then when that was dry I re-undercoated
the area, inside and out. I cleaned out the two rubber drain plugs
and put them back in.
I then pulled the trunk weatherstripping out of the channel where it
was leaking, and used a hose and toothbrush to clean the dirt out of
the channel. I gouged out the loose glue and wiped it all dry. I
cleaned the weatherstripping and dried it too, then I got out the
weatherstrip cement and glued it all back, making sure to completely
coat the surface on the trunk side. (This should keep the water from
spilling over into the trunk, and in the channel where it belongs and
can drain rearwards.)
The other battery box retaining strap was starting to crack like the
first one did, so I welded it too. It got ground, brushed, and
painted as well.
The battery hatch hinges were rusted solid, and a couple of days
soaking with penetrant hadn't really helped. No matter, I know the
trick: I used the acetylene torch to put a red heat on them, and they
loosened right up. I then brushed and painted them, then oiled them.
Lacking any big rivets as used originally, I reattched the hinges to
the plastic hatch cover using some large sheet metal screws driven
into some aluminum strips (cut from dryer vent pipe) with starter
holes drilled in them. It's solid enough.
The plastic battery box itself was cracked and broken, so I started
gluing it back together with Shoe Goo. It'll take a few sessions to
get it done. (I don't think I have quite all the pieces, but it'll be
OK.)
...In the evening I glued some more pieces of the battery box back on.
One more session ought to do it. I think there's only one 4-inch
piece of the sealing channel that's actually missing, that's not too
bad. (It's like doing a dirty, deformed jigsaw puzzle.)
Monday, June 21, 2010
Raining hard again, so all I did was more gluing on the battery box.
I found a bit more that needs gluing, so I think that another session
will be required. I cut the broken EPDM lid seal ring ends at a bias
with a razor blade and glued them back together with cyanoacrylate
glue, making a solid ring again. Just before I went to work I applied
the last of the glue, as the last stuff had set up enough to hold its
position by itself.
Tuesday, June 22, 2010
Pin-straightening day! I got out the anvil, BFH, and acetylene torch.
I straightened most of the pin with just the hammer, but the cocked
head needed heat. With a bunch of tapping the pin ended up about as
straight as one can make it that way, but naturally it was all dimpled
from the hammering. I then took it over to the grinder and skinned
it, spinning it while holding it gently against the flat of the wheel
to take off an even layer while smoothing it. I then got out the
hinge arms and ran a close-fitting drill bit through the bores to
clean them out, being careful not to damage the nylon bushings too
much. I then dry-fit the pin through the hinges, and kept skinning it
until it slipped in all the way. This will be a looser fit than
factory, but far better that than too tight! A final wire-brushing
smoothed the pin nicely. I then checked the pin's fit in the brackets
in the car and it was fine. I had to use the hammer to bend one of
the bracket ears out a bit where it had gotten pressed inwards by all
the prying. I also had to do some finagling to get the pin retaining
tab bent back out to where it could be used again, it had gotten
pretty beat up during the removal.
Time to do something constructive! I greased the pin and the hinge
bores and faces, and assembled the hinge. The two arms moved easily,
yet with no noticeable slop. I bent the retaining tab down to hold in
the pin, then attached the horse collar and the trunk to their hinge
arms. The paint should be safe now! Both panels move easily.
While I was there I touched up some of the black paint inside the
trunk and tire well.
To reinstall a non-broken battery box you actually have to
remove the ground cable from the car, and that's where I ran into
trouble. The bolt was badly rusted and the captive nut broke loose
from the frame, and there doesn't seem to be any way to get at it from
the bottom. There's a rubber plug directly under it on the bottom of
the car, but it appears to be a decoy. The nut is captive inside the
frame, and not accessible at all. (Visibility is very poor through
the hole.) I sprayed penetrant all over and put everything away, I
was out of time anyway.
Wednesday, June 23, 2010
I played with the battery cable bolt some more, and it was unimproved
from yesterday. So I got out the grinder and cut away the side of the
frame, exposing the nut. Turns out it was a regular hex nut with a
press-in flange, and you can reach it from below, but it was
14mm and I couldn't get any of my 14mm sockets through the bottom
hole! I put a wrench on it and got it out, then I cleaned up both
bolt and nut, using the wire brush and a tap and die set. I then put
the nut back in place and welded it to the frame, gently I hope. It
seemed to hold, anyway. I then put the bolt in it to protect the
threads and welded up the hole I'd just cut in the frame. That took
awhile. I ground it back down to profile, re-welded the exposed
imperfections, and ground it down again. I then wire-brushed the
area, and cleaned up the nut and bolt, again. I painted the general
area, but not the battery cable attachment point.
Next was the battery box, which I finally got to put back! It works
best to remove the grommet from the negative battery cable and insert
it in the box first, then thread the cable through it and attach it.
I used anti-sieze compound, that should prevent this problem from
happening again. I then painted the bolt attachment area. The
positive cable grommet was a real pain to get put back because you
have to do it with the cable through it, but I managed. When I put
the battery in the box I found the source of part of the problem: the
battery is too small, and if the box is intact the cables don't reach
the posts! I pulled on the positive cable to break loose (partially)
some of the gluing I'd done on the box, enough to get the clamps
attached to the battery. I then bolted the hatch cover hinges down,
and then finally the box retaining straps. As I was out of time for
more I cleaned up the area, but at least the car is driveable again.
As the rains have again stopped and it warmed up 20 degrees or so it
was nice to have the car back in service.
Thursday, June 24, 2010
I hooked up the torsion spring. Now that was a royal pain!
The secret tool turned out to be from an old MB in-car toolkit. It's
a weird hex extension rod, P/N 000 581 38 01, made
by Matador, W. Germany. It has an 11mm male hex end, and a 10mm
socket end. What was magic about it was the length, not too long and
not too short, and that it has a hole bored in the 10mm socket end
that's just about the right diameter for the torsion rod. I cut a
strip of sheet metal and rolled it up as a liner for the hole, which
made for a nice friction fit over the torsion spring end. I then used
the vise grips to wind up the torsion spring a little, enough to allow
the tool to slip over the end. With a socket over the pokey end of
the tool to ease the pain on my hand I could then wind up the rod the
rest of the way, and then push the back of it upwards into the notch
in the hinge, pulling up hard on the end towards the hinge whilst
pushing down and forward towards the hinge on the far end. Sounds
fairly straightforward, and it was...the last time which finally
worked! I spent quite a bit of time trying various tools (including
this rod) and techniques that did not work. The secret is a
comfortable rod of a nice length, with a snug-fitting hole (6mm?)
bored axially in the end. Any slop and the tool cocks at enough of an
angle that it runs into things like the filler neck that prevents you
from pushing at the necessary angle to slip the spring into the notch
in the hinge. (Hence the sheet-metal hole liner, which was the final
bit of magic.) Or you could just take Job 75-130's advice and purchase the
special spring tool, P/N 107 589 00 37 00.
I then painted the chewed-up end of the torsion rod, as well as the
general hinge pin area.
There was some suspicion that one of the expansion tank fuel lines was
weeping at its connection. It had a bit of slack in it so I cut off
1/2" and reconnected it. The cut-off piece actually looked pretty
good.
It was then time to put the trunk wall back, which took a lot of
fiddling. I had to remove the battery hatch again in order to fit the
panel into place. Do not tighten any bolts down until you
have them all started! The worst part was getting the expansion tank
screw started, it didn't want to fit. I then put some non-hardening
RV window putty between the trunk lid skin and the support channels,
which cures the rattle. The trunk now feels and sounds like a
Mercedes ought to when you open and close it.
I still have to reattach the carpet I peeled back from the bolt heads
on the trunk wall, but this little project is getting close to done,
after 21.5 hours so far!
...After work I filled up again. In honor thereof I put in a clean
sparkplug.
Friday, June 25, 2010
I touched up the paint chips that I'd gotten while working on the
trunk lid. Since I was there I also touched up some other chips that
I found on the lower lip of the trunk lid, and back behind the license
plate. I glued back the trunk wall carpet, I used contact cement. I
used more weatherstrip cement to glue/seal more of the trunk
weatherstrip, in the hopes of keeping water out in the future. (I ran
out of glue, in fact.) I then vacuumed and reinstalled all the
carpets, and reattached the lower antenna mount. There was a missing
clip for the antenna's carpeted cardboard shield, so I got some
hardware from the junk box and rigged something to hold it in place.
I tested the trunk light, it still worked. (Impressive in a way,
considering how much stress got placed on the wire back by the hinge
during all this.) I then cleaned up the trunk contents, putting away
this and that. I put my toolkit in the pocket next to the battery.
There, done! Let's call it 22 hours, though I bet that's short.
...At lunch I took a break and walked down to Schuck's (or whatever
they're calling it these days) and bought some more weatherstrip
cement, a quart of oil (emergency kit), and a proper sparkplug
anti-fouler ($5 for two). After work I installed the anti-fouler on
#7, we'll see if it helps any. (It has the correct seat and so should
seal better than the last one I tried, and the threads are long enough
to keep the threads in the head from getting gunked up.) About 18
miles on the plug from yesterday's fill-up and it's already getting
oily. Even if this doesn't help much with the fouling, its presence
makes the plug a lot easier to change on a hot engine and
cuts wear and tear on the head's plug threads. It's funny just how
much difference a fresh plug with no anti-fouler (compression reducer)
makes in the 'feel' of the engine. Much stronger and
smoother—for a few miles!
Wednesday, July 21, 2010
Car's been filthy lately, so I washed it.
Friday, July 23, 2010
Naturally yesterday was a blowing duststorm, followed by a smattering
of rain. So today I got to wash the car again!
I also noted at lunch that the AC seems to be inoperative, though the
compressor was engaging. Probably low on refrigerant again. Seems to
last about two years. I dropped by the sporting goods store to stock
up again. $5/can for the base material.
Sunday, July 25, 2010
I attempted a recharge, and I could only get 50 °F vent
temperatures. I think I should have vacuumed out the system first,
the balance of the two base refrigerants is probably off. I was less
than enthusiastic about doing it though, since the vents aren't
working right at all now. I suspect the center pod leak has gotten
bad enough that it's disabled all vent control.
Friday, July 30, 2010
Another tank, another (badly oil-fouled) plug. Sigh.
Wednesday, August 11, 2010
Back from vacation, the car started instantly this morning. It always
seems to prefer being left alone for awhile.
Today Craig's List came through again:
Convertible top only!
Complete assembly. Mercedes Benz original, factory convertible top for
R107–W107
Fits all 450SL, 380SL, 500SL, 560SL, 350SL from 1972 to 1989. (Also
euro version 280SL from 1974+. No, it won't fit 230SL, 250SL, 280SL.)
This is complete with the entire frame assembly and canvas. Just bolt
on your SL.
Frame is perfect. Hinges are complete and work perfectly. Canvas is
dark gray / black in very, very good [condition] with no holes, no
rips, no wear. Window is in very clear with no scratches or
yellowing. Tan headliner is excellent. All rubber molding is
excellent. Very clean. From a cigarette-smoke-free 1985 380SL.
Easy install—only 4 bolts.
$280.
509-217-XXXX
Sweet! The pictures looked very good. I called, and made
arrangements to get it after work, in the car. We dropped by where he
had it stored, and it looked very good. The plastic windows were
clear, though with the normal amount of scuffing, the rubber seals
were intact, though in need of a touch of gluing, and the top was
good, both inside and out, though dusty. The frame was not
rusty, unlike my original. Sold!
The top was from a parked car that got whacked in the front, enough to
ruin the water pump, etc. Nothing good left on the entire front he
said.
The guy expressed an interest in my old frame, and Jill
was very interested in not bringing home two, so we
made a deal: for $75 he got my old one. (She was bouncing up and down
and saying "Yes, yes!" right from the first. Honey, we
have got to work on your negotiating skills!) Yes, properly
marketed I could probably have gotten more, but this is done
now and is not itself a project. That's worth something right now.
He got out a 13mm swivel socket wrench and we swapped tops, it took
about a half hour. It was a bit fiddly getting the frame back in
place and all the spacer shims back where they belonged, but nothing
too onerous. The front turn latches (a bit rustier than mine, but who
cares) cinched down well, but the rear peg wouldn't reach the hole.
I've seen this before, the canvas has to be wet to stretch a bit
before it'll reach, they get that way in storage. No big deal, I
imagine. The bow hinges aren't quite as easy to work as the old ones,
but some oil and use will probably take care of that, just as it did
on that one.
I'm very happy that the top is now 'dealt with', and in a
ready-for-sale condition, for about a $200 net expense. I should wash
and waterproof the top, and the guy suggested Meguire's plastic
cleaner to take off the fine scratching. He also suggested that I
might try Castrol 20W50 oil to see if it helps with the oil
consumption.
Saturday, August 14, 2010
WalMart wanted $4/qt for their Castrol 20W50, so today I hit the
McParts store. They had Chevron 20W50 on sale for $2/qt, so I bought
a case. (Regularly $3.29/qt.) That and some 'rebuild-in-a-can'
stuff. We'll see if we can't cut the oil consumption some. It's
about time for an oil change anyway.
Tuesday, August 17, 2010
Time for another fillup and spark plug. After work I drained the oil,
looked like a diesel's oil it did and at only 4900 miles, and replaced
it with 6 quarts of the 20W50 and the Restore. About mid-dipstick,
we'll run it once and then see about the level.
Saturday, August 21, 2010
It rained in the night, so I raced out and put up the top. It wasn't
easy, so in the morning I loosened the frame and adjusted the
positioning. That helped. I lubed some of the pivots, the ones that
I could reach (the back bow). Since the top was so tight, and the
rain mudded the car, I washed it in the morning and thoroughly soaked
the soft top, then I forced it down into the clamp and tightened it to
let it dry stretched. I'm hoping that this will help loosen it up a
bit.
Friday, August 27, 2010
Replaced the burnt-out RR stop light bulb.
Tuesday, August 31, 2010
Ordered new brake pads, all around. Pagid. About $80. Also bought
12 more quarts of 20W50 while they were on sale (last day), that
should be enough for two full changes plus an add or two between.
Thursday, September 9, 2010
One of the side quarter windows in the 'new' soft top had developed a
1/8" crack in the middle, probably due to a careless stowing. (You
really have to be careful to tuck these just right or they get a
pointed crease in the center.) Damn! I used a red-hot piece of wire
to melt it out, presumably ending the possibility of a stress run,
then a bit of Shoe Goo over it. Doesn't look that nice anymore, but
looks way better than a big split all the way across, which
is what its fate was if I didn't do something.
Sunday, September 12, 2010
Brake day! The car's been grinding and shrieking on the right side
for some time now, and the parts have been here. I jacked it up and
found the outside of the front disc ground by the metal backing plate
of its pad. Not good! Obviously the brake-wear sensor isn't working.
It was ground enough that I didn't want to put in a new pad just to
see it chewed up, so I put in the best one that I'd taken out of the
560 SEL
yesterday. We'll see if it can smooth it up a bit first. The
rear squeaking pad had a loose piece of brake material, and looked
like it might have been semi-metallic (noisy) anyway, so I also
replaced it with the best from the other car. The other side looked
OK still, approximately equivalent to the 'repaired' state of the
other side, so we'll continue on this way for a bit and see if it's
better. I rotated the tires, it was desperately in need of it.
(Outside edges of front tires wear off quicker.)
Monday, September 13, 2010
The trim underneath the driver's headlight had lost its screw some
time ago, and kept coming loose. I found that the captive nut had
shifted, and put it back, then replaced the missing screw with one
from the junkbox. I also topped off the power steering fluid.
Monday, September 20, 2010
I had a seriously low LF tire today, I noticed it at band and so drove
home extra-slow. It was 5# (!) when I checked it at home. Sheesh!
Tuesday, October 12, 2010
Two quarts of oil today, and I put in some old antifreeze I'd found in
the garage. (Cleaning up.) Also pumped up the LF tire again.
Sunday, November 21, 2010
Switched over to the Frankenheap for the
winter driving season.
Sunday, January 30, 2011
Dried out the car with the heater, and put the battery on charge, and
aired the tires. Just a little mid-winter touchup.
Another large chunk of clear coat has peeled off of the hood. Crap!
Monday, May 9, 2011
Time to start driving the car again. It started up instantly.
Did the fluids and air thing, no problems.
Wednesday, July 6, 2011
AC has been unresponsive lately. After work it was 92 °F,
plenty hot enough to do AC work, so I checked the pressures and they
were essentially nil. (Less than a year retention, it looks like.)
So I got out the vacuum pump and other fixin's and charged it again.
I stopped when I started to get wonky pressures; the compressor cut
off yet I was still only down to 59 °F on the vents. The
vacuum control of the venting seems inoperative, there was no action
on the center vents and the defrost ducts were open. Leak? There
was vacuum at the distribution cluster under the hood.
Friday, August 19, 2011
I stopped by the U-Pull today and bought a gallon of used antifreeze,
$2. The car leaks and is low, almost the entire gallon went in.
Oops. I don't want to do a proper cooling system service until after
the engine problem is resolved.
Friday, April 13, 2012
'bout time to get the car out again, so I aired the tires, charged the
battery and checked the oil. (It needed a bit.) The car started
instantly, and moved off normally. For awhile Jill will be driving
it while we sort out her summer car needs.
Friday, April 20, 2012
Took car to see Fernando at Motortech, for professional help
dealing with the fouling problem. We'll see.
Wednesday, May 16, 2012
Picked up car today. He said it had low compression (60#) on that
cylinder, and that the engine was thus toast. $80 for the diagnosis.
(And storage! :-)
Sigh. I don't know that I believe him. If the cylinder was all
crapped up due to an oily plug not firing just prior to the test I
could easily believe the valves did not seal correctly during the
test. I saw much better numbers when I
tested it.
Wednesday, June 13, 2012
After yesterday's debacle with the
560 SEL coolant I decided to park it, and
drive this car instead.
Wednesday, August 8, 2012
Another quart of oil, the gauge was flickering.
Thursday, August 9, 2012
Recharged the AC, wasn't really all that long since last time. Got it down to about 47 °F at
the vent. Also added some coolant. There was a fair amount of
exhaust under the hood, seemed to be on the driver's side.
Inconclusive.
Thursday, August 16, 2012
The AC is definitely leaking, there's oil all over the receiver/drier.
Crud. The right window switch dried up and jammed, so today I took it
apart and greased it. Back to normal operation.
Wednesday, August 29, 2012
I have come to terms with just getting out from under this car, rather
than following my original plan of not losing money on it. I find that
I've put maybe 20,000 miles on the car in five years, which I can use
to justify some 'loss'. The car needs a few things, but I just don't
have time for this one, it needs to go away.
I began preparing the car for sale. I removed the test wires I had
connected to the Jetronic control box, and
reinstalled the floor panel and carpets. I then vacuumed the interior
and tidied up the trunk. Mostly cleaning and photography left to do,
now.
Thursday, August 30, 2012
I dug up the title and the spare key, that took longer than expected,
and made the insert for the For-Sale sign. (Using Apple
Sketch—ancient!) Asking $3200 right now. I taped the inserts
to the signs. I then washed the car and removed the hard top. (First
time this year!) I used a damp rag to mop out the interior, it was
dusty. I then parked the car fetchingly and began photographing it
for the sale page. It was a dewy morning, so I had to wait quite
a while for the car to dry sufficiently to get good photographs.
During the day, when the car was parked, I made sure to park it in
visible places and with the signs up. It begins!
Monday, September 3, 2012
We're back, so I put the car onto craigslist.
Tuesday, September 4, 2012
First call on the car, from a drive-by. Directed him to the web page to answer his questions.
Saturday, September 8, 2012
Three nibbles on the car today. Two pedestrians and one from the CL
ad.
Sunday, September 9, 2012
The car sold today! Kathy (from the CL ad.) called and wished to come out and
see/drive the car. Which she did. She made an offer for $3000, which
I accepted. We cleaned out/off the car, put in the extras (except for the
CD, which I couldn't find), put the hardtop back on, and signed it
over. I ran over the care and feeding of the beast, and then we drove
off to her house. Jill followed me to pick me up, and then we went to
the fair.
That's a big relief off my mind, I just have too many cars and other
projects to keep up with. Now there's one less.
When we got home I took the ad. down and fixed up my web site.
Monday, September 10, 2012
Yikes! I went to the issuing bank today to cash the
check, and they said it was only for $15,
not $1,500! (The written-out amount omitted the word
"hundred", a fact that neither I nor Kathy noticed at the time.
Oops.) The issuing bank also wanted a $5 'non-customer' fee, 33% at
this point in time. I declined both options and, in a bit of a
twitter, went home and phoned and e-mailed the buyer.
Tuesday, September 11, 2012
Today Kathy dropped by my work (in the car!) to exchange a packet of
Franklins for the bad check. No problems. I'd also found the
maintenance manual CD by then, and was able to give it to her, and was
able to show her that the door locks were merely a bit stiff, not
inoperative.
Saturday, September 19, 2015
Blast from the past! The car had managed to collect some parking
tickets, and the new owner had not transferred the car into her name,
so the court was after me. Using a Vehicle Record
Request I was able to acquire a Report Of
Sale from the State, and
forward it to the Court. Let's hope
this is the end of it.
Wednesday, October 28, 2015
What a pain. After much messing around, e-mailing the report to the
court, having it printed there and mailed to me, with instructions to
mail it back in, I finally got the dismissal letter.
Thursday, May 12, 2016
I was driving at 1st and Pines and there was the car! It was looking
pretty rough, the clearcoat is coming off big-time, and somebody had
put weird aftermarket wheels on it. It was sitting in front of a
shop, apparently it's not running right.
Saturday, March 25, 2017
I was over at Motortech dropping off the SEL, and
found this car in his boneyard. He was parting it out. Very sad,
after all the work I'd put into it, but maybe it can help keep other
cars alive.
Return to Site Home
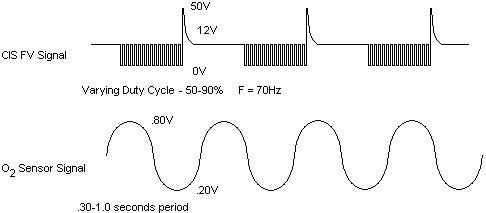