Luckily, there was only a hole in the top, the Mog idled nicely as I contemplated things for awhile. I got the crane out of the tank and properly mounted on the Mog, then I stuffed a rag into the tear and threw a board over it all to keep the rain out. The Mog sat for awhile after this, as its owner was somewhat depressed. And busy.
I thought about my options. While I'm sure I could purchase a new tank, I was pretty sure that this would be on the expensive side. And, as my tendency is to buy a new tool rather than a new part, I decided to try to repair this tank. I knew it was going to be grueling, but I had no idea... Other people suggested I just buy some off-the-rack truck tank and hang it in place. But the Mog's tank has some nice features that I would lose this way. The guy at the welding supply store said that welding sheet metal was hard, and welding used fuel tanks was really hard because the fuel seeps into the metal's pores and contaminates the weld. But, to paraphrase something from "Annie, Get Your Gun": Anything you can do, I can do... eventually. Or so I generally think. Really hard is not the same as impossible, right?
First I had to drain the tank. So I had to make a place to store the fuel. I had a clean(-ish) 55-gallon barrel laying around, with barrel pump, so I washed it out and then dried it thoroughly by pointing my shop heater at it and stuffing a small leaf blower into the neck. With some judicious rocking around at times this managed to dry the barrel. It took two days. (I do such things in the mornings before I go to work.) Then I was able to pump out the tank using the barrel pump, and I rolled the barrel into the garage. (The Mog's large filler neck is sure nice!) Oh yeah, I filled the shop heater's tank too while I was at it.
After dealing with some straightforward rusted-in-place mounting bolts, the tank lifted off the Mog. And started leaking! Underneath the mounting bands the tank had rusted half-through, and what with this and that mechanical trauma some cracks had developed in the corners. I'm surprised the tank wasn't already leaking, I don't think the crane had actually caused all of the tank damage. It was a pretty clean punch right through the top after all. And it didn't leak until I dismounted it. The mounting bands and the hardened rubber underneath them were acting as a truss I guess.
Anyway, with the tank off I drained off the residual fuel. Looking at the tear, it had deep lips going inwards. Some prodding and prying showed that this wouldn't be easy to get straightened out. And, with the crunched-in corners I decided on another approach. I would cut the end off the tank, and then hammer out the dents that way. Then I could just weld the tank back together.
Sounds nice doesn't it? (Stop cringing!) The first part was easily accomplished with my Sawzall and a BFH.
As I had only a stick welder and an acetylene torch, I decided that for the repairs I would braze, and then use the stick welder to stitch up Frankenstein's neck. I was able to braze the tear back together pretty well, as well as some of the cracks. But others didn't want to seal well. Also, I brazed over the thin rusted spots (after wire brushing all the rust off) to bolster them. This also seemed to go well.
So far so good, now it was time to stick-weld the two tank halves back together. I wire-brushed and ground the edges clean, and set the tank back together. Using the stick welder, I spot-welded the two halves together in several places. After prying the wavy edges to line up better, I began to weld. Well, I call it welding, but I'm not sure what I was really doing. I've only done a little stick welding before. Eventually I was able to stop burning so many holes in the tank. (I got pretty quick at filling those in, yes indeedy.) Eventually I got a ratty looking bead around the tank, and decided to do the first test.
I pressurized the tank, and heard a lot of hissing. (This I expected, Rome wasn't built in a day after all.) But when I slopped water onto the tank, I got a shower! All of the bead leaked, and most of it not just a little.
Sigh, here goes nothing. Thus began a seemingly-endless cycle of grinding, brushing, and welding. I started on the top, as I figured that was the least critical area and that I'd get better as I went. Initially I had not fully appreciated the necessity of cleanliness, and I tried to just weld over the pinholes. This never worked, because the holes were due to contaminants, mostly fuel residue. Also some slag, as the slag removal process was difficult. (You can't bang on a tank too hard with a pointy hammer, after all!) I spent weeks (an hour or two in the morning, 4-5 days per week) on this, and never really got anywhere. I had figured there would be some learning curve, but I apparently wasn't learning anything at all.
Rather than give up I went and bought a "glue gun" (wire-feed welder). I knew that I wanted one of these, but I had been waiting until the right project came along. It was obvious that welding this tank was very difficult, and that I needed all the help I could get. I had heard that welding of this type was easiest done with a wire-feed welder. I selected a Miller 175A 220V unit, which had the advantage of plugging right into my existing welder socket. (I'd have had to run a 110V circuit to that doorway in order to use a smaller welder. More work! This will be done eventually, but not yet.) Up 'til then I wasn't committed (financially) to the repair of the tank, but once I'd dropped the serious bucks on the welder there was no turning back. This tank would live again!
In a (mistaken) effort to try to save a little money, I bought the small bottle for shielding gas, and a small spool of wire. Big mistake! This runs out much too quickly, especially if you don't know what you are doing.
With this welder, I was able to go a lot faster. The adjustability of the welder was nice, and the lack of slag was a real plus. But I was still having a lot of trouble getting a clean weld.
All through this welding I had been able to (eventually) seal a spot up, but cracks would form off at the edges. So my 'pool' of welded area kept growing as I tried to fix these new leaks. And the center of the pool was leaky too, as of course one edge of each weld was on the inside.
In desperation, I cut out this whole chunk of crappy weld and fit a new piece of sheet metal. And the process began again, with pretty similar results. What's worse, the spread of the welded area had gotten into the brazed areas, which was really bad.
Cleanliness. Yes, that is important. If there is anything in the weld besides steel, it won't seal up. Eventually I started to make progress. This was because I started to get really aggressive with the grinding. I'd put on a bead, and if it leaked I'd grind it all back off, usually taking some of the contaminant with it. Grind, brush, weld, repeat. Over and over. The weld got cleaner each time, and eventually I'd get a good bead and it would seal. It looked really bad, but a long time ago I'd given up on how it looked. When you got a good bead, it was pretty obvious from the way the metal just puddled together, cleanly and quietly.
Eventually I started to make more forward progress than backwards. As I mentioned before, the brazing was a bad idea, because if I needed to weld in that area the brass was a contaminant. Those half-rusted-through areas didn't need bolstering, they needed covering up by new steel! The metal was so rotten underneath the brazing that as I worked with the tank, cracks opened up in the brazed areas. And with all the brass in the area, I couldn't weld the cracks back shut! Attempts to braze over the cracks didn't work, they'd just open up again, or at least nearby. I ended up welding strips of new steel over these areas, tying into the still-good areas alongside where the bands had gone. Yes indeed, the other key to making this work: new steel. I bought a couple of small sheets of this at the hardware store, and cut strips of the appropriate sizes. The difference in weld-ability of the new steel being tied into good clean parts of the tank was dramatic. I had relatively little trouble once I started doing this. When everything went right the welding process was so clean and easy. It was almost like using, well, a glue gun!
Things were finally going well, and in an ironic twist, the last problem I had was with the original tear that I had brazed shut. It cracked, and I ended up grinding off a lot of brass and then welding a chunk of new steel over the top.
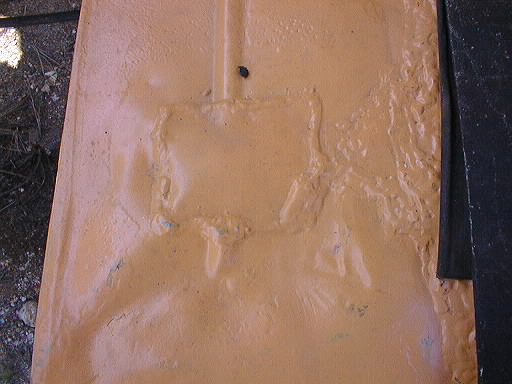
Finally it was all sealed up, and no bubbles would show up with the tank overpressured and with water poured over every weld. All told I ended up using two small spools of wire, and most of another large spool. I emptied one small tank of shielding gas, a big tank, and half of another big tank. What with all this, buying the original welding sticks, and buying the wire-feed welder, this has not exactly been an inexpensive project. On the other hand, I'm not afraid to tackle a welding job now, and I have pretty much everything I'd need.
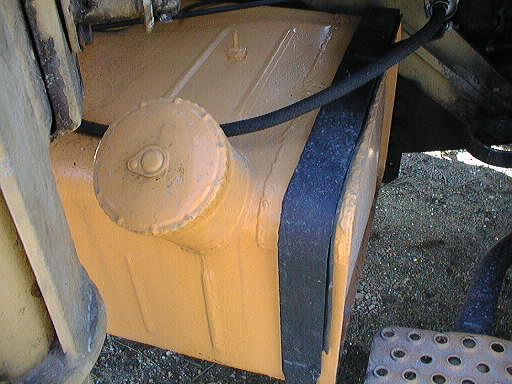
Anyway, I wire-brushed the whole tank to remove any slag, oxidation, rust, and loose paint. I then washed and dried the tank and let it sit for a day. The next day I primed the tank, and then painted it. After all this the tank was looking pretty sharp I thought, even with the really crappy welds. I put back the pickup and return tubes, and remounted the fuel level sender. I used RTV gasket material to augment the existing tired gaskets, as they had leaked when under pressure.
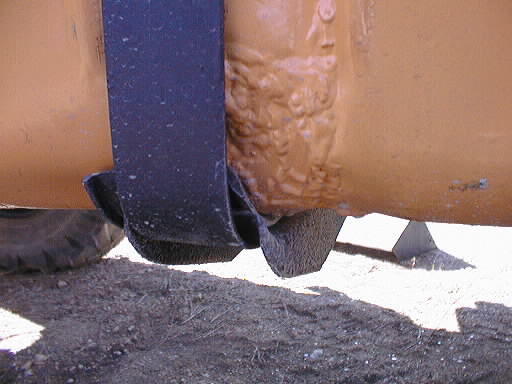
I had to do a similar clean and paint process on the mounting bands. Then, I was finally ready to mount the tank. I was unable to get the one band to join up going around the tank, due to the irregularities in the shape of the tank (warps, welds, bumps, and hollows). I had to join the two ends of the band with a thread or two of the joining nuts, and then drive the band over the end of the tank with a hammer. This scuffed up the paint a bit, but by then I didn't care. I just wanted this job over! The other band, being different in nature, was not a problem.
Pictures:
With the tank hung, I reattached the lines, and then pumped the fuel back into the tank. I bled the fuel system and started it up. It ran! No problems. I drove around the property a bit and it was fine. So the next day I drove it to work, with the intent of giving it a road test and of filling the tank the rest of the way.
It got to work just fine, but at lunchtime on the way to the fuel station I started getting classic fuel starvation problems. I was able to get there and put in $20 worth, but it was a pretty dicey process. (I wasn't out of fuel, I still had nearly half a tank.) I decided to go home instead of back to work, and it was slow. The Mog nearly died many times, and actually did die several times. I had opened the filler neck to relieve any vacuum, and while this did seem to help marginally at times, it wasn't the problem.
Going up the steep final grade was the worst. It died several times, and I'd get it started and manage to go some number of yards up the hill before it died again. Very frustrating! But I finally got it home and parked it. I drove off back to work in a car, very late. The Mog sat for a couple of weeks. I was depressed, and I had plenty of other things to do.
Finally I had a little time to look at the problem, and it was apparent that the first in-line fuel filter was full of crap. Little slag bits and such. While I had washed and dried the tank, and vacuumed it out, there was apparently still plenty of junk left.
So I replaced this filter with a reusable filter I had laying around. (It's a sausage shape, with a sintered element in it. Supposedly you can clean it and blow it out, and then reuse it. I liked the idea of using this at first in order to get all the crap out of the tank without going through a box of in-line filters.
With the new filter in place, I bled the system. It took awhile, but I was finally able to get it started. The Mog ran fine, so I took it for another spin. This time I started out going up the hill first; I figured I could always coast back down.
Good thing, too. Because 100 yards up the hill it all began again. The main fuel filters were again full of air, so I bled the system, or at least attempted to. I was never able to get it to run well after that, as I was never able to get all the air out of the system. I coasted back downhill to a turnaround point just up from the driveway. I worked on it there for awhile, but the clock was ticking. It would almost idle, but not for long. Finally in desperation (time!) I just got in and decided to drive the remaining few yards on ether. I hung out the window, and kept shooting little snorts of ether into the air intake, just enough to keep it running. And drove back to the Mog's parking place. (Near the end it started running a bit better, so it didn't need the ether. I still ended up using up most of a can, but it was quicker than trying to tow the thing back home.)
Very frustrating. It was parked again, but now I knew where to look. It was obviously getting air sucked into the fuel system, and I just needed to chase that down.
In another session (in the rain!) a week or so later, I got out the MityVac and went looking. It became obvious that the 'new' reusable fuel filter leaked air, so it had to go. I filched the inline filter from the SDL's stash of spare consumables, and installed that instead. I also cut off 1/2 inch from the ends of the fuel lines as they were a little cracked. (There was no sign of excessive age at the new ends.) The fuel lines are now a little tight, but the MityVac said that things were better.
Bleeding the fuel system now was easy. Didn't take long at all. After this, the Mog started up with some difficulty, but this is to be expected as the injection pump was full of air at first. Once started and running, the Mog ran well and restarted easily. I repeated my test drive attempt, and this time there was no problem.
So I repeated the preceding test drive as well. I drove the Mog to work, no problem. From there, I drove to the fuel station and filled the tank to the brim (there goes another $20), and then went on several errands. No problem. I drove home after work, no problem. The Mog is running fine, and now seems no different than it was when I got it. Success!