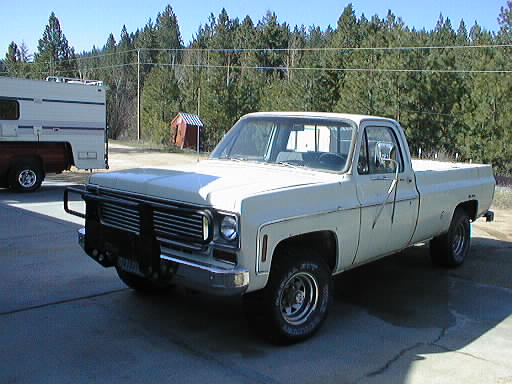
Chevy Pickup, 1974
When I got stuck in a snowdrift in my Camaro one winter I decided that I had to have a four-wheel drive pickup truck instead of the two-wheel drive Dodge that I had at the time. This truck turned out to be it. Heavy 1/2-ton model, 4-speed manual, 350 cid engine, manual hubs, dual gas tanks, big off-road tires.
My brother found it in a cow pasture. It had holes drilled for a fifth-wheel mount in it. It also had carried a dog kennel, so I'm told. This truck had been around! They were starting to part it out, but my brother (the mechanic) thought it was too good for that and that it would be better to restore it to life for me, on the cheap. After a drawn-out ordeal getting the title, he did some work on it to get it driveable. This included a replacement windshield (unfortunately cracked on installation), dashboard, and instrument panel from a neighbor's cache. Then it was brought to me.
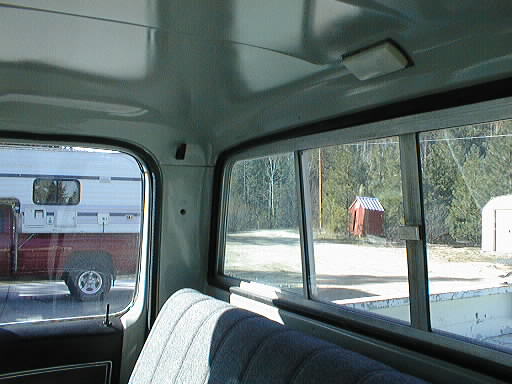
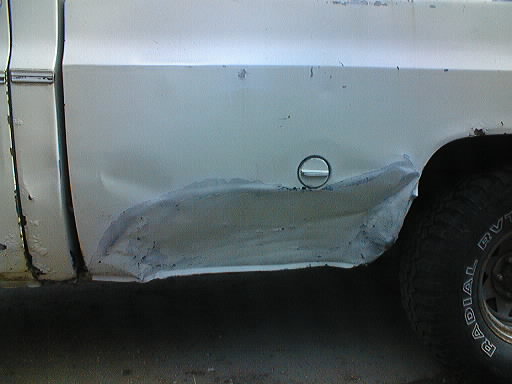
It was driveable, yes, but man was it nasty. A lot of body cancer here and there (this, at least, was acceptable). The interior was rotten, Fred Flintstone brakes, and it had that nice kept-in-a-cow-pasture old pickup truck aroma. And it leaked in the rain.
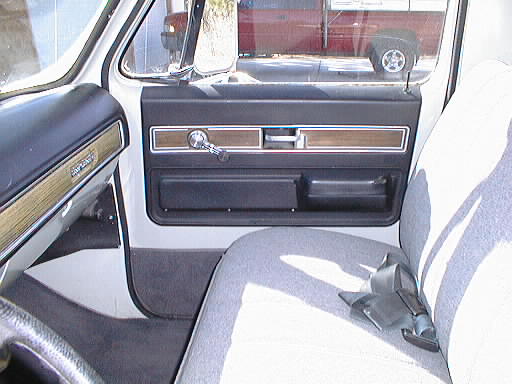
I had lots of free time at that point in my life, but no money. Not only was this to be a utility vehicle, it was also to be my backup vehicle and my bad-weather vehicle. There was a distinct chance that I might have to take a date in this thing, so I ripped out the interior of the truck and had at it. The floorboards I wire-brushed and fiberglassed. I built new doorframe lips out of oak strips with fiberglass over them. I was going to rattle-can the interior, but my brother talked me into buying a real spray gun (I already had air) and using automotive paint. I painted the interior, more than once, as I learned how to do this acceptably well. I also painted all the plastic trim bits, the sunvisors, and the seat belts in black using a flexible rattle-can paint. I carpeted it using a JC Whitney molded carpet, and installed new door seals. I also had the seat recovered.
Some PO had butchered the dash and doors trying to put a stereo in there, and I had to do some fabrication to get a factory radio back in. I mounted cheap stereo speakers in the dash, and another pair in the corners behind the seat. A door carpet kit from JC Whitney masked the can-opener holes in the doors. I also mounted one of those clock/temperature modules in the cubby in the dash, and I added Hadley air horns (since moved to the new Dodge pickup). There was no tailgate, so I procured one from a junkyard, in an approximately-matching white. A garage sale yielded the Warn brush guard and winch mount. I never did end up getting a winch, though. I rebuilt the windshield wiper so that the washer pump worked. Is that thing ever a Rube Goldberg contraption! I used a piece of shell casing to rebuild the cam follower.
It leaked oil pretty bad, and I fought that for awhile. I put in a couple of oil pan seals. Finally I gave up and took it to a shop. They charged a lot, but fixed the problem. Some brainiac had cut part of the timing cover off, presumably so that it could be removed and reinstalled without dropping the oil pan. But they cut off too much, and it never would seal up. The new timing cover fixed that.
This all looked and worked pretty good, but it still got wet inside. Much sealing of the windshield did no good. It turns out the problem was the radio antenna wire, which had lost its grommet and had rusted a pretty good rain highway into the cabin. Some Black Jack roofing tar fixed that. It's been more than five years, and it's still dry inside.
I had a set of Hadley "Bully" air horns on it (JC Whitney), but they've since been moved to the big Dodge. Great fun!
One time at work I went to start it to go to lunch, and it ker-chunked once, and then nothing. I found the starter motor hanging from its wire underneath. It had broken a bolt, and the other one had backed out under vibration. This one wasn't too bad to have fixed at the shop that was in the same parking lot! It was ready by the time I had to go home after work. It also needed some brake work done about then, which I also farmed out. (The income was picking up a bit by then.)
It ran OK, but it did oil-foul plugs. This got progressively worse, until I couldn't even use a tank of gas without losing the plugs, which I used to sandblast and reuse. So I had the engine rebuilt by a striking Kaiser Aluminum worker, at a modest price. He built race engines as a hobby, and needed some income. He was a little disappointed that I didn't want a race engine, just a good basic rebuild. I had him do the clutch too, while he was there.
It's been fine since this, but has not had all that much use. I use it to haul firewood out of our woods, and to help people move, etc. It's a good loaner vehicle too, if you kill all the bees living in and on it first. All the body cancer is still there, and probably some new outbreaks. I plan to sell it once the Unimog is deployed. I doubt I'll get even half what I've got into it, which is par for the course.
More pictures:
I find that the engine is again fouling plugs, but not so bad as before. I wonder what's up with that, could it be that very rich running is washing the oil off the cylinder walls? I did rebuild the carburetor last year (or was it the year before?), which the engine rebuild guy had recommended I do immediately. (I didn't.) Perhaps I waited too late? I have this perennial thought of putting in a throttle-body injection system from the junkyard, to improve its fuel economy and improve cold-startability. Probably never happen.
Anyway, I used PB Blaster to get the handle assembly loose and pulled it out to release the rods for the latches. (While there I used a crowbar to reopen the handle's access hole, it had gotten bent in somewhere along the line.) Then I could pull out the latch on the offending side, whereupon I could then reach the loose pin. It had been staked into position, and what with rust and bending over the years it had come loose. I rotated it into position and then welded it down. Ratty welding, since I couldn't see well and I didn't clean it, but I don't care. It won't come loose again! Then I put the tailgate back together. It runs a lot smoother now that the PB is serving as a lubricant. I should squirt some oil in there when the PB abates a bit.
When I came inside I scrubbed the rubber seal in the laundry tub, where it had been soaking in hot water to soften up for installation. (I'm an optimist.) That got it fairly clean, this seal is really in pretty good shape.
I had a sudden panic attack, as sitting over the hole it didn't even look like the right glass! It seemed too large. Anyway, I wrapped the heavy plastic twine around the channel in the rubber and set the whole thing into place. With enough pushing and shoving I got the bottom channel seated and the corners started. I used a screwdriver to tuck the rubber over the lip of the window frame, alternating both sides. It's not actually too hard to get it most of the way up to the upper corners, but after that it gets hard.
What followed was a very tedious and frustrating session of using the screwdriver like an old-fashioned can opener to pull the rubber over the metal lip. The twine idea is a good one, but I think two or more wraps would be better, and you'd still need to use the screwdriver. As I worked near the passenger corner I heard a sharp SNAP!, and yes, the glass had broken. Way over there it was not going to be an issue, but it wasn't a good sign.
I got my wife to help by prying on the rubber inside while I pushed down from above. That seemed to help. It got jammed, so she went inside while I worked on it some myself, sans pressure. SNAP!
Oh, that's not so good. A crack from top to bottom, right through the rock pip, to the left of center. I think the lack of pressure from above contributed to this, the sides of the glass were in place yet the center was still bowed out, tending to want to break the glass. With pressure from above, even though it actually makes doing the rubber harder, I think the net stress on the glass would be reduced.
Once the rubber was over the lip the rubber could be pressed into place, leaving the glass to float to where it needs to with time.
In the end, the glass is not that much better than what I started with, though the channel rust is patched and I did learn a few things. Chiefly that this job sucks big-time. That and that pressure at the top center of the glass is required to relieve some of the stress that wants to crack it as you get to the end of the installation.
I then cleaned up, and used the mallet to hammer the wiper arms back into place. I cracked the windows a bit to help it dry out, that should take quite awhile.
After work I had a very low RR tire, so I stopped by Les Schwab. They fixed it, there was a nail. No charge, these are their tires. (They've been on it since I got it, maybe 15 years ago.)
In the afternoon I backed up to the loading dock at work and several guys helped tip the crate onto the trailer. The snow still on the trailer added to the fun. A hand truck was useful to lift its downward corner out of the snow to get it scooted into place. The crate was surprisingly heavy.
When I got home it was dark, and rather than park it and deal with it the next day I 'went for it', and ran down the hill behind the house. The snow almost stopped me. Also, the Cat that did the excavation for the new living room left quite a choppy mess down at the North end of my route but I managed to put the car trailer where I'd intended anyway. Whether or not I can get the crate unloaded and the truck and trailer back up top remains to be seen. And I've managed to get wedged up against the big tree that was uprooted, so getting loose without breaking anything could be fun. No Fear, that's my motto! I think I'll wait for the weekend before trying anything, there's too little time in the morning and it's dark before I can get home.
I used the 'new' wire-feed welder. Its story (since it isn't recorded anywhere else):
Thursday, January 8, I bought a Hobart Handler 120 (with their Piecemaker 14A gun) that had been dropped, for $50. The guy I bought it from (via Craigslist) had bought it from a rental place in Yakima in that condition, I think for $90. He'd replaced the broken fan blade on the trans(former-)motor and said that while it would weld, it would only put out low power. He could use it for tacking, but not much more. (He replaced it with a Lincoln 140, with which he was very happy.) This Hobart, by the way, is old-school, with a big transformer, two big diodes, and a reactor, as well as a big capacitor with a bleed resistor. (Not inverter based, in other words. Not much to go wrong, the four-position heat switch just feeds different primary taps on the transformer.) I went through it, even going so far as to remove the diode pack and test (sort of) each one of the six. I could find nothing wrong. The open-circuit voltage out of the transformer changed with each of the four settings, and was up to 40 V side-to-side. (About 20 V center-tap to either side.) The DC output is only 26–27 V at maximum, rather than the 29 V specified, though the two lowest settings are pretty close to their ratings. Voltage on the large capacitor (with bleeder) rose and fell as one might expect. Current is balanced in the two transformer sides, according to my clampmeter. Using jumper cables I hooked up a load wire to the welder (the load wire was the interior spring from an old radiator hose!), I could make it glow red hot on each of the four heat settings, and the time it took to do so was proportionate to the heat setting. The output current (variable) was about the same on each setting, but the voltage was different. I guess it appears to be working right, but I haven't tried actually welding with it yet.One thing I did notice was that the + terminal post in the wire feed chamber was melted, it looks like it might been put on loose and then heated up, or perhaps it got corroded with the same result. I suppose it's possible that this was its only problem, I'll certainly look into that before I actually try to weld with it.
My idea was to have a second welder, one that was set up for either flux-core wire or aluminum. For $50 I couldn't pass it up, I think I could part it out for that if I had to. The gun's in good shape and the feed mechanism works. (The case, of course, was not—the back cover was badly broken and it was missing the feed chamber side plate.) This certainly will not be replacing my Millermatic 175, which I bought brand new, but it's always nice to have a spare! I'm not sure it'll be up to running aluminum, that takes more heat and wire speed than steel, and this is a lightweight 110 V unit after all.
It's also the 'loaner'. Nobody borrows 220 V equipment, but a 110 V welder could easily be loaned out. And at $50 I'm not too worried about it, either! (The Miller was 10× that price. More, with the bottle.) This could also run off of a generator, I suppose, for portable welding of my own.
I then tackled the melted feedthrough. It was seriously corroded and messed up. A mongo session with various wire brushes cleaned up the metal parts. The plastic, though heavily melted, seems to be still usable.
I'm guessing that the feedthrough was loose and the resulting poor contact started to heat some. (It was possibly loosened in the drop.) Once it melted the plastic enough this released clamping tension between the metal parts and it loosened up even more, compounding the problem. Cleaned and tightened, it should be OK again.
I put it back together and fed in the crap HF fluxless wire I'd bought earlier. It fed fine. I welded onto a piece of scrap sheet metal (the cut-out section of Unimog fuel tank) and it seemed to work fine. The four heat settings are different, and it's easy to punch holes in the sheet metal except on the lowest setting.
The replacement fan blade kept walking off the end of the transmotor's shaft, making a tremendous racket as it whacked into the chassis of the welder. While working on the welder I left it off as it was sufficiently cold that no fan was necessary at that time anyway. When I looked into the problem I could see that the shaft was grooved near the end, so I found an E-clip that could be pressed into service. That should hold the fan blade onto the shaft.
I'm going to call it fixed. Now to put it all back together. Shoe Goo is going to feature prominently on the broken plastic end-caps!
A $50 name-brand wire-feed welder? Not too shabby! A photocopy of the manual (from on-line) came with it, complete with schematics and technical specifications. Nice.
I then Shoe-Gooed the rear plastic endcap of the welder, the one that took the brunt of the drop. An entire corner was missing, so I cut a piece of 2×4 and glued it into the corner to take its place. This also serves as one of the four 'feet' on the bottom of the unit. I clamped the endcap to a table while the Goo set up, since there was a twist in the tortured plastic. I also glued the splits and cracks in the endcap. The general approach was to use a dot of cyanoacrylate glue and accelerant to tack things into place, then smear with Goo for strength.
Once the glue was partially dry I painted the wood black. The next day the thing was fully dry so I put the welder all back together. I had to use some new screws I'd bought at the hardware store to replace the missing ones. It's actually quite solid now, after the repairs and being put together correctly.
The wire chamber needed a cover, otherwise welding, weather, or grinding spatter could damage the guts or the wire on the spool, or the unused loose pieces of the feed mechanism could get lost, or it could even get kicked and broken. Not good to have it all exposed, anyway. I got out the old microwave oven that I've been using for sheet metal. I ground off all the little rivets that held the back on, since it was the only piece left that was big enough to serve. I hammered over the flanges along the two starting edges (bottom and rear) to make the piece stiffer. With that done, and with the big raised section that's stamped into it, the piece is actually quite stiff even though it is fairly thin sheet metal. I used the Sawzall to cut off the excess along the forward edge, leaving enough extra to form another flange. I bent this over and hammered it flat. I then got out a scrap concrete form 'nail' and ground and shaped its end. I welded it onto the forward edge of the cover such that it acted as a hinge pin for the one side, fitting into the socket in the plastic endcap, then I cut off the excess and reshaped the remainder to be the second, sliding pin. I cut a piece of sheet metal to form a channel for the pin, then I welded it to the cover at the bottom edge by the other hinge site. With that in place I hammered it over the sliding pin, then welded down the other edge. The pin then slid (with a hammer) in its new channel, pinning into the end cap's hinge socket. The cover then could flip up and down. Because the top corners need to be chamfered I marked them where they needed to be cut, then I cut them off and cleaned up the roughness with the grinder. I was going to cut off the excess top and make a hammered-over flange there too, and then come up with some sort of a latch, but the existing flange was at exactly the right height to form a decent friction fit with the top of the welder. It's good enough as it sits, it doesn't really need a latch, so I left it that way. I then primed and painted the messed-up parts of the new cover. It's not at all 'factory', but it will do just fine.
Ship it!
I then went over to the other fender and repaired its tears too. It got a minor version of the hammer job, then the brushing and welding trick. I didn't need to take the wheels off because I didn't need to use the big hammer or take big swings, I was just fixing the edge cracks, putting strength back into the fender.
With that all done, I primed and painted the repairs. I then put the light and the wheels back on, and parked the trailer back in its hole. Then I put everything away. Done!
Anyway, after the plug cleaning and steam bath I was able to use the truck to haul a load of firewood rounds out of the woods.
The RF tire is flat again, I think it's toast.
Later I put a couple of gallons of fresh gas in, got it started and left it on high idle to warm up while I mixed up some actual Bon Ami Ring Job treatment in a beer bottle. I got Daniel to keep the revs up while I fed it to the engine. Scary! I gave it a couple of bottles of water to wash it down, then shut it off. I then changed out all the plugs for the new set I'd bought four years ago, dumped the oil, and gave it fresh Delo oil and a filter. It started easily after that. I Slimed the bad tire and took it for a spin. It drove well, I put a couple of miles on it and parked it.
Ready for sale, I'd say.
I spent a couple hours snowblowing a track to the trucks so they could drive up out of the hole. A fair amount of effort, but having a prospective buyer to take this albatross off my hands makes it seem worth it.
The prospective buyer arranged to come tomorrow to see the truck.
The interior was very wet/icy from condensation, so after a long idle while it heated up we mopped it out, then I put in a space heater with the windows slightly cracked to help dry it out in the sun. (22°F today, not exactly warm!) I really must not leave a foot of snow on top of any vehicles, it's just killer for inducing condensation problems.
We were done prepping the truck for sale by about 1PM, the prospective buyer's due at 2-ish.
...And the truck sold, for $1250 (I had asked $1500). We used the WA value form, the buyer was not familiar with the State's piss-ant tax grab tactics.
I'm both sad and relieved to see it go. I've had it a long time, since perhaps 1995, and it's provided good service and a lot of memories, but I simply don't have the time or interest in keeping it up any longer.
Because Daniel had been of material help this morning, working with me for a substantial time without whining and being useless, and because it's possible I might not have had the truck ready for sale in time without him, I threw him the $50 bill. He's dating now, he's going to need it!